
Popular categories
Looking for a yarn?


Comments / Questions (237)
![]() Gerlinde Weimer-Stuckmann wrote:
Gerlinde Weimer-Stuckmann wrote:
Hi, kann ich diese Mütze auch rund stricken OHNE Naht?
09.01.2022 - 02:24DROPS Design answered:
Liebe Frau Weimer-Stuckmann, wahrscheinlich, dann sollen Sie nur die Anleitung so anpassen. Viel Spaß beim stricken!
10.01.2022 - 08:30
![]() Albert Lobbestael wrote:
Albert Lobbestael wrote:
I like this pattern very much. is there pattern for 3-4 year old child?
19.10.2021 - 01:19
![]() Hanna wrote:
Hanna wrote:
Har följt mönstret men toppen på mössan är långt ifrån hur den ser ut på bilden.
29.07.2021 - 18:36
![]() Martina wrote:
Martina wrote:
Hallo, Ich habe an der Stelle mit den Zunahmen 6 cm ab Anschlagskante, an den Stellen dazwischen nur 5 cm. Welche Stelle nehme ich jetzt also als Orientierung, nach den 6 Zu- und Abnahmen? Liebe Grüße, Martina
25.07.2021 - 15:05DROPS Design answered:
Liebe Martina, stimmt Ihre Maschenprobe? Haben Sie die 26 Maschen x 34 Reihen glatt rechts gestrickt = 10 x 10 cm?
26.07.2021 - 09:30
![]() Lene Hasle wrote:
Lene Hasle wrote:
Jeg kan se, at mine huer ser nøjagtig ud som dem der er lagt op i galleriet. Desværre bliver tutten slet ikke som billedet på opskriften!
21.07.2021 - 10:30
![]() Lene Hasle wrote:
Lene Hasle wrote:
Det er en fin hue med en god pasform, men når man starter indtagninger i siden på hver pind, når der er 15 masker tilbage, så får man altså ikke den sjove tut i toppen!
21.07.2021 - 00:36
![]() Lilup wrote:
Lilup wrote:
Guten Tag, danke für die hübsche undleicht verständliche Anleitung! Leider ist mir nicht ganz klar, ob die 6cm inkl. Anschlagrand gemeint sind oder ohne? Danke im Voraus für die Rückmeldung
13.06.2021 - 17:18DROPS Design answered:
Liebe Lilup, diese 6 cm sollen von der Anschlagskante gemessen, dh die gesamte höhe. Viel Spaß beim stricken!
14.06.2021 - 08:56
![]() Ana wrote:
Ana wrote:
No entiendo bien la corrección.. 2MP fueron movidos 1punto,. No entiendo. Me lo pueden aclarar??. Gracias
04.05.2021 - 00:59DROPS Design answered:
Hola Ana, el patrón está escrito correctamente, la corrección es solo para aquellos que imprimieron el patrón antes de la fecha de la corrección indicada.
09.05.2021 - 20:09
![]() Elena wrote:
Elena wrote:
Buongiorno scusate la domanda, ho letto la correzione a fondo pagina, dice : 2 segnapunti aumenti/diminuzioni sono stati spostati di 1 maglia. Ma quali di preciso? Grazie
27.04.2021 - 18:14DROPS Design answered:
Buonasera Elena, le correzioni sono già state incorporate nel testo, quindi le istruzioni riportate sono corrette. Buon lavoro!
27.04.2021 - 19:56
![]() Doro wrote:
Doro wrote:
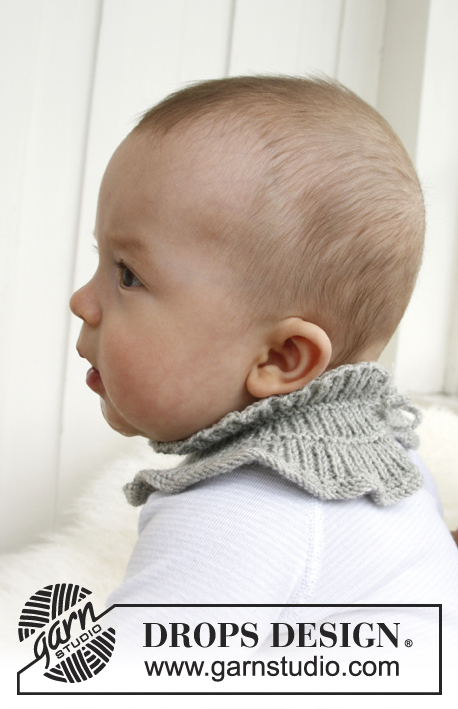
Hallo, Auf dem Bild sehe ich, dass die Mütze eine Kante hat, die immer rechts gesreickt yu sein scheint, nachher scheint es Hinreihen in rechts und Rückreihen in linken Maschen zu geben. Ich kann dem Muster nicht entnehmen, wann sie von nur rechten Maschen in Hin-und Rückreihe auf linke in den Rückreihen (vermute ich mal) umstellen. Vielen Dank für Ihre Hilfe.
04.04.2021 - 20:41DROPS Design answered:
Liebe Doro, nach dem Maschenanschlag stricken Sie 8 Reihen rechts - also jede Reihe rechts, das ist der kraus rechte Rand, den Sie auf dem Foto sehen. Danach stricken Sie dann glatt rechts weiter (nachdem Sie die Markierungen angebracht haben). Viel Spaß beim Stricken!
05.04.2021 - 10:17
|
|
Alladin#alladinhat |
|
|
|
|
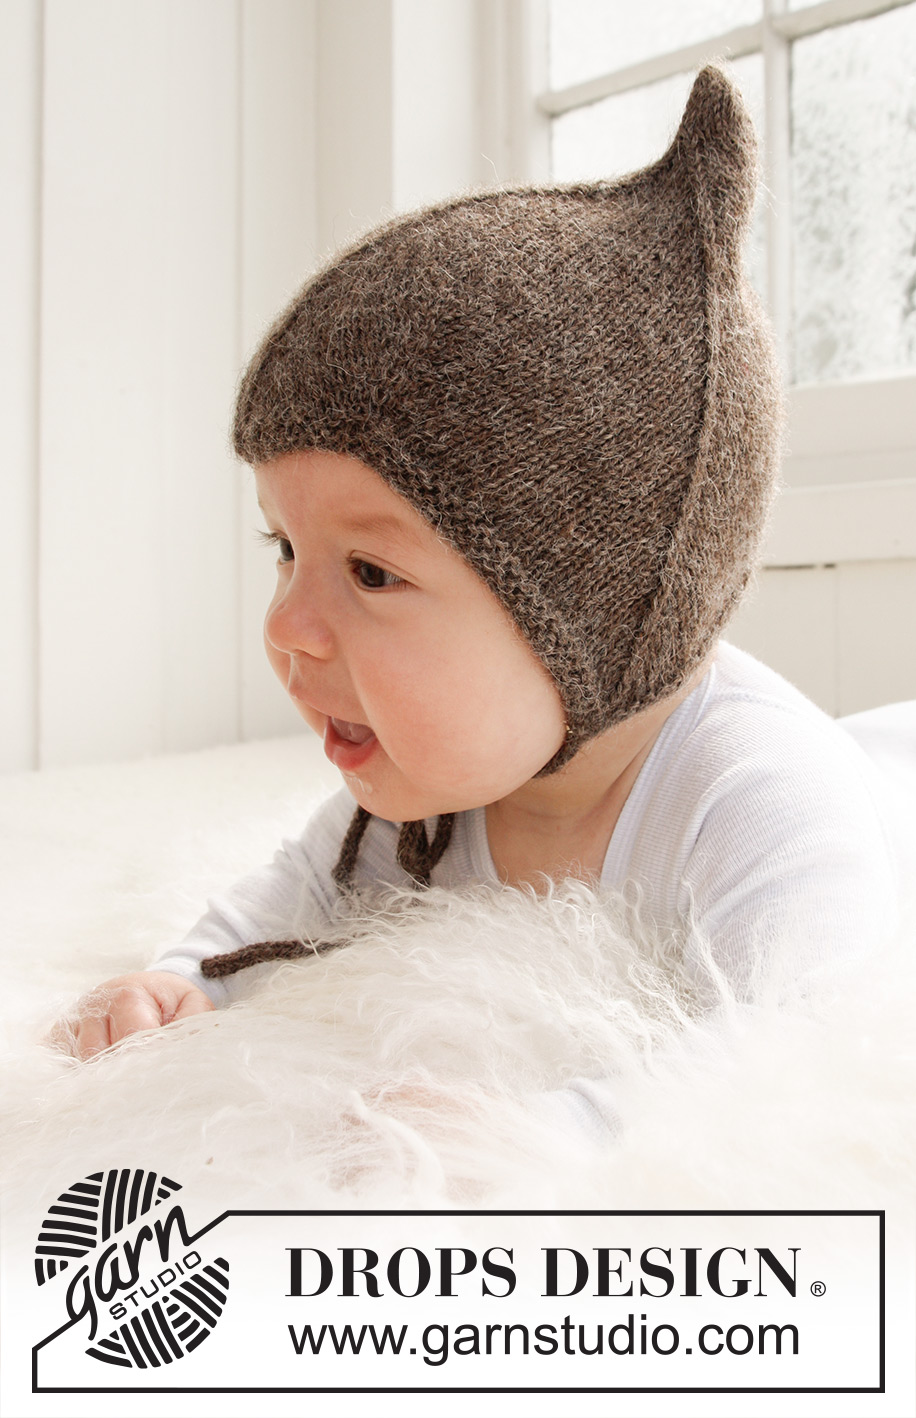
Knitted hat for baby and children in DROPS Alpaca
DROPS Baby 21-34 |
|
|
INCREASE TIP: All inc are done from RS. Inc 1 st before and after st with marker by making 1 YO. On next round P YO twisted (i.e. work in back loop of YO instead of front) to avoid holes. DECREASE TIP: All dec are done from RS. Dec 1 st on each side of st with marker. Beg 1 st before st with marker. Slip 1 st on a cable needle behind the piece, slip 1 st (= st with marker), K next st and st on cable needle tog, psso. -------------------------------------------------------- HAT: Worked back and forth on needle. Cast on 117-123-129 (135-141) sts (incl 1 edge st in each side) on needle size 2.5 mm with Alpaca. K 8 rows (1st row = RS). Insert 7 markers in piece from RS as follows: 1st marker in the 2nd st on needle, 2nd marker in the 24th-25th-26th (27th-28th) st, 3rd marker in the 48th-50th-52nd (54th-56th) st, 4th marker in the 59th-62nd-65th (68th-71st) st, 5th marker in the 70th-74th-78th (82nd-86th) st, 6th marker in the 94th-99th-104th (109th-114th) st, and the 7th marker in the next to last st on the needle. Continue in stocking st with 1 edge st in garter st in each side of piece - AT THE SAME TIME on 1st row beg to inc and dec - Read INCREASE TIP and DECREASE TIP above - on every other row as follows: Inc 1 st after 1st marker. Dec 1 st on each side of 2nd marker. Inc 1 st on each side of 3rd marker. Dec 1 st on each side of 4th marker. Inc 1 st on each side of 5th marker. Dec 1 st on each side of 6th marker. Inc 1 st before 7th marker. Continue to inc and dec from RS like this on every other row (. i.e., on every row from RS) a total of 6 times. The piece measures approx. 6 cm from cst on edge – if the tension in height is not correct you can work as before with the increase/decrease. Then dec on each side of the 2nd, 4thand 6th marker until 15 sts remain on needle (= 17-18-19 (20-21 times). Piece measures approx. 16-17-17 (18-19)cm from the bottom tip at the 2nd or 6th marker = ear flap. Work next row from RS as follows: K 1, K 2 tog, K 9, K 2 tog, K 1 = 13 sts. Repeat dec in each side on every row (from WS P the 2 sts before and after edge st tog) until 5 sts remain. On the last row from WS work 1 edge st, P 3 sts tog and work 1 edge st. Pull thread through the remaining sts. ASSEMBLY: Sew the hat tog mid back inside 1 edge st. The middle of the 3 whole tips on cast on edge goes down to the forehead at the front. TIES: Cast on 4 sts on needle size 2.5 mm. Work as follows: * K 1, place yarn in front of piece (towards you), slip 1 st as if to P, place yarn behind piece (from you) *, repeat from *-* on more time and on all rows. This results in a round ribbon. Cast off when the tie measures approx. 20-22-24 (26-28) cm. Knit a similar tie. Sew one ribbon at the bottom of each tip on ear flap on each side. |
|
Have you finished this pattern?Tag your pictures with #dropspattern #alladinhat or submit them to the #dropsfan gallery. Do you need help with this pattern?You'll find 17 tutorial videos, a Comments/Questions area and more by visiting the pattern on garnstudio.com. © 1982-2026 DROPS Design A/S. We reserve all rights. This document, including all its sub-sections, has copyrights. Read more about what you can do with our patterns at the bottom of each pattern on our site. |


With over 40 years in knitting and crochet design, DROPS Design offers one of the most extensive collections of free patterns on the internet - translated to 17 languages. As of today we count 325 catalogues and 12298 patterns translated into English (UK/cm). 12298
We work hard to bring you the best knitting and crochet have to offer, inspiration and advice as well as great quality yarns at incredible prices! Would you like to use our patterns for other than personal use? You can read what you are allowed to do in the Copyright text at the bottom of all our patterns. Happy crafting!
Post a comment to pattern DROPS Baby 21-34
We would love to hear what you have to say about this pattern!
If you want to leave a question, please make sure you select the correct category in the form below, to speed up the answering process. Required fields are marked *.