Alladin by DROPS Design

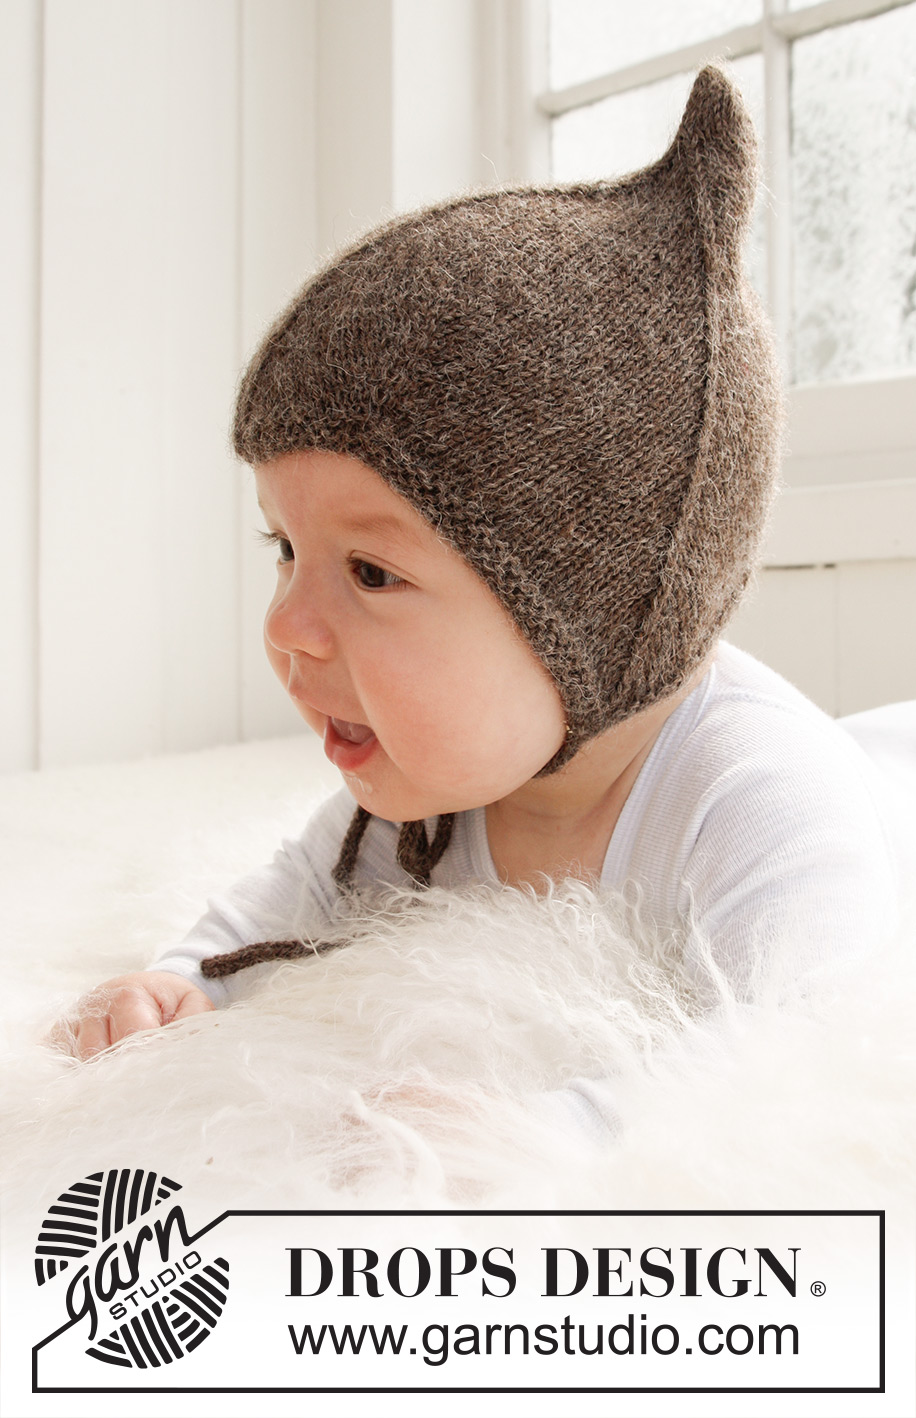
Knitted hat for baby and children in DROPS Alpaca

DROPS Baby 21-34
DROPS design: Pattern no Z-085-by
Yarn group A
--------------------------------------------------------
HAT:
Size: 1 – 3 – 6 – (12 – 18) months
Fits head circumference in cm:
38/40-41/42-43/44 (45/46-47/48) cm

Materials: DROPS ALPACA from Garnstudio
Colour no 607m, eco light brown: 50 g for all sizes

DROPS STRAIGHT NEEDLES SIZE 2.5 mm - or size needed to get 26 sts x 34 rows in stocking st = 10 x 10 cm.

-------------------------------------------------------

Knitting tension – See how to measure it and why here
Alternative Yarn – See how to change yarns here
Yarn Groups A to F – Use the same pattern and change the yarn here
Yarn usage using an alternative yarn – Use our yarn converter here

-------------------------------------------------------


100% Alpaca
from 7.00 BGN /50g
DROPS Alpaca uni colour DROPS Alpaca uni colour 7.00 BGN /50g
HOBIYARN
Order
DROPS Alpaca mix DROPS Alpaca mix 8.00 BGN /50g
HOBIYARN
Order
needles DROPS Needles & Hooks Order
You can get the yarn to make this pattern from 7BGN. Read more.

Pattern instructions

INCREASE TIP:
All inc are done from RS. Inc 1 st before and after st with marker by making 1 YO. On next round P YO twisted (i.e. work in back loop of YO instead of front) to avoid holes.
DECREASE TIP:
All dec are done from RS. Dec 1 st on each side of st with marker. Beg 1 st before st with marker. Slip 1 st on a cable needle behind the piece, slip 1 st (= st with marker), K next st and st on cable needle tog, psso.
--------------------------------------------------------

HAT:
Worked back and forth on needle. Cast on 117-123-129 (135-141) sts (incl 1 edge st in each side) on needle size 2.5 mm with Alpaca. K 8 rows (1st row = RS).
Insert 7 markers in piece from RS as follows:
1st marker in the 2nd st on needle,
2nd marker in the 24th-25th-26th (27th-28th) st,
3rd marker in the 48th-50th-52nd (54th-56th) st,
4th marker in the 59th-62nd-65th (68th-71st) st,
5th marker in the 70th-74th-78th (82nd-86th) st,
6th marker in the 94th-99th-104th (109th-114th) st, and the 7th marker in the next to last st on the needle.
Continue in stocking st with 1 edge st in garter st in each side of piece - AT THE SAME TIME on 1st row beg to inc and dec - Read INCREASE TIP and DECREASE TIP above - on every other row as follows:
Inc 1 st after 1st marker.
Dec 1 st on each side of 2nd marker.
Inc 1 st on each side of 3rd marker.
Dec 1 st on each side of 4th marker.
Inc 1 st on each side of 5th marker.
Dec 1 st on each side of 6th marker.
Inc 1 st before 7th marker.
Continue to inc and dec from RS like this on every other row (. i.e., on every row from RS) a total of 6 times. The piece measures approx. 6 cm from cst on edge – if the tension in height is not correct you can work as before with the increase/decrease.
Then dec on each side of the 2nd, 4thand 6th marker until 15 sts remain on needle (= 17-18-19 (20-21 times). Piece measures approx. 16-17-17 (18-19)cm  from the bottom tip at the 2nd or 6th marker = ear flap. Work next row from RS as follows: K 1, K 2 tog, K 9, K 2 tog, K 1 = 13 sts. Repeat dec in each side on every row (from WS P the 2 sts before and after edge st tog) until 5 sts remain. On the last row from WS work 1 edge st, P 3 sts tog and work 1 edge st. Pull thread through the remaining sts.

ASSEMBLY:
Sew the hat tog mid back inside 1 edge st. The middle of the 3 whole tips on cast on edge goes down to the forehead at the front.

TIES:
Cast on 4 sts on needle size 2.5 mm. Work as follows: * K 1, place yarn in front of piece (towards you), slip 1 st as if to P, place yarn behind piece (from you) *, repeat from *-* on more time and on all rows.
This results in a round ribbon. Cast off when the tie measures approx. 20-22-24 (26-28) cm. Knit a similar tie. Sew one ribbon at the bottom of each tip on ear flap on each side.

This pattern has been corrected. .

Updated online: 17.12.2020
Sizes have been adjusted and 2 markers for inc/dec has been moved 1 stitch.

Do you need help with this pattern?

Thank you for choosing a DROPS Design pattern. We take pride in providing patterns that are correct and easy to understand. All patterns are translated from Norwegian and you can always check the original pattern (DROPS Baby 21-34) for measurements and calculations.

Are you having trouble following the pattern? See below for a list of resources to help you finish your project in no time - or why not, learn something new.

signature-image signature

Are you having trouble following the pattern? See below for a list of resources to help you finish your project in no time - or why not, learn something new.

Each of our patterns has specific tutorial videos to help you.

We have also step-by-step guides for different techniques which you'll find here.

1) Why is the knitting/crochet tension so important?

Knitting tension is what determines the final measurements of your work, and is usually measured per 10 x 10 cm. It is provided like so: number of stitches in width x number of rows in height - eg: 19 stitches x 26 rows = 10 x 10 cm.

The knitting tension is very individual; some people knit/crochet loosely while others work tightly. You adjust the knitting tension with the needle size, which is why the suggested needle size only serve as a guide! You need to adjust this (up or down) to ensure that YOUR knitting tension matches the knitting tension provided in the pattern. If you work with a different knitting tension than provided you will have a different yarn consumption, and your work will have different measurements than what the pattern suggests.

The knitting tension also determines which yarns can replace each other. As long as you achieve the same knitting tension you can replace one yarn with another.

See DROPS lesson: How to measure your tension/gauge

See DROPS video: How to make a gauge tension swatch

to top

2) What are the yarn groups?

All our yarns are categorised into yarn groups (from A to F) according to thickness and knitting tension – group A contains the thinnest yarns and group F the thickest. This makes it easier for you to find alternative yarns to our patterns, should you wish to switch yarn. All yarns within the same group have a similar knitting tension and can easily replace each other. However, different yarn qualities have different structures and properties which will give the finished work a unique look and feel.

Click here for an overview of the yarns in each yarn group

to top

3) Can I use a different yarn than what the pattern suggests?

The important thing when changing from one yarn to another is that the knitting/crochet tension remains the same. This is so that the measurements of the finished piece will be the same as on the sketch provided. It is easier to achieve the same knitting tension using yarns from the same yarn group. It is also possible to work with multiple strands of a thinner yarn to achieve the knitting tension of a thicker one. Please try our yarn converter. We recommend you to always work a test swatch.

Please NOTE: when changing yarn the garment might have a different look and feel to the garment in the photo, due to individual properties and qualities of each yarn.

See DROPS lesson: Can I use a different yarn than the one mentioned in the pattern?

to top

4) How do I use the yarn converter?

At the top of all our patterns you’ll find a link to our yarn converter, which is a helpful tool should you wish to use a different yarn than suggested. By filling in the yarn quality you wish to replace, the amount (in your size) and number of strands, the converter will present good alternative yarns with the same knitting tension. Additionally it will tell you how much you’ll require in the new qualities and whether you’ll need to work with multiple strands. Most skeins are 50g (some are 25g or 100g).

If the pattern is worked with multiple colours, every colour will have to be converted separately. Similarly, if the pattern is worked with several strands of different yarns (for example 1 strand Alpaca and 1 strand Kid-Silk) you will have to find alternatives for each, individually.

Click here to see our yarn converter

to top

5) Why do I get the wrong knitting tension with the suggested needle size?

The needle size provided in the pattern serves only as a guide, the important thing is to follow the knitting tension. And since knitting tension is very individual, you will have to adjust the needle size to ensure that YOUR tension is the same as in the pattern – maybe you’ll have to adjust 1, or even 2 needle sizes, up or down to achieve the correct tension. For this, we recommend that you work test swatches.

Should you work with a different knitting tension than the one provided, the measurements of the finished garment might deviate from the measurement sketch.

See DROPS lesson: How to measure your tension/gauge

See DROPS video: How to make a gauge tension swatch

to top

6) Why is the pattern worked top-down?

Working a garment top-down provides more flexibility and room for personal adjustment. For example it is easier to try the garment on while working, as well as making adjustments to length of yoke and shoulder caps.

The instructions are carefully explaining every step, in the correct order. Diagrams are adjusted to the knitting direction and are worked as usual.

to top

7) Why are the sleeves shorter in larger sizes?

The total width of the garment (from wrist-to-wrist) will be larger in the larger sizes, despite the actual sleeves being shorter. The larger sizes have longer sleeve caps and wider shoulders, so there will be a good fit in all sizes.

to top

8) What is a repeat?

Diagrams are often repeated on the round or in height. 1 repeat is the diagram the way it appears in the pattern. If it says to work 5 repeats of A.1 in the round, then you work A.1 a total of 5 times after/next to each other in the round. If it says to work 2 repeats of A.1 vertically/in height you work the entire diagram once, then begin again at the start and work the entire diagram one more time.

to top

9) How do I work according to a knitting diagram?

The diagram depicts all rows/rounds, and every stitch seen from the right side. It is read from bottom to top, from right to left. 1 square = 1 stitch.

When working back and forth, every other row is worked from the right side and every other row is worked from the wrong side. When working from the wrong side, the diagram will have to be worked reversed: from left to right, knit stitches are purled, purl stitches are knit etc.

When working in the round every round is worked from the right side and the diagram are worked from right to left on all rounds.

See DROPS lesson: How to read knitting diagrams

to top

10) How do I work according to a crochet diagram?

The diagram depicts all rows/rounds, and every stitch seen from the right side. It is worked from bottom to top, from right to left.

When working back and forth every other row is worked from the right side: from right to left and every other row is worked from the wrong side: from left to right.

When working in the round, every row in the diagram are worked from the right side, from right to left.

When working a circular diagram you start in the middle and work your way outwards, counter clockwise, row by row.

The rows usually start with a given number of chain stitches (equivalent to the height of the following stitch), this will either be depicted in the diagram or explained in the pattern.

See DROPS lesson: How to read crochet diagrams

to top

11) How do I work several diagrams simultaneously on the same row/round?

Instructions for working several diagrams after each other on the same row/round, will often be written like so: “work A.1, A.2, A.3 a total of 0-0-2-3-4 times". This means you work A.1 once, then A.2 is worked once, and A.3 is repeated (in width) the number of times provided for your size – in this case like so: S = 0 times, M = 0 times, L=2 times, XL= 3 times and XXL = 4 times.

The diagrams are worked as usual: begin with the first row in A.1, then work the first row in A.2 etc.

See DROPS lesson: How to read knitting diagrams

See DROPS lesson: How to read crochet diagrams

to top

12) Why does the piece start with more chain stitches than it’s worked with?

Chain stitches are slightly narrower than other stitches and to avoid working the cast-on edge too tight, we simply chain more stitches to begin with. The stitch count will be adjusted on the following row to fit the pattern and measurement sketch.

to top

13) Why increase before the rib edge when the piece is worked top-down?

The rib edge is more elastic and will contract slightly compared to, for example, stocking stitch. By increasing before the rib edge, you avoid a visible difference in width between the rib edge and the rest of the body.

to top

14) Why increase in the cast-off edge?

It’s very easy to cast off too tightly, and by making yarn overs while casting off (and simultaneously casting these off) you avoid a too tight cast off edge.

See DROPS video: How to bind off with yarn overs (yo)

to top

15) How do I increase/decrease on every 3rd and 4th row/round alternately?

To achieve an even increase (or decrease) you can increase on, for example: every 3rd and 4th row alternately, like so: work 2 rows and increase on the 3rd row, work 3 rows and increase on the 4th. Repeat this until the increase is complete.

See DROPS lesson: Increase or decrease 1 st on every 3rd and 4th row alternately

to top

16) Why is the pattern slightly different than what I see in the photo?

Pattern repeats can vary slightly in the different sizes, in order to get the correct proportions. If you’re not working the exact same size as the garment in the photo, yours might deviate slightly. This has been carefully developed and adjusted so that the complete impression of the garment is the same in all sizes.

Make sure to follow instructions and diagrams for your size!

to top

17) How can I work a jacket in the round instead of back and forth?

Should you prefer to work in the round instead of back and forth, you may of course adjust the pattern. You’ll need to add steeks mid-front (usually 5 stitches), and follow the instructions. When you would normally turn and work from the wrong side, simply work across the steek and continue in the round. At the end you’ll cut the piece open, pick up stitches to work bands, and cover the cut edges.

See DROPS video: How to knit steeks and cut open

to top

18) Can I work a jumper back and forth instead of in the round?

Should you prefer to work back and forth instead of in the round, you may of course adjust the pattern so you work the pieces separately and then assemble them at the end. Divide the stitches for the body in 2, add 1 edge stitch in each side (for sewing) and work the front and back pieces separately.

See DROPS lesson: Can I adapt a pattern for circular needles into straight needles?

to top

19) Why do you show discontinued yarns in the patterns?

Since different yarns have different qualities and textures we have chosen to keep the original yarn in our patterns. However, you can easily find options among our available qualities by using our yarn converter, or simply pick a yarn from the same yarn group.

It is possible that some retailers still have discontinued yarns in stock, or that someone has a few skeins at home that they would like to find patterns for.

The yarn converter will provide both alternative yarn as well as required amount in the new quality.

to top

20) How do I make a women’s size garment into a men’s size one?

If you have found a pattern you like which is available in women’s size it’s not very difficult to convert it to men’s size. The biggest difference will be the length of sleeves and body. Start working on the women size that you think would fit across the chest. The additional length will be worked right before you cast off for the armhole/sleeve cap. If the pattern is worked top-down you can add the length right after the armhole or before the first decrease on sleeve.

Regarding additional yarn amount, this will depend on how much length you add, but it is better with a skein too many than too few.

to top

21) How do I prevent a hairy garment from shedding?

All yarns will have excess fibres (from production) that might come off as lint or shedding. Brushed yarns (ie hairier yarns) have more of these loose, excess fibres, causing more shedding.

Shedding also depends on what is worn under or over the garment, and whether this pulls at the yarn fibres. It’s therefore not possible to guarantee that there will be no shedding

Below are some tips on how to get the best result when working with hairier yarns:

1. When the garment is finished (before you wash it) shake it vigorously so the looser hairs come off. NOTE: do NOT use a lint roller, brush or any method that pulls at the yarn.

2. Place the garment in a plastic bag and put it in your freezer - the temperature will cause the fibres to become less attached to each other, and excess fibres will come off easier.

3. Leave in the freezer for a few hours before taking it out and shaking it again.

4. Wash the garment according to the instructions on the yarn label.

to top

22) Where on the garment is the length measured?

The measurement sketch/schematic drawing provides information regarding the full length of the garment. If it’s a jumper or a jacket the length is measured from the highest point on the shoulder closest to the neckline, and straight down to the bottom of the garment. It is NOT measured from the tip of shoulder. Similarly, the length of yoke is measured from the highest point on the shoulder and down to where yoke is split into body and sleeves.

On a jacket measures are never taken along bands, unless specifically stated. Always measure inside band stitches when measuring the length.

See DROPS lesson: How to read a schematic drawing

to top

23) How do I know how many balls of yarn I need?

The required amount of yarn is provided in grams, eg: 450 g. To calculate how many balls you’ll need you first need to know how many grams are in 1 ball (25g, 50g or 100g). This information is available if you click on the individual yarn quality on our pages. Divide the amount required with the amount of each ball. For example, if each ball is 50g (the most common amount), the calculation will be as follows: 450 / 50 = 9 balls.

to top

Have you purchased DROPS yarn to make this pattern? Then you are entitled to receive help from the store where you bought the yarn. Find a list of DROPS stores here!
Still can't find the answer you need? Then scroll down and leave your question so one of our experts can try to help you. This will be done normally within 5 to 10 working days. In the meantime, you can read the questions and answers that others have left to this pattern or join the DROPS Workshop on Facebook to get help from fellow knitters/crocheters!

Comments / Questions (230)

country flag Lis wrote:

Indtagningerne på Alladin kan sagtens strikkes med de 2 strikkepinde (uden brug af hjælpepind): "Tag den markerede maske + masken før ret løs af (sammen), strik næste retmaske og træk de 2 løst aftagne masker over." Så enkelt kan det gøres, og indtagningerne ligger på samme fine måde som i opskriften. Men hvorfor skal vi dog bruge en hjælpepind og gøre indtagningerne mere besværlige? Mvh Lis.

19.08.2023 - 03:06

DROPS Design answered:

Hei Lis Har du en teknikk du syns er enklest og den gir det samme uttrykket, bruk den. Dett fins mange, mange muligheter til å felle, og vi prøver å tilfredstille alle våre brukere og viser forskjellige teknikker. Noen liker denne teknikken, men andre liker den teknikken du beskriver. mvh DROPS Design

21.08.2023 kl. 11:07

country flag 42n8 wrote:

E' possibile lavorare questo modello con i ferri circolari o a doppia punta?

14.02.2023 - 11:39

DROPS Design answered:

Buonasera 42n8, può lavorare il modello in piano anche sui ferri circolari. Buon lavoro!

14.02.2023 kl. 22:22

country flag Loly Aguilar Araujo wrote:

No entiendo si estoy haciendo lo correcto porque estoy haciendo la talla 12 mesesy cuando e puesto los MP tengo 2 MP 25MP 27MP 14MP 14MP 27MP24MP 2 y todo estos puntos suman 135 la pregunta es porque tengo 25 puntos después de los 2 primeros y al final antes de los 2 últimos tengo 24 puntos

14.12.2022 - 23:08

DROPS Design answered:

Hola Loly, insertar el 1º mp en el 2ºpt (no entre los pts), el 2º mp en el 27º pt, el siguiente en el 54º pt, el siguiente en el 68º pt, el siguiente en el 82º, el siguiente en el 109º y el último en el 134º. Después del último hay solo 1 pt antes de finalizar la vuelta.

18.12.2022 kl. 18:27

country flag Ana wrote:

Volveré a intentarlo. Gracias

07.11.2022 - 16:05

country flag Ana wrote:

Estoy empezando el gorro alladin,talla. 3meses. Monte123 puntos. No soy capaz de distribuir los marcapuntos. Se cuentan siempre desde principio? Gracias

05.11.2022 - 23:36

DROPS Design answered:

Hola Ana, sí, se cuenta cada vez desde el principio.

06.11.2022 kl. 23:55

country flag Ana wrote:

Estoy empezando el gorro alladin,talla. 3meses. Monte123 puntos. No soy capaz de distribuir los marcapuntos. Se cuentan siempre desde principio? Gracias

05.11.2022 - 23:34

country flag Ana wrote:

Estoy empezando el gorro alladin,talla. 3meses. Monte123 puntos. No soy capaz de distribuir los marcapuntos. Se cuentan siempre desde principio? Gracias

05.11.2022 - 23:33

country flag Lillian Henriksen wrote:

I stedet for jeres anvisning på indtagning i videoen, lavet jeg 2 r sammen ved hver side af markøren (denne maske strikkes ret) og beholdte en ret maske hele vejen op. Toppen fik jeg længere, da jeg stoppet med at lave indtagning, ved de tre midterste markør, da der kun var 2 masker tilbage. Derved blev den lidt længere, og synes selv det blev pænere.

15.10.2022 - 15:28

country flag Verena wrote:

Hallo, Durch die Zu- und Abnahmen ist das Strickstück ja nicht mehr an jeder Stelle gleich lang. An welcher Stelle messe ich die 6cm? An den Ohrklappen oder dazwischen? Vielen Dank

01.10.2022 - 23:36

DROPS Design answered:

Liebe Verena, messen Sie ab der Anschlagskante in der Arbeitsrichtung, zwischen die "Spitzen". Viel Spaß beim stricken!

03.10.2022 kl. 09:01

country flag Elin Stender wrote:

Hej, Ska jag enligt denna instruktion minska endast från rätsidan eller också från aviga? "Sedan minskas det på varje sida av 2:a, 4:e, och 6:e markören tills det blir 15 m kvar på st. (= 17-18-19 (20-21) gånger)." Mvh Elin

21.04.2022 - 09:57

DROPS Design answered:

Hej Elin, nederst i opskriften har vi en rigtig god video, som viser nøjagtig hvordan du skal gøre - god fornøjelse!

22.04.2022 kl. 14:10

Post a comment to pattern DROPS Baby 21-34

We would love to hear what you have to say about this pattern!

If you want to leave a question, please make sure you select the correct category in the form below, to speed up the answering process. Required fields are marked *.

#dropsfan gallery

Alladin

Kaardewol, Belgium

Alladin

Marta, Poland

Alladin

Vanessa Timeus, France

See more