
Popular categories
Looking for a yarn?


Comments / Questions (33)
![]() Claudine wrote:
Claudine wrote:
Col châle / devant gauche Après avoir repris les 23 mailles en attente il est indiqué sur l'endroit du travail commencé par 7 mailles au point mousse. Ce devrait plutôt être indiqué sur l'envers du travail?
28.04.2026 - 22:53DROPS Design answered:
Bonjour Claudine, tout à fait, correction faite, merci pour votre retour. Bonne continuation!
29.04.2026 - 11:27
![]() Claudine wrote:
Claudine wrote:
Bonjour, pour le dos, quand nous sommes rendus à rabattre les mailles de l'épaule avec la technique I-cord et que nous avons 40 mailles, est-ce que l'on rabat aussi les 9 mailles (3 fois) qui n'ont pas été tricoté dans l'étape juste avant?
18.04.2026 - 20:56DROPS Design answered:
Bonjour Claudine, tout à fait, on doit rabattre ici toutes les mailles de l'épaule, découvrez ici, en vidéo comment procéder. Bon tricot!
20.04.2026 - 09:49
![]() Rebecca wrote:
Rebecca wrote:
When working A2 on the back piece can you explain where the increases are worked. I can only see one stitch increase on the pattern diagram?
01.04.2026 - 20:48DROPS Design answered:
Hi Rebecca, A.2 is repeated on the row (6 stitches x 16 in the smallest size for example), with 1 stitch increased in each repeat = 16 increased stitches on the row. Happy Easter! Regards, Drops Team.
03.04.2026 - 07:40
![]() Ludivine wrote:
Ludivine wrote:
Lorsque l’on commence le col, faut-il continuer la bordure et les 3 mailles en point mousse ?
05.11.2025 - 15:55DROPS Design answered:
Bonjour Ludivine, les mailles restantes du col châle se tricotent comme elles se présentent: les 7 mailles point mousse au point mousse et les mailles restantes soit à l'endroit soit à l'envers en fonction du rang précédent. Bon tricot!
05.11.2025 - 17:08
![]() Bessin Jacqueline wrote:
Bessin Jacqueline wrote:
Bonjour,j’ai tricoté ce modèle sans difficulté jusqu’au col châle .Très beau modèle mais je ne comprends pas quand on me dit pour le côté gauche par exemple de tricoter sur l’endroit alors que je suis sur l’envers et inversement pour le côté droit.Je suis bloquée et vous remercie pour votre réponse .Modèle 235-2
15.10.2025 - 18:46DROPS Design answered:
Bonjour Mme Bessin, le col châle se fait avoir terminé les épaules, on a rabattu les mailles et coupé le fil, le 1er rang du col châle du devant droit se tricote sur l'envers (joignez le fil en début de rang sur l'envers) et tricotez les rangs raccourcis en commençant sur l'endroit; pour le devant gauche, tricotez le 1er rang du col sur l'endroit (joignez le fil en début de rang sur l'endroit) et commencez les rangs raccourcis sur l'envers. Bon tricot!
16.10.2025 - 17:27
![]() Christine wrote:
Christine wrote:
Nach einer Rückfrage hier habe ich den Schalkragen an beiden VT nach Anleitung hinbekommen und bin leider überhaupt nicht glücklich. Obwohl alle Maße stimmen, liegt der Kragen (nicht die Blende, der Rest) als ganz seltsame, sich nach außen stülpende Wulst im Nacken; für ein vernünftiges Umschlagen ist er aber wiederum zu schmal. Sehr schade... Ich werde nun die Nähte und den gesamten Teil an beiden VT wieder auftrennen und hoffentlich eine alternative Lösung finden.
12.03.2025 - 21:50
![]() Sarah wrote:
Sarah wrote:
Hey, I’m loving the pattern so far. I’ve reached the end of the back when I cast off the middle section and start working on the shoulders individually. But I’m really confused and not sure how I’m suppose to do them. Do I knit for a bit then start decreasing on the side closest to the neck… I’m confused 😵💫 Any help welcomed, thank you.
03.02.2025 - 21:31DROPS Design answered:
Hi Sarah, You cast off 1 stitch at the beginning of the next row from the neck, straight after casting off the middle stitches for the neckline. Then you continue working the shoulder until you have reached the required length, before beginning to work the diagonal shoulders. Hope this helps and happy knitting!
04.02.2025 - 06:48
![]() Carmen-Gabriela wrote:
Carmen-Gabriela wrote:
Hallo + Danke. Ja, die verkürzte Seite wird an den rückw. HA genäht. Die äußere Seite der Blende ist aber ziemlich lang, selbst nach dem Annähen von ca. 3 cm tiefer. Also, (hoher) Stehkragen im Nacken oder umschlagen; je nach dem werde ich die Naht der beiden schrägen Teile von der rechten oder linken Strick-Seite gestalten. Ich stricke für ein Familienmitglied und werde nach dem 2. VT (ist in Arbeit) anpassen. Es bleibt spannend, ansonsten ist die Jacke echt schön!
22.01.2025 - 18:18
![]() Carmen-Gabriela wrote:
Carmen-Gabriela wrote:
Hallo, ich bin ebenfalls bzgl. V-Ausschnitt/Schalkragen irritiert. Ich habe RT + re. VT fertig. Wird dieser Kragen im Nacken umgeschlagen? Falls ja, würde der Umschlage-Knick/Revers bereits im Wabenmuster A.7 beginnen. Aufgestellt kann nicht sein, denn sooo tief ist der rückw. Halsausschnitt nicht. Ich grüble über die rückwärtige Naht beider Schalkragen-Teile (26 M / 14 cm br/ XL) - Evtl. haben Sie eine Idee/Lösung?
21.01.2025 - 18:56DROPS Design answered:
Liebe Carmen-Gabriela, in diesem Video zeigen wir, wie man so einen Schalkragen näht, dh im Video wurde die Halsblende ohne verkürzten Reihen gestrickt, hier sollen Sie aber diese verkürzten Reihen stricken, damit die äußerste Seite der Blende länger als die Seite, die am Hals/Rückenteil genäht wird. Kann das Ihnen helfen oder misverstehe ich Ihre Frage?
22.01.2025 - 09:03
![]() Christine wrote:
Christine wrote:
Ein wunderschönes Muster. Leider komme ich beim Schalkragen der Vorderseiten nicht weiter. Beim linken VT scheinen Hin- und Rückreihen zu "wechseln", wenn die "Hinreihe" (eigentlich ja die Rückreihe des Musters) mit den 7 Blendenmaschen beginnt. Dann aber verkürze ich die Reihen doch auf der falschen Seite, d.h. die Blendenseiten wird kürzer, nicht länger... im Diagramm sieht es allerdings so aus, aus müsste die Halsseite lang werden?
12.01.2025 - 16:19DROPS Design answered:
Liebe Christine, beim linken Vorderteil beginnen die verkürzten Reihen mit einer Rückreihe, damit die äusserte Seite länger als die innere Seite wird (die am Halsausschnitt angenäht wird). Viel Spaß beim Stricken!
13.01.2025 - 09:58
|
||||||||||||||||||||||
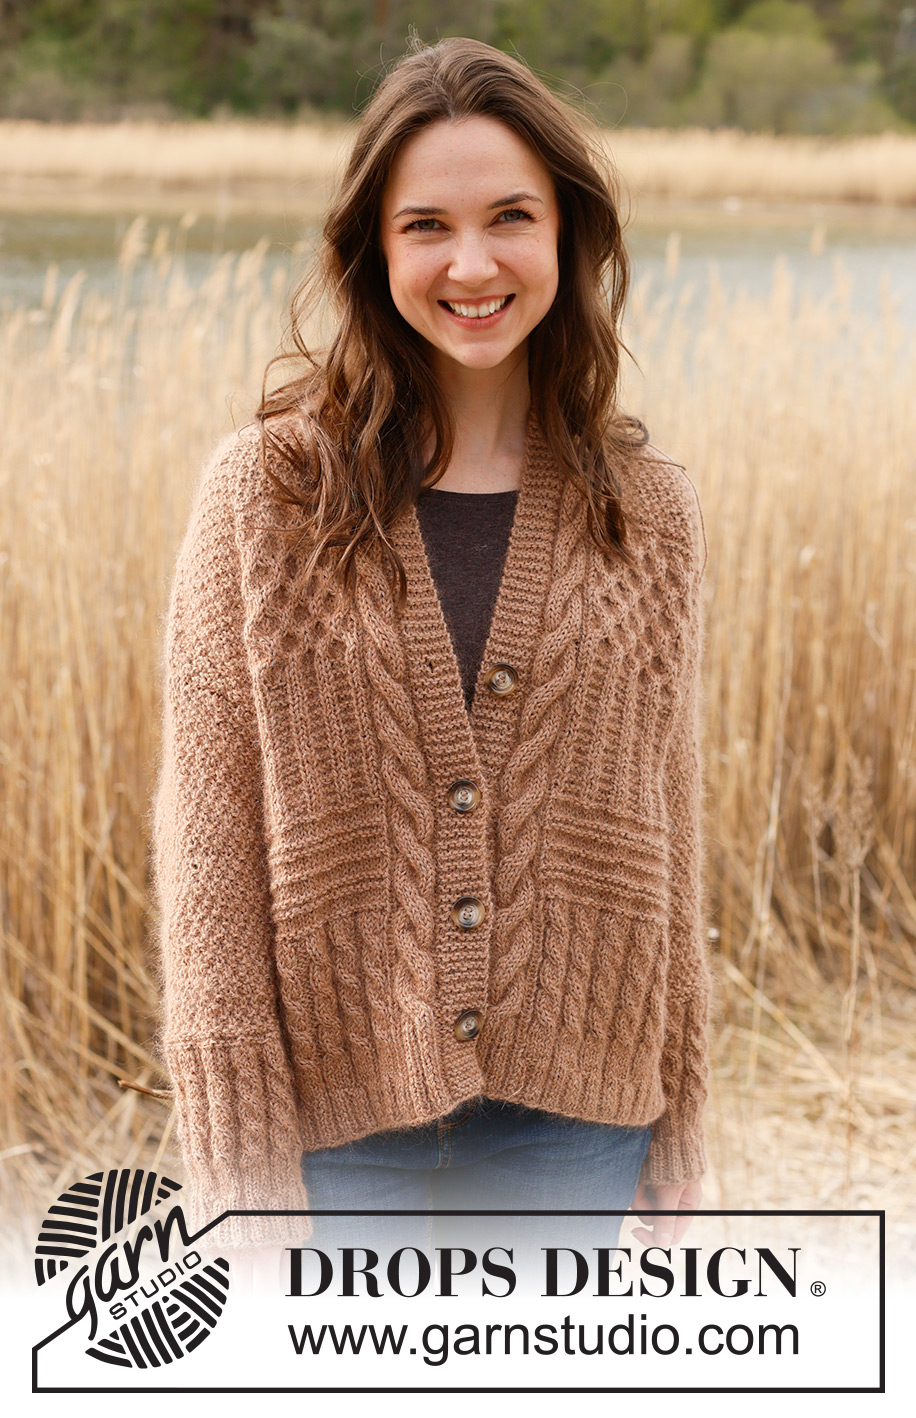
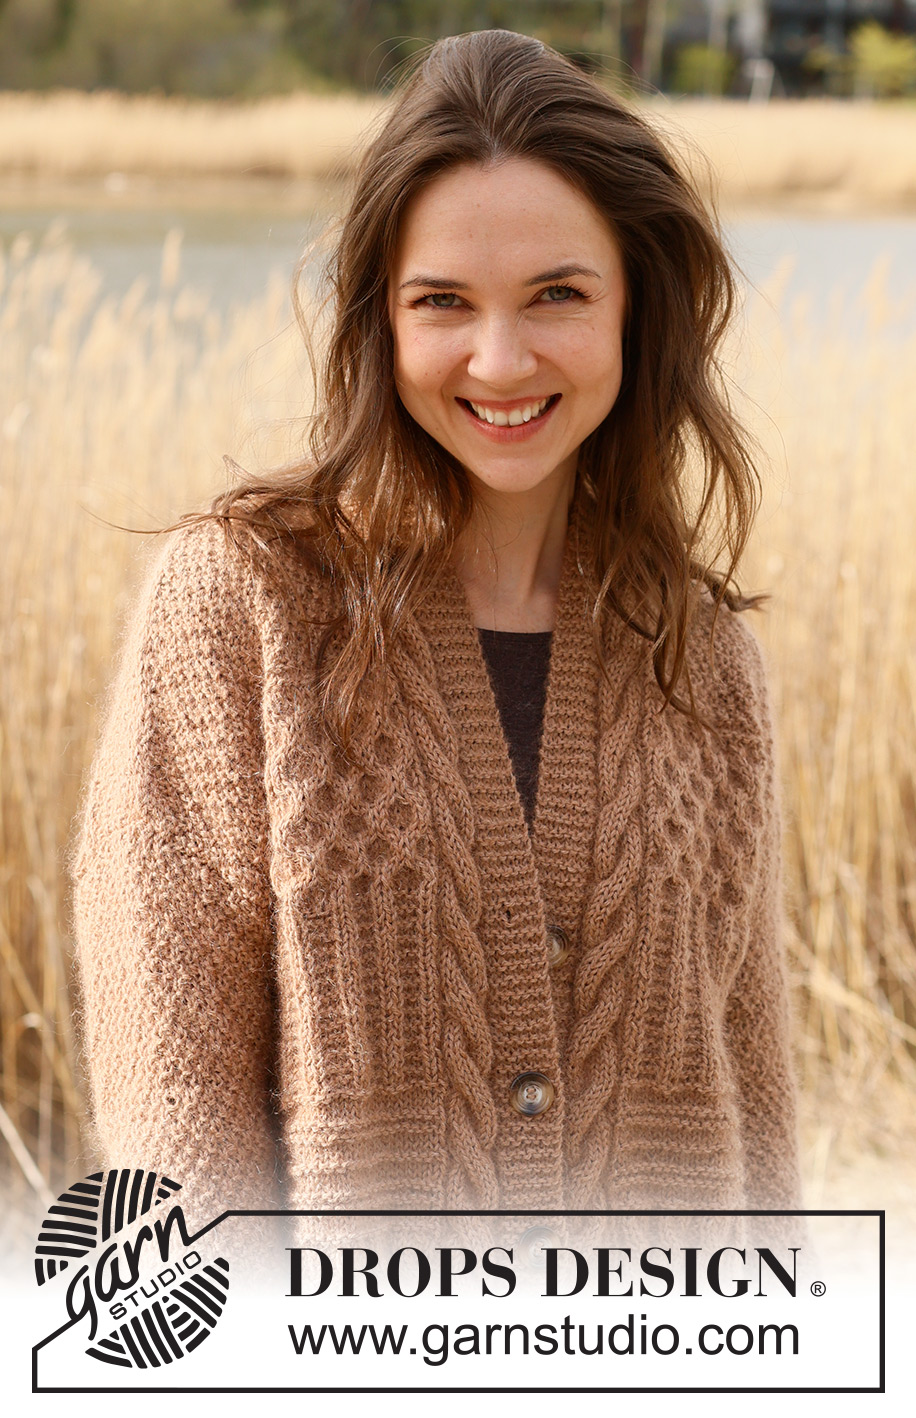
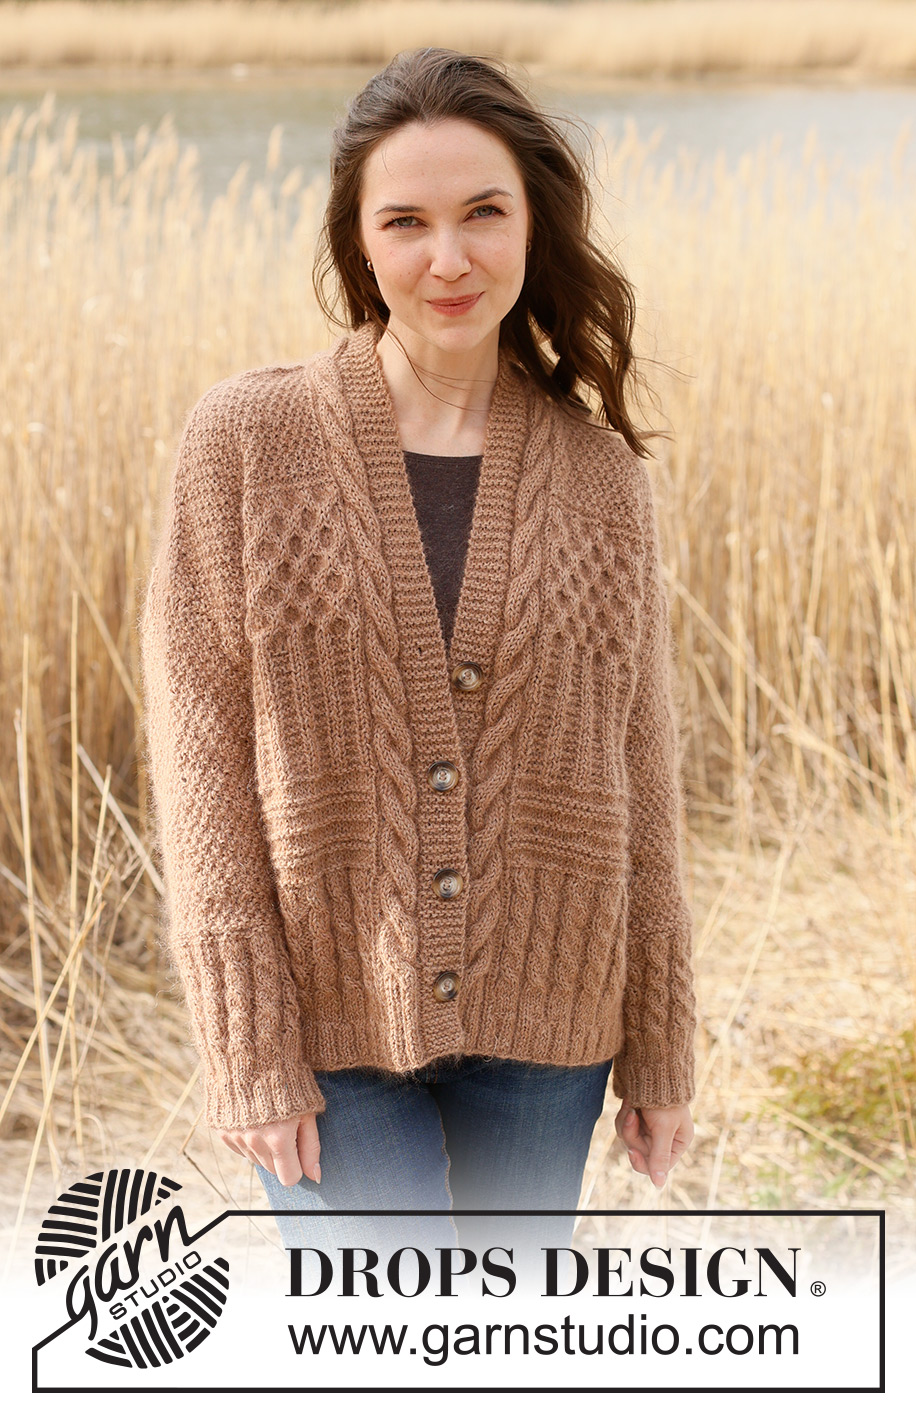
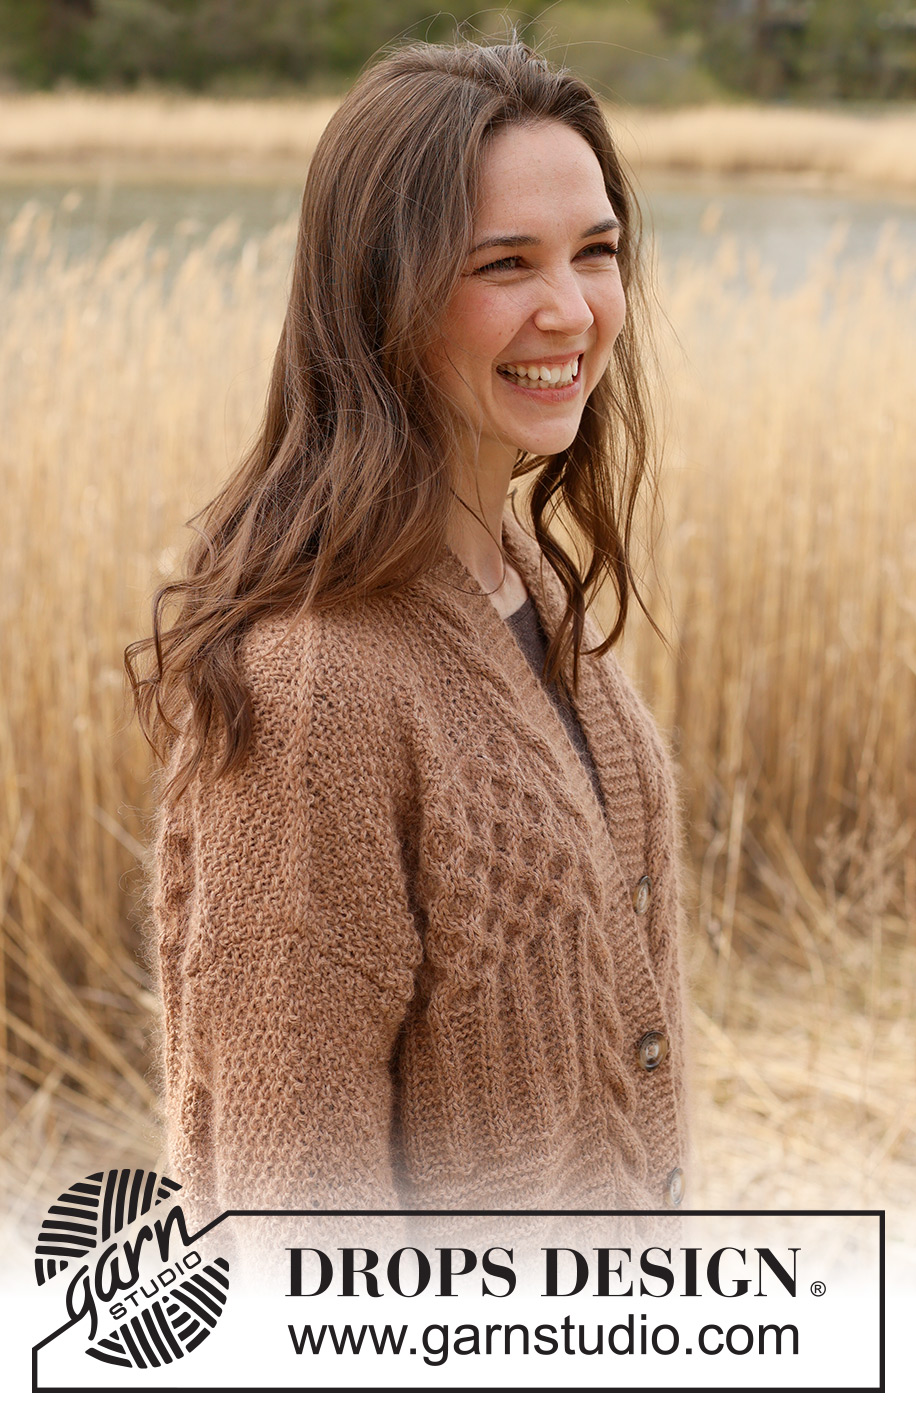
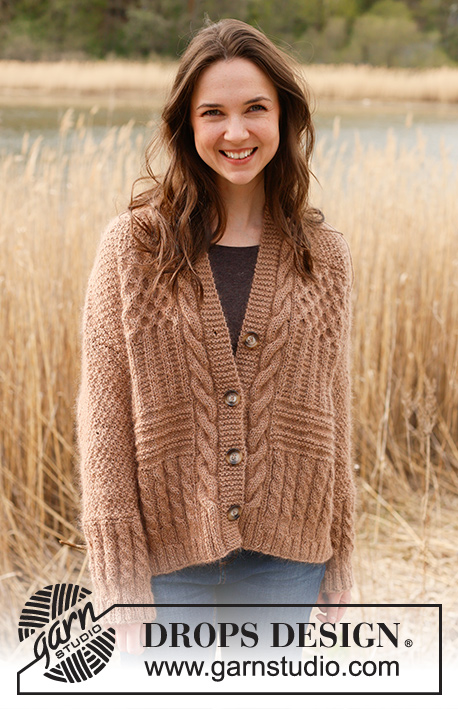
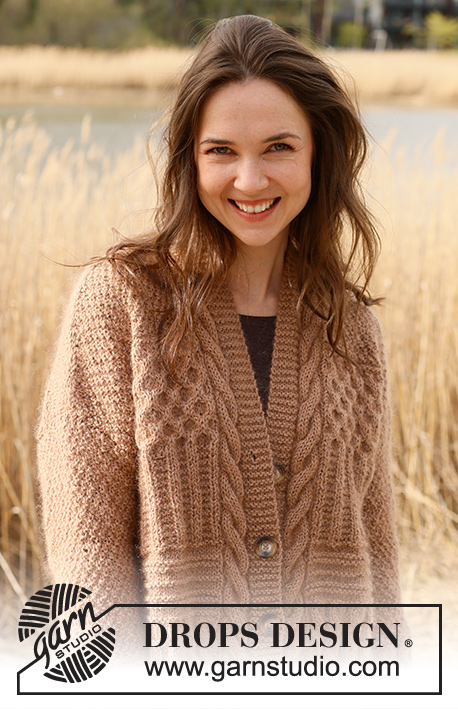
Cracked Walnuts Jacket#crackedwalnutsjacket |
||||||||||||||||||||||
 |
 |
|||||||||||||||||||||
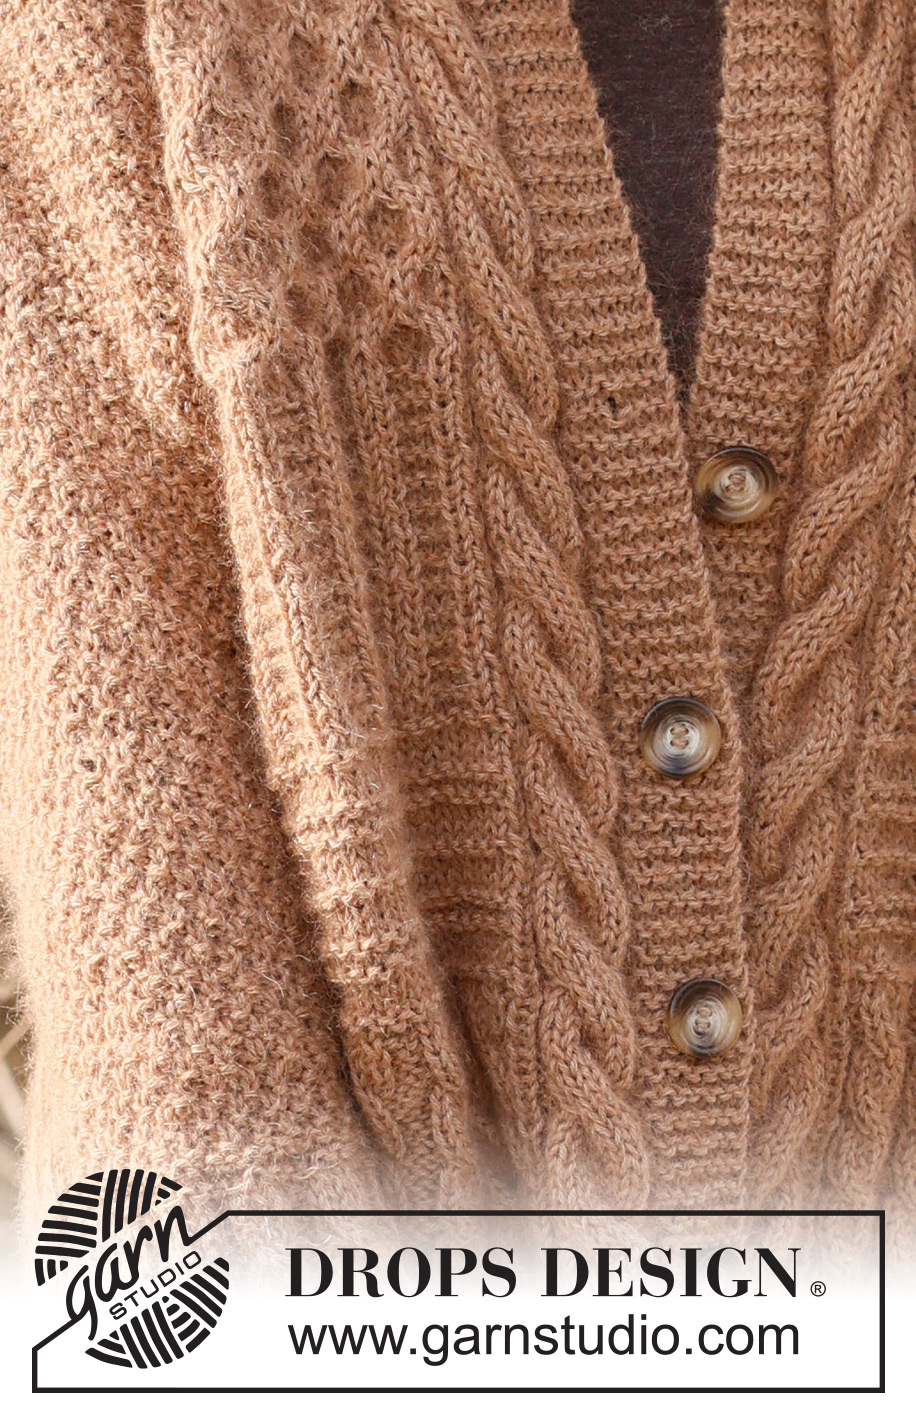
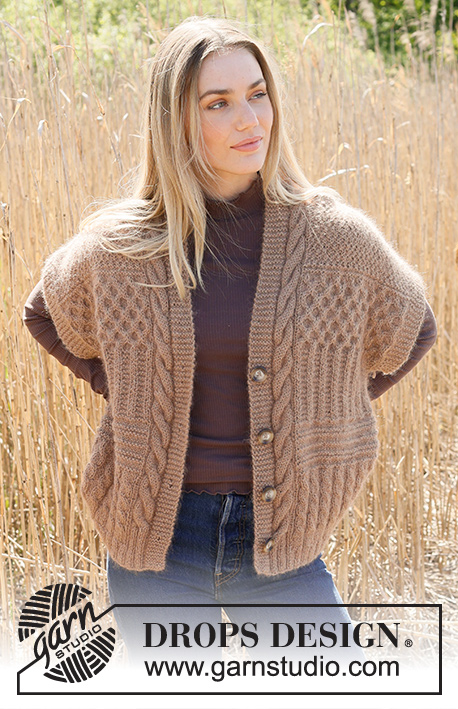
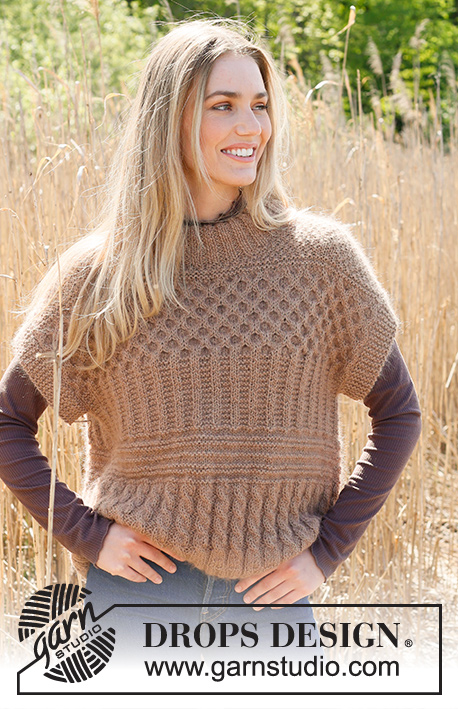
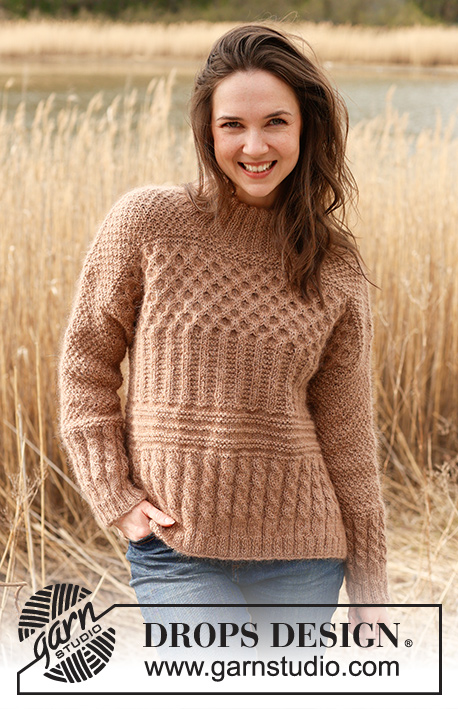
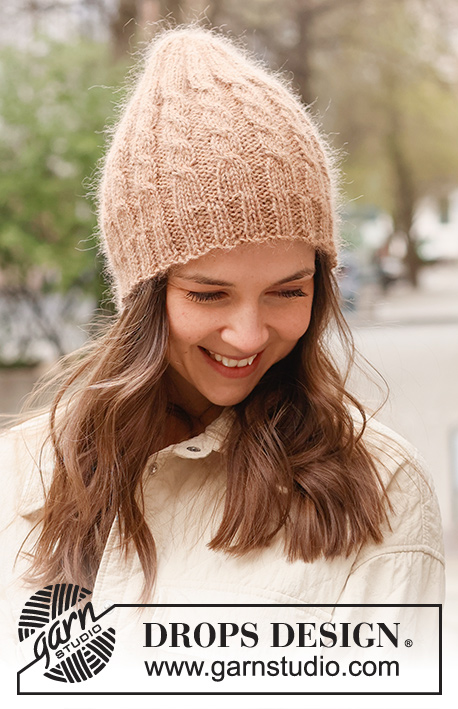
Knitted jacket in DROPS Kid-Silk and DROPS Puna / DROPS Merino Extra Fine. Piece is knitted bottom up with textured pattern, ridges, cables and rib. Size XS – XXL.
DROPS 235-2 |
||||||||||||||||||||||
|
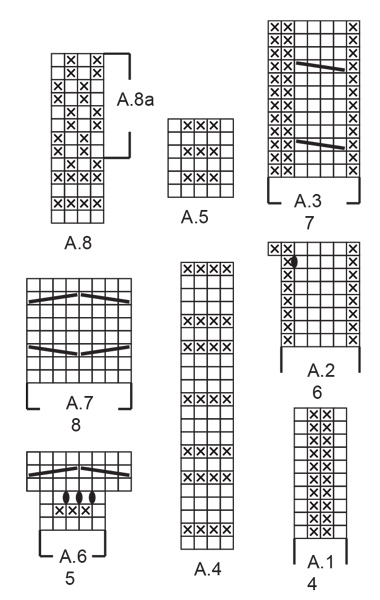
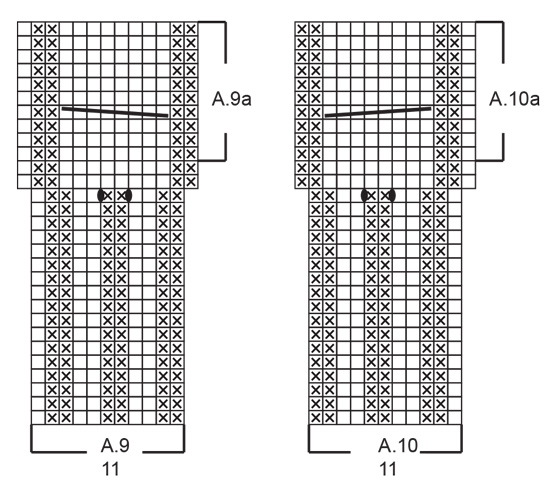
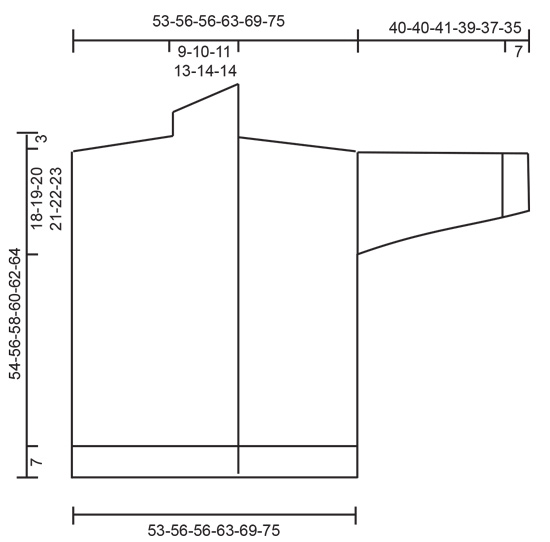
---------------------------------------------------------- EXPLANATION FOR THE PATTERN: ---------------------------------------------------------- GARTER STITCH (back and forth): Knit all rows. 1 ridge vertically = knit 2 rows. PATTERN: See diagrams A.1 to A.10. Diagrams show all rows in pattern seen from the right side. KNIT TOGETHER: FROM RIGHT SIDE: Slip 1 stitch knitwise, knit 1, pass slipped stitch over stitch worked. FROM WRONG SIDE: Purl 2 together. STOCKING STITCH: When working from wrong side, purl and when working from right side, knit. INCREASE TIP (applies to sleeves): Work 1 past marker, make 1 yarn over, work as before until 2 stitches remain before marker at the end of round thread, make 1 yarn over. On next round work yarn overs twisted. BUTTONHOLES (bottom up): Decrease for buttonholes on right band. 1 BUTTONHOLE = knit third and fourth stitch from edge together and make 1 yarn over. On next row knit yarn over to make hole. Decrease for buttonholes when piece measures: XS: 6, 14, 22 and 30 cm S: 6, 14, 22 and 30 cm M: 6, 14, 23 and 32 cm L: 7, 16, 25 and 34 cm XL: 6, 14, 22, 29 and 36 cm. XXL: 6, 14, 22, 29 and 36 cm. ---------------------------------------------------------- START THE PIECE HERE: ---------------------------------------------------------- JACKET - SHORT OVERVIEW OF THE PIECE: Work front and back piece bottom up, back and forth in parts. Work sleeves bottom up in the round on double pointed needles/circular needle. BACK PIECE: Cast on 98-110-110-122-134-146 stitches on circular needle size 4 mm with 1 strand of each quality (2 strands). Purl 1 row from wrong side. Work next row as follows from right side: 1 edge stitch in GARTER STITCH – read explanation above, work A.1 until 1 stitch remains, 1 edge stitch in garter stitch. When A.1 has been worked 1 time vertically, work pattern as follows: 1 edge stitch in garter stitch, work A.2 until 1 stitch remains, 1 edge stitch in garter stitch. When A.2 has been worked 1 time vertically, there are 114-128-128-142-156-170 stitches on needle. Switch to circular needle size 5.5 mm. Work pattern as follows: 1 edge stitch in garter stitch, work A.3 until 1 stitch remains, 1 edge stitch in garter stitch. REMEMBER THE KNITTING TENSION! Repeat A.3 vertically until piece measures 16-17-19-19-21-22 cm. Work pattern, begin from right side as follows: 1 edge stitch in garter stitch, work A.4 until 1 stitch remains and decrease at the same time 27-36-36-40-44-48 stitches evenly, 1 edge stitch in garter stitch = 87-92-92-102-112-122 stitches. When A.4 has been worked 1 time vertically, work pattern as follows: 1 edge stitch in garter stitch, work A.5 until 1 stitch remains, 1 edge stitch in garter stitch. Repeat A.5 vertically. Continue pattern like this until piece measures 33-35-36-38-39-41 cm. Work pattern, begin from right side as follows: 1 edge stitch in garter stitch, work A.6 until 1 stitch remains, 1 edge stitch in garter stitch. When A.6 has been worked 1 time vertically, there are 138-146-146-162-178-194 stitches on needle. Work pattern as follows: 1 edge stitch in garter stitch, work A.7 until 1 stitch remains, 1 edge stitch in garter stitch. Work A.7 3 times in total vertically. Piece measures approx. 45-47-48-50-51-53 cm. Work pattern as follows: 1 edge stitch in garter stitch, work A.8 until 1 stitch remains and decrease at the same time 51-54-54-60-66-72 stitches evenly 1 edge stitch in garter stitch = 87-92-92-102-112-122 stitches. When A.8 has been worked 1 time vertically, work A.8a vertically until finished measurements. When piece measures 50-52-54-56-58-60 cm, cast off the middle 13-14-16-18-20-20 stitches and finish each shoulder (37-39-38-42-46-51 stitches) separately. On next row from neck cast off 1 stitch at the beginning of row = 36-38-37-41-45-50 stitches. When piece measures 51-53-55-57-59-61 cm, work diagonal shoulder, begin on next row from the neck as follows: * Work pattern as before until 8-9-9-10-11-12 stitches remain, turn and work back *, work from *-* 3 times in total. I.e. work 8-9-9-10-11-12 stitches less on every row from the neck. On last row towards neck, cast on 2 new stitches at the end of row = 38-40-39-43-47-52 stitches. Now work and cast off with an edge over shoulder stitches. Work stitches cast on with shoulder stitches as follows: Work * 1 stitch in STOCKING STITCH – read explanation above, work next stitch together with first/next stitch from shoulder - read KNIT TOGETHER, pass the 2 stitches back on needle they came from with strand on wrong side of piece, make sure that strand is not too tight *, work from *-* until all stitches from shoulder have been worked together with the 2 new stitches cast on. Cast off the 2 stitches. Work the other shoulder the same way. RIGHT FRONT PIECE: Cast on 61-67-67-73-79-85 stitches on circular needle size 4 mm with 1 strand of each quality. Purl until 7 stitches remain, 7 band stitches in garter stitch. On next row from right side work pattern as follows: 7 band stitches in garter stitch, A.9, purl 1-0-0-1-0-1, knit 1-0-0-1-0-1, work A.1 until 1 stitch remains, 1 edge stitch in garter stitch. When A.1 has been worked 1 time vertically, work pattern from right side as follows: 7 band stitches in garter stitch, A.9 as before, work A.2 until 1 stitch remains, 1 edge stitch in garter stitch. Decrease for BUTTONHOLES - read explanation above. When A.2 has been worked 1 time vertically, there are 70-77-77-84-91-98 stitches on needle. Switch to circular needle size 5.5 mm. Work pattern as follows: 7 band stitches in garter stitch, A.9a, make 1 yarn over (this is done so that the pattern is the same mid front on both front pieces), work A.3 until 1 stitch remains, 1 edge stitch in garter stitch = 71-78-78-85-92-99 stitches. Knit yarn over twisted on next row, then purl from right side and knit from wrong side. Repeat A.3 vertically until piece measures 16-17-19-19-21-22 cm. Work pattern, begin from right side as follows: 7 band stitches in garter stitch, A.9a as before, work A.4 until 1 stitch remains and decrease at the same time 15-17-17-19-21-23 stitches evenly, 1 edge stitch in garter stitch = 56-61-61-66-71-76 stitches. When A.4 has been worked 1 time vertically, work pattern as follows: 7 band stitches in garter stitch, A.9a as before, work A.5 until 1 stitch remains, 1 edge stitch in garter stitch. Repeat A.5 vertically. Continue pattern like this until piece measures 33-35-36-38-39-41 cm. Work pattern, begin from right side as follows: 7 band stitches in garter stitch, A.9a as before, work A.6 until 1 stitch remains, 1 edge stitch in garter stitch. When A.6 has been worked 1 time vertically, there are 77-85-85-93-101-109 stitches on needle. Work pattern as follows: 7 band stitches in garter stitch, A.9a as before, work A.7 until 1 stitch remains, 1 edge stitch in garter stitch. Work A.7 3 times in total vertically. Piece measures approx. 45-47-48-50-51-53 cm. Work pattern as follows: 7 band stitches in garter stitch, A.9a as before, work A.8 until 1 stitch remains and decrease at the same time 21-24-24-27-30-33 stitches evenly, 1 edge stitch in garter stitch = 56-61-61-66-71-76 stitches. When A.8 has been worked 1 time vertically, work A.8a vertically until finished measurements. When piece measures 51-53-55-57-59-61 cm, work diagonal shoulder, begin on next row from the neck as follows: * Work pattern as before until 8-9-9-10-11-12 stitches remain, turn and work back *, work from *-* 3 times in total. I.e. work 8-9-9-10-11-12 stitches less on every row from the neck. On next row towards the neck work until 20-23-24-25-26-26 stitches remain, slip the last 20-23-24-25-26-26 stitches on a thread for shawl collar and cast on 2 new stitches at the end of row = 38-40-39-43-47-52 stitches. Now work and cast off with an edge over shoulder stitches. Work stitches cast on with shoulder stitches as follows: Work * 1 stitch in stocking stitch, work next stitch together with first/next stitch from shoulder – remember KNIT TOGETHER, pass the 2 stitches back on needle they came from with strand on wrong side of piece, make sure not to tighten yarn too much *, work from *-* until all stitches from shoulder have been worked together with the 2 new stitches cast on. Cast off the 2 stitches. SHAWL COLLAR: Slip the 20-23-24-25-26-26 stitches from stitch holder on circular needle size 5.5 mm. Work as follows from wrong side: 0-2-3-3-5-5 stitches in garter stitch, knit over knit and purl over purl until 7 stitches remain, work 7 band stitches in garter stitch. Continue like this (i.e. cables are done) and work short rows as follows: ROW 1 (= right side): Work the first 16-19-20-21-22-22 stitches, turn and tighten yarn. ROW 2 (= wrong side): Work 16-19-20-21-22-22 stitches. ROW 3 (= right side): Work over all stitches, turn and tighten yarn. ROW 4 (= wrong side): Work over all stitches. Work 1st to 4th row until shawl collar measures approx. 7-8-8-9-9-9 cm on the shortest. Work 1 ridge over all stitches. Cast off. LEFT FRONT PIECE: Cast on 61-67-67-73-79-85 stitches on circular needle size 4 mm with 1 strand of each quality. Work 7 band stitches in garter stitch, purl the rest of row. On next row from right side work pattern as follows: 1 edge stitch in garter stitch, work A.1 until 20-18-18-20-18-20 stitches remain, knit 1-0-0-1-0-1, purl 1-0-0-1-0-1, A.10, 7 band stitches in garter stitch. When A.1 has been worked 1 time vertically, work pattern from right side as follows: 1 edge stitch in garter stitch, work A.2 until 18 stitches remain, A.10 as before, 7 band stitches in garter stitch. When A.2 has been worked 1 time vertically, there are 70-77-77-84-91-98 stitches on needle. Switch to circular needle size 5.5 mm. Work pattern as follows: 1 edge stitch in garter stitch, work A.3 until 20 stitches remain, A.10a, 7 band stitches in garter stitch. Repeat A.3 vertically until piece measures 16-17-19-19-21-22 cm. Work pattern, begin from right side as follows: 1 edge stitch in garter stitch, work A.4 until 20 stitches remain and decrease at the same time 14-16-16-18-20-22 stitches evenly, A.10a as before, 7 band stitches in garter stitch = 56-61-61-66-71-76 stitches. When A.4 has been worked 1 time vertically, work pattern as follows: 1 edge stitch in garter stitch, work A.5 until 20 stitches remain, A.10a as before, 7 band stitches in garter stitch. Repeat A.5 vertically. Continue pattern like this until piece measures 33-35-36-38-39-41 cm. Work pattern, begin from right side as follows: 1 edge stitch in garter stitch, work A.6 until 20 stitches remain, A.10a as before, 7 band stitches in garter stitch. When A.6 has been worked 1 time vertically, there are 77-85-85-93-101-109 stitches on needle. Work pattern as follows: 1 edge stitch in garter stitch, work A.7 until 20 stitches remain, A.10a as before, 7 band stitches in garter stitch. Work A.7 3 times in total vertically. Piece measures approx. 45-47-48-50-51-53 cm. Work pattern as follows: 1 edge stitch in garter stitch, work A.8 until 20 stitches remain and decrease at the same time 21-24-24-27-30-33 stitches evenly, A.10a as before, 7 band stitches in garter stitch = 56-61-61-66-71-76 stitches. When A.8 has been worked 1 time vertically, work A.8a vertically until finished measurements. When piece measures 51-53-55-57-59-61 cm, work diagonal shoulder, begin on next row from the neck as follows: * Work pattern as before until 8-9-9-10-11-12 stitches remain, turn and work back *, work from *-* 3 times in total. I.e. work 8-9-9-10-11-12 stitches less on each row from the neck. On next row towards the neck work until 20-23-24-25-26-26 stitches remain, slip the last 20-23-24-25-26-26 stitches on a thread for shawl collar and cast on 2 new stitches at the end of row = 38-40-39-43-47-52 stitches. Now work and cast off with an edge over shoulder stitches. Work stitches cast on with shoulder stitches as follows: Work * 1 stitch in stocking stitch, work next stitch together with first/next stitch from shoulder – remember KNIT TOGETHER, pass the 2 stitches back on needle they came from with strand on wrong side of piece, make sure not to tighten yarn too much *, work from *-* until all stitches from shoulder have been worked together with the 2 new stitches cast on. Cast off the 2 stitches. SHAWL COLLAR: Slip the 20-23-24-25-26-26 stitches from stitch holder on circular needle size 5.5 mm. Work as follows from wrong side: 7 band stitches in garter stitch, knit over knit and purl over purl until 0-2-3-3-5-5 stitches remain, and work the last stitches in garter stitch. Continue like this (i.e. cables are done) and work short rows as follows: ROW 1 (= wrong side): Work the first 16-19-20-21-22-22 stitches, turn and tighten yarn. ROW 2 (= right side): Work 16-19-20-21-22-22 stitches. ROW 3 (= wrong side): Work over all stitches, turn and tighten yarn. ROW 4 (= right side): Work over all stitches. Work 1st to 4th row until shawl collar measures approx. 7-8-8-9-9-9 cm on the shortest. Work 1 ridge over all stitches. Cast off. SLEEVES: Cast on 60-60-60-72-72-72 stitches on double pointed needles size 4 mm with 1 strand of each quality. Knit 1 round. Insert 1 marker at beginning of round. Work A.1 in the round. When A.1 has been worked 1 time vertically, work A.2 over all stitches. When A.2 has been worked 1 time vertically, there are 70-70-70-84-84-84 stitches on needle. Switch to double pointed needles size 5.5 mm. Work A.3 over all stitches. Work A.3 2 times in total vertically. Work A.8 over all stitches, on first round decrease 22-22-22-26-26-26 stitches evenly = 48-48-48-58-58-58 stitches. Repeat A.8a vertically until finished measurements. AT THE SAME TIME when piece measures 20 cm, increase 1 stitch on each side of marker - read INCREASE TIP! Increase like this every 3½-3½-2½-3-3-2 cm 6-6-8-6-6-8 times in total = 60-60-64-70-70-74 stitches. Work the increased stitches in the pattern. Cast off when sleeve measures 40-40-41-39-37-35 cm. Knit another sleeve the same way. ASSEMBLY: Sew shoulder seams inside 1 stitch on i-cord edge. Sew shawl collar together mid back and sew it to neck line in the back of neck. Sew in sleeves. Sew side seams inside 1 edge stitch. Sew the buttons on to left front piece. |
||||||||||||||||||||||
Diagram explanations |
||||||||||||||||||||||
|
||||||||||||||||||||||
 |
||||||||||||||||||||||
 |
||||||||||||||||||||||
 |
||||||||||||||||||||||
Have you finished this pattern?Tag your pictures with #dropspattern #crackedwalnutsjacket or submit them to the #dropsfan gallery. Do you need help with this pattern?You'll find 35 tutorial videos, a Comments/Questions area and more by visiting the pattern on garnstudio.com. © 1982-2026 DROPS Design A/S. We reserve all rights. This document, including all its sub-sections, has copyrights. Read more about what you can do with our patterns at the bottom of each pattern on our site. |
||||||||||||||||||||||


With over 40 years in knitting and crochet design, DROPS Design offers one of the most extensive collections of free patterns on the internet - translated to 17 languages. As of today we count 324 catalogues and 12290 patterns translated into English (UK/cm). 12290
We work hard to bring you the best knitting and crochet have to offer, inspiration and advice as well as great quality yarns at incredible prices! Would you like to use our patterns for other than personal use? You can read what you are allowed to do in the Copyright text at the bottom of all our patterns. Happy crafting!
Post a comment to pattern DROPS 235-2
We would love to hear what you have to say about this pattern!
If you want to leave a question, please make sure you select the correct category in the form below, to speed up the answering process. Required fields are marked *.