
Popular categories
Looking for a yarn?


Comments / Questions (12)
![]() Christina wrote:
Christina wrote:
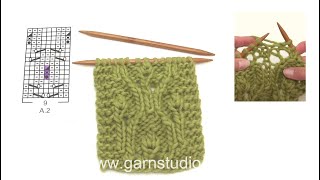
Ich verstehe nicht was im Diagramm in der 7. Zeile von unten das Kästchen mit dem schwarzen Dreieck bedeutet. Die Erklärung ist identisch zu dem schwarzen Dreieck, das über drei Kästchen geht. Sollen in Zeile 7 wirklich immer 2 Maschen abgenommen werden? Aber in Zeile 8 sind doch weiterhin 8 Maschen in A.2.
24.10.2025 - 20:48DROPS Design answered:
Liebe Christina, es ist richtig, dass die beiden Symbole genau das gleiche bedeuten. In der 5. Reihe nehmen Sie 2 Maschen zu (runder schwarzer Kreis), in der 6. Reihe (Rück-Reihe) stricken Sie 3 Maschen links - diese 3 Maschen werden nur durch EIN Kästchen angezeigt, nämlich das mit dem durchgekreuzten schwarzen Kreis. Dann kommt in der 7. Reihe das Dreieck - Sie stricken die 3 Maschen wie beschrieben zusammen (= 2 Maschen abgenommen). Damit haben Sie wieder 8 Maschen in A.2. Da die Zunahmen und Abnahmen so direkt übereinander liegen, wurde es hier in dieser Weise dargestellt und nicht mit zusätzlichen Kästchen. Viel Spaß beim Weiterstricken!
25.10.2025 - 00:05
![]() Sabina wrote:
Sabina wrote:
This was a first for me, knitting a yoke with lace and the pattern was easy to follow. My Rain Romance Cardigan knitted up beautifully with Drops Air yarn. It is so soft and pretty. I love it. My daughter wants one now.
11.08.2025 - 04:58
![]() Cornelia wrote:
Cornelia wrote:
Hello, the modell should be worked only on the right side or also on the wrong side? And if it is worked on the wrong side also, should I read the diagram from left side or the right side? Thank you for your answer.
08.09.2024 - 21:29DROPS Design answered:
Dear Cornelia, Diagrams show all rows in pattern seen from the right side. That is, it shows rows both from the right side and wrong side. When working rows from the wrong side, read the diagram in the opposite directions, from left to right. For more information you can read the following lesson: https://www.garnstudio.com/lesson.php?id=68&cid=19. Happy knitting!
08.09.2024 - 22:42
![]() Sanne wrote:
Sanne wrote:
Opskriften er fyldt med fejl. Når mønster plus masker der skal tages ud inden inddeling til ærmer og krop er helt forkert
24.11.2023 - 20:54
![]() Shari wrote:
Shari wrote:
There seems to be a mistake in under the Double Neck Section. It states: “Now cast on 6 new stitches at the end of the next 2 rows = 99-103-105-111-115-121 stitches. Continue in stockinette stitch back and forth with 1 stitch in garter stitch in each side towards mid front.” It seems like it should say “Continue in rib back and forth …” Is this a correct assumption?
08.06.2023 - 18:59DROPS Design answered:
Dear Shari, you are right, pattern has been now fixed,thanks for your feedback. Happy knitting!
09.06.2023 - 08:50
![]() Ilaria wrote:
Ilaria wrote:
Buongiorno ho appena iniziato a lavorare questo bel giacchino. Ho un dubbio. Lavorando il bordo del collo doppio a un certo punto è indicato: “Avviare Avviare 6 maglie alla fine dei 2 ferri successivi” . Queste 6+6 maglie ai lati vanno poi lavorate a m rasata? Ma nel momento in cui poi piego il bordo, e lavoro ogni maglia insieme a quelle del bordo di avvio, ai lati restano degli “scalini” formati dalla lavorazione di queste 6 maglie. Come Risolvere? Grazie
20.02.2023 - 13:51DROPS Design answered:
Buonasera Ilaria, non ci sono correzione previste per questo modello al momento. Buon lavoro!
20.02.2023 - 23:44
![]() Dominique Collado wrote:
Dominique Collado wrote:
Bonjour, je ne me retrouve pas dans l augmentation après le motif : l’ouvrage mesure environ 19-19-20-20-21-21 cm à partir du marqueur et on a 265-279-293-321-349-363 mailles. Puis on augmente de :Tricoter 1 rang endroit sur l’endroit en augmentant en même temps 6-8-16-4-10 mailles . Mais je n arrive pas au même compte que vous :285-301-337-353-373 mailles. Pouvez.vous m'éclairer ? Merci beaucoup
08.01.2023 - 08:50DROPS Design answered:
Bonjour Mme Collado, les augmentations ne se font pas en taille S, seulement dans les autres tailles, autrement dit, en taille M, vous aviez 279 m + 6 m = 285 mailles et ainsi de suite. Vous gardez bien 265 mailles en S et augmentez uniquement dans les autres tailles. Bon tricot!
09.01.2023 - 09:47
![]() Maria Paula Marques wrote:
Maria Paula Marques wrote:
Penso que já compreendi e que o meu erro foi que na carreira anterior (sexta), pelo avesso, tinha tricotado as três malhas que se tinham formado como uma única malha e deveria tê-las tricotado uma a uma, certo? Deste modo na sétima volta torno a obter o número inicial de malhas! :)
15.10.2022 - 01:31
![]() Maria Paula Marques wrote:
Maria Paula Marques wrote:
Boa noite! Estou a fazer este modelo e fiquei com uma dúvida. No esquema A1, na sétima fila ficam a faltar duas malhas, com o passar das duas malhas que deslizaram para a agulha da direita por cima da malha tricotada em meia. Como consigo tricotar as três restantes malhas, se duas delas ficaram a faltar, só me tendo sobrado uma? E continuar com as oito malhas por padrão? Desde já o meu muito obrigada!
14.10.2022 - 23:53DROPS Design answered:
Boa tarde, Obrigada pela sua pergunta! Permitiu-nos detectar um lapso nas explicações dos símbolos do diagrama. Pelo avesso, tricotam-se 3 malhas liga. Desta forma, já não irão faltar malhas. Bons tricôs e parabéns pela escolha deste bonito modelo!
18.10.2022 - 15:57
![]() Purlyplatypus wrote:
Purlyplatypus wrote:
Spring in Vienna
05.08.2022 - 07:28
|
|||||||||||||||||||||||||||||||
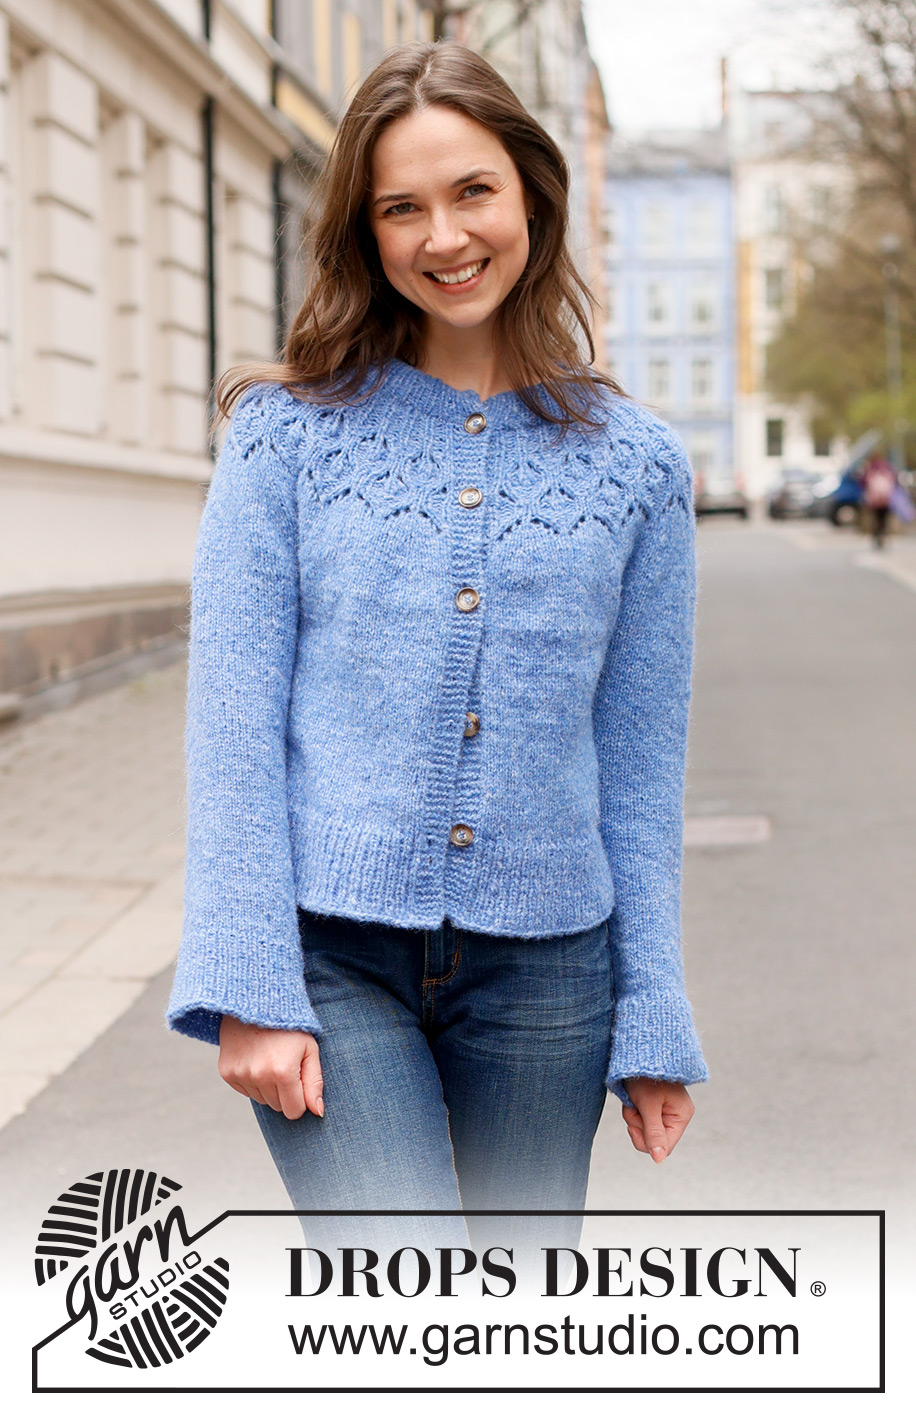
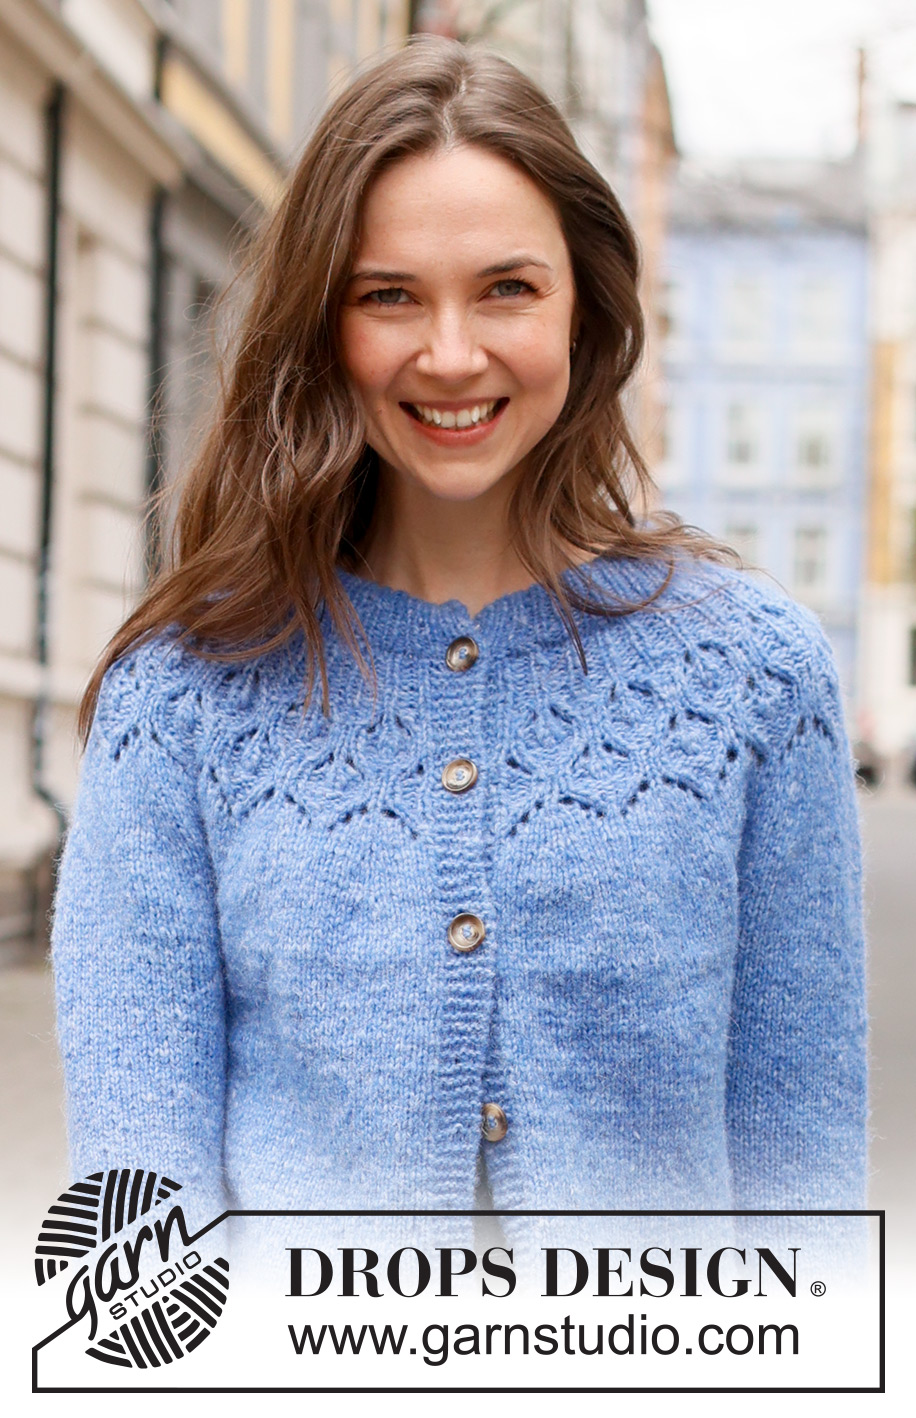
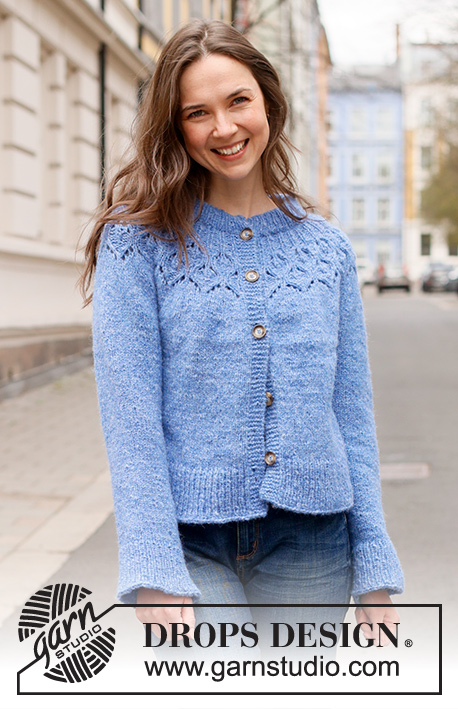
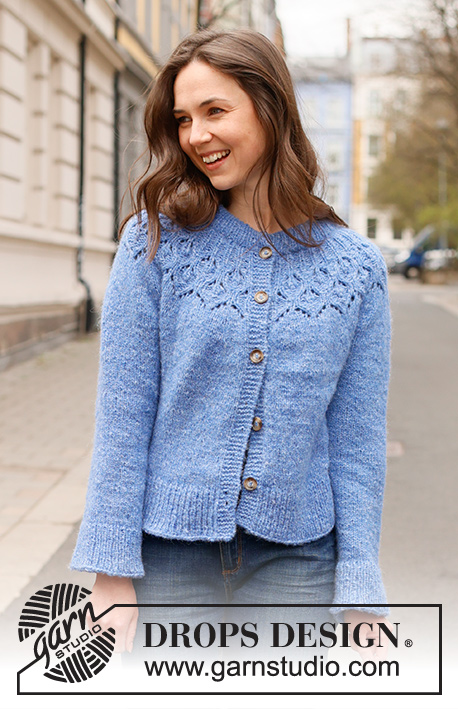
Rain Romance Jacket#rainromancejacket |
|||||||||||||||||||||||||||||||
 |
 |
||||||||||||||||||||||||||||||
Knitted jacket in DROPS Air. Piece is knitted top down with double neck edge, round yoke and lace pattern. Size: S - XXXL
DROPS 236-13 |
|||||||||||||||||||||||||||||||
|
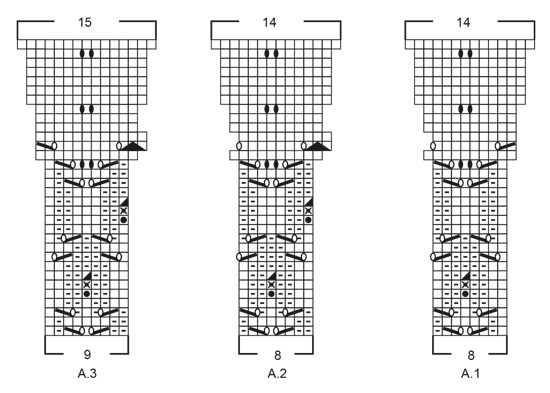
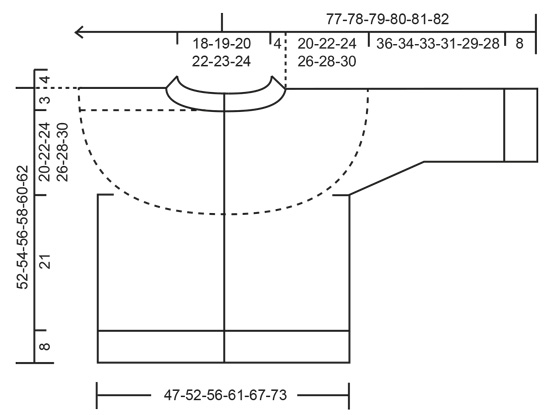
---------------------------------------------------------- EXPLANATION FOR THE PATTERN: ---------------------------------------------------------- GARTER STITCH (back and forth): Knit all rows. 1 ridge vertically = knit 2 rows. PATTERN: See diagrams A.1 to A.3. Diagrams show all rows in pattern seen from the right side. BUTTONHOLES: Decrease for buttonhole on right band, i.e. work from right side until 4 stitches remain on needle, make 1 yarn over, knit 2 together and finish by knitting 2. On next row (wrong side) knit the yarn over to make a hole. Decrease first buttonhole right after neck edge. Then decrease the next 4-4-5-5-5-5 buttonholes approx. 10-10½-9-9½-9½-10 cm apart. DECREASE TIP (applies to sleeves): Begin 3 stitches before marker thread and knit 2 together, knit 2 (marker thread is between these 2 stitches), slip 1 stitch knitwise, knit 1, pass slipped stitch over stitch worked. ---------------------------------------------------------- START THE PIECE HERE: ---------------------------------------------------------- JACKET - SHORT OVERVIEW OF THE PIECE: Work double neck edge and yoke back and forth on circular needle, work top down. Now divide yoke for body and sleeves. Work body back and forth on circular needle. Work sleeves in the round on double pointed needles/a short circular needle. DOUBLE NECK EDGE: Cast on 87-91-93-99-103-109 stitches with DROPS Air over circular needle size 5 and circular needle size 3.5 mm held together. Pull out circular needle 5 mm and keep stitches on the circular needle size 3.5 mm (cast on is done like this to get an elastic cast-on edge). Purl 1 row from wrong side. Work next row as follows from right side: 1 stitch in GARTER STITCH - read explanation above - * knit 1, purl 1 *, work from *-* until 2 stitches remain, knit 1 and finish with 1 stitch in garter stitch. Continue rib like this until piece measures 4 cm. Now cast on 6 new stitches at the end of the next 2 rows = 99-103-105-111-115-121 stitches. CoContinue rib (also over the new stitches) back and forth with 1 stitch in garter stitch in each side towards mid front. When rib measures 8 cm from cast-on edge and next row is knitted, fold the rib in so that the edge is double - then work next row as follows from right side, 1 stitch in garter stitch, 5 stitches rib as before, then work rib while AT THE SAME TIME working every other stitch on needle together with every other stitch from cast-on edge until 6 stitches remain on needle, work 5 stitches rib as before and 1 stitch in garter stitch. You now have a double neck edge. Insert 1 marker inside the 6 outermost stitches on needle. Work yoke as explained below. Measure yoke from this marker. YOKE: Switch to circular needle size 5 mm. Work first row as follows from wrong side: 6 stitches in garter stitch (band), purl until 6 stitches remain on needle and increase at the same time 22-24-28-34-42-42 stitches evenly over these stitches, finish with 6 stitches in garter stitch (band) = 121-127-133-145-157-163 stitches. Work next row as follows from right side: 6 stitches in garter stitch, * knit 1, purl 2 *, work from *-* until 7 stitches remain, knit 1 and finish with 6 stitches in garter stitch remember BUTTONHOLES – read explanation above. Continue rib like this. SIZE S, M and L: When piece measures 3-3-4 cm from marker, increase all 2 purl stitches to 3 purl stitch on next row from right side (increase by making 1 yarn over before all 2 purl stitches) = 157-165-173 stitches. Work back from wrong side with garter stitch over garter stitch, knit over knit and purl over purl (knit yarn overs twisted to avoid holes). SIZE XL, XXL and XXXL: When piece measures 2-3-3 cm from marker, increase every other 2 purl stitches to 3 purl stitch on next row from right side (increase by making 1 yarn over before every other 2 purl stitches) = 167-181-188 stitches. Continue rib (on first row, wrong side, knit yarn overs twisted to avoid holes). When piece measures 4-5-5 cm from marker, increase the remaining 2 purl stitches to 3 purl stitches = 189-205-213 stitches. Work back from wrong side with garter stitch over garter stitch, knit over knit and purl over purl (knit yarn overs twisted to avoid holes). ALL SIZES: Piece now measures approx. 4-4-5-5-6-6 cm from marker and there are 157-165-173-189-205-213 stitches on needle. Work next row as follows from right side: 6 stitches in garter stitch, A.1, work A.2 16-17-18-20-22-23 times in total, work A.3 and 6 stitches in garter stitch. Continue this pattern. REMEMBER THE KNITTING TENSION! When A.1 to A.3 have been worked vertically, piece measures approx. 19-19-20-20-21-21 cm from marker and there are 265-279-293-321-349-363 stitches on needle. Work in stocking stitch with 6 stitches in garter stitch in each side. When piece measures 20-21-22-23-24-25 cm from marker, work as follows: SIZE S: Divide the piece for body and sleeves as explained under. SIZE M, L, XL, XXL and XXXL: Knit 1 row from right side while increasing 6-8-16-4-10 stitches evenly (do not increase over bands) = 285-301-337-353-373 stitches. Work in stocking stitch with 6 stitches in garter stitch in each side. When piece measures 22-24-26-28-30 cm, divide for body and sleeves as explained below. DIVIDE THE PIECE FOR BODY AND SLEEVES AS FOLLOWS: Work 43-47-49-54-58-62 stitches as before, slip the next 52-54-58-66-66-68 stitches on a thread for sleeve, cast on 6-6-8-8-10-12 new stitches on needle (in the side under sleeve), work 75-83-87-97-105-113 stitches in stocking stitch, slip the next 52-54-58-66-66-68 stitches on a thread for sleeve, cast on 6-6-8-8-10-12 new stitches on needle (in the side under sleeve), and work the last 43-47-49-54-58-62 stitches as before. Finish body and sleeves separately. NOW MEASURE PIECE FROM HERE! BODY: = 173-189-201-221-241-261 stitches. Work in stocking stitch and 6 stitches in garter stitch in each side until piece measures 21 cm from division. Knit 1 row from right side while increasing 26-28-32-32-36-40 stitches evenly( do not increase over bands) = 199-217-233-253-277-301 stitches. Switch to circular needle size 3.5 mm. Work next row as follows from wrong side: 6 stitches in garter stitch, * purl 1, knit 1 *, repeat from *-* until 7 stitches remain, purl 1 and 6 stitches in garter stitch. Continue rib like this for 8 cm. Cast off somewhat loosely by knitting from the right side. Jacket measures approx. 52-54-56-58-60-62 cm from shoulder. SLEEVES: Slip the 52-54-58-66-66-68 stitches from thread in one side of piece on double pointed needles or a short circular needle size 5 mm and pick in addition up 1 stitch in each of the 6-6-8-8-10-12 new stitches cast on under sleeve = 58-60-66-74-76-80 stitches. Insert 1 marker thread mid under sleeve – in the middle of the 6-6-8-8-10-12 stitches that were cast on under sleeve. Begin round at the marker thread and work stocking stitch in the round. When piece measures 3-3-3-2-2-2 cm, decrease 2 stitches mid under sleeve - read DECREASE TIP. Decrease like this every 4-4-2½-2-2-1½ cm 4-4-6-9-9-10 times in total = 50-52-54-56-58-60 stitches. Work until sleeve measures 36-34-33-31-29-28 cm from division. 8 cm remain until finished measurements. Try the jacket and work to desired length before rib. Knit 1 round while increasing 10-10-10-12-12-12 stitches evenly = 60-62-64-68-70-72 stitches. Switch to double pointed needles size 3.5 mm. Work rib (knit 1/purl 1) for 8 cm. Cast off somewhat loosely by knitting. Sleeve measures approx. 44-42-41-39-37-36 cm. Work the other sleeve the same way. ASSEMBLY: Sew the buttons on to the left band. |
|||||||||||||||||||||||||||||||
Diagram explanations |
|||||||||||||||||||||||||||||||
|
|||||||||||||||||||||||||||||||
 |
|||||||||||||||||||||||||||||||
 |
|||||||||||||||||||||||||||||||
Have you finished this pattern?Tag your pictures with #dropspattern #rainromancejacket or submit them to the #dropsfan gallery. Do you need help with this pattern?You'll find 36 tutorial videos, a Comments/Questions area and more by visiting the pattern on garnstudio.com. © 1982-2026 DROPS Design A/S. We reserve all rights. This document, including all its sub-sections, has copyrights. Read more about what you can do with our patterns at the bottom of each pattern on our site. |
|||||||||||||||||||||||||||||||


With over 40 years in knitting and crochet design, DROPS Design offers one of the most extensive collections of free patterns on the internet - translated to 17 languages. As of today we count 324 catalogues and 12290 patterns translated into English (UK/cm). 12290
We work hard to bring you the best knitting and crochet have to offer, inspiration and advice as well as great quality yarns at incredible prices! Would you like to use our patterns for other than personal use? You can read what you are allowed to do in the Copyright text at the bottom of all our patterns. Happy crafting!
Post a comment to pattern DROPS 236-13
We would love to hear what you have to say about this pattern!
If you want to leave a question, please make sure you select the correct category in the form below, to speed up the answering process. Required fields are marked *.