
Popular categories
Looking for a yarn?


Comments / Questions (126)
![]() Ewa wrote:
Ewa wrote:
Hello, I was wondering if the bands in the pattern are the same as on the picture of the cardigan? Following the explanation in the pattern (and the video) 2 garter stitches are towards the edge of the band and one garter stitch is connecting the band with the body of the cardigan. On the picture it looks like it's the other way around.
11.06.2021 - 21:52DROPS Design answered:
Dear Ewa, you're reading it the other way around. The 2 stitches connect with the body. The first round is on the wrong side, so the second row begins from the edge towards the center of the front piece.
07.08.2021 - 11:22
![]() Iris wrote:
Iris wrote:
Hallo! Ich hänge gerade bei den Raglan-Zunahmen: Ihr schreibt, alle 6 Reihen (Größe L) wird jeweils zugenommen und erwähnt auch, daß das 3 rechten Patentmaschen entspricht. Mein Maschenbild sieht aber anders aus als auf dem Foto. Auf dem Foto sieht es so aus, als ob alle 12 Reihen = 6 Patentmaschen zugenommen wird. Wie ist es nun richtig? Danke!
11.05.2021 - 21:08DROPS Design answered:
Liebe Iris, in L (= 4. Größe) nehmen Sie für den Raglan in jeder 8. Reihe, dh in jeder 4. Reihe mit sichtbaren Patentmaschen in der Höhe, so bekommen Sie die richtigen Maßen wie bei der Skizze. Viel Spaß beim stricken!
12.05.2021 - 07:50
![]() Sanna wrote:
Sanna wrote:
Miksei suomenkielisessä ohjeessa ole mallineuleen tai mittojen kuvia?
17.04.2021 - 22:34DROPS Design answered:
Nyt piirrokset löytyvät.
05.05.2021 - 17:13
![]() JoeJ5 wrote:
JoeJ5 wrote:
Bonjour. Il me semble qu'il y a une erreur dans l'espacement des boutons. Taille S, le corps mesure 30 cm + 4 en côtes et le premier bouton est environ à 4 cm au dessus donc il semble que 5 boutons espacés de 9 cm chacun sont à prévoir. Merci
13.04.2021 - 18:59
![]() Astrid Jensen wrote:
Astrid Jensen wrote:
Hi Drops Design, I´m having trouble with the raglan and v neck increases. do you start the raglan and v neck increases at the beginning of the yoke formation or only after 6 rows of working A.1/A.2.? Kind regards
03.04.2021 - 19:12DROPS Design answered:
Sear Astrid, you start increasing for the raglan after you have knitted 6 rows of A.1/A.2 . Happy Knitting!
03.04.2021 - 19:41
![]() Nancy wrote:
Nancy wrote:
Ich haette gerne gewusst, wie man über die Raglan zunahmen strickt, bzw. wie man sie einarbeitet. Ich habe mir die Anleitung mehrmals durchgelesen und videos gegoogelt, komme aber nicht weiter.
25.02.2021 - 17:16DROPS Design answered:
Liebe Nancy, die Raglanzunahmen werden wie unter RAGLANZUNAHMEN gestrickt, dh die rechte Masche vor der linken Masche mit der Markierung 3 Mal stricken (Umschlag + Masche rechts zusammenstricken, 1 Umschlag + noch einmal der Umschlag + die rechte Masche stricken = es sind jetzt 3 Maschen auf der Nadel), die linke Masche mit der Markierung stricken, und in die nächste Masche noch mal 3 Maschen stricken. Bei der nächsten Reihe stricken Sie die neuen Masche im Patent wie die anderen. Viel Spaß beim stricken!
26.02.2021 - 08:55
![]() Heloise wrote:
Heloise wrote:
Bonjour, J’aimerai utiliser la Brushed Alpaga Silk, donc un fil de catégorie C non doublé. Quelle est l’équivalence avec les 2 fils de catégorie A mentionné dans le patron en terme de grammage? Merci beaucoup pour vôtre réponse !
17.02.2021 - 08:47DROPS Design answered:
Bonjour Heloïse, cette leçon explique comment calculer le métrage nécessaire quand on choisit une alternative - "2 fils de métrage différents par 1 fil" dans votre cas, pour utiliser DROPS Brushed Alpaca Silk au lieu de DROPS Alpaca + DROPS Kid-Silk. Bon tricot!
17.02.2021 - 14:12
![]() France wrote:
France wrote:
Bonjour, c'est la première fois que je tricote un modèle de Garnstudio et aussi un pull top-down. J'ai déjà une question concernant le début du tricot. Quand vous écrivez : "Tricoter les 7 mailles de bordure devant comme avant, * faire 1 jeté, glisser 1 maille à l'envers, 1 maille endroit*, répéter de *-* " Est-ce que la maille endroit doit être tricotée ou simplement jetée ? Avec mes remerciements
09.02.2021 - 17:53DROPS Design answered:
Bonjour France, la maille endroit doit etre tricotee. Bon tricot!
09.02.2021 - 18:06
![]() Aurelie Labrecque wrote:
Aurelie Labrecque wrote:
Bonjour, lorsque vous dites "glisser les 45-49-55-59-67-69 mailles suivantes en attente sur 1 fil pour la manche", est-ce qu'il faut mettre les mailles sur une autre aiguille?
26.01.2021 - 03:30DROPS Design answered:
Bonjour Aurelie, oui, sur une autre aiguille ou sur un fil. Bon tricot!
26.01.2021 - 08:54
![]() Nina wrote:
Nina wrote:
Hallo liebes Garnstudio-Team, Meine 13-jährige Tochter will unbedingt diese Jacke haben. Ich will diese Jacke in Alaska mit 8mm Nadeln stricken. Nur tue ich mich schwer mit dem Umrechnen der Anleitung. Sie hat Größe XS. Könnt ihr mir da eventuell weiterhelfen? Liebe Grüße Nina
23.01.2021 - 21:01DROPS Design answered:
Liebe Nina, diese Jacke wird mit 2 Fäden Garngruppe A (= Alpaca + Kid-Silk), Sie können dann mit nur 1 Faden Garngruppe C (= wie Alaska z.B.) stricken, dh hier mit Nadel 4 und 5 oder die benötige Nadelgrösse um die Maschenprobe zu bekommen. Hier lesen Sie mehr über Garnalternativen. Viel Spaß beim stricken!
25.01.2021 - 09:05
|
||||||||||
Lavender Breeze#lavenderbreezecardigan |
||||||||||
 |
 |
|||||||||
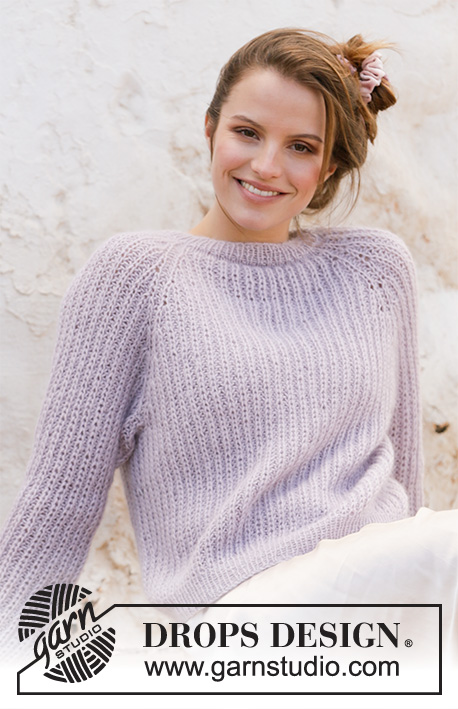
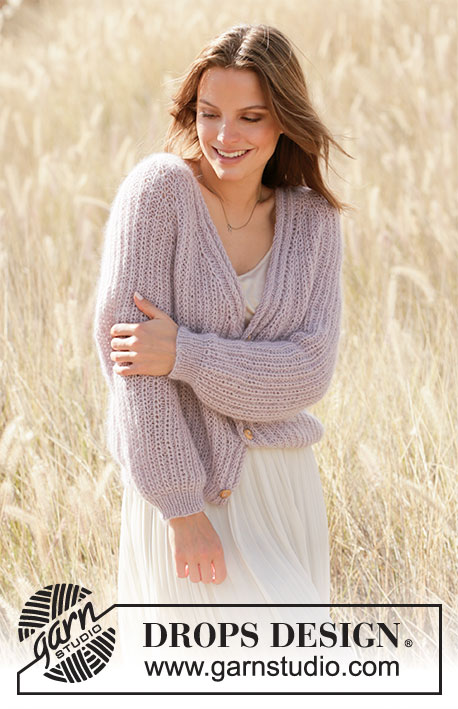
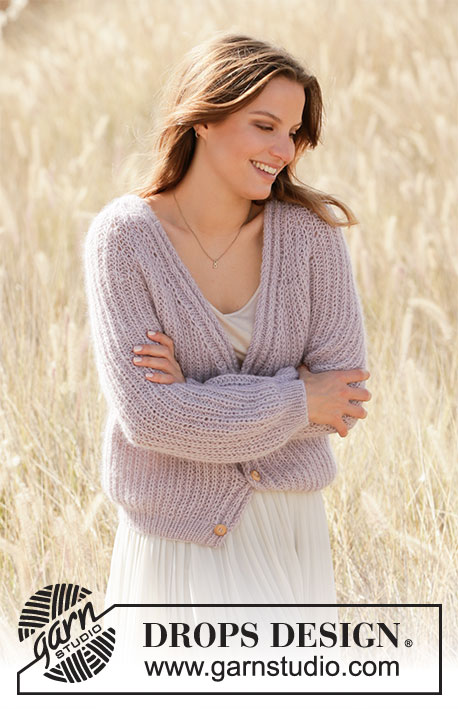
Knitted jacket in DROPS Alpaca and DROPS Kid-Silk. The piece is worked top down with English rib, raglan and v-neck. Sizes XS - XXL.
DROPS 213-7 |
||||||||||
|
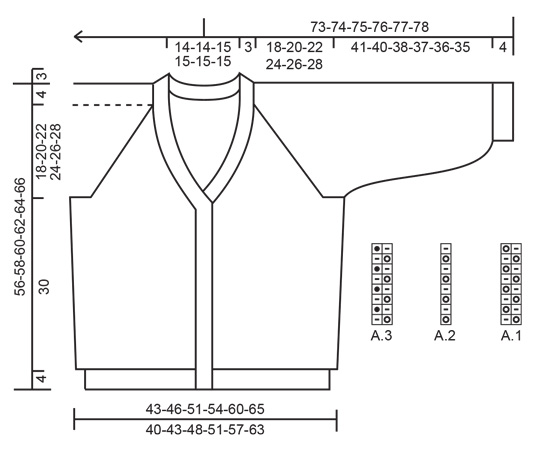
------------------------------------------------------- EXPLANATIONS FOR THE PATTERN: ------------------------------------------------------- ENGLISH RIB STITCH (on bands): From right side: Knit 1 under the next stitch. From wrong side: Purl the stitch. PATTERN: See diagrams A.1 and A.2. The diagrams show all rows in the pattern seen from the right side. INCREASE TO RAGLAN: Increase to raglan on each side of the purled stitch with marker (= raglan-stitch), i.e. increase in the knitted stitch and yarn over closest to the raglan-stitch. Increase 2 stitches on each side of all raglan-stitches (= 16 stitches increased on an increase-row). All increases are worked from the right side! Increase 2 stitches in the knitted stitch by working 3 stitches in the stitch and yarn over as follows: Knit together the stitch and yarn over but do not slip them onto the right needle, make 1 yarn over the right needle and knit together the stitch and yarn over 1 more time (= 2 stitches increased). Then work the new stitches in English rib (A.1/A.2) but be aware that on the first row after the increase the one increased stitch is knitted without a yarn over as there is no yarn over for this stitch. INCREASE TO V-NECK: Increase to v-neck in the knitted stitch and yarn over closest to the bands on each side towards mid front. All increases are worked from the right side! Increase 2 stitches in the knitted stitch and yarn over in the same way as described for increasing to raglan. DECREASE TIP (for sides of body and mid under the sleeves): Decrease in stitches closest to the purled stitches with markers mid under the sleeve and in the sides of the body. All decreases are worked on a row/round where the knitted stitches and yarn overs are knitted together! DECREASE 2 STITCHES TOWARDS THE LEFT AS FOLLOWS (i.e. start after the purled stitch with marker): Slip the first knitted stitch and yarn over onto the right needle as if to knit together, knit the next 2 stitches together (i.e. 1 purled + knitted stitch and yarn over), then pass the slipped stitch and yarn-over over the knitted together stitches (= 2 stitches decreased). DECREASE 2 STITCHES TOWARDS THE RIGHT AS FOLLOWS (i.e. start 3 stitches + 2 yarn overs before the purled stitch with marker): Slip the first knitted stitch and yarn over onto the right needle as if to knit together, purl 1, pass the slipped stitch and yarn-over over the purled stitch, slip the stitch back onto the left needle, pass the stitch and yarn-over over the stitch which was slipped back onto the left needle, and finally slip the remaining stitch onto the right needle (= 2 stitches decreased). BUTTONHOLES: Work buttonholes on the left band (when the garment is worn). Work from the right side at the beginning of the row as follows: Work the first 3 stitches as before, make 1 yarn over, knit 2 together and then continue as before. On the next row (wrong side), knit the yarn over to leave a hole. The first buttonhole is worked approx. 2 cm after the last increase for v-neck. Then work the next 3-3-4-4-4-4 buttonholes with approx. 9½-10-8½-9-8-8 cm between each one. NOTE: If the knitting tension is not correct in height this will affect the positioning of the buttonholes. Measure the piece when the v-neck is finished and adjust the position of the 4-4-5-5-5-5 buttonholes if necessary. CASTING-OFF TIP: To avoid the cast-off edge being tight you can cast off with a larger size needle. If the edge is still tight, make 1 yarn over after approx. each 4th stitch at the same time as casting off and the yarn overs are cast off as normal stitches. ------------------------------------------------------- START THE PIECE HERE: ------------------------------------------------------- JACKET – SHORT OVERVIEW OF THE PIECE: First you work 2 loose neck-edges (one for each front piece). These are placed on the circular needle and stitches are cast on for the neck as described in the text (the neck-edges are later sewn together mid-back and sewn to the neck-line at the back). The yoke is worked back and forth with circular needle from mid front, top down. AT THE SAME TIME you increase to v-neck and raglan. The sleeves are worked in the round with double pointed needles/short circular needle, top down. NOTE: All stitch counts given when working English rib are without the yarn overs; these are counted together with their respective stitches as 1 stitch. RIGHT NECK-EDGE (when the garment is worn): Cast on 7 stitches with needle size 4 mm and 1 strand Alpaca and 1 strand Kid-Silk (= 2 strands). Work as follows: ROW 1 (wrong side): Purl. ROW 2 (right side): Knit 1, 1 ENGLISH RIB STITCH – read description above, knit 2, 1 English rib stitch, knit 2. ROW 3 (wrong side): Knit 2, purl 1, knit 2, purl 1, knit 1. Repeat rows 2 and 3 until the neck-edge measures approx. 13-13-13-16-16-16 cm (adjust after a row from the wrong side). Cut the strand and lay the piece to one side. LEFT NECK-EDGE (when the garment is worn): Cast on 7 stitches with needle size 4 mm and 1 strand Alpaca and 1 strand Kid-Silk (= 2 strands). Work as follows: ROW 1 (wrong side): Purl. ROW 2 (right side): Knit 2, 1 English rib stitch, knit 2, 1 English rib stitch, knit 1. ROW 3 (wrong side): Knit 1, purl 1, knit 2, purl 1, knit 2. Repeat rows 2 and 3 until the neck-edge measures approx. 13-13-13-16-16-16 cm (adjust after a row from the right side). Place these 7 stitches on circular needle size 5 mm, do not cut the strand but cast on 51-53-59-59-59-59 new stitches on the needle (= sleeves and back piece) and then work the 7 stitches from the right neck-edge as before = 65-67-73-73-73-73 stitches on the needle. The outermost 7 stitches on each side are now called the band stitches. Insert 1 marker after the band at the beginning of the row. Then work the yoke as described below; the yoke is measured from the marker. YOKE: Change to circular needle size 5 mm and work the first row from the wrong side as follows: Work the 7 band stitches as before, * make 1 yarn over, slip 1 stitch as if to purl, knit 1 *, work from *-* until there are 8 stitches left on the row, 1 yarn over, slip 1 stitch as if to purl and finish with 7 band stitches as before. Now insert 4 markers in the piece as described below (without working the stitches); these markers are used when increasing to raglan. Count 8 stitches (= front piece), insert 1 marker in the next stitch (= raglan-stitch), count 11-11-13-13-13-11 stitches (= sleeve), insert 1 marker in the next stitch (= raglan-stitch), count 23-25-27-27-27-31 stitches (= back piece), insert 1 marker in the next stitch (= raglan-stitch), count 11-11-13-13-13-11 stitches (= sleeve), insert 1 marker in the next stitch (= raglan-stitch). There are 8 stitches left for the front piece after the last marker. The next row is worked as follows from the right side: Work the 7 band stitches as before, A.1 until there are 8 stitches left on the row (= 25-26-29-29-29-29 repeats of 2 stitches), A.2 (= 1 stitch) and finish with 7 band stitches as before. Continue this pattern back and forth. AT THE SAME TIME increase to RAGLAN and V-NECK as described below. REMEMBER THE KNITTING TENSION! RAGLAN: When you have worked 6-6-6-6-4-4 rows of A.1/A.2 (and the next row is to be worked from the right side), increase to RAGLAN – read description above (= 16 stitches increased on this increase-row). Increase like this every 8th-8th-8th-8th-6th-6th row (i.e. every 4th-4th-4th-4th-3rd-3rd row with visible English rib stitches in height) a total of 8-9-10-11-13-14 times. V-NECK: AT THE SAME TIME when you increase to raglan the 3rd-3rd-2nd-2nd-5th-5th time, increase to the V-NECK on each side as well – read description above. Increase to v-neck on every 8th-8th-8th-8th-6th-6th row a total of 5-5-6-6-6-7 times (when the increases to v-neck are finished there are 1-2-3-4-3-3 increases left to raglan). When all the increases to raglan and v-neck are finished there are 213-231-257-273-305-325 stitches on the needle. Continue A.1/A.2 back and forth with 7 band stitches on each side as before - remember BUTTONHOLES on left band - read explanation above. When the piece measures 18-20-22-24-26-28 cm from the marker in the neck (the piece measures approx. 22-24-26-28-30-32 cm from the shoulder), divide the yoke for body and sleeves as follows from the wrong side: Work 34-36-40-42-46-50 stitches as before (= front piece), place the next 45-49-55-59-67-69 stitches on 1 thread for the sleeve, cast on 5 new stitches on the needle (= in side under the sleeve), work 55-61-67-71-79-87 stitches as before (= back piece), place the next 45-49-55-59-67-69 stitches on 1 thread for the sleeve, cast on 5 new stitches on the needle (= in side under the sleeve) and work the remaining 34-36-40-42-46-50 stitches as before (= front piece). Body and sleeves are finished separately. THE PIECE IS NOW MEASURED FROM HERE! BODY: = 133-143-157-165-181-197 stitches. Insert 1 marker in the middle stitch of the 5 stitches cast on under each sleeve. Allow the markers to follow your work onwards; they will be used when decreasing in the sides. Continue back and forth with English rib and 7 band stitches on each side as before. DECREASE IN SIDES: When the piece measures 8 cm from the division, decrease on each front piece by decreasing 2 stitches in the English rib stitch closest to the purled stitch with the marker on each side – read DECREASE TIP; i.e. on the left front piece (when the garment is worn) decrease 2 stitches towards the right and on the right front piece decrease 2 stitches towards the left = 129-139-153-161-177-193 stitches. When the piece measures 18 cm from the division, decrease in the same way on the back piece (i.e. decrease 2 stitches towards the left at the beginning and 2 stitches towards the right at the end of the back piece) = 125-135-149-157-173-189 stitches. Continue working until the piece measures 30 cm from the division in all sizes (there is 4 cm left to finished length. You can try the garment on a work to the desired length). Change to circular needle size 4 mm and work rib back and forth (= knit 1 / purl 1) with 7 band stitches on each side as before – on the first row the yarn-overs are knitted together with the knitted stitches. When the rib measures 4 cm, loosely cast off with knit over knit and purl over purl – read CASTING-OFF TIP! The jacket measures approx. 56-58-60-62-64-66 cm from the shoulder down. SLEEVE: Place the 45-49-55-59-67-69 stitches from the thread on the one side of the piece on double pointed needles or short circular needle size 5 mm and knit up 1 stitch in each of the 5 stitches cast on under the sleeve = 50-54-60-64-72-74 stitches. Insert a marker thread in the middle stitch of the 5 stitches cast on under the sleeve. Allow the thread to follow your work onwards; it will be used when decreasing under the sleeve. Work A.3 in the round. AT THE SAME TIME on round 8 (i.e. on the 4th round of visible English rib stitches), decrease 4 stitches mid under the sleeve – read DECREASE TIP (decrease 2 stitches towards the left after the stitch with the marker and decrease 2 stitches towards the right before the stitch with the marker). Decrease like this every 8th-8th-8th-8th-6th-6th round (i.e. every 4th-4th-4th-4th-3rd-3rd round of visible English rib stitches) a total of 3-3-4-5-5-5 times = 38-42-44-44-52-54 stitches. Continue working until the sleeve measures 41-40-38-37-36-35 cm from the division (there is 4 cm left to finished length. You can try the garment on a work to the desired length). Change to double pointed needles size 4 mm. Work rib (= knit 1 / purl 1) – on the first round the yarn overs are knitted together with the knitted stitches. When the rib measures 4 cm, cast off with knit over knit and purl over purl – remember CASTING-OFF TIP! The sleeve measures approx. 45-44-42-41-40-39 cm from the division. Work the other sleeve in the same way. ASSEMBLY: Sew the neck-edge together mid back with the seam turning inwards. Stretch the neck-edge slightly and sew it to the neck-line at the back. Sew the buttons onto the left band. |
||||||||||
Diagram explanations |
||||||||||
|
||||||||||
 |
||||||||||
Have you finished this pattern?Tag your pictures with #dropspattern #lavenderbreezecardigan or submit them to the #dropsfan gallery. Do you need help with this pattern?You'll find 27 tutorial videos, a Comments/Questions area and more by visiting the pattern on garnstudio.com. © 1982-2026 DROPS Design A/S. We reserve all rights. This document, including all its sub-sections, has copyrights. Read more about what you can do with our patterns at the bottom of each pattern on our site. |
||||||||||


With over 40 years in knitting and crochet design, DROPS Design offers one of the most extensive collections of free patterns on the internet - translated to 17 languages. As of today we count 324 catalogues and 12290 patterns translated into English (UK/cm). 12290
We work hard to bring you the best knitting and crochet have to offer, inspiration and advice as well as great quality yarns at incredible prices! Would you like to use our patterns for other than personal use? You can read what you are allowed to do in the Copyright text at the bottom of all our patterns. Happy crafting!
Post a comment to pattern DROPS 213-7
We would love to hear what you have to say about this pattern!
If you want to leave a question, please make sure you select the correct category in the form below, to speed up the answering process. Required fields are marked *.