
Popular categories
Looking for a yarn?


Comments / Questions (92)
![]() Renate wrote:
Renate wrote:
Guten Tag Welche Methode eignet sich hier am besten zum Abketten (Rumof nach den Krausripoen) Viele Grüße
19.04.2026 - 19:09DROPS Design answered:
Liebe Renate, hier kann man einfach die Maschen rechts abketten - nicht zu eng und auch nicht zu locker; hier finden Sie andere Videos, wo man zeigt, wie man die Maschen abketten kann. Viel Spaß beim Stricken!
22.04.2026 - 08:33
![]() Renate wrote:
Renate wrote:
Guten Tag Warum muss der Faden nach den V Ausschnitt Zumahmen abgeschnitten werden?
03.04.2026 - 22:19DROPS Design answered:
Liebe Renate, wenn die Zunahmen für den V Ausschnitt fertig sind, wird man in der Runde stricken, die Runden werden dann in der hintere Mitte beginnen, so muss man den Faden abschneiden, die Maschen bis die Mitte vom Rückenteil abheben (ohne sie zu stricken) und dann ab hier Faden anbringen und in der Runde stricken. Viel Spaß beim Stricken!
08.04.2026 - 08:43
![]() Renate wrote:
Renate wrote:
Siege Mail der Kategorie Kommentar
25.03.2026 - 10:24
![]() Renate wrote:
Renate wrote:
Guten Tag Ich habe Fragen zu der Anleitung Raglanzunahmen: jeweils Inder Hin und Rückreihe ? (Anleitung in jeder 2, Reihe ) Oder heißt dies in jeder Hin Reihe? Werden die Zunahmen links verschränkt gestrickt um Löcher zu vermeiden? Danke für eine kurze Info Viele Grüße Renate
25.03.2026 - 10:23DROPS Design answered:
Liebe Renate, die Raglanzunahmen entstehen in jeder 2. Reihe = in jeder Hinreihe; die Zunahmen für Halsausschnitt beginnen bei der 3. Reihe (2. Hinreihe) dann wird man zuerst in jeder 4. Reihe (= in jeder 2. Hinreihe) dann in jeder 2. Reihe (= in jeder Hinreihe) zunehmen. Siehe am Anfang der Anleitung wie man die RAGLANZUNAHMEN: und für den V-AUSSCHNITT: zunimmt. Viel Spaß beim Stricken!
25.03.2026 - 16:00
![]() Yvonne wrote:
Yvonne wrote:
After much trial&error I knit the neck band in 1 piece: cast on 4 st with a provisional cast on, knit 6 cm, do short rows nr 1, knit the cm for the back of the neck (for me 2x6,5=13), do short rows nr 1 again, knit the last 6 cm. Now you can see the shaping of the shoulders in the neck band. Pick up the required stitches in the bumbs of the garter stitch band on the outer (wider) side. Rotate the work. Knit 4, purl across, knit 4. Set up complete!
06.03.2026 - 22:32
![]() Paola Vacchini wrote:
Paola Vacchini wrote:
Non riesco a capire il punto "ferri accorciati", c'è un tutorial o potreste spiegarmi meglio come si fa? Sono alle prime armi e questo mi sembrava un maglione semplice! Grazie.
15.02.2026 - 18:50DROPS Design answered:
Buonasera Paola, i ferri accorciati sono dei ferri in cui non si lavora su tutte le maglie del ferro ma solo sul numero indicato nelle spiegazioni. Deve seguire quanto riportato all'inizio delle spiegazioni. Buon lavoro!
26.04.2026 - 13:37
![]() Konny Sørensen wrote:
Konny Sørensen wrote:
Har noget garn baby merino. Og en anden kid silk. Kan det bruges til en v bluse.
11.02.2026 - 10:19DROPS Design answered:
Hej Konny, ja hvis det er DROPS BAbyMerino og DROPS Kid-Silk, så kan du strikke ifølge opskrifter fra garngruppe C med 17 eller 18 masker på 10 cm :)
11.02.2026 - 12:28
![]() Truus wrote:
Truus wrote:
Ik ben met deze trui begonnen. Na het meerderen voor de v-hals heb ik niet de gewenste lengte bereikt, terwijl ik wel de goede stekenverhouding heb. Ik heb heen en weer de toeren geteld, of moet ik alleen de toeren aan de voorzijde tellen.
18.01.2026 - 13:31
![]() Sylke wrote:
Sylke wrote:
Hallo, muss ich mehr Reihen (= 61R- Gr. L) für die Raglanzunahmen stricken als die Zunahmen für den V-Ausschnitt (= 41R). Stricke ich nach den Zunahmen des V-Ausschnitt in Runden weiter und nehme die restlichen (= 21R) Raglanmaschen dann zu oder stricke ich in Runden weiter, wenn ich alle Raglanzunahmen gestrickt habe?
09.01.2026 - 22:13DROPS Design answered:
Liebe Sylke, wenn die V-Ausschnitt fertig sind, stricken Sie weiter in der Runde, so werden die letzten Raglanzunahmmen in der Runde gestrickt. Viel Spaß beim Stricken!
12.01.2026 - 08:49
![]() Anne-Mona wrote:
Anne-Mona wrote:
Hei, Det står at man skal sette en merketråd midt bak når v-halsen er ferdig. Og så står det at man skal strikke glattstrikk til arbeidet måler 21 (str.M) cm fra dette merket og så dele til ermer og bol . Det må da bli for langt før man deler til ermer og bol?
14.11.2025 - 22:57DROPS Design answered:
Hei Anne-Mona. Det er en merketråd som settes midt bak når v-haslen er ferdig, men merket du skal måles fra er satt mye tidligere. Se siste linje under halskant (HERFRA MÅLES ARBEIDET VIDERE!). mvh DROPS Design
17.11.2025 - 14:56
|
||||||||||
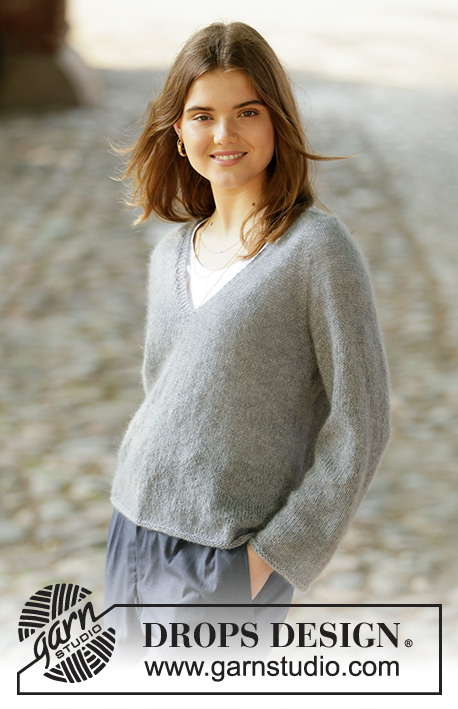
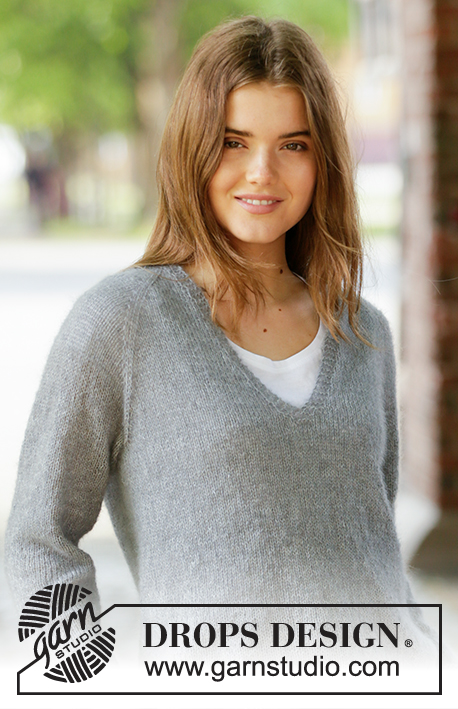
Simply Confident#simplyconfidentsweater |
||||||||||
 |
 |
|||||||||
Knitted jumper with raglan and v-neck in DROPS Lace and DROPS Kid-Silk or DROPS Sky. The piece is worked top down. Sizes S - XXXL.
DROPS 205-14 |
||||||||||
|
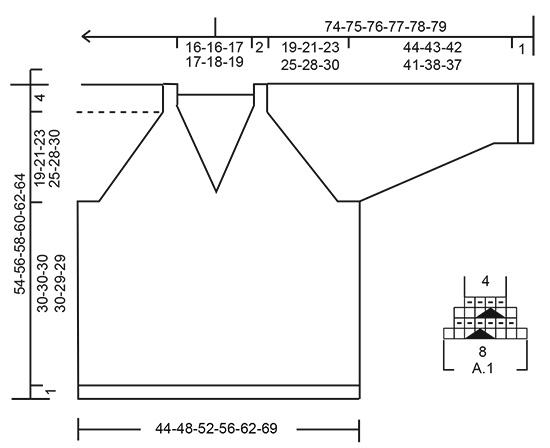
------------------------------------------------------- EXPLANATIONS FOR THE PATTERN: ------------------------------------------------------- RIDGE/GARTER STITCH (worked in the round): 1 ridge in height = 2 rounds; Knit 1 round and purl 1 round. RIDGE/GARTER STITCH (worked back and forth): Knit all rows. 1 ridge in height = Knit 2 rows. PATTERN: See diagram A.1. The diagram shows all rows in the pattern seen from the right side. SHORT ROWS-1 (for right neck-edge): Start from the right side and work as follows: * 1 ridge back and forth over the first 3 stitches, 1 ridge back and forth over all 4 stitches *, work from *-* a total of 3 times. SHORT ROWS-2 (for left neck-edge): Start from the wrong side and work as follows: * 1 ridge back and forth over the first 3 stitches, 1 ridge back and forth over all 4 stitches *, work from *-* a total of 3 times, then knit 1 row from the wrong side over all 4 stitches. RAGLAN: All increases are worked from the right side! Increase to raglan on each side of the marker thread as follows: Work until there is 1 stitch left before marker thread, 1 yarn over, knit 1 (marker thread sits here), knit 1, 1 yarn over (= 2 stitches increased). Increase like this at all the other marker threads (8 stitches increased on the round). On the next row/round work the yarn overs twisted to avoid holes. Then work the new stitches in stocking stitch. V-NECK: All increases are worked from the right side! Increase 1 stitch inside the 4 stitches in garter stitch on each side of the piece by making 1 yarn over. On the next row purl the yarn overs twisted to avoid holes. Then work the new stitches in stocking stitch. DECREASE TIP (for sleeves): Decrease 1 stitch on each side of the marker thread as follows: Work until there are 3 stitches left before the marker thread, knit 2 together, knit 2 (marker thread sits between these 2 stitches), slip 1 stitch as if to knit, knit 1 and pass the slipped stitch over the knitted stitch. ------------------------------------------------------- START THE PIECE HERE: ------------------------------------------------------- JUMPER – SHORT OVERVIEW OF THE PIECE: You first work 2 loose neck-edges. These are then placed on the circular needle and stitches are cast on for the neck as described in the text (the neck-edges are sewn together mid back and sewn onto the neck later). Then the yoke is worked back and forth from mid front and top down. AT THE SAME TIME, you increase stitches for v-neck and raglan. When the increases to v-neck are finished the piece is continued in the round. The sleeves are worked in the round with double pointed needles/short circular needle, top down. NECK-EDGES: Cast on 4 stitches with needle size 3.5 mm and Lace + Kid-Silk (= 2 strands) or 1 strand Sky and work GARTER STITCH back and forth – read description above (row 1 = right side). When the neck edge measures 6-6-6½-6½-7-7½ cm, work SHORT ROWS-1 – read description above. When the short rows are finished, work garter stitch back and forth over all 4 stitches for 6 cm in all sizes; finish with a row from the wrong side (right neck-edge now measures 14-14-14½-14½-15-15½ cm in length on the inside where it is shortest). Cut the strand and lay the piece to one side. Work left neck-edge in the same way, but when it measures 6-6-6½-6½-7-7½ cm, work SHORT ROWS-2 – read description above. When the short rows are finished, work garter stitch back and forth over all 4 stitches for 6 cm in all sizes; finish with a row from the right side (left neck-edge now measures 14-14-14½-14½-15-15½ cm in length on the inside where it is shortest). Place the stitches on circular needle size 4 mm (do not cut the strand) and cast on 66-66-68-68-70-72 stitches with the same circular needle (straight after the left neck edge) then knit the 4 stitches from the right neck edge = 74-74-76-76-78-80 stitches on the needle. Work the next row from the wrong side as follows: 4 stitches in garter stitch, work 2 stitches in the next stitch (= 1 stitch increased), purl until there are 5 stitches left on row, work 2 stitches in the next stitch (= 1 stitch increased) and work 4 stitches in garter stitch = 76-76-78-78-80-82 stitches. Insert a marker in the middle of the 4 neck-edge stitches on one side. THE PIECE IS NOW MEASURED FROM HERE! Now work the yoke as described below. YOKE: Insert 1 marker thread in each transition between body and sleeves (= 4 marker threads) as follows: Insert 1 marker thread 5 stitches in from each side, i.e., after 4 stitches in garter stitch + 1 knitted stitch (= transition between front pieces and sleeves), insert the next 2 marker threads after 16 new stitches on each side (= transition between sleeves and back piece). There are 34-34-36-36-38-40 stitches between the last 2 marker threads (= back piece). Work stocking stitch with 4 stitches in garter stitch on each side towards the v-neck mid front. AT THE SAME TIME increase to raglan and v-neck as follows: REMEMBER THE KNITTING TENSION! RAGLAN: On the first row from the right side start to increase to RAGLAN – read description above. Increase to raglan every 2nd row a total of 24-28-31-34-36-38 times. V-NECK: On row 3 start to increase to V-NECK – read description above. Increase like this every 4th row 4-5-6-7-8-8 times, then every 2nd row 10-9-9-8-8-9 times (= a total of 14-14-15-15-16-17 stitches increased for the v-neck on each side). When all increases to v-neck are finished, cut the yarn. Insert a marker on mid back. This is now the beginning of the round. Continue working in the round from right side; over the 8 stitches in garter stitch work pattern A.1. When A.1 has been completed in height 4 stitches have been decreased in the diagram. When all the increases to raglan (+ the 4 decreases in A.1) are finished there are 292-324-352-376-396-416 stitches on the round. Now continue with stocking stitch until the piece measures 19-21-23-25-28-30 cm from the marker. Finish the round mid back. The next round is worked as follows: NOTE: The piece is divided for body and sleeves and 1-1-1-2-4-6 stitches from each side of each sleeve are worked into the body; the transitions between body and sleeves are no longer at the marker threads: Work the first 42-46-50-54-59-64 stitches (= half back piece), place the next 62-70-76-80-80-80 stitches on a thread for sleeve and cast on 8-8-10-10-12-16 new stitches on the needle (= in side under sleeve), work the next 84-92-100-108-118-128 stitches (= front piece), place the next 62-70-76-80-80-80 stitches on a thread for sleeve and cast on 8-8-10-10-12-16 new stitches on the needle (= in side under sleeve), work the remaining 42-46-50-54-59-64 stitches (= half back piece). Body and sleeves are finished separately. THE PIECE IS NOW MEASURED FROM HERE! BODY: = 184-200-220-236-260-288 stitches. Work stocking stitch in the round with circular needle size 4 mm. When the piece measures 30-30-30-30-29-29 cm change to circular needle size 3.5 mm. Work 2 ridges. Cast off. The jumper measures approx. 54-56-58-60-62-64 cm from the shoulder down. SLEEVE: Place the 62-70-76-80-80-80 stitches from the thread on the one side of the piece on short circular needle/double pointed needles size 4 mm and knit up 1 stitch in each of the 8-8-10-10-12-16 stitches cast on under the sleeve = 70-78-86-90-92-96 stitches. Insert a marker thread in the middle of the new stitches (= 4-4-5-5-6-8 new stitches on each side). Work stocking stitch in the round. When the sleeve measures 4 cm decrease 2 stitches under the sleeve – read DECREASE TIP. Decrease like this every 3½-2½-2-2-1½-1½ cm a total of 10-13-16-17-17-18 times = 50-52-54-56-58-60 stitches. When the sleeve measures 44-43-42-41-38-37 cm change to double pointed needles size 3.5 mm and work 2 ridges. Cast off. The sleeve measures approx. 45-44-43-42-39-38 cm. Work the other sleeve in the same way. ASSEMBLY: Sew the neck-edges together mid back with the seam on wrong side. Stretch the neck-edge slightly and sew to the neck at the back. |
||||||||||
Diagram explanations |
||||||||||
|
||||||||||
 |
||||||||||
Have you finished this pattern?Tag your pictures with #dropspattern #simplyconfidentsweater or submit them to the #dropsfan gallery. Do you need help with this pattern?You'll find 27 tutorial videos, a Comments/Questions area and more by visiting the pattern on garnstudio.com. © 1982-2026 DROPS Design A/S. We reserve all rights. This document, including all its sub-sections, has copyrights. Read more about what you can do with our patterns at the bottom of each pattern on our site. |
||||||||||


With over 40 years in knitting and crochet design, DROPS Design offers one of the most extensive collections of free patterns on the internet - translated to 17 languages. As of today we count 324 catalogues and 12290 patterns translated into English (UK/cm). 12290
We work hard to bring you the best knitting and crochet have to offer, inspiration and advice as well as great quality yarns at incredible prices! Would you like to use our patterns for other than personal use? You can read what you are allowed to do in the Copyright text at the bottom of all our patterns. Happy crafting!
Post a comment to pattern DROPS 205-14
We would love to hear what you have to say about this pattern!
If you want to leave a question, please make sure you select the correct category in the form below, to speed up the answering process. Required fields are marked *.