
Popular categories
Looking for a yarn?


Comments / Questions (35)
![]() Sandra wrote:
Sandra wrote:
Bonjour, Je suis en train de tricoter le bonnet. J'ai terminé A8, et au milieu on nous demande de faire une maille envers. Je continue avec A3, et je remarque maintenant que la maille envers se situe au tout début. Si je compare les photos des bonnets terminés, et le bonnet sur la photo officiel, les motifs ne sont pas placés au même endroit. Je pense que c'est dû au décalage de cette maille envers entre A8 et A3. Est ce que c'est possible ? Merci, bonne soirée !
12.02.2022 - 21:22DROPS Design answered:
Bonjour Sandra, désolée pour la réponse tardive, une correction a été faite pour les diagrammes du bonnet, merci pour votre retour. Bon tricot!
19.04.2022 - 07:14
![]() Benedetta wrote:
Benedetta wrote:
Buongiorno, Nel primo ferro in cui si intrecciano le maglie per eseguire gli scalfi, si intreccia il primo scalfo a metà. Poi si lavora tutto il davanti, l'altro scalfo per intero e il dietro, fino a giungere alla fine del ferro. La seconda metà del primo scalfo va intrecciata a rovescio nel ferro successivo quando lavoro separatamente davanti e dietro? Grazie
04.02.2022 - 13:28DROPS Design answered:
Buonasera Benedetta, può procedere in questo modo. Buon lavoro!
05.02.2022 - 20:55
![]() Stefania wrote:
Stefania wrote:
Salve sto lavorando il berretto e sono bloccata al penultimo giro del diagr. A3 dove c\'è la freccia Vorrei sapere se dopo aver passato sul f.dx le prime 2 maglie senza lavorarle , lavorato fino alla decima devo fare il gettato e ricominciare la ripetizione oppure proseguire sul motivo che sta fuori le 10 maglie ? e poi ricominciare il motivo. Grazie e spero di essere stata comprensibile
07.08.2021 - 17:39DROPS Design answered:
Buonasera Stefania, deve continuare con la ripetizione del motivo. Buon lavoro!
09.08.2021 - 21:30
![]() Hanna Mourino wrote:
Hanna Mourino wrote:
Hej! Kan det verkligen stämma 😯 att mössan endast kräver 50 gram garn?!!
10.02.2021 - 07:52DROPS Design answered:
Hej Hanna. Det ska vara tillräckligt. Jag ser att andra mössor i samma garn har samma garnåtgång, och vi har inte heller fått kommentarer om att det inte räcker från andra som gjort den. Mvh DROPS Design
11.02.2021 - 09:47
![]() Nel wrote:
Nel wrote:
Hallo, Ik vind dit een geweldig patroon. Maar ik heb er zo'n hekel aan om rond te breien. Ik doe liever op en neer omdat met rondbreien mijn werk vaak scheef wordt. Kan ik dit patroon door de helft delen en dan kantsteken toevoegen,of kom ik dan met de telpatronen in de knoei? Met vriendelijke groet, Nelleke
24.11.2020 - 14:15DROPS Design answered:
Dag Nel,
Dan kom je waarschijnlijk niet uit met het telpatroon, want dit loopt door in de zijnaad. Voor het aanpassen van patronen om ze met rechte naalden te kunnen breien, hebben we een instructie geschreven Deze kun je hier vinden. Kijk maar even of je hier wat aan hebt en in hoeverre je het ajourpatroon aan wilt passen, zodat je hem met rechte naalden kunt breien.
30.11.2020 - 20:53
![]() Agnes wrote:
Agnes wrote:
Bij het armsgat...kant je dan de tricot steken af en als die op zijn de patroonsteken, of kant je af en brei je daarna telkens dezelfde hoeveelheid (15) tricotsteken, waarna je verder gaat in patroon? Groet, Agnes
11.10.2020 - 22:35DROPS Design answered:
Dag Agnes,
Bij het armsgat kant je de aangegeven hoeveelheid steken af en je breit verder in patroon, je hoeft geen extra tricotsteken o.i.d. te breien, probeer gewoon het patroon zo ver mogelijk door te breien. Het patroon wordt dus afgebroken waar de mouw komt.
18.11.2020 - 22:38
![]() Conny wrote:
Conny wrote:
Leider lässt sich die Anleitung nicht kompett ausdrucken. Ich erhalte nur die 2 erste Seiten? LG Conny
18.12.2019 - 10:34DROPS Design answered:
Liebe Conny, wir könnten die komplette Anleitung als Test drucken, prüfen Sie mal die Druckereinstellungen, alle Seiten sollten ausgedruckt werden. Viel Spaß beim stricken!
18.12.2019 - 12:14
![]() Agnes wrote:
Agnes wrote:
I diagrammen över mönstret måste det vara fel, jag har jämfört med andra språk. Symbolen "-" är beskriven som avig maska på avig sida, men det borde bara avig maska på rät sida.
29.08.2019 - 16:02DROPS Design answered:
Hej. Tack för info, det hade blivit fel i den svenska översättningen. Detta är nu rättat. Mvh DROPS Design
30.08.2019 - 10:35
![]() Elaine Hébert wrote:
Elaine Hébert wrote:
J’ai terminé le col et je l’ai rabattu souplement. Tout est beau sauf au niveau du dos ou j’ai rabattu les mailles centrales du dos. Le col roule vers l’extérieur du chandail. Est-ce que j’aurais du les mettre en attente comme pour le devant ou j’ai trop relevé de mailles à ce niveau ? Merci de m’aider
20.08.2019 - 16:47DROPS Design answered:
Bonjour Mme Hébert, la première idée qui me vient est que vous avez peut-être rabattu ces mailles là trop souplement, mais il vaudrait mieux montrer votre ouvrage, même en photo, à votre magasin DROPS, il pourra plus facilement vous conseiller. Bon tricot!
21.08.2019 - 08:11
![]() Elaine Hébert wrote:
Elaine Hébert wrote:
Comment mesurer le tour de tête pour pouvoir choisir la bonne grandeur du bonnet ?
18.05.2019 - 15:08DROPS Design answered:
Bonjour Mme Hébert, mesurez le tour de tête au niveau du front (en gardant le mètre ruban bien droit). Le bonnet sera légèrement plus court en circonférence pour bien s'adapter à la tête et à la taille indiquée. Bon tricot!
20.05.2019 - 10:21
|
|||||||||||||||||||
Lady Angelika#ladyangelikasweater |
|||||||||||||||||||
 |
 |
||||||||||||||||||
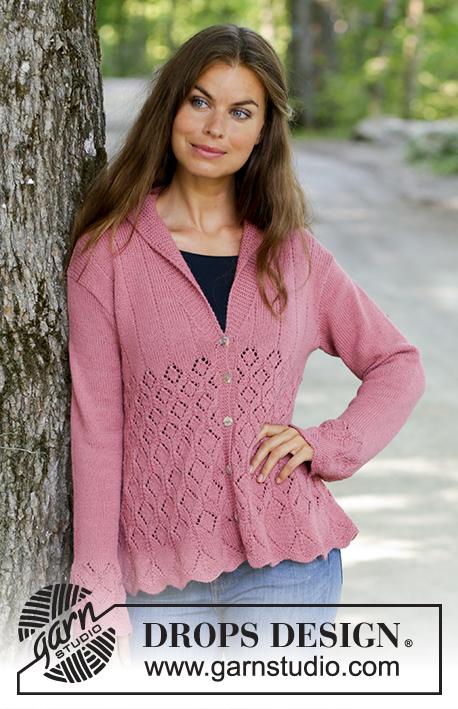
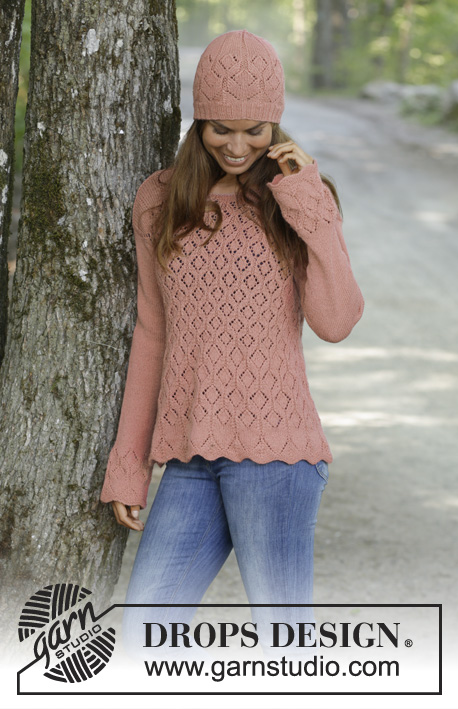
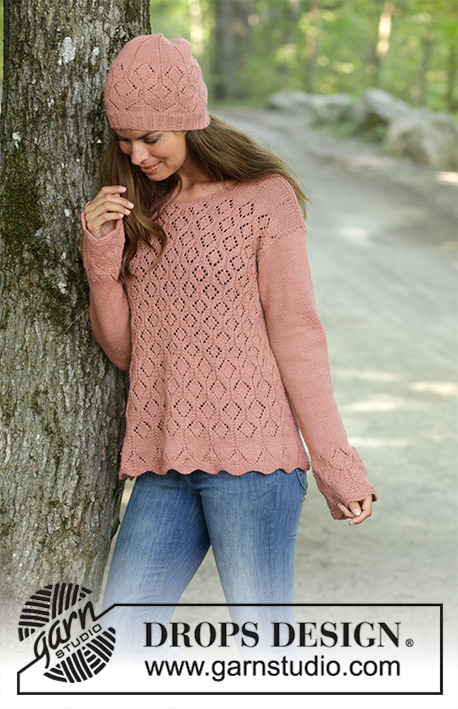
Knitted jumper with lace pattern in DROPS Flora. Sizes S - XXXL. Knitted hat with lace pattern in DROPS Flora.
DROPS 197-24 |
|||||||||||||||||||
|
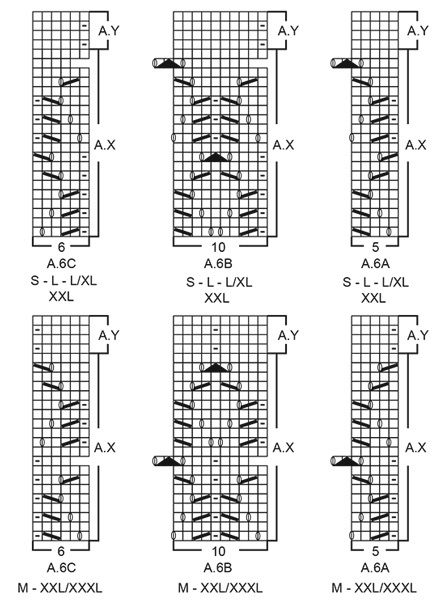
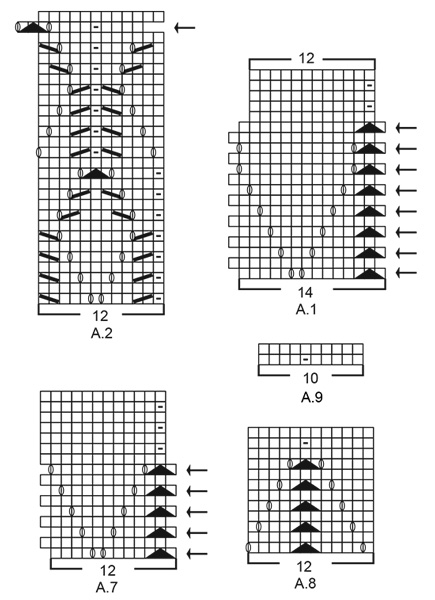
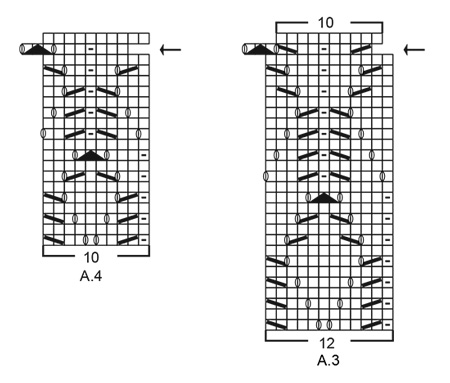
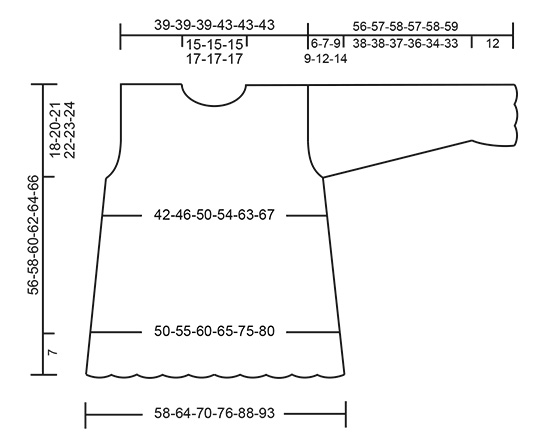
EXPLANATIONS FOR THE PATTERN: ------------------------------------------------------- RIDGE/GARTER STITCH (worked in the round): 1 ridge = 2 rounds. Knit 1 round and purl 1 round. PATTERN: Jumper: See diagrams A.1 to A.7. Choose diagram for your size (applies to A.5 and A.6). Hat: See diagrams A.3, A.8 and A.9. The diagrams show all the rows in the pattern seen from the right side. INCREASE TIP (for mid under sleeve): Start 1 stitch before the stitch with the marker thread, make 1 yarn over, knit 3 (the marker thread sits in the middle stitch of these 3 stitches), make 1 yarn over (= 2 stitches increased). On the next round knit the yarn overs twisted to avoid holes. DECREASE TIP-1 (evenly spaced): To work out how to decrease evenly, count the total number of stitches on the needle (e.g. 124 stitches) and divide by the number of decreases to be made (e.g. 16) = 7.75. In this example, decrease by knitting each 7th and 8th stitch together (approx.). DECREASE TIP-2 (for top of hat): Decrease as follows before the garter stitch: Start 2 stitches before the stitch with the marker thread, knit 2 together (= 1 stitch decreased). Decrease as follows after the garter stitch: Slip 1 stitch as if to knit, knit 1 and pass the slipped stitch over the knitted stitch (= 1 stitch decreased). ---------------------------------------------------------- START THE PIECE HERE: ------------------------------------------------------- JUMPER – SHORT OVERVIEW OF THE PIECE: The piece is worked in the round with circular needle, bottom up as far as the armholes. Then the front and back pieces are worked separately, back and forth with circular needle. The sleeves are worked in the round with double pointed needles/short circular needle, bottom up. BODY: Cast on 280-308-336-364-420-448 slightly loose stitches with circular needle size 3.5 mm and Flora. Work 3 RIDGES in the round – read description above. Work 2 rounds of stocking stitch. Then work A.1 in the round (= 20-22-24-26-30-32 repeats of 14 stitches). When A.1 has been completed there are 240-264-288-312-360-384 stitches on the needle and the piece measures approx. 7 cm from the cast-on edge at the longest point. REMEMBER THE KNITTING TENSION! Then work A.2 (= 20-22-24-26-30-32 repeats of 12 stitches). When A.2 has been completed, work A.3 (= 20-22-24-26-30-32 repeats of 12 stitches). When A.3 has been completed there are 200-220-240-260-300-320 stitches on the needle. Then work A.4 (= 20-22-24-26-30-32 repeats of 10 stitches). When A.4 has been worked a total of 3 times in height, insert 2 marker threads in the piece as follows (without working the stitches): The first marker thread is inserted in the first stitch on the round, then count 99-109-119-129-149-159 stitches and insert 1 marker thread in the next stitch. There are 99-109-119-129-149-159 stitches left on the round after the second marker thread. The threads mark the sides of the body. READ THE REST OF BODY BEFORE CONTINUING! PATTERN: The next round is worked as follows: Work 5-10-15-15-25-30 stitches in stocking stitch (marker thread in first of these stitches), work A.5A (= 5 stitches), A.5B over the next 80-80-80-90-90-90 stitches (= 8-8-8-9-9-9 repeats of 10 stitches), A.5C (= 6 stitches), work 9-19-29-29-49-59 stitches in stocking stitch (marker thread in the middle stitch of these stitches), work A.5A (= 5 stitches), A.5B over the next 80-80-80-90-90-90 stitches (= 8-8-8-9-9-9 repeats of 10 stitches), A.5C (= 6 stitches) and finish with 4-9-14-14-24-29 stitches in stocking stitch. Continue this pattern, but when A.5 has been worked 1-1-1-2-2-2 times in height work A.6 over A.5 in the same way. When A.X in A.6 has been worked 1 time in height work A.Y to finished length. ARMHOLE: AT THE SAME TIME when the piece measures 38-38-39-40-41-42 cm cast off for armholes in each side as described below. The marker threads have been inserted in the piece and you should have started A.5 as described above, but adjust so that the next round is an odd round in the diagrams, i.e. a round of lace pattern. This is important so that the rows of pattern are worked from the right side when you start working back and forth. The cast-off round is worked as follows: Cast off 3-3-4-4-6-8 stitches for armhole, work the next 95-105-113-123-139-145 stitches as before, cast off 5-5-7-7-11-15 stitches for armhole, work the next 95-105-113-123-139-145 stitches as before and cast off the remaining 2-2-3-3-5-7 stitches for armhole. Front and back pieces are finished separately. FRONT PIECE: = 95-105-113-123-139-145 stitches. Continue the pattern back and forth as before (the first row is from the wrong side and each row from the wrong side is purled). AT THE SAME TIME cast off for armholes at the beginning of each row in each side as follows: Cast off 3 stitches 0-0-0-0-2-3 times, 2 stitches 0-2-3-3-4-4 times and then 1 stitch 1-2-4-4-4-4 times in each side = 93-93-93-103-103-103 stitches left. Continue the pattern as before with 1 edge stitch in each side (knit edge stitch from right and wrong side). When the piece measures approx. 48-50-52-53-55-57 cm (A.X in A.6 should now be finished and A.Y should have started) place the middle 19-19-19-23-23-23 stitches on 1 thread for neck and each shoulder is finished separately. Continue casting off for neck at the beginning of each row from the neck as follows: Cast off 2 stitches 3 times and 1 stitch 3 times = 28-28-28-31-31-31 stitches left on shoulder. Continue working until there is 1 row left before the piece measures 56-58-60-62-64-66 cm. Knit 1 row from the wrong side. Loosely cast off with knit from the right side. Work the other shoulder in the same way. BACK PIECE: = 95-105-113-123-139-145 stitches. Continue the pattern back and forth as before (the first row is from the wrong side and each row from the wrong side is purled). AT THE SAME TIME cast off for armholes at the beginning of each row in each side as follows: Cast off 3 stitches 0-0-0-0-2-3 times, 2 stitches 0-2-3-3-4-4 times and then 1 stitch 1-2-4-4-4-4 times in each side = 93-93-93-103-103-103 stitches left. Continue the pattern as before with 1 edge stitch in each side (knit edge stitch from right and wrong side). Remember that when A.X in A.6 has been worked 1 time in height, you continue with A.Y to finished length. AT THE SAME TIME when the piece measures 54-56-58-60-62-64 cm cast off the middle 33-33-33-37-37-37 stitches for neck and each shoulder is finished separately. Then cast off 2 stitches on the next row from the neck = 28-28-28-31-31-31 stitches left on shoulder. Continue working until there is 1 row left before the piece measures 56-58-60-62-64-66 cm. Knit 1 row from the wrong side. Loosely cast off with knit from the right side. Work the other shoulder in the same way. SLEEVE: Cast on 60-60-60-72-72-72 slightly loose stitches with double pointed needles size 3.5 mm and Flora. Work 3 ridges in the round. Work 2 rounds of stocking stitch. Then work A.7 in the round (= 5-5-5-6-6-6 repeats of 12 stitches). When A.7 has been completed work A.3 in the round (= 5-5-5-6-6-6 repeats of 12 stitches). Continue this pattern, but when there are 6 rounds left in A.3 work stocking stitch over the one purled stitch in the pattern until A.3 is finished. When A.3 has been completed, there are 50-50-50-60-60-60 stitches on the needles. Insert 1 marker thread in the first stitch on the round and allow it to follow your work onwards. The marker thread will be used when you increase mid under sleeve. Work stocking stitch in the round. When the piece measures 14-14-13-13-13-13 cm increase 2 stitches mid under sleeve – read INCREASE TIP. Increase like this a total of 11-17-19-17-21-23 times in Size S: Every 10th round, in M and L/XL: Every 6th round, in L: Alternately every 5th and 6th round, in XXL: Alternately every 4th and 5th round and in XXL/XXXL: Every 4th round = 72-84-88-94-102-106 stitches. Continue until the sleeve measures 50-50-49-48-46-45 cm (shorter measurements in the larger sizes due to wider shoulders and longer sleeve cap). The next round is worked as follows: Cast off 3-3-4-4-6-8 stitches, work 67-79-81-87-91-91 stitches in stocking stitch and cast off the remaining 2-2-3-3-5-7 stitches. Cut the strand. Then finish the sleeve cap back and forth with circular needle size 3.5 mm as follows: Work stocking stitch and cast off at the beginning of each row in each side as follows: Cast off 3 stitches 1 time in all sizes, 2 stitches 2-2-3-3-4-4 times and 1 stitch 1-2-4-4-7-10 times in each side, then cast off 2 stitches in each side until the piece measures 55-56-57-56-57-58 cm. Cast off 3 stitches 1 time in each side and then cast off the remaining stitches. The sleeve measures approx. 56-57-58-57-58-59 cm from top down. Work the other sleeve in the same way. ASSEMBLY: Sew shoulder seams inside the cast-off edge. Sew in the sleeves inside the 1 edge stitch in each side. NECK: Knit up approx. 90 to 106 stitches from the right side around the neck with short circular needle size 3 mm and Flora. Purl 1 round, knit 1 round and purl 1 round. Cast off with knit. ------------------------------------------------------- HAT - SHORT OVERVIEW OF THE PIECE: The piece is worked in the round with short circular needle, bottom up. Change to double pointed needles when necessary. HAT: Cast on 124-136-136 stitches with short circular needle size 2.5 mm and Flora. Knit 1 round. Then work rib in the round (= knit 2 / purl 2) for 4 cm. Change to short circular needle size 3.5 mm and knit 2 rounds where you decrease 16 stitches evenly on first round – read DECREASE TIP-1 = 108-120-120 stitches. Work A.8 in the round (= 9-10-10 repeats of 12 stitches). Work A.8 1 time in height. Cut the yarn. Slip 6 stitches over the right needle without working them. The round starts now here. Work A.3 in the round (= 9-10-10 repeats of 12 stitches). When A.3 has been completed there are 90-100-100 stitches on the needle. Then work A.9 in the round (= 9-10-10 repeats of 10 stitches). A.9 is repeated to finished length. AT THE SAME TIME when the piece measures 17-19-21 cm insert 1 marker thread in each garter stitch (= 9-10-10 marker threads in the piece). On the next round decrease 1 stitch before each garter stitch – read DECREASE TIP-2 = 81-90-90 stitches. Work 1 round without decreasing. On the next round decrease 1 stitch after each garter stitch – read DECREASE TIP-2 = 72-80-80 stitches. Continue to decrease like this, alternately before and after the garter stitch, every 2nd round until you have decreased a total of 8 times by each marker thread (4 times before and 4 times after each marker thread) = 18-20-20 stitches left. Work 1 round where all stitches are knitted together 2 and 2 = 9-10-10 stitches left. Knit 1 round without decreasing. On the next round knit all stitches together again 2 and 2 = 5 stitches left in all sizes. Cut the strand, pull it through the remaining stitches, tighten and fasten well. The hat measures approx. 23-25-27 cm from the top down. |
|||||||||||||||||||
Diagram explanations |
|||||||||||||||||||
|
|||||||||||||||||||
 |
|||||||||||||||||||
 |
|||||||||||||||||||
 |
|||||||||||||||||||
 |
|||||||||||||||||||
 |
|||||||||||||||||||
Have you finished this pattern?Tag your pictures with #dropspattern #ladyangelikasweater or submit them to the #dropsfan gallery. Do you need help with this pattern?You'll find 28 tutorial videos, a Comments/Questions area and more by visiting the pattern on garnstudio.com. © 1982-2026 DROPS Design A/S. We reserve all rights. This document, including all its sub-sections, has copyrights. Read more about what you can do with our patterns at the bottom of each pattern on our site. |
|||||||||||||||||||


With over 40 years in knitting and crochet design, DROPS Design offers one of the most extensive collections of free patterns on the internet - translated to 17 languages. As of today we count 324 catalogues and 12290 patterns translated into English (UK/cm). 12290
We work hard to bring you the best knitting and crochet have to offer, inspiration and advice as well as great quality yarns at incredible prices! Would you like to use our patterns for other than personal use? You can read what you are allowed to do in the Copyright text at the bottom of all our patterns. Happy crafting!
Post a comment to pattern DROPS 197-24
We would love to hear what you have to say about this pattern!
If you want to leave a question, please make sure you select the correct category in the form below, to speed up the answering process. Required fields are marked *.