
Popular categories
Looking for a yarn?


Comments / Questions (35)
![]() Elvira wrote:
Elvira wrote:
Ich habe eine frage, wie stricke ich den Armausschnitt?Es ist etwas umständlich beschrieben.
23.03.2026 - 22:42DROPS Design answered:
Liebe Elvira, am Ende vom Rumfpteil stricken Sie die nächste Runde so: die ersten 3-3-4-4-6-8 Maschen der Runde abketten, die nächsten 95-145 M wie zuvor stricken, dann die nächsten 5-5-7-7-11-15 Maschen abketten, die nächsten 95-145 M wie zuvor stricken und die letzten 2-2-3-3-5-7 Maschen abketten, jetzt stricken Sie jedes Teil separat. Und je nach der Größe wird es so beidseitig in jeder 2. Reihe abgekettet: 0, 2 oder 3 M 1 Mal, dann 2 Maschen 0, 2, 3 oder 4 Mal und endlich 1 Masche 1, 2 oder 4 Mal = 93-103 M sind noch übrig. Viel Spaß beim Stricken!
24.03.2026 - 09:14
![]() Elvira wrote:
Elvira wrote:
Ich habe eine Frage zu A1 und A7.Hier steht in den Runden 1 Masche nach rechts verschieben. Wie soll man das verstehen ?
05.02.2026 - 18:36DROPS Design answered:
Liebe Elvira, Sie stricken die letzte Masche der Vor-Runde nicht, sondern beginnen mit der neue Runde 1 Masche vor dem eigentlichen Rundenbeginn und stricken 3 Maschen wie beschrieben zusammen (schwarzes Dreieck-Symbol), d.h. Sie haben bereits die letzte Masche der alten Runde mit den 2 ersten Maschen der neuen Runde zusammengestrickt. Das ist nötig, damit das Muster "im Takt" bleibt. Viel Spaß beim Stricken!
05.02.2026 - 23:23
![]() Rosy wrote:
Rosy wrote:
Bonjour, je souhaite tricoter ce pull, mais uniquement avec le motif A1 à la base du corps du pull et à la base des manches, et le reste de l'ouvrage sans points fantaisie. Cela est-il possible en gardant le même nombre de mailles, augmentations, etc...? Merci !
06.08.2025 - 08:52DROPS Design answered:
Bonjour Rosy, probablement, il vous faudra juste ajuster votre nombre de mailles pour diminuer comme vous devriez le faire dans les diagrammes, dans ce modèle. Vous pouvez aussi vous inspirer d'un autre modèle qui correspondra davantage à ce que vous cherchez, et tricoter ainsi le motif en bas pour commencer - retrouvez ici tous les pulls de ce groupe de tension, tricotés de bas en haut. Bon tricot!
06.08.2025 - 16:02
![]() Sandra Samuelsson wrote:
Sandra Samuelsson wrote:
Hej, jag förstår inte mössans beskrivning. Där står fäst en markör i varje rät maska i A9 efter x antal cm. Men det borde väl stå avig?
01.05.2024 - 18:13DROPS Design answered:
Hej Sandra, mærket skal sidde i den rätstickade maskan: RÄTSTICKNING (stickas runt): Sticka *1 varv rätt och 1 varv avigt*, upprepa *-*.
03.05.2024 - 14:33
![]() Kristel Rõõm wrote:
Kristel Rõõm wrote:
Kuidas kududa varrukate kahandusi: kas vahele kududa ka ilma kahanduseta ridu? Kuidagi ei saa aru.
11.02.2024 - 19:16DROPS Design answered:
Tere Kristel! Varrukakaare tegemiseks koo maha iga rea alguses näiteks suurusel L (kolmas number reas): 3 silmust 1 kord mõlemal küljel (st kood 3 silmust maha, kood rea lõpuni, pöörad tööd, kood 3 silmust maha ja kood rea lõpuni), siis 2 silmust 3 korda mõlemal küljel, siis 1 silmus 4 korda mõlemal küljel, siis 2 silmust mõlemal küljel, kuni töö pikkus on 57 cm. Teistel suurustel vaata vastavat numbrit reas. Head kudumist!
14.02.2024 - 21:41
![]() Uschi wrote:
Uschi wrote:
Guten Tag, leider klappt die untere Kante auf. Haben sie einen Tipp, wie ich das vermeiden kann? Liebe Grüße
28.12.2023 - 22:24DROPS Design answered:
Liebe Uschi, Sie können den Pullover mit Stecknadeln auf einer geeigneten Unterlage spannen, anfeuchten (z.B. mit einer Sprühflasche für Blumen) und trocknen lassen, danach entfernen Sie die Stecknadeln, dann sollte sich der Rand nicht mehr rollen.
02.01.2024 - 09:48
![]() Jane wrote:
Jane wrote:
Hej! Jag är förvirrad. Under rubriken " TRÖJA – KORT ÖVERSIKT ÖVER ARBETET:" så står det att man ska använda rund sticka upp tillärmhålen och sedan "rundsticka där man stickar fram och tillbaka". Fattar inte detta. Ska det vara strumpsticka istället. Det ska ju vara hål i sidorna för ärmarna!!!??? Är det jag som tänker fel?
09.12.2022 - 06:46DROPS Design answered:
Hei Jane. Først stikker du rundt fra oppleggskanten og opp til ermhullene. Da bruker du rundpinne. Når du skal strikke forstykket og bakstykket hver for seg, strikkes det også på rundpinne, men det strikkes frem og tilbake, 1 pinne fra retten og 1 pinne fra vrangen. Så mens du strikker forstykket frem og tilbake "hviler" maskene til bakstykket på samme rundpinne, og omvendt. Ønsker du å strikke delene hver for seg på parpinner kan du fint gjøre det. mvh DROPS Design
12.12.2022 - 11:59
![]() Nel wrote:
Nel wrote:
I ben nu bij het punt waarop ik verder moet gaan met 5.A,B en C. Maar ik begrijp het niet. Als ik dat volg, klopt het doorlopende patroon volgens mij niet meer. De averechtse steek komt dan boven de averechtse steek in patroon 4, en tot nu toe was het steeds zo dat de averechtse steek in het volgende telpatroon (of de herhaling vand e vorige, boven het hiervoor gesloten vierkantje kwam. Qua steken klopt het wel, maar qua patroonverloop volgens mij niet.
01.11.2022 - 11:23DROPS Design answered:
Dag Nel,
Om het beter te kunnen bekijken eerst even een vraag: welke maat ben je aan het breien? (En heb je de juiste telpatronen voor de juiste maat bij elkaar gezocht? Even voor de zekerheid checken :)
02.11.2022 - 14:53
![]() Malin Wester Fröst wrote:
Malin Wester Fröst wrote:
Jag kan inte se diagram/mönster A1 och A2 i beskrivningen längre.
16.05.2022 - 10:15DROPS Design answered:
Hei Malin. I begynnelsen av FRAM- OCH BAKSTYCKE, står det at du skal strikke A.1 og når du er ferdig med A.1 står det at du skal strikke A.2. Begge diagrammene finner du sammen med alle de andre diagrammene under oppskriften. mvh DROPS Design
16.05.2022 - 10:35
![]() Anne Katrine Vilhelm wrote:
Anne Katrine Vilhelm wrote:
Hej med jer Jeg er kommet til ærmerne, og skal i str. S tage tre masker ind til ærmegab. Jeg kan ikke finde ud af hvor præcist jeg starter lukningen. Er det efter afmærkningen, eller skal jeg strikke to masker først jævnfør strik de resterende 95 masker. Mvh Katrine
27.02.2022 - 18:25DROPS Design answered:
Hej Anne Katrine, du lukker de første 3 masker af efter mærket, strikker 95 masker, lukker 5 masker af i den anden side, strikker 95 masker og lukker de sidste 2 masker af. Nu strikkes forstykket færdigt for sig. God fornøjelse!
02.03.2022 - 11:51
|
|||||||||||||||||||
Lady Angelika#ladyangelikasweater |
|||||||||||||||||||
 |
 |
||||||||||||||||||
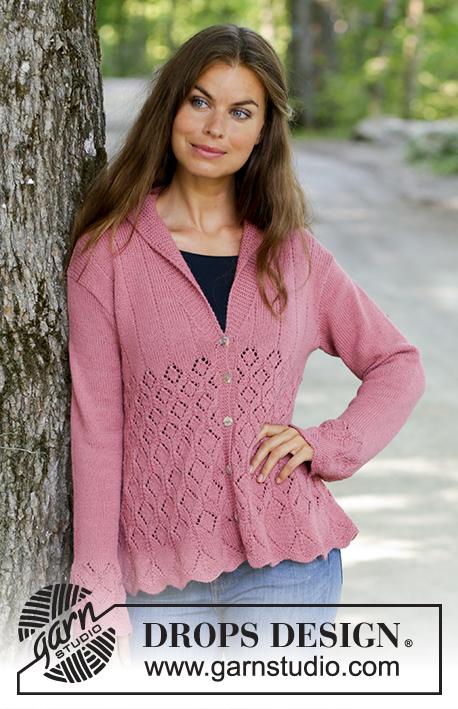
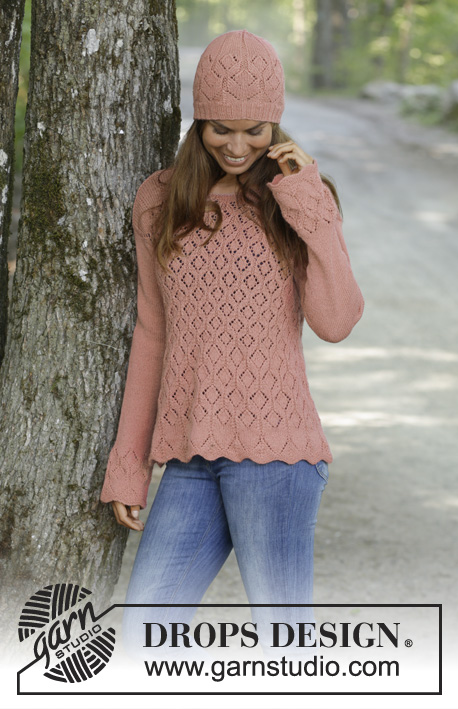
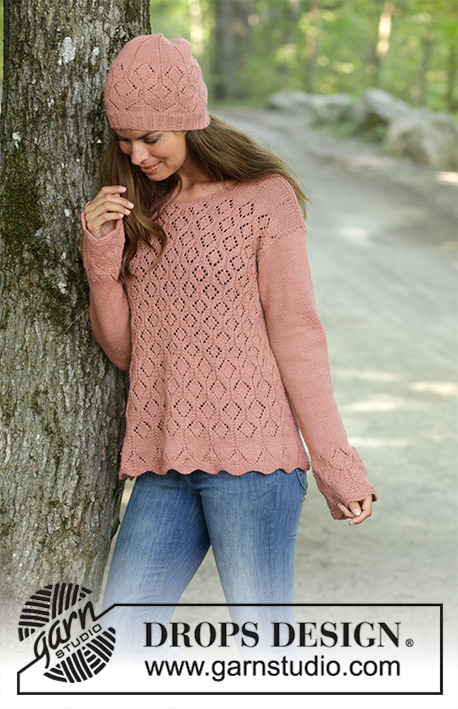
Knitted jumper with lace pattern in DROPS Flora. Sizes S - XXXL. Knitted hat with lace pattern in DROPS Flora.
DROPS 197-24 |
|||||||||||||||||||
|
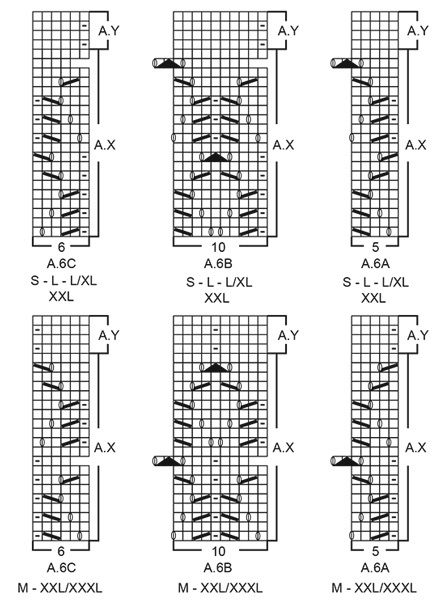
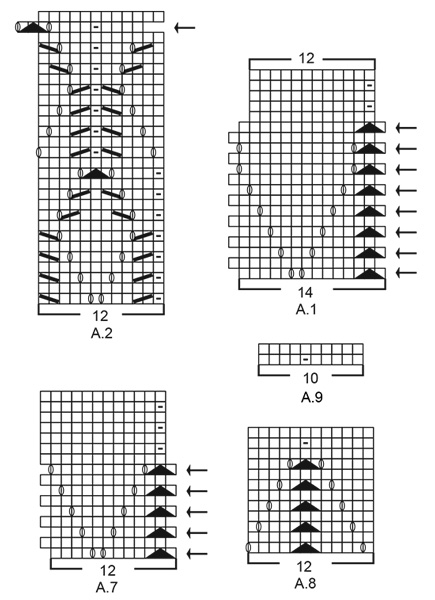
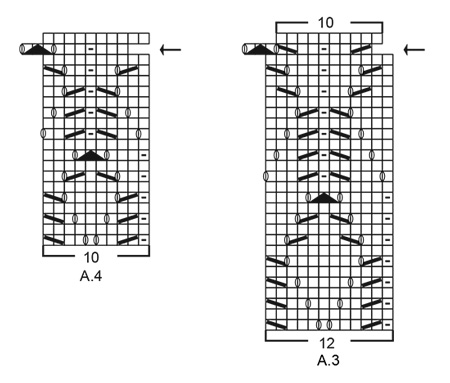
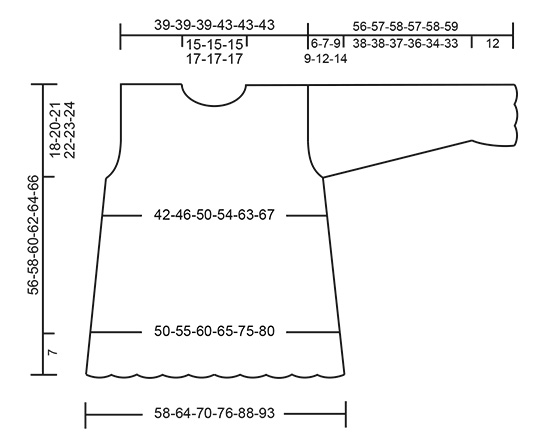
EXPLANATIONS FOR THE PATTERN: ------------------------------------------------------- RIDGE/GARTER STITCH (worked in the round): 1 ridge = 2 rounds. Knit 1 round and purl 1 round. PATTERN: Jumper: See diagrams A.1 to A.7. Choose diagram for your size (applies to A.5 and A.6). Hat: See diagrams A.3, A.8 and A.9. The diagrams show all the rows in the pattern seen from the right side. INCREASE TIP (for mid under sleeve): Start 1 stitch before the stitch with the marker thread, make 1 yarn over, knit 3 (the marker thread sits in the middle stitch of these 3 stitches), make 1 yarn over (= 2 stitches increased). On the next round knit the yarn overs twisted to avoid holes. DECREASE TIP-1 (evenly spaced): To work out how to decrease evenly, count the total number of stitches on the needle (e.g. 124 stitches) and divide by the number of decreases to be made (e.g. 16) = 7.75. In this example, decrease by knitting each 7th and 8th stitch together (approx.). DECREASE TIP-2 (for top of hat): Decrease as follows before the garter stitch: Start 2 stitches before the stitch with the marker thread, knit 2 together (= 1 stitch decreased). Decrease as follows after the garter stitch: Slip 1 stitch as if to knit, knit 1 and pass the slipped stitch over the knitted stitch (= 1 stitch decreased). ---------------------------------------------------------- START THE PIECE HERE: ------------------------------------------------------- JUMPER – SHORT OVERVIEW OF THE PIECE: The piece is worked in the round with circular needle, bottom up as far as the armholes. Then the front and back pieces are worked separately, back and forth with circular needle. The sleeves are worked in the round with double pointed needles/short circular needle, bottom up. BODY: Cast on 280-308-336-364-420-448 slightly loose stitches with circular needle size 3.5 mm and Flora. Work 3 RIDGES in the round – read description above. Work 2 rounds of stocking stitch. Then work A.1 in the round (= 20-22-24-26-30-32 repeats of 14 stitches). When A.1 has been completed there are 240-264-288-312-360-384 stitches on the needle and the piece measures approx. 7 cm from the cast-on edge at the longest point. REMEMBER THE KNITTING TENSION! Then work A.2 (= 20-22-24-26-30-32 repeats of 12 stitches). When A.2 has been completed, work A.3 (= 20-22-24-26-30-32 repeats of 12 stitches). When A.3 has been completed there are 200-220-240-260-300-320 stitches on the needle. Then work A.4 (= 20-22-24-26-30-32 repeats of 10 stitches). When A.4 has been worked a total of 3 times in height, insert 2 marker threads in the piece as follows (without working the stitches): The first marker thread is inserted in the first stitch on the round, then count 99-109-119-129-149-159 stitches and insert 1 marker thread in the next stitch. There are 99-109-119-129-149-159 stitches left on the round after the second marker thread. The threads mark the sides of the body. READ THE REST OF BODY BEFORE CONTINUING! PATTERN: The next round is worked as follows: Work 5-10-15-15-25-30 stitches in stocking stitch (marker thread in first of these stitches), work A.5A (= 5 stitches), A.5B over the next 80-80-80-90-90-90 stitches (= 8-8-8-9-9-9 repeats of 10 stitches), A.5C (= 6 stitches), work 9-19-29-29-49-59 stitches in stocking stitch (marker thread in the middle stitch of these stitches), work A.5A (= 5 stitches), A.5B over the next 80-80-80-90-90-90 stitches (= 8-8-8-9-9-9 repeats of 10 stitches), A.5C (= 6 stitches) and finish with 4-9-14-14-24-29 stitches in stocking stitch. Continue this pattern, but when A.5 has been worked 1-1-1-2-2-2 times in height work A.6 over A.5 in the same way. When A.X in A.6 has been worked 1 time in height work A.Y to finished length. ARMHOLE: AT THE SAME TIME when the piece measures 38-38-39-40-41-42 cm cast off for armholes in each side as described below. The marker threads have been inserted in the piece and you should have started A.5 as described above, but adjust so that the next round is an odd round in the diagrams, i.e. a round of lace pattern. This is important so that the rows of pattern are worked from the right side when you start working back and forth. The cast-off round is worked as follows: Cast off 3-3-4-4-6-8 stitches for armhole, work the next 95-105-113-123-139-145 stitches as before, cast off 5-5-7-7-11-15 stitches for armhole, work the next 95-105-113-123-139-145 stitches as before and cast off the remaining 2-2-3-3-5-7 stitches for armhole. Front and back pieces are finished separately. FRONT PIECE: = 95-105-113-123-139-145 stitches. Continue the pattern back and forth as before (the first row is from the wrong side and each row from the wrong side is purled). AT THE SAME TIME cast off for armholes at the beginning of each row in each side as follows: Cast off 3 stitches 0-0-0-0-2-3 times, 2 stitches 0-2-3-3-4-4 times and then 1 stitch 1-2-4-4-4-4 times in each side = 93-93-93-103-103-103 stitches left. Continue the pattern as before with 1 edge stitch in each side (knit edge stitch from right and wrong side). When the piece measures approx. 48-50-52-53-55-57 cm (A.X in A.6 should now be finished and A.Y should have started) place the middle 19-19-19-23-23-23 stitches on 1 thread for neck and each shoulder is finished separately. Continue casting off for neck at the beginning of each row from the neck as follows: Cast off 2 stitches 3 times and 1 stitch 3 times = 28-28-28-31-31-31 stitches left on shoulder. Continue working until there is 1 row left before the piece measures 56-58-60-62-64-66 cm. Knit 1 row from the wrong side. Loosely cast off with knit from the right side. Work the other shoulder in the same way. BACK PIECE: = 95-105-113-123-139-145 stitches. Continue the pattern back and forth as before (the first row is from the wrong side and each row from the wrong side is purled). AT THE SAME TIME cast off for armholes at the beginning of each row in each side as follows: Cast off 3 stitches 0-0-0-0-2-3 times, 2 stitches 0-2-3-3-4-4 times and then 1 stitch 1-2-4-4-4-4 times in each side = 93-93-93-103-103-103 stitches left. Continue the pattern as before with 1 edge stitch in each side (knit edge stitch from right and wrong side). Remember that when A.X in A.6 has been worked 1 time in height, you continue with A.Y to finished length. AT THE SAME TIME when the piece measures 54-56-58-60-62-64 cm cast off the middle 33-33-33-37-37-37 stitches for neck and each shoulder is finished separately. Then cast off 2 stitches on the next row from the neck = 28-28-28-31-31-31 stitches left on shoulder. Continue working until there is 1 row left before the piece measures 56-58-60-62-64-66 cm. Knit 1 row from the wrong side. Loosely cast off with knit from the right side. Work the other shoulder in the same way. SLEEVE: Cast on 60-60-60-72-72-72 slightly loose stitches with double pointed needles size 3.5 mm and Flora. Work 3 ridges in the round. Work 2 rounds of stocking stitch. Then work A.7 in the round (= 5-5-5-6-6-6 repeats of 12 stitches). When A.7 has been completed work A.3 in the round (= 5-5-5-6-6-6 repeats of 12 stitches). Continue this pattern, but when there are 6 rounds left in A.3 work stocking stitch over the one purled stitch in the pattern until A.3 is finished. When A.3 has been completed, there are 50-50-50-60-60-60 stitches on the needles. Insert 1 marker thread in the first stitch on the round and allow it to follow your work onwards. The marker thread will be used when you increase mid under sleeve. Work stocking stitch in the round. When the piece measures 14-14-13-13-13-13 cm increase 2 stitches mid under sleeve – read INCREASE TIP. Increase like this a total of 11-17-19-17-21-23 times in Size S: Every 10th round, in M and L/XL: Every 6th round, in L: Alternately every 5th and 6th round, in XXL: Alternately every 4th and 5th round and in XXL/XXXL: Every 4th round = 72-84-88-94-102-106 stitches. Continue until the sleeve measures 50-50-49-48-46-45 cm (shorter measurements in the larger sizes due to wider shoulders and longer sleeve cap). The next round is worked as follows: Cast off 3-3-4-4-6-8 stitches, work 67-79-81-87-91-91 stitches in stocking stitch and cast off the remaining 2-2-3-3-5-7 stitches. Cut the strand. Then finish the sleeve cap back and forth with circular needle size 3.5 mm as follows: Work stocking stitch and cast off at the beginning of each row in each side as follows: Cast off 3 stitches 1 time in all sizes, 2 stitches 2-2-3-3-4-4 times and 1 stitch 1-2-4-4-7-10 times in each side, then cast off 2 stitches in each side until the piece measures 55-56-57-56-57-58 cm. Cast off 3 stitches 1 time in each side and then cast off the remaining stitches. The sleeve measures approx. 56-57-58-57-58-59 cm from top down. Work the other sleeve in the same way. ASSEMBLY: Sew shoulder seams inside the cast-off edge. Sew in the sleeves inside the 1 edge stitch in each side. NECK: Knit up approx. 90 to 106 stitches from the right side around the neck with short circular needle size 3 mm and Flora. Purl 1 round, knit 1 round and purl 1 round. Cast off with knit. ------------------------------------------------------- HAT - SHORT OVERVIEW OF THE PIECE: The piece is worked in the round with short circular needle, bottom up. Change to double pointed needles when necessary. HAT: Cast on 124-136-136 stitches with short circular needle size 2.5 mm and Flora. Knit 1 round. Then work rib in the round (= knit 2 / purl 2) for 4 cm. Change to short circular needle size 3.5 mm and knit 2 rounds where you decrease 16 stitches evenly on first round – read DECREASE TIP-1 = 108-120-120 stitches. Work A.8 in the round (= 9-10-10 repeats of 12 stitches). Work A.8 1 time in height. Cut the yarn. Slip 6 stitches over the right needle without working them. The round starts now here. Work A.3 in the round (= 9-10-10 repeats of 12 stitches). When A.3 has been completed there are 90-100-100 stitches on the needle. Then work A.9 in the round (= 9-10-10 repeats of 10 stitches). A.9 is repeated to finished length. AT THE SAME TIME when the piece measures 17-19-21 cm insert 1 marker thread in each garter stitch (= 9-10-10 marker threads in the piece). On the next round decrease 1 stitch before each garter stitch – read DECREASE TIP-2 = 81-90-90 stitches. Work 1 round without decreasing. On the next round decrease 1 stitch after each garter stitch – read DECREASE TIP-2 = 72-80-80 stitches. Continue to decrease like this, alternately before and after the garter stitch, every 2nd round until you have decreased a total of 8 times by each marker thread (4 times before and 4 times after each marker thread) = 18-20-20 stitches left. Work 1 round where all stitches are knitted together 2 and 2 = 9-10-10 stitches left. Knit 1 round without decreasing. On the next round knit all stitches together again 2 and 2 = 5 stitches left in all sizes. Cut the strand, pull it through the remaining stitches, tighten and fasten well. The hat measures approx. 23-25-27 cm from the top down. |
|||||||||||||||||||
Diagram explanations |
|||||||||||||||||||
|
|||||||||||||||||||
 |
|||||||||||||||||||
 |
|||||||||||||||||||
 |
|||||||||||||||||||
 |
|||||||||||||||||||
 |
|||||||||||||||||||
Have you finished this pattern?Tag your pictures with #dropspattern #ladyangelikasweater or submit them to the #dropsfan gallery. Do you need help with this pattern?You'll find 28 tutorial videos, a Comments/Questions area and more by visiting the pattern on garnstudio.com. © 1982-2026 DROPS Design A/S. We reserve all rights. This document, including all its sub-sections, has copyrights. Read more about what you can do with our patterns at the bottom of each pattern on our site. |
|||||||||||||||||||


With over 40 years in knitting and crochet design, DROPS Design offers one of the most extensive collections of free patterns on the internet - translated to 17 languages. As of today we count 324 catalogues and 12290 patterns translated into English (UK/cm). 12290
We work hard to bring you the best knitting and crochet have to offer, inspiration and advice as well as great quality yarns at incredible prices! Would you like to use our patterns for other than personal use? You can read what you are allowed to do in the Copyright text at the bottom of all our patterns. Happy crafting!
Post a comment to pattern DROPS 197-24
We would love to hear what you have to say about this pattern!
If you want to leave a question, please make sure you select the correct category in the form below, to speed up the answering process. Required fields are marked *.