
Popular categories
Looking for a yarn?


Comments / Questions (31)
![]() Økningene Kan Da Ikke Stemme? wrote:
Økningene Kan Da Ikke Stemme? wrote:
Det står når A2 er strikket skal det være 250 masker på pinnen (str L). Det kan ikke stemme da A2 er 19 økninger, dvs 8 per runde inkludert ermene = 152. 106+152=258.
06.04.2025 - 07:20DROPS Design answered:
Hej, jo første pind med udtagninger er medregnet i de 106 masker, så du har kun 18x8 udtagninger tilbage ifølge diagrammet :)
09.04.2025 - 13:43
![]() Maren wrote:
Maren wrote:
Liebes Drops-Team, vielen Dank für die schöne Anleitung, ich habe nur ein kleines Problem mit dem unteren Rand des Rumpfteils, auch nach drei Krausrippen wellt er sich noch nach oben, was kann ich tun? Ich wollte eigentlich keinen so dicken Rand und noch eine vierte Krausrippe stricken... Liebe Grüße und Dankeschön!
14.02.2025 - 20:20DROPS Design answered:
Liebe Maren, Sie können den Pullover mit Stecknadeln auf einer geeigneten Unterlage spannen, anfeuchten (z.B. mit einer Sprühflasche für Blumen) und trocknen lassen, danach entfernen Sie die Stecknadeln, dann sollte sich der Rand nicht mehr rollen. Viel Spaß beim Stricken!
17.02.2025 - 07:38
![]() Angela Casna wrote:
Angela Casna wrote:
Anleitung habe ich keinen Durchblick. Bitte um Hilfe. Vielen Dank
26.02.2024 - 14:14DROPS Design answered:
Liebe Frau Casna, dieser Pullover wird von oben nach unten mit verschiedenen Muster/Diagrammen gestrickt; man wird für den Raglan in jeder 2. Runde wie gezeigt in den Diagrammen zunehmen. In dieser Lektion erklärt man, wie man einen Pullover von oben nach unten strickt, es kann vielleicht damit helfen, aber sonnst sagen Sie uns gerne mehr, welches Teil Sie nicht verstehen, so kann man versuchen, Ihnen zu helfen. Danke fü Ihr Verständnis!
26.02.2024 - 15:00
![]() Diane wrote:
Diane wrote:
Bonjour, je tiens à vous remercier pour votre précieuse aide au début de mon projet, je l’ai (enfin) terminé et il est superbe! Très agréable à tricoter, j’ai juste envie d’en tricoter un autre! Merci beaucoup!
15.09.2021 - 13:44
![]() Diane wrote:
Diane wrote:
Bonjour, je tricote la grandeur XXL, j’ai fini A2, (38 rangs) et A3 (fini au rang 5), donc j’ai 274 m. Lorsque vous dites après 10 rangs de haut, ajoutez un motif ajouré, où dois-je prendre le modèle (diagramme)et à quelle place je le mets? La séquence est: A2,A3, jeté, m en jersey,jeté,A3,A2,A3,jeté, m en jersey,A3. Merci.
03.08.2021 - 04:22DROPS Design answered:
Bonjour Diane, augmentez maintenant comme avant au début et à la fin de A.2 (= 1 jeté), et en même temps, continuez le point fantaisie comme avant en répétant les rangs encadrés avec l'étoile, vous tricoterez plus de motifs ajourés que dans le diagramme mais commencez et terminez de la même façon que cette partie. Bon tricot!
03.08.2021 - 09:24
![]() Diane wrote:
Diane wrote:
Bonjour, pourXXL, au rang 3 de l’empiècement, est-ce qu’on tricote:A2 (19m), A3 (16 m), 1 jeté, 12 ou 14 m?, 1 jeté, A3 (16m), A2 (19m), A3 (16m), 1 jeté, 12 ou 14m ? , 1 jeté, A3 (16m)? Dois-je augmenter de 2 mailles chaque côté des mailles en jersey, tous les deux rangs? De plus, que fait-on quand on a fini le diagramme A3 (8 rangs) est-ce qu’il faut le recommencer au rang 1, jusqu’au 38 rangs du diagramme A2? Merci!
25.07.2021 - 01:17DROPS Design answered:
Bonjour Diane, au 3ème rang de l'empiècement, vous aurez 14 mailles entre les jetés après A.3 et avant A.3 = les 2 jetés du 1er rang. Ainsi, vous aurez toujours 2 mailles en plus après avoir augmenté à chaque nouveau rang sur l'endroit (= manches). Quand A.3 est terminé, reprenez-le au 1er rang effectivement et continuez ainsi. Bon tricot!
26.07.2021 - 08:48
![]() Diane wrote:
Diane wrote:
Bonjour, une autre question, savez-vous comment je peux être à 132 au lieu de 126 mailles après le premier tour de l’empiètement? J’ai fait A2, A3, 1 jeté, 12 mailles en jersey, 1 jeté, A3, A2, A3, 1 jeté, 12 mailles en jersey, 1 jeté, A3. Au diagramme A2, dois-je toujours faire les jetés au début et à la fin? Merci, je trouve le modèle superbe mais, je commence à penser que je ne suis pas assez compétente pour y arriver!
18.07.2021 - 21:43DROPS Design answered:
Bonjour Diane, au 1er rang de A.3 vous faites 1 jeté au milieu pour la petite torsade ajourée, vous devez donc avoir 4 mailles en plus sur les tours avec ce jeté (= A.3 se tricote sur 16 m, mais aux rangs 1 et 5 vous faites 1 jeté, vous aurez donc 17 m aux rangs 1, 2, 5, 6 et 16 m aux rangs 3,4, 7, 8. Vous devez donc avoir 130 m: 118 avant ce premier tour + 2 m augmentées dans chaque A.2 x 2 = 4 m + 2 m augmentées sur chaque manche = 8 m = 118+4+4=126 + 4 jetés de A.3 = 130 m. Bon tricot!
19.07.2021 - 09:15
![]() Diane wrote:
Diane wrote:
Bonjour, je suis un peu perdue, quels jetés dois-je tricoter torse, les jetés des diagrammes ou les jetés chaque côté des 12 mailles en jersey? Lesquels dois-je tricoter à l’endroit (non torse)? Les corrections apportées sont-elles corrigées sur le version que je viens d’imprimer? Merci beaucoup de votre aide.
18.07.2021 - 21:26DROPS Design answered:
Bonjour Diane, au tour suivant les augmentations du raglan, tricoter les jetés des diagrammes à l'endroit (ils forment des trous) et les augmentations figurent dans A.2 et tricoter les augmentations des manches torse à l'endroit (ils ne forment pas de trous). Regardez aussi AUGMENTATIONS-2 (côtés dos & devant). La version imprimee par toi est deja corrigee. Bon tricot!
18.07.2021 - 21:51
![]() Florencia Collavino wrote:
Florencia Collavino wrote:
Podrían explicarme en las mangas como son los aumentos? son 12puntos que se aumentan cada dos vueltas? porque no entiendo como llegar a la cantidad de 250 puntos al final de A2. Muchas gracias
16.09.2020 - 23:53DROPS Design answered:
Hola Florencia, los aumentos se trabajan de la siguiente manera: Los aumentos en el cuerpo están incluidos en el diagrama A.2. Para la manga trabajamos los aumentos antes y después de los puntos de la manga. En total hay 8 aumentos en cada vuelta con aumentos (18 vueltas), por lo que hay 144 puntos + los 106 iniciales = 250 puntos.
20.11.2020 - 23:19
![]() Rhona Baxter wrote:
Rhona Baxter wrote:
Thanks for your reply ,but that will give me 110 after my first row on round ,reference my first question . That gives me 110 not 106.
05.12.2019 - 15:46DROPS Design answered:
Dear Mrs Baxter, yes that's right, A.3 is counted throughout the pattern with only 16 sts (see previous answer), so that you should have 106 sts at the end of 1st row (with only 16 sts in each A.3), but since you worked a total of 4 yarnovers in A.3 for the mock cables, you have then 106+4 yarn overs (=2 yarn over in each of both A.3 - these yarn overs are not included in increases, only to the mock cables) = 110 sts on needle. happy knitting!
05.12.2019 - 15:58
|
|||||||||||||||||||||||||
Canari#canarisweater |
|||||||||||||||||||||||||
 |
 |
||||||||||||||||||||||||
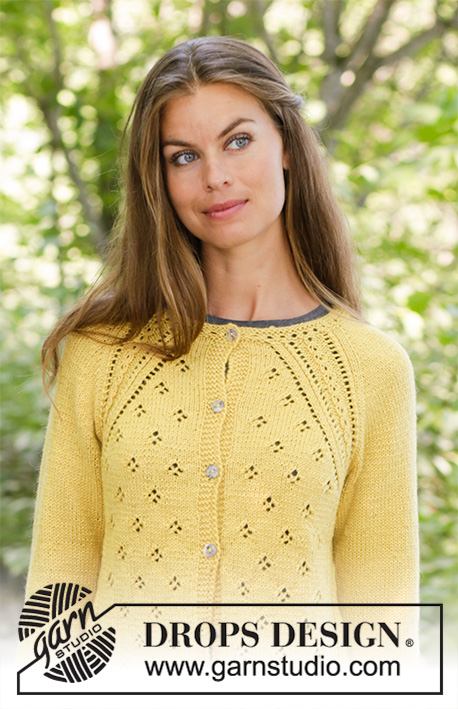
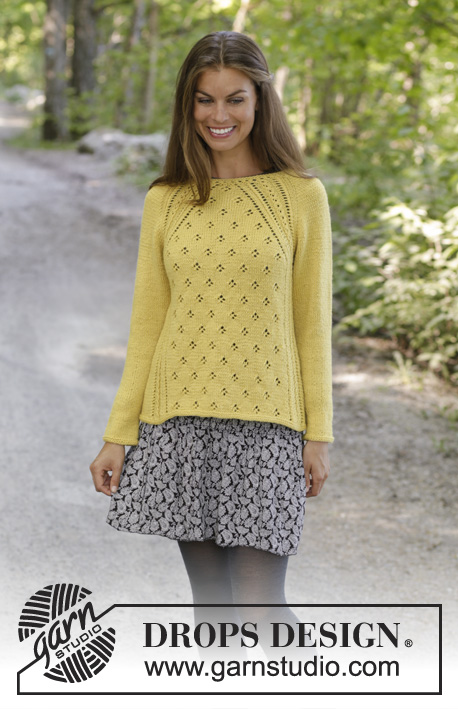
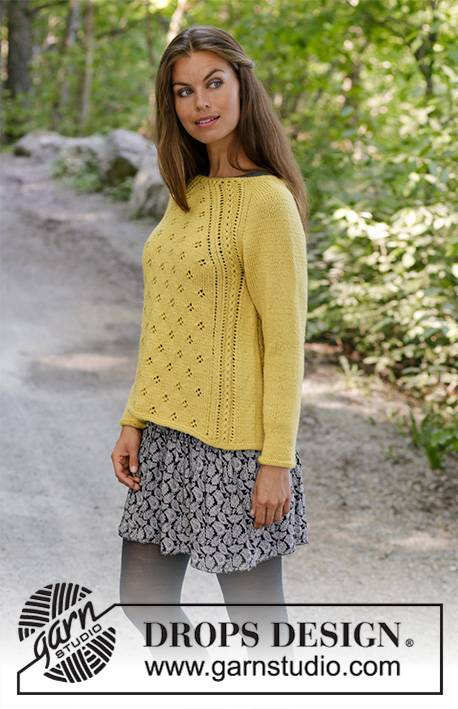
Knitted jumper with raglan in DROPS Karisma. The piece is worked top down with lace pattern. Sizes S - XXXL.
DROPS 195-16 |
|||||||||||||||||||||||||
|
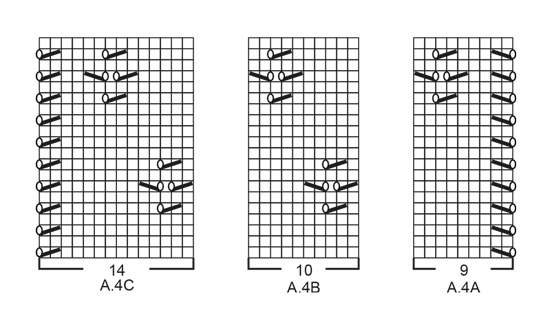
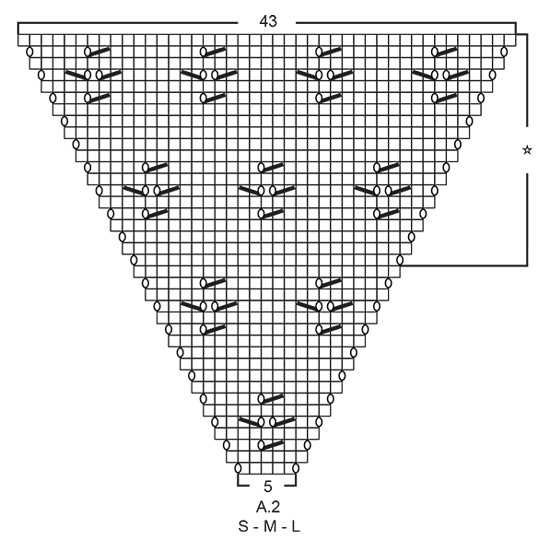
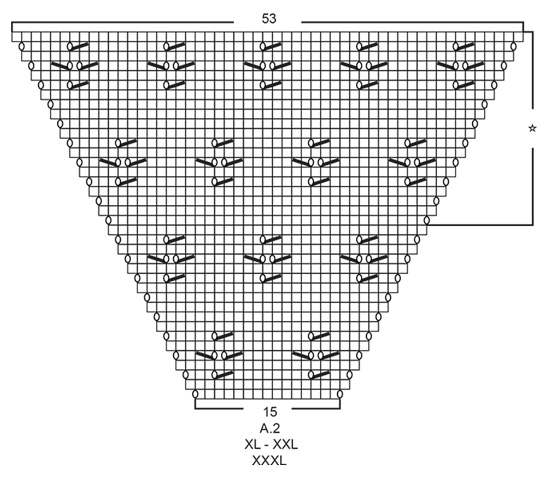
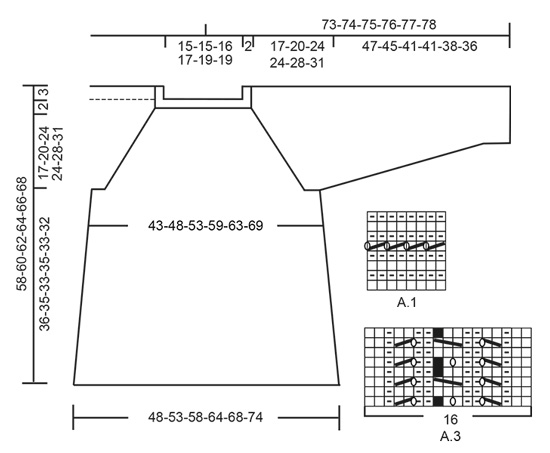
------------------------------------------------------- EXPLANATIONS FOR THE PATTERN: ------------------------------------------------------- RIDGE/GARTER STITCH (worked in the round): 1 ridge = 2 rounds. Knit 1 round and purl 1 round. PATTERN: See diagrams A.1 to A.4. Choose diagram for your size (applies to A.2). The diagrams show all the rows in the pattern seen from the right side. INCREASE TIP-1 (evenly spaced): To work out how to increase evenly, count the total number of stitches on the needle (e.g. 88 stitches) and divide by the number of increases to be made (e.g. 10) = 8.8. In this example, increase by making 1 yarn over after approx. each 9th stitch. On the next round knit the yarn overs twisted to avoid holes. INCREASE TIP-2 (for sides of body): Start 2 stitches before the marker thread, 1 yarn over, knit 4 (marker thread sits in the middle of these 4 stitches), 1 yarn over (= 2 stitches increased). On the next row knit the yarn overs twisted to avoid holes. Then work the increased stitches in stocking stitch. DECREASE TIP (mid under sleeves): Start 3 stitches before the marker thread, knit 2 together, knit 2 (marker thread sits in the middle of these 2 stitches), slip 1 stitch as if to knit, knit 1 and pass the slipped stitch over the knitted stitch (= 2 stitches decreased). ------------------------------------------------------- START THE PIECE HERE: ------------------------------------------------------- JUMPER - SHORT OVERVIEW OF THE PIECE: Neck, yoke and body are worked in the round with circular needle, top down. The sleeves are worked in the round with short circular needle/double pointed needles, top down. Be aware that all the stitch numbers on the yoke and body are given with A.3 = 16 stitches, but A.3 varies between 16 and 17 stitches. If you have just worked rounds 1-2-5 or 6 in A.3 when the number of stitches is given, you will have 4 more stitches on the needle. NECK: Cast on 88-88-92-96-104-104 stitches with short circular needle size 3.5 mm and Karisma. Work A.1. After A.1 knit 1 round where you increase 10-10-6-22-14-14 stitches evenly on round - read INCREASE TIP-1 = 98-98-98-118-118-118 stitches. Change to circular needle size 4 mm and work yoke as described below. YOKE: The first round is worked as follows: Work A.2 (= 5-5-5-15-15-15 stitches), A.3 (= 16 stitches), 1 yarn over, work 12 stitches in stocking stitch (= sleeve), 1 yarn over, work A.3 (= 16 stitches), A.2 (= 5-5-5-15-15-15 stitches), A.3 (= 16 stitches), 1 yarn over, 12 stitches in stocking stitch (= sleeve), 1 yarn over, A.3 (= 16 stitches). There are now 106-106-106-126-126-126 stitches on the needle. Continue this pattern onwards; i.e. you increase on the front and back pieces in each side as shown in A.2. On the sleeves you increase in each side with a yarn over on each side of the stitches in stocking stitch. Increase like this every 2nd round. On the round after an increase round the yarn overs in the diagrams are knitted (to leave holes), and increased stitches are worked into the pattern as shown in A.2, while the yarn overs on the sleeves are knitted twisted (to avoid holes), and the increased stitches are worked in stocking stitch. REMEMBER THE KNITTING TENSION! When A.2 has been worked 1 time in height there are 250-250-250-270-270-270 stitches on the needle. Continue this pattern onwards; i.e. the pattern is repeated as shown in A.2 and every time you have worked 10 rows in height there is room for 1 more repeat of the lace pattern on the front and back pieces. When you have increased a total of 24-29-34-34-39-44 times on each side of A.3 there are 290-330-370-390-430-470 stitches on the needle and the piece measures approx. 19-22-26-26-30-33 cm from the cast-on edge and down mid front. The next round is worked as follows: Work 69-79-89-99-109-119 stitches as before (= back piece), place the next 60-70-80-80-90-100 stitches on 1 thread for sleeve, cast on 6-6-6-8-8-10 new stitches on the needle (= in side under sleeve), work the next 85-95-105-115-125-135 stitches as before (= front piece), place the next 60-70-80-80-90-100 stitches on 1 thread for sleeve, cast on 6-6-6-8-8-10 new stitches on the needle (= in side under sleeve) and work the last 16 stitches as before (= back piece). Cut the strand. Body and sleeves are finished separately. THE PIECE IS NOW MEASURED FROM HERE! BODY: = 182-202-222-246-266-290 stitches. Insert 1 marker thread in each side, in the middle of the 6-6-6-8-8-10 stitches cast on under each sleeve. Allow the marker threads to follow your work onwards; they will be used a little later when you increase. Start the round by one of the marker threads and work the first round as follows: Work 3-3-3-4-4-5 stitches in stocking stitch, continue A.3 over the next 16 stitches, work A.4A (= 9 stitches), A.4B over the next 30-40-50-60-70-80 stitches (= 3-4-5-6-7-8 repeats of 10 stitches), A.4C (= 14 stitches), continue A.3 over the next 16 stitches, 6-6-6-8-8-10 stitches in stocking stitch (the marker thread sits in the middle of these 6-6-6-8-8-10 stitches), continue A.3 over the next 16 stitches, work A.4A (= 9 stitches), A.4B over the next 30-40-50-60-70-80 stitches (= 3-4-5-6-7-8 repeats of 10 stitches), work A.4C (= 14 stitches), continue A.3 over the next 16 stitches, and finish with 3-3-3-4-4-5 stitches in stocking stitch. Continue this pattern. When the piece measures 4 cm from the division, increase 1 stitch on each side of both marker threads - read INCREASE TIP-2 = 4 stitches increased. Increase like this every 6-6-5-6-5-5 cm a total of 5 times = 202-222-242-266-286-310 stitches. Continue until the piece measures approx. 35-34-32-34-32-31 cm from the division (shorter measurements in the larger sizes due to longer yoke), or to desired length, but make sure to finish after a complete lace pattern in height. Change to circular needle size 3.5 mm. Work 2 RIDGES – read description above. Change back to circular needle size 4 mm. Cast off with knit, but make sure that the cast-off edge is not tight. The jumper measures approx. 58-60-62-64-66-68 cm from the shoulder down. SLEEVE: Place the 60-70-80-80-90-100 stitches from the thread on the one side of the piece on short circular needle/double pointed needles size 4 mm and knit up 1 stitch in each of the 6-6-6-8-8-10 new stitches cast on in the side under the sleeve = 66-76-86-88-98-110 stitches. Insert a marker thread in the middle of the 6-6-6-8-8-10 new stitches in side under sleeve and allow the marker thread to follow your work onwards; it will be used a little later when decreasing mid under sleeve. Start the round by the marker thread and work stocking stitch in the round. When the piece measures 2-1-1-1-1-1 cm decrease 2 stitches mid under sleeve – read DECREASE TIP. Decrease like this every 2nd round a total of 1-2-3-3-4-7 times = 64-72-80-82-90-96 stitches. Then decrease every 3½-2½-2-2-1½-1 cm a total of 12-15-18-18-21-23 times = 40-42-44-46-48-50 stitches left on the needles .Continue until the piece measures 46-44-40-40-37-35 cm from the division or to desired length (shorter measurements in larger sizes due to wider neck and longer yoke). Change to double pointed needles size 3.5 mm and work 2 ridges. Change back to double pointed needles size 4 mm. Cast off with knit. Make sure the cast-off edge is not tight! The sleeve measures approx. 47-45-41-41-38-36cm from the division. Work the other sleeve in the same way. |
|||||||||||||||||||||||||
Diagram explanations |
|||||||||||||||||||||||||
|
|||||||||||||||||||||||||
 |
|||||||||||||||||||||||||
 |
|||||||||||||||||||||||||
 |
|||||||||||||||||||||||||
 |
|||||||||||||||||||||||||
Have you finished this pattern?Tag your pictures with #dropspattern #canarisweater or submit them to the #dropsfan gallery. Do you need help with this pattern?You'll find 25 tutorial videos, a Comments/Questions area and more by visiting the pattern on garnstudio.com. © 1982-2026 DROPS Design A/S. We reserve all rights. This document, including all its sub-sections, has copyrights. Read more about what you can do with our patterns at the bottom of each pattern on our site. |
|||||||||||||||||||||||||


With over 40 years in knitting and crochet design, DROPS Design offers one of the most extensive collections of free patterns on the internet - translated to 17 languages. As of today we count 324 catalogues and 12290 patterns translated into English (UK/cm). 12290
We work hard to bring you the best knitting and crochet have to offer, inspiration and advice as well as great quality yarns at incredible prices! Would you like to use our patterns for other than personal use? You can read what you are allowed to do in the Copyright text at the bottom of all our patterns. Happy crafting!
Post a comment to pattern DROPS 195-16
We would love to hear what you have to say about this pattern!
If you want to leave a question, please make sure you select the correct category in the form below, to speed up the answering process. Required fields are marked *.