
Popular categories
Looking for a yarn?


Comments / Questions (59)
![]() Susi wrote:
Susi wrote:
Hallo liebes Team, wieso kann ich die Anleitung Drops Baby / 31 / 15 nicht als PDF herunterladen? Danke im voraus Susi
28.01.2020 - 19:31DROPS Design answered:
Liebe Susi, drucken Sie die Anleitung aber dann wählen Sie einen virtuellen Druker, damit Sie als PDF herunterladen können. Viel Spaß beim stricken!
29.01.2020 - 08:31
![]() Emma wrote:
Emma wrote:
Hej, angående utökningen av maskor när man stickar benen undrar jag om det spelar någon roll hur man väljer att öka en maska på varje sida? Det vill säga jag har ökat osynligt genom att lyfta upp tråden mellan två maskor, men såg sedan att ni skrev högre upp att man skulle utöka med hjälp av omslag. Vad blir skillnaden? Ska jag ta upp varven jag hunnit sticka och göra om med omslag?
09.12.2019 - 21:52DROPS Design answered:
Hei Emma! I denne oppskriften ambefaler vi å øke med kast, dette er fordi plagget ikke skal bli for stramt. Men hvordan man velger å øke er helt opp til den som strikker plagget, det kan være lurt å dobbeltsjekke målskissen for å se at målene til plagget er riktig. Lykke til!
10.12.2019 - 08:53
![]() Emma wrote:
Emma wrote:
Hej jag ska göra heldressen, och undrar om man man bara ska sticka räta maskor fram och tillbaka de första varven? Och i sådana fall vad ni menar med kantmaska? På er video angående kantmaskor, gör det endast skillnad när man sticker aviga maskor från avigsidan, då man börjar och avslutar med med en rät maska, Men från rätsidan stickas alla maskor lika. Så vad ska jag göra för kantmaska om jag bara sticker räta maskor både fram och tillbaka enligt er beskrivning??
03.12.2019 - 22:47DROPS Design answered:
Hej Emma, det stemmer at alle masker strikkes i retstrik = ret på hver pind(også kantmasken), lidt senere i opskriften skal du tage ud inden for kantmasken... Bare følg opskriften :)
04.12.2019 - 08:07
![]() Elin wrote:
Elin wrote:
Hej, Jag känner mig jättedum, men jag förstår inte hur de virkade snörena ska knytas när allt är klart. Det ena snöret hamnar ju omlott under, och den som är synlig kan inte fästas i något. Ska det verkligen vara virkade snören vid båda kanterna?
17.11.2019 - 16:43DROPS Design answered:
Hej. Du har virkat knytband i spetsarna på båda styckena. Sedan gör du 2 knytband till och det ena fäster du på utsidan av vänster framstycke och det andra på insidan av höger framstycke. du ser på den sista bilden hur det blir på ena sidan, du har då motsvarande på andra sidan men på insidan. Mvh DROPS design
19.11.2019 - 13:08
![]() LAURA TARONI wrote:
LAURA TARONI wrote:
Io che lavoro con ferri diritti come mi comporto con le gambe? Non riesco a capire! Grazie per una vostra eventuale risposta
02.10.2019 - 12:47DROPS Design answered:
Buongiorno Laura. La tutina è lavorata in ferri di andata e ritorno. Può quindi seguire le istruzioni senza dover apportare nessuna modifica. Buon lavoro!
02.10.2019 - 13:01
![]() Adri wrote:
Adri wrote:
Is it possible to knit the border instead of crochet. I'm left handed and can"t crochet at all.
31.08.2019 - 16:31DROPS Design answered:
Dear Adri, you can work a knitted edge if you rather like too, you then just have to adjust the pattern with the edge pattern you would l ike to get. Happy knitting!
02.09.2019 - 10:09
![]() Veronique wrote:
Veronique wrote:
Bonjour, poivre vous me dire comment assembler les 5 mailles entre elles ainsi que la fente devant jusqu'aux 3 m montées de chaque côté et coudre les 3m de bordure, je ne comprends pas très bien. Merci pour votre aide
22.08.2019 - 10:40DROPS Design answered:
Bonjour Véronique, on a 10 m rabattues au total pour l'entrejambe (= 5 de chaque côté de chaque jambe), on assemble les 5 m rabattues de chaque jambe entre elles (5 m du devant contre les 5 m du dos). On assemble ensuite entre elles au milieu devant les 3 côtes mousse tricotées avant de monter les 3 m de chaque côté. Puis on pose les 3 m des bordures devant l'une au-dessus de l'autre et on les coud en bas de la combinaison pour les fixer. Bon assemblage!
22.08.2019 - 11:38
![]() Christel wrote:
Christel wrote:
Bonjour Dois je assembler les jambes du devant en tricotant les 116 mailles ou dois je tricoter le devant séparément ? Merci pour votre aide et bonne journée
05.08.2019 - 22:51DROPS Design answered:
Bonjour Christel, vous tricotez d'abord les 2 jambes = 58 m à la fin de chaque jambe, vous coupez le fil à la fin de la 1ère jambe, mais à la fin de la 2ème jambe, vous tricotez d'abord les 58 m de celle-ci puis tricotez les 58 m de la 1ère jambe = 116 m au total. Vous tricotez maintenant la combinaison à partir du devant, puis le dos jusqu'à l'autre devant. Bon tricot!
07.08.2019 - 11:41
![]() Irene wrote:
Irene wrote:
Hola! Cuando dice montar 46 puntos (incluyendo 1 punto de orillo a cada lado) significa que tengo que montar 48 y que el primero y el ultimo son puntos de orillo o que tengo que montar 46 puntos de los cuales el primero y el ultimonson de orillo? Muchas gracias!
09.06.2019 - 22:33DROPS Design answered:
Hola Irene. Tienes que montar 46 puntos. Los puntos de orillo están incluidos en estos 46 puntos.
09.06.2019 - 22:45
![]() Turid wrote:
Turid wrote:
Hej ! Fins det någon video som visar hur man syr ihop dressen mellan benen ?
26.05.2019 - 22:47DROPS Design answered:
Hei Turid. Dessverre finnes det ikke noen viedo av dette, men vi har lagt inn et videoønske hos vår videoavdeling. Du skal altså sy de 5 maskene fra det ene benet, sammen med de 5 maskene fra det andre benet. Både foran og bak. God fornøyelse
27.05.2019 - 09:32
|
||||
Time for Fun#timeforfunjacket |
||||
 |
 |
|||
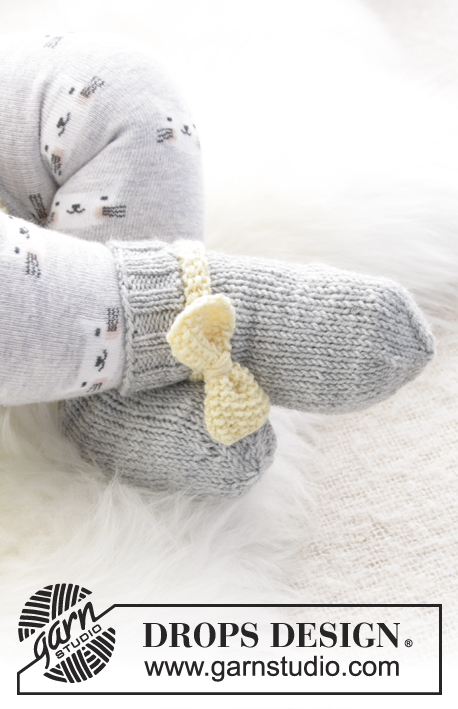
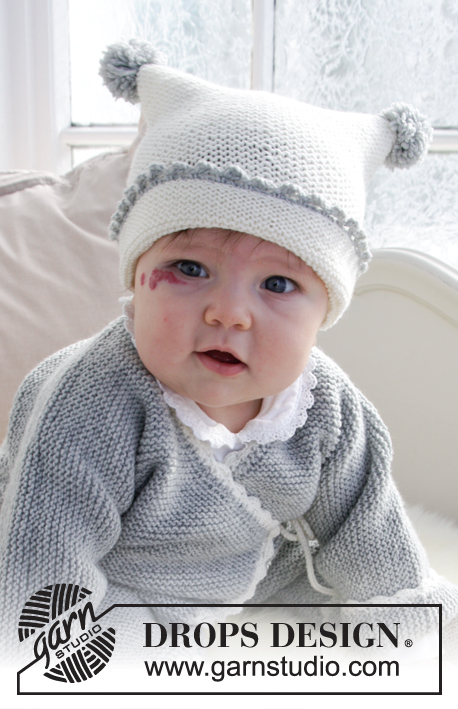
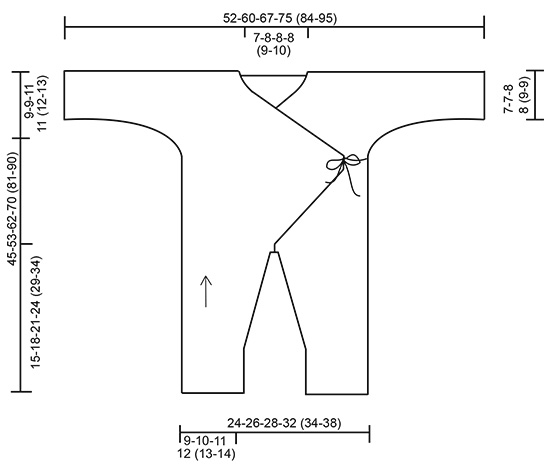
Set consists of: Knitted baby overall in garter stitch with crocheted edge, hat in garter stitch with crocheted edge and pompoms and socks. Size premature - 4 years Set is knitted in DROPS BabyMerino.
DROPS Baby 31-15 |
||||
|
INFORMATION FOR PATTERN: GARTER STITCH (worked back and forth - applies to suit and socks): Knit all rows. 1 ridge = knit 2 rows. GARTER STITCH (in the round - applies to hat): 1 ridge = 2 rounds. Knit 1 round and purl 1 round. INCREASE TIP (applies to suit): Increase inside 1 band stitch. All increases are done from the right side. Increase by making 1 yarn over. Knit yarn over twisted on next row, it should not make holes. DECREASE TIP (applies to suit): Decrease inside 1 band stitch. All decreases are done from the right side. Decrease as follows after 1 band stitch: Slip 1 stitch knitwise, knit 1, pass slipped stitch over. Decrease as follows before 1 band stitch: Knit 2 together. ---------------------------------------------------------- SUIT: Work from bottom up. First work 2 legs, then work the legs together and knit back and forth up to sleeve. Cast on stitches for sleeve in each side of piece, and finish front and back pieces separately until finished. Sew shoulder and sleeve seams and crochet an edge around the opening on suit in off white at the end. The entire suit is worked in GARTER STITCH - see explanation above. LEG: Worked back and forth on circular needle to make room for all the stitches. Cast on 46-50-54-58 (66-70) stitches (including 1 edge stitch in each side) on circular needle size 3 mm with light grey. Work in garter stitch. REMEMBER THE KNITTING TENSION! When piece measures 6 cm, increase 1 stitch in each side of piece inside 1 edge stitch in garter stitch (= 2 stitches increased). Increase like this every 3rd-4th-5th-5th (8th-8th) row 11-11-12-14 (13-16) times in total = 68-72-78-86 (92-102) stitches. When piece measures 15-18-21-24 (29-34) cm, cast off 5 stitches at the beginning of the 2 next rows (i.e. stitches are cast off in each side of piece) = 58-62-68-76 (82-92) stitches. Put piece aside and knit another leg the same way. SUIT: Slip both legs on to same circular needle size 3 mm with cast off stitches towards each other = 116-124-136-152 (164-184) stitches. Insert 1 marker thread in the piece. NOW MEASURE PIECE FROM HERE! Work 3 ridges back and forth, begin mid front. Then work as follows: Cast on 3 band stitches at the end of the next 2 rows = 122-130-142-158 (170-190) stitches. Insert 1 marker after 32-34-37-41 (44-49) stitches in from each side. Move the markers upwards when working, they mark front pieces and back piece. Now increase stitches mid front (i.e. in each side of piece) so that the front pieces overlap. Increase 1 stitch inside 1 band stitch in each side of piece (= 2 stitches increased) - read INCREASE TIP! Increase on very 4th row 3-2-0-3 (2-13) more times, then on every 6th row 8-11-16-17 (21-15) times (= 12-14-17-21 (24-29) stitches increased in total in each side of piece) = 44-48-54-62 (68-78) stitches on each front piece = 146-158-176-200-218-248 stitches in total. READ ALL OF THE FOLLOWING SECTION BEFORE CONTINUING! DECREASE MID FRONT FOR NECK INSIDE 1 BAND STITCH WHILE AT THE SAME TIME DIVIDING THE PIECE AND CASTING ON STITCHES FOR SLEEVE. DECREASE MID FRONT FOR NECK AS FOLLOWS: Work in garter stitch over all stitches until piece measures 17-20-25-28 (32-34) cm from marker thread. Then decrease 1 stitch inside 1 band stitch for neck in each side of piece (= 2 stitches decreased) - read DECREASE TIP! Decrease like this on every other row 20-24-27-31 (35-41) more times, then on very 4th row 2 times (= 23-27-30-34 (38-44) stitches decreased in total in each side of piece). DIVIDE THE PIECE AND CAST ON STITCHES FOR SLEEVE AS FOLLOWS: RIGHT FRONT PIECE: When piece measures 21-26-30-35 (40-43) cm from marker thread, divide piece at the 2 markers and finish front and back piece separately. Adjust so that next row is from right side. Now work over stitches until first marker (= right front piece). Slip the remaining stitches on a stitch holder. Now cast on stitches for sleeve at the end of every row from right side as follows (NOTE: Continue to decrease inside 1 band stitch at the beginning of row as before): Cast on 4-6-6-6 (6-6) stitches in 4-4-5-6 (7-8) times in total, then 17-17-16-16 (18-20) stitches 1 time in total (= 33-41-46-52 (60-68) stitches cast on in total for sleeve). When all stitches are cast on and all decreases are done, there are 54-62-70-80 (90-102) stitches on needle. Work in garter stitch until piece measures 45-53-62-70 (81-90) cm in total, measured from leg to shoulder. Cast off. LEFT FRONT PIECE: Work over the last stitches slipped on a stitch holder, until marker. Work as right front piece but reversed. I.e. cast on stitches for sleeve at the end of row from wrong side. Continue to decrease inside 1 band stitch at the end of row as before for neck. BACK PIECE: = 58-62-68-76 (82-92) stitches. Cast on new stitches at the end of every row in each side for sleeves as follows: Cast on 4-6-6-6 (6-6) stitches in 4-4-5-6 (7-8) times in total, then 17-17-16-16 (18-20) stitches 1 time in total (= 33-41-46-52 (60-68) stitches cast on in total for sleeve in each side of piece) = 124-144-160-180 (202-228) stitches. When piece measures 44-52-61-69 (80-89) cm in total, cast off the middle 16-20-20-20 (22-24) stitches for neck and finish each shoulder/sleeve separately (= 54-62-70-80 (90-102) stitches remain on each shoulder). Work like this until piece measures 45-53-62-70 (81-90) cm in total, measured from leg to shoulder, adjust according to front pieces. Cast off. Work the other shoulder the same way. ASSEMBLY: Sew overarm-/shoulder seams with grafting/Kitchener stitches from right side. Sew underarm seams together edge to edge in front loop of outermost stitches. Sew legs together inside 1 edge stitch, and sew the 5 stitches cast off between legs together, from the mid front to the mid back. Sew vent up to where the 3 new stitches were cast on in each side for band stitches and sew the 3 band stitches in each side of piece to suit. CROCHET EDGE: Crochet on hook size 2.5 mm with off white around the entire opening mid front on suit as follows: ROW 1 (= from wrong side): Begin mid front at the bottom of left front piece, work 1 double crochet in first stitch where 3 band stitches were cast on, * 1 chain stitch, skip approx. 1 cm, 1 double crochet in next stitch *, repeat from *-* (make sure to avoid a tight edge), continue crochet edge around suit until corner where decrease for neck began on left front piece, work tie as follows: 1 double crochet in tip, then work chain stitches for approx. 20-25 cm, turn and work 1 slip stitch in every chain stitch, then work 1 double crochet in tip on front piece again, work in the round until next tip (i.e. on right front piece), work tie, continue as before around the rest of suit down to where 3 band stitches were cast on, adjust to finish with 1 double crochet. ROW 2 (from right side): Work 1 chain stitch, 1 double crochet around first chain stitch, * 4 chain stitches, 1 treble crochet in 4th chain stitch from hook, skip 1 double crochet + 1 chain stitch + 1 double crochet, work 1 double crochet around next chain stitch *, repeat from *-* (make sure to work over ties so that the ties are under the edge, i.e. do not work in stitch in tie), finish with 1 slip stitch in first double crochet on previous row. Fasten off. Crochet on hook size 2.5 mm with off white at the bottom around both legs as follows: ROUND 1: Begin at the seam. Work 1 double crochet in first stitch, * 1 chain stitch, skip 2 stitches, 1 double crochet in next stitch *, repeat from *-* and finish with 1 slip stitch in first double crochet at beginning of round. ROUND 2: Work 1 chain stitch, 1 double crochet around first chain stitch, * 4 chain stitches, 1 treble crochet in 4th chain stitch from hook, skip 1 double crochet + 1 chain stitch + 1 double crochet, work 1 double crochet around next chain stitch *, repeat from *-* the entire round, finish with 1 slip stitch in first double crochet at beginning of round. Crochet on hook size 2.5 mm with off white at the edge around both sleeves as follows: ROUND 1: Work 1 double crochet in first stitch at the bottom of sleeve, * 1 chain stitch, skip approx. 1 cm, 1 double crochet in next stitch *, repeat from *-* (make sure to avoid a tight edge) and finish with 1 slip stitch in first double crochet at beginning of round. ROUND 2: Work 1 chain stitch, 1 double crochet around first chain stitch, * 4 chain stitches, 1 treble crochet in 4th chain stitch from hook, skip 1 double crochet + 1 chain stitch + 1 double crochet, work 1 double crochet around next chain stitch *, repeat from *-* the entire round, finish with 1 slip stitch in first double crochet at beginning of round. Then work 1 tie like the one in the tip on right and left front piece, on the outside of left front piece, under sleeve (i.e. in the side) and on the inside of right front piece – make sure that the ties are at the same hight as tips on front piece. ---------------------------------------------------------- HAT: Worked in the round on double pointed needles. Cast on (68) 82-94-100-104 (112-116) stitches on double pointed needles size 2.5 mm with off white. Work in GARTER STITCH – see explanation above – until piece measures 3.5 cm (= edge). On next round with knit, switch to double pointed needles size 3 mm and decrease 8 stitches evenly = (60) 74-86-92-96 (104-108) stitches. REMEMBER THE KNITTING TENSION! Continue in garter stitches until piece measures (17) 18-19-20-21 (22-23) cm. Cast off. Place hat flat and sew together at the top. POMPOM: Make 2 dense pompoms with a diameter of 5 cm with light grey and fasten at each end of seam. CROCHET EDGE: Turn hat inside out so that edge is worked from wrong side, this is folded later. Work on hook size 2.5 mm with light grey around the edge on hat as follows: ROUND 1: Work 1 double crochet in first stitch, * 2 chain stitches, skip 2 stitches, 1 double crochet in next stitch *, repeat from *-* and finish with 1 slip stitch in first double crochet at beginning of round. ROUND 2: Work 1 chain stitch, 1 double crochet around first chain stitch, * 4 chain stitches, 1 treble crochet in 4th chain stitch from hook, skip 1 double crochet + 1 chain stitch + 1 double crochet, work 1 double crochet around next chain stitch *, repeat from *-* the entire round. Finish with 1 slip stitch in first double crochet at beginning of round. Turn the hat with right side out and fold the edge up. ---------------------------------------------------------- SOCKS: The sock is worked back and forth from mid back. LEG: Cast on 48-52-56 (56) stitches on circular needles size 2.5 mm with off white. Work rib (= knit 2/purl 2) for 5-6-6 (7) cm, adjust so that next row is worked from wrong side. REMEMBER THE KNITTING TENSION! Purl 1 row from wrong side while AT THE SAME TIME decreasing 14-14-18 (14) stitches evenly = 34-38-38 (42) stitches. WITH EYELET HOLES: Work next row as follows from right side: Knit 1, * knit 2 together, 1 yarn over *, repeat from *-* and finish with knit 1. Purl 1 row from wrong side. WITHOUT EYELET HOLES: Knit 1 row from right side and purl 1 row from wrong side. FOOT: Now slip the outermost 12-13-13 (15) stitches in each side on 1 stitch holder. Work 4-4½-5½ (6½) cm in GARTER STITCH – see explanation above, over the middle 10-12-12 (12) stitches (= middle piece). Slip stitches from stitch holders back on needle and pick up 10-11-13 (16) stitches on each side of middle piece = 54-60-64 (74) stitches. Insert 1 marker after 27-30-32 (37) stitches in = middle of piece. Work in garter stitch for 3-4-5 (5) cm AT THE SAME TIME after 1½-2-2½ (3) cm decrease on every other row until finished measurements, as follows: Decrease 1 stitch at the beginning and the end of piece and knit 2 together on each side of the 2 middle stitches. Cast off and sew together mid under foot and continue up mid back in outer loops of edge stitches to avoid a chunky seam. If you wish, thread a silk ribbon through the eyelet holes. |
||||
Diagram explanations |
||||
|
||||
 |
||||
Have you finished this pattern?Tag your pictures with #dropspattern #timeforfunjacket or submit them to the #dropsfan gallery. Do you need help with this pattern?You'll find 32 tutorial videos, a Comments/Questions area and more by visiting the pattern on garnstudio.com. © 1982-2026 DROPS Design A/S. We reserve all rights. This document, including all its sub-sections, has copyrights. Read more about what you can do with our patterns at the bottom of each pattern on our site. |
||||


With over 40 years in knitting and crochet design, DROPS Design offers one of the most extensive collections of free patterns on the internet - translated to 17 languages. As of today we count 324 catalogues and 12290 patterns translated into English (UK/cm). 12290
We work hard to bring you the best knitting and crochet have to offer, inspiration and advice as well as great quality yarns at incredible prices! Would you like to use our patterns for other than personal use? You can read what you are allowed to do in the Copyright text at the bottom of all our patterns. Happy crafting!
Post a comment to pattern DROPS Baby 31-15
We would love to hear what you have to say about this pattern!
If you want to leave a question, please make sure you select the correct category in the form below, to speed up the answering process. Required fields are marked *.