
Popular categories
Looking for a yarn?


Comments / Questions (68)
![]() Annbjørg Stevnebø wrote:
Annbjørg Stevnebø wrote:
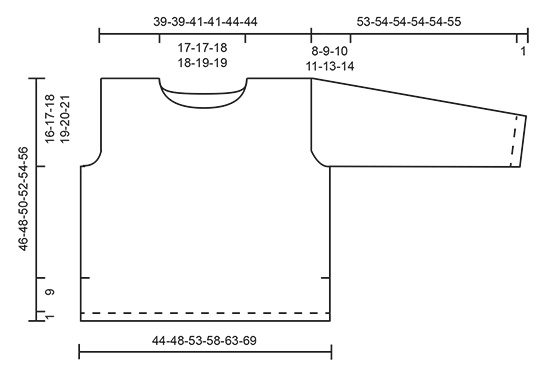
Hva er måla på dei forskjellige str ?
28.12.2021 - 12:35DROPS Design answered:
Hej Annbjørg. Du finner en måleskiss längst ner på oppskriften , under diagrammen. Mvh DROPS Design
03.01.2022 - 10:46
![]() Kjersti Hærum Lohne wrote:
Kjersti Hærum Lohne wrote:
I oppskriften står det strikk fra retten 3 masker rille = vil det si rett på retten og vrang på vrangen ? Så står det 10 masker rett = vil det si rett på retten og vrang på vrangen MVH Kjersti Lohne
26.03.2021 - 11:17DROPS Design answered:
Hej Kjersti. 3 m rille (strikkes frem og tilbake) = rett på retten og rett på vrangen. 10 masker rett = rett på retten og vrang på vrangen. Mvh DROPS Design
26.03.2021 - 11:52
![]() Gonny Naalden wrote:
Gonny Naalden wrote:
Hoe breed is de mouw voordat men gaat minderen voor de kop. Er staat geen aparte tekening van de mouw bij, dus is dit lastig te zien en het wordt ook niet vermeldt in het patroon. Wel de lengte
26.02.2020 - 14:56DROPS Design answered:
Dag Gonny,
Dit wordt onderaan aangegeven in de tekening en komt overeen met ongeveer de hoogte van het armsgat. (Deze maten staan aan de linkerkant aangegeven.
28.02.2020 - 19:24
![]() Maria wrote:
Maria wrote:
He tejido este jersey y ha quedado muy bonito, pero al humedecerlo para bloquearlo ha aumentado mucho su tamaño. Solo lo he humedecido y secado en una superficie plana, sin estirarlo. He tejido otro diseño y ha ocurrido lo mismo. Es normal y se debe al tratamiento superwash? Tengo otro proyecto y no se a que atenerme. Muchas gracias
01.12.2019 - 20:26DROPS Design answered:
Hola Maria. El problema que has tenido no es por el tratamiento superwash. Es difícil saberlo solo leyendo el comentario por qué ha pasado. Puede ser que, por ejemplo, la lana haya absorbido demasiado agua. Te recomendamos acudir a la tienda más cercana para tener ayuda personalizada
10.12.2019 - 00:03
![]() Solange Ho wrote:
Solange Ho wrote:
Hi, do you have instruction on how to assembly the neck to the body. Thanks. Solange
25.10.2019 - 18:33DROPS Design answered:
Dear Solange, there is not that much assembly for the neck on this sweater. You have to pick up 95-105 stitches around the neckline, and knit an edging according to teh description, and cast of with picos (also according to the description. Happy Knitting!
25.10.2019 - 21:21
![]() Solange wrote:
Solange wrote:
Hello. I’m new in knitting but I love this shirt so much that I attempt to knit one. I wonder if the wrong side is knit only since it said “ work pattern on the right side only”? Thank you so much for your wonderful work.
19.09.2019 - 12:59DROPS Design answered:
Dear Solange, all rows in pattern are shown in diagrams, ie the right side rows and the wrong side rows, bot seen from the right side - read more about diagrams here. Happy knitting!
19.09.2019 - 15:20
![]() Solange wrote:
Solange wrote:
Hello. Does the knit 2 pass the slipped stitch over to the knitted stitches considered as 1 or 2 stitch(s) on the next line? Thank you
17.09.2019 - 15:22DROPS Design answered:
Dear Solange, when you slip 1 stitch as if to knit, knit 2, pass the slipped stitch over the knitted stitches; 2 stitches remain on needle, you get such a small mock cable. Happy knitting!
17.09.2019 - 15:42
![]() Jeannie Jonasson wrote:
Jeannie Jonasson wrote:
Kære jer. Jeg kan ikke gennemskue, hvad forskellen er på retstrik (frem og tilbage = ret på alle p.) og masker ret, fx som angivet hér: "Strik mønster fra retsiden således: 3 masker retstrik, 4-8-10-15-18-24 masker ret (...)", Er det hele ikke bare retmasker?? Og hvad skal jeg strikke på hver vrangside? Kun vrang, kun ret eller mønster Jf "strik mønster fra retsiden (...)"? Mvh. og tak for hjælpen fra Jeannie
14.05.2019 - 10:22DROPS Design answered:
Hei Jeannie. Retstrikk er som du sier, at du strikker rett på hver pinne slik at det blir annenhver pinne rett og vrang sett fra rettsiden. Når du så skal strikke 4-8-10-15-18-24 masker rett vil dette si du skal strikke glattstrikk (rett fra rettsiden, vrang fra vrangsiden). Når du strikker fra rettsiden vil alle masker strikkes rett, men når du strikker fra vrangsiden vil rettstrikken strikkes rett, og glattstrikken (rettmaskene) strikkes vrang. Når du strikker etter diagram står det forklart i symbolforklaringen hvordan det strikkes fra vrangsiden. God fornøyelse
15.05.2019 - 12:54
![]() Hege Husabø wrote:
Hege Husabø wrote:
Eg treng ein video som viser korleis eg skal strikke picot på halskant på modell me-129
01.03.2019 - 17:30DROPS Design answered:
Hei Hege, På venstre siden av oppskriften, under fotografiet, finner du video på forskjellige teknikker. Søk på Picot så får du hjelp. God fornøyelse!
02.03.2019 - 09:57
![]() Hege Husabø wrote:
Hege Husabø wrote:
Eg treng ein video som viser korleis eg skal strikke picot på halskant på modell me-129
26.02.2019 - 17:34
|
|||||||||||||||||||||||||||||||||||||
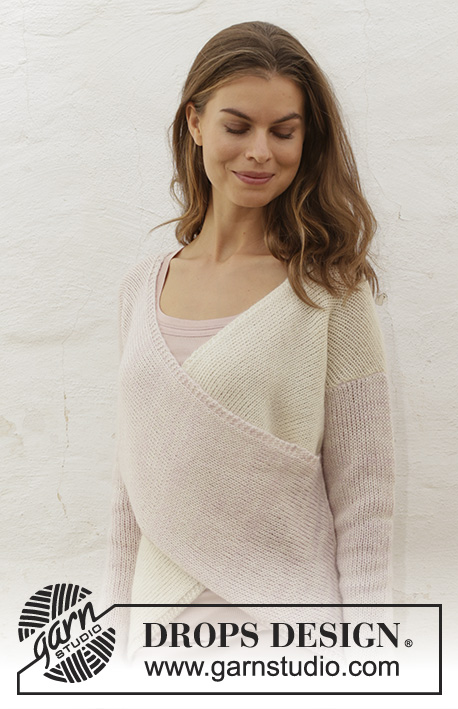
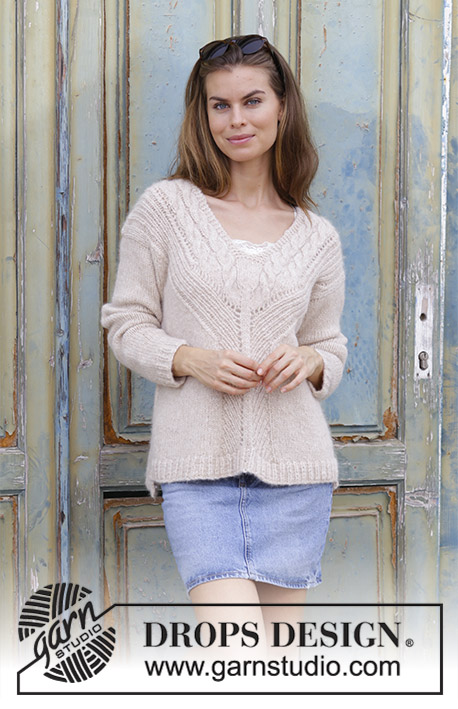
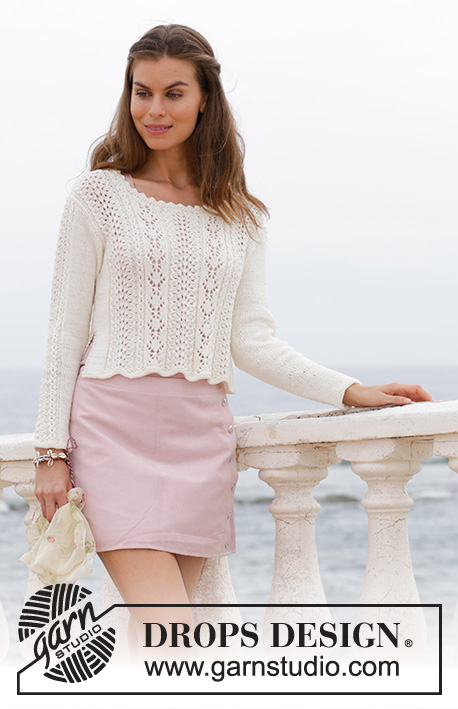
Rendez-vous#rendezvoussweater |
|||||||||||||||||||||||||||||||||||||
 |
 |
||||||||||||||||||||||||||||||||||||
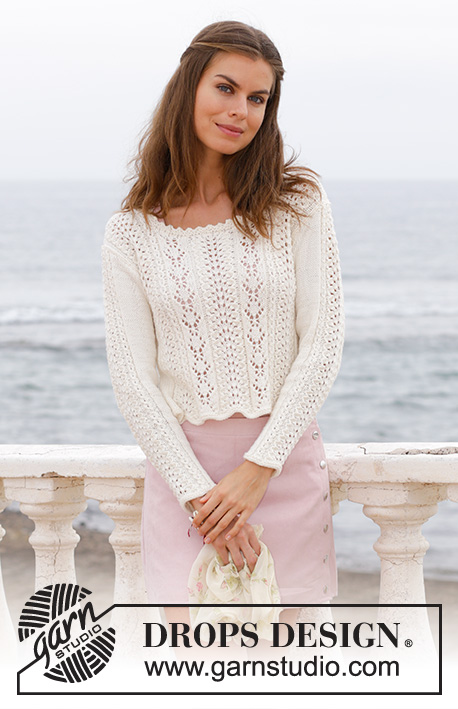
Knitted jumper with lace pattern and split in the sides. Sizes S - XXXL. The piece is worked in DROPS Merino Extra Fine.
DROPS 188-9 |
|||||||||||||||||||||||||||||||||||||
|
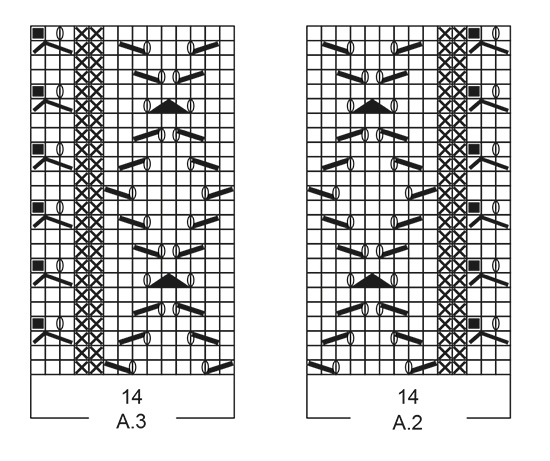
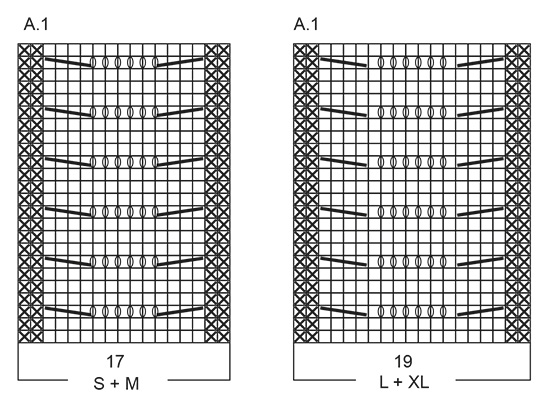
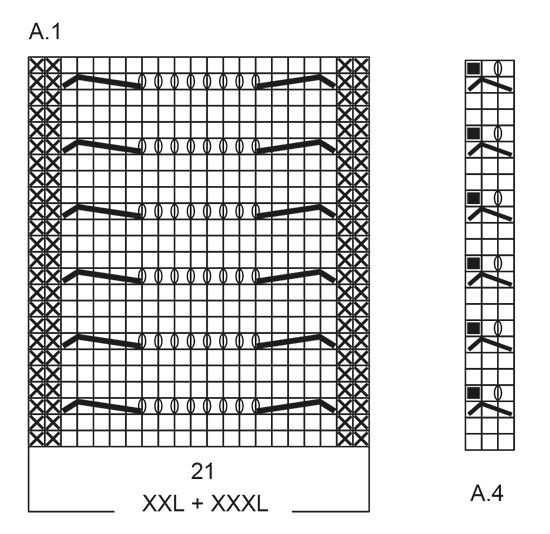
INFORMATION FOR THE PATTERN: RIDGE/GARTER STITCH (worked in the round): 1 ridge = 2 rounds. Knit 1 round and purl 1 round RIDGE/GARTER STITCH (worked back and forth): 1 ridge = Knit 2 rows. PATTERN: See diagrams A.1 to A.4. Choose diagram for your size (applies to diagram A.1). The diagrams show all the rows in the pattern seen from the right side. INCREASE TIP (for sleeves): All increases are made from the right side! Increase 1 stitch by making 1 yarn over between 2 stitches; on the next row, purl the yarn over twisted to avoid a hole. ---------------------------------------------------------- JUMPER: The piece is worked back and forth with circular needle and the parts are sewn together to finish. It is worked bottom up. The sleeves are worked back and forth with circular needle. BACK PIECE: Cast on (a little loosely) 93-101-111-121-133-145 stitches with circular needle size 4 mm and Merino Extra Fine. Work 2 RIDGES – see description above. Work pattern from the right side as follows: 3 stitches in garter stitch, knit 4-8-10-15-18-24 stitches, A.1 (= 17-17-19-19-21-21 stitches), A.2 (= 14 stitches), A.1, A.3 (= 14 stitches), A.1, knit 4-8-10-15-18-24 stitches, 3 stitches in garter stitch. Continue back and forth in this way until the piece measures 10 cm. At the end of the next 2 rows, cast on 1 new stitch (marks the split) = 95-103-113-123-135-147 stitches. REMEMBER THE KNITTING TENSION! Now continue the pattern from the right side as follows: 1 stitch in garter stitch, knit 7-11-13-18-21-27 stitches, A.1 (= 17-17-19-19-21-21 stitches), A.2 (= 14 stitches), A.1, A.3 (= 14 stitches), A.1, knit 7-11-13-18-21-27 stitches, 1 stitch in garter stitch. Continue the pattern like this. When the piece measures 30-31-32-33-34-35 cm, cast off for armhole on every 2nd row in each side as follows: Cast off 4 stitches 1-1-1-2-2-3 times, 2 stitches 0-2-3-3-4-4 times and 1 stitch 2-2-2-3-4-6 times = 83-83-89-89-95-95 stitches. Continue the pattern as follows: 1 stitch in garter stitch, knit 1, continue the pattern as before over the next 79-79-85-85-91-91 stitches, knit 1, 1 stitch in garter stitch. When the piece measures 43-45-47-49-51-53 cm cast off the middle 33-33-35-35-37-37 stitches for neck and each shoulder is finished separately. Continue by casting off 1 stitch on the next row from the neck = 24-24-26-26-28-28 stitches. When the piece measures 45-47-49-51-53-55 cm – adjust so that you finish after row 4, 8, 12, 16, 20 or 24 in the pattern, work 2 ridges over all stitches. Cast off, but make sure that the cast off edge is not tight. Work the other shoulder in the same way. FRONT PIECE: Cast on and work as for back piece. When the piece measures 30-31-32-33-34-35 cm cast off for the armholes in the same way as for the back piece = 83-83-89-89-95-95 stitches. Now continue from the right side as follows: 1 stitch in garter stitch, knit 1, continue the pattern as before over the next 79-79-85-85-91-91 stitches, knit 1, 1 stitch in garter stitch. When the piece measures 36-38-40-41-43-45 cm place the middle 17-17-19-19-21-21 stitches on 1 thread for neck and each shoulder is finished separately. Continue by casting off for the neck on each row from the neck as follows: Cast off 3 stitches 2 times, 2 stitches 1 time and 1 stitch 1 time = 24-24-26-26-28-28 stitches. When the piece measures 45-47-49-51-53-55 cm – adjust so that you finish after row 4, 8, 12, 16, 20 or 24 in the pattern and that it matches the back piece, work 2 ridges over all stitches. Cast off, but make sure that the cast off edge is not tight. Work the other shoulder in the same way. SLEEVE: Cast on (a little loosely) 41-45-47-49-51-53 stitches with circular needle size 4 mm and Merino Extra Fine. Work 2 ridges. Then work pattern from the right side as follows: 1 edge stitch in garter stitch, knit 6-8-8-9-9-10 stitches, purl 2 stitches, A.4 (= 3 stitches), A.1 – choose diagram for your size (= 17-17-19-19-21-21 stitches), A.4, purl 2 stitches, knit 6-8-8-9-9-10 stitches, 1 edge stitch in garter stitch. Continue like this back and forth. When the piece measures 8-8-8-7-5-5 cm increase 1 stitch inside the 1 edge stitch in garter stitch in each side – read INCREASE TIP! Increase like this every 3-3-3-2-2-2 cm 8-8-8-11-14-15 times and every 4-4-2-3-3-1 cm 3-3-5-4-2-3 times = 63-67-73-79-83-89 stitches. When the piece measures 45-45-44-43-41-41 cm cast off for sleeve cap at the beginning of each row in each side as follows: Cast off 4 stitches 1 time, 2 stitches 4-4-5-5-5-5 times, 1 stitch 1-2-3-5-7-9 times and 2 stitches 5-5-5-5-5-5 times = 17-19-19-21-21-23 stitches. Cast off the remaining stitches. The sleeve measures approx. 53-54-54-54-54-55 cm. Work the other sleeve in the same way. ASSEMBLY: Sew the shoulder seams with grafting stitches. Sew the sleeves into the body inside the cast off edge on the sleeves and the 1 edge stitch in garter stitch on the body. Sew the sleeve seam and then continue down the side as far as the split (sew inside the 1 edge stitch in garter stitch in each side). Repeat on the other side. NECK: The neck is worked in the round with short circular needle. Knit up from the right side approx. 95-105 stitches (including the stitches from the thread mid front) with short circular needle size 4 mm. Work 2 RIDGES in the round – see description above. Knit 1 round where the number of stitches is adjusted so that it is divisible by 3 + 2 (e.g. 95, 98, 101 or 104 stitches) - this is because you will cast off with picot as follows: Knit 1 stitch, (* insert the right needle between the first 2 stitches on the left needle (i.e. between the stitches on the needle, not through the stitches) make 1 yarn over the right needle, pull the yarn over through between the stitches and place it on the left needle *, work from *-* 2 more times (= 3 new stitches on the left needle). ** Knit the first stitch on the left needle, pass the first stitch on the right needle over the last stitch worked **), work from **-** a total of 6 times and repeat from (-) along the whole neck until there is 1 stitch left. Cut the strand and pull it through the last stitch. |
|||||||||||||||||||||||||||||||||||||
Diagram explanations |
|||||||||||||||||||||||||||||||||||||
|
|||||||||||||||||||||||||||||||||||||
 |
|||||||||||||||||||||||||||||||||||||
 |
|||||||||||||||||||||||||||||||||||||
 |
|||||||||||||||||||||||||||||||||||||
 |
|||||||||||||||||||||||||||||||||||||
Have you finished this pattern?Tag your pictures with #dropspattern #rendezvoussweater or submit them to the #dropsfan gallery. Do you need help with this pattern?You'll find 36 tutorial videos, a Comments/Questions area and more by visiting the pattern on garnstudio.com. © 1982-2026 DROPS Design A/S. We reserve all rights. This document, including all its sub-sections, has copyrights. Read more about what you can do with our patterns at the bottom of each pattern on our site. |
|||||||||||||||||||||||||||||||||||||


With over 40 years in knitting and crochet design, DROPS Design offers one of the most extensive collections of free patterns on the internet - translated to 17 languages. As of today we count 324 catalogues and 12290 patterns translated into English (UK/cm). 12290
We work hard to bring you the best knitting and crochet have to offer, inspiration and advice as well as great quality yarns at incredible prices! Would you like to use our patterns for other than personal use? You can read what you are allowed to do in the Copyright text at the bottom of all our patterns. Happy crafting!
Post a comment to pattern DROPS 188-9
We would love to hear what you have to say about this pattern!
If you want to leave a question, please make sure you select the correct category in the form below, to speed up the answering process. Required fields are marked *.