Comments / Questions (52)
![]() Michelle wrote:
Michelle wrote:
Pourriez-vous m'aider pour le modèle 17147 châle dentelle? Grille 1 : après le 20e rang il y a 51 mailles, que veut dire Ax sur les croquis? Merci
09.12.2020 - 19:04DROPS Design answered:
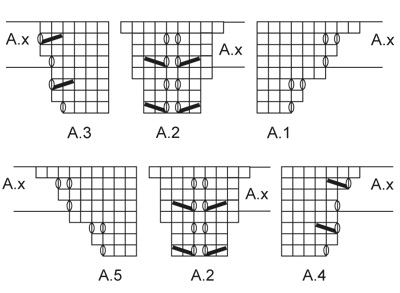
Bonjour Michelle, A.x correspond aux 4 derniers rangs des diagrammes A.1 à A.5 que vous devez répéter 24 fois au total en hauteur (= vous avez ainsi 339 m). Vous allez ainsi augmenter 4 mailles au 1er rang de A.x et 8 mailles au 2ème rang de A.x soit 12 mailles à chaque fois que ces 4 rangs sont tricotés. Bonne continuation!
10.12.2020 - 08:50
![]() Marianne Ålstig wrote:
Marianne Ålstig wrote:
Hej, är det diagram som jag kan läsa här det som är rättat så att det stämmer? Tacksam för svar
07.09.2020 - 00:16DROPS Design answered:
Hej Marianne. Ja diagrammen du ser är rättade. Mvh DROPS Design
07.09.2020 - 11:09
![]() Margret wrote:
Margret wrote:
Hallo, ich stricke das Tuch und komme jetzt nicht weiter. Nach A1 bis A5 1mal in der Höhe gestrickt, wie geht es jetzt weiter? Fange ich wieder in der ersten Reihe des Diagramms an oder soll ich die Reihen 9 bis 15 Stricken? Und bleibt es bei den 3 markierten Maschen, wobei dann die Zwischenräume glatt rechts immer größer werden?
14.05.2020 - 17:23DROPS Design answered:
Liebe Magret, nach A.1 bis A.5 1 Mal in der Höhe gestrickt wird, wiederholen Sie nur die Reihen in A.x (= die 4 letzten Reihen in den Diagrammen) une diese 4 Reihe wiederholen Sie 23 mehr mal (= A.x wird so 24 Mal in der Höhe gestrickt). A.2 stricken Sie immer wie zuvor, mit dem Markierer in der mittleren Maschen. Viel Spaß beim stricken!
15.05.2020 - 08:10
![]() Anja Von Karstedt wrote:
Anja Von Karstedt wrote:
Hallo. Ich habe mir ein Strickheft gekauft wo dieses Lacetuch abgebildet ist. Ich würde es gerne stricken und bis Reihe 12 ist auch alles gut. Aber ab Reihe 13 komme ich nicht mehr mit. Dort steht beschrieben das ich zur MM 4 Maschen rechts stricken soll ich habe aber nur drei und auf der linken Seite natürlich auch. Was mache ich verkehrt? Vielen Dank im Voraus für eine Antwort.
04.10.2019 - 11:09DROPS Design answered:
Liebe Frau Von Karstedt, haben Sie gesehen, daß die Diagramme A.2, A.3 und A.4 wurde korrigiert? Am besten drücken Sie diese Diagramme noch einmal. Viel Spaß beim stricken!
04.10.2019 - 12:15
![]() Paola wrote:
Paola wrote:
Vorrei sapere se quando trovo scritto che i modelli sono stati corretti lo schema riportato sotto e' quello esatto
16.10.2018 - 03:16DROPS Design answered:
Buongiorno Paola. Sì, quando viene segnalato che il modello è stato corretto, la correzione è già stata apportata. Trova l’indicazione della correzione cliccando sul link “Cliccare sul link per vedere la/le correzione/correzioni”. Se dovesse riscontrare ulteriori errori, c’è li può segnalare. Buon lavoro!
16.10.2018 - 06:52Zohreh wrote:
Hi. I've just started knitting this pattern. But diagram A.1 to A.5 have mistakes in 4th and 8th rows. in A.2 3rd and 7th rows when we have 2 YO without K2 tog, we will inc 2 sts in A.2. but in next row you add both of these 2 sts to A.3 and A.5. whereas it is not possible. 1 will be in A1/A4 and 1 in A.3/A.5. when I did like the diagram the position of YOs changed.
09.10.2018 - 19:12DROPS Design answered:
Dear Zohreh, thanks for your feedback, diagrams will be checked again.
10.10.2018 - 09:14
![]() Marielle wrote:
Marielle wrote:
Bonjour J’ai tricoté de A1aA5 une fois mais là je ne comprend pas les augmentations. Faut il que je continue en commençant au trait de Ax?pouvez vous m’aider s’il vous plaît Merci
30.10.2017 - 21:50DROPS Design answered:
Bonjour Marielle, vous répétez maintenant la partie A.x des diagrammes, soit à partir du trait jusqu'au dernier rang. Bon tricot!
31.10.2017 - 09:26
![]() Carolyn B wrote:
Carolyn B wrote:
Am trying to knit this pattern and am stuck on charts 6 to 8. By the count at the end of knitting these charts once vertically, there are nowhere near 429 stitches What am I missing? There are only 2 increased stitches on each rs row and an extra 4 sts on rows 11 and 17
15.07.2017 - 20:00DROPS Design answered:
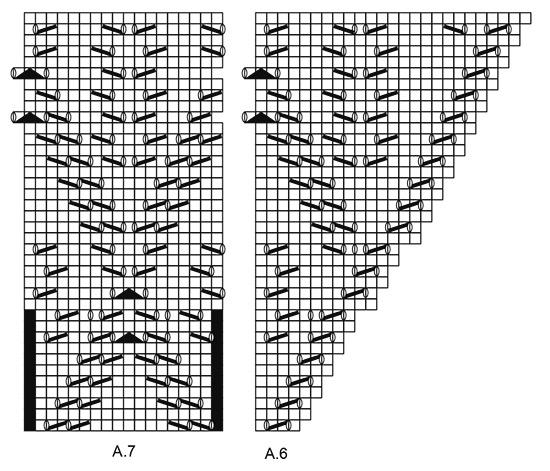
Dear Carolyn B, you are increasing: 21 st in A.6 (starting with 4 sts + 21 = 25 sts), 2 sts in each A.7 (starting with 16 sts + 2 = 18 sts x 21 = 378 sts) 21 sts in each A.8 (starting with 3 sts + 21 = 24 sts). You will then have: 1 edge st, 25 sts in A.2, 378 sts in A.7, 24 sts in A.8, 1 edge st = 1 + 25 + 378 + 24 + 1 = 429 sts. Happy knitting!
17.07.2017 - 09:07
![]() Carolyn wrote:
Carolyn wrote:
Can you please clarify the setting of markers and Row 11, which I think is missing instructions? I'm a new knitter and struggling but want to make this beautiful shawl! Thanks...
19.05.2017 - 20:24DROPS Design answered:
Hi Carolyn, After row 9 you should have 3 markers, 1 in the middle of the shawl and 1 each side, the first one in the middle of the 1 edge st in garter st, 1 YO, K 1, 1 YO, K 3 (at the beginning of the row) and one in the middle of 1 YO, K 1, 1 YO, K 3 after the second marker. You only use the middle marker (which is on the middle stitch) for row 11. The other markers are used subsequently. I will let the design deptmt know about the pattern. Thanks for your comments. Kind regards, Deirdre
21.05.2017 - 10:43
![]() Maite Fervenza wrote:
Maite Fervenza wrote:
Hola. Estoy tejiendo el chal Angelique en Lace y no consigo aclararme con los aumentos. Son 12 aumentos por cada repetición vertical de A1-A5. En La primera fila LD, aumento 4pts , uno a cada lado de A2. Pero cuando aumentó la siguiente , no se colocar los 8 aumentos restantes. Me lo podríais explicar? Gracias
05.04.2017 - 21:05DROPS Design answered:
Hola Maite. presta atención a los diagramas: 2 aumentos al inicio de A.1, 2 en el centro de A.2 (primera parte), 2 en el centro de A.2 y 2 al final de A.5 (segunda parte) = un total 8 puntos aumentados.
14.04.2017 - 12:48
Angelique#angeliquescarf |
|||||||||||||||||||
 |
 |
||||||||||||||||||
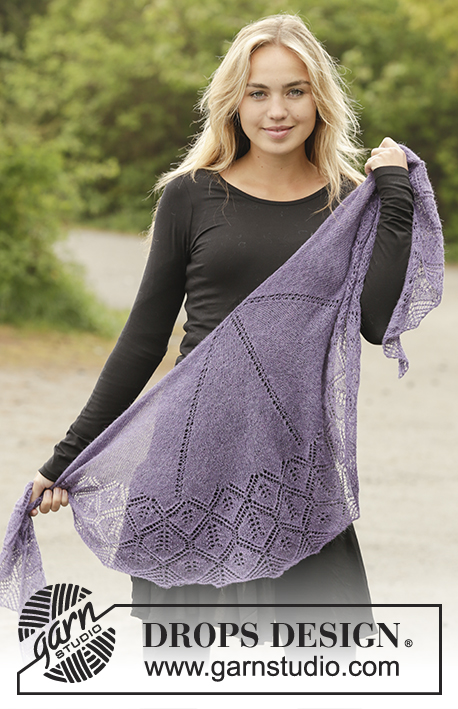
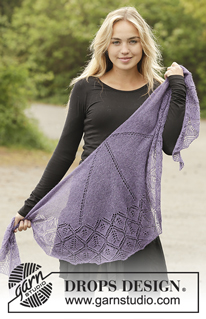
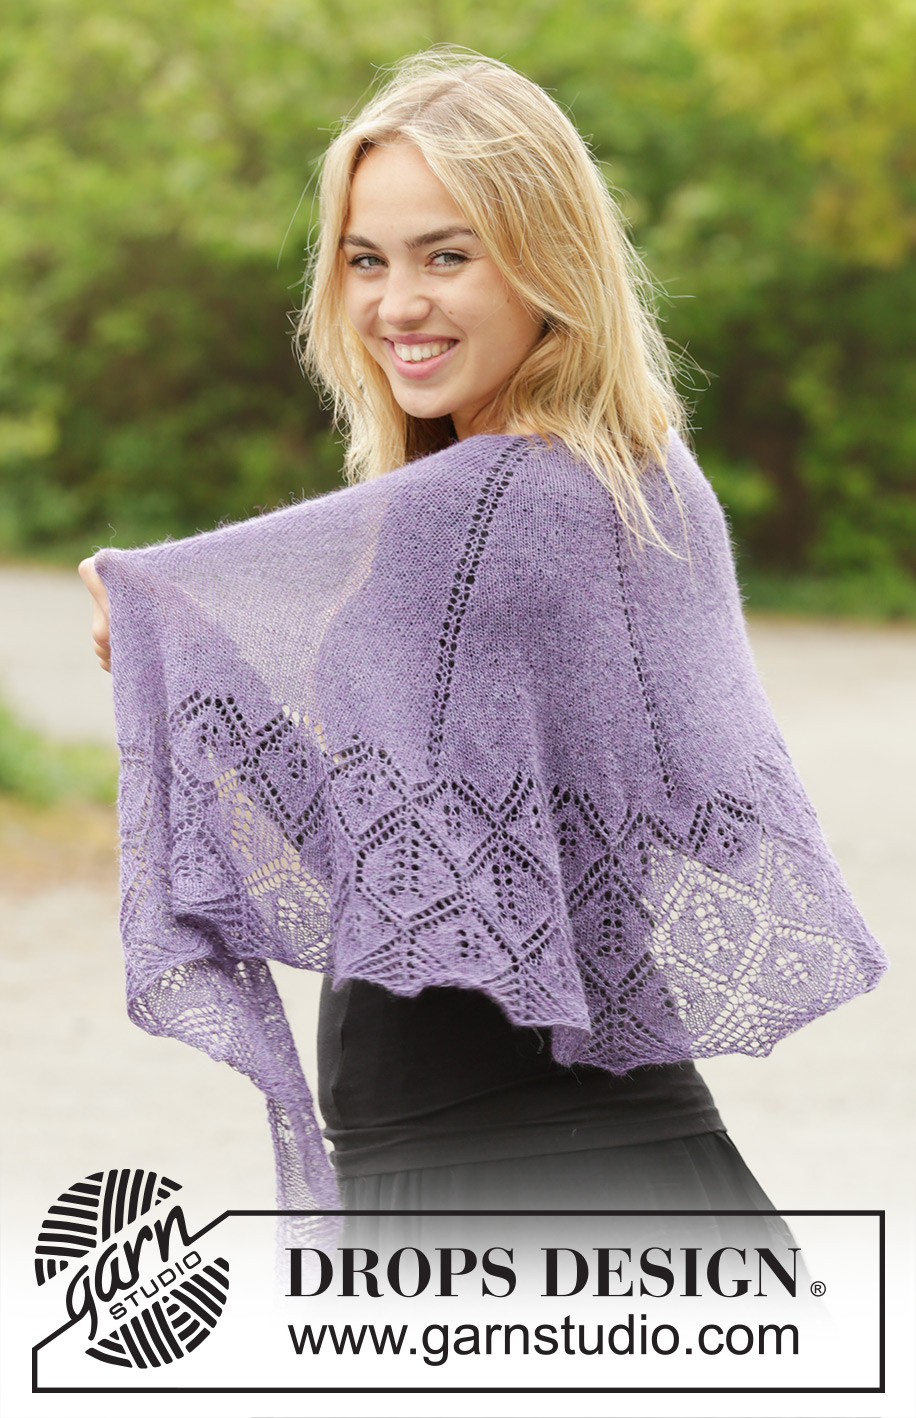
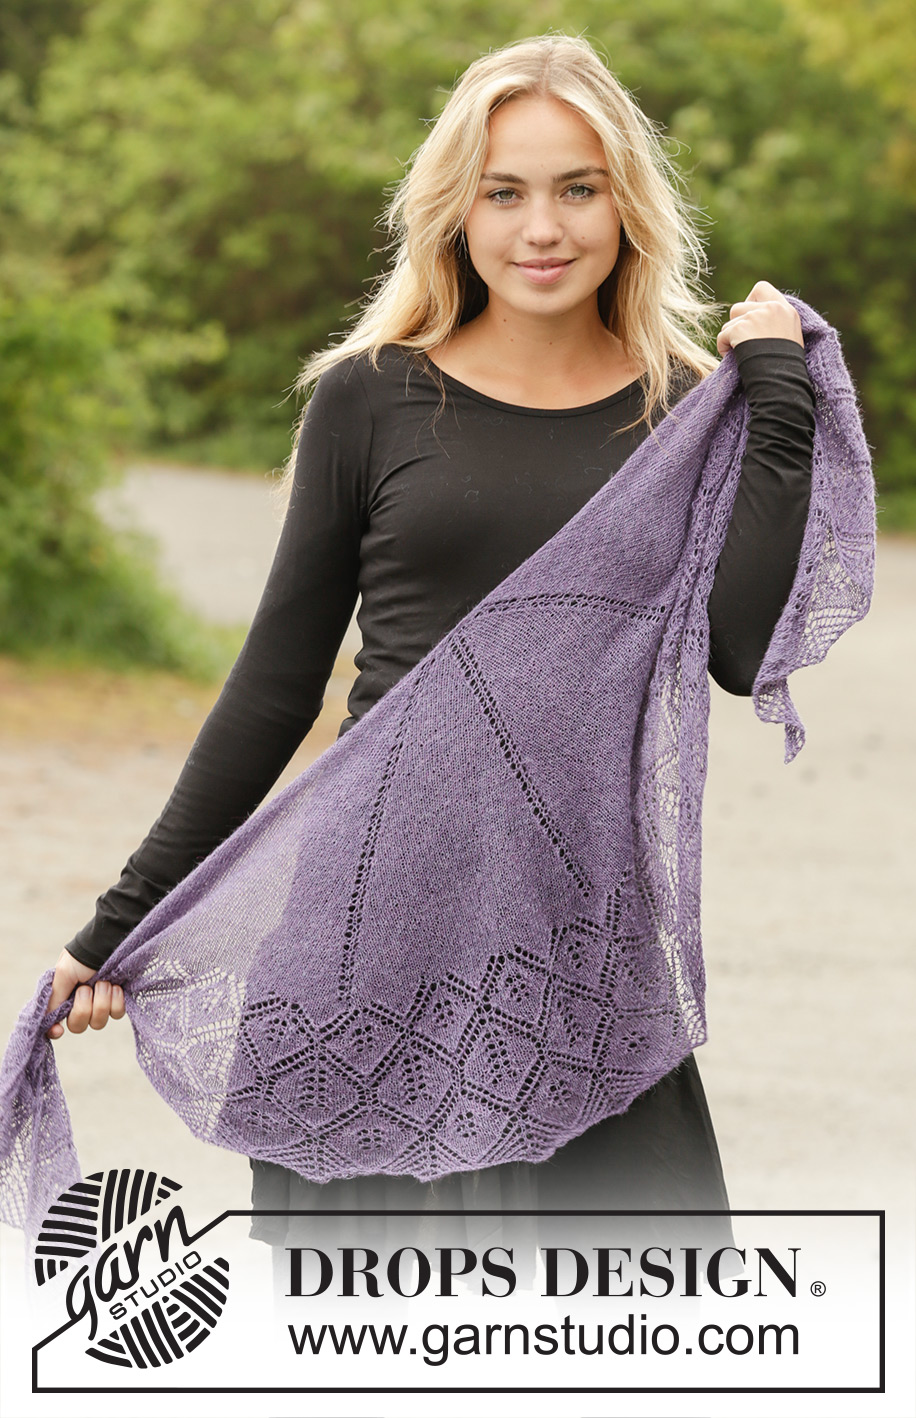
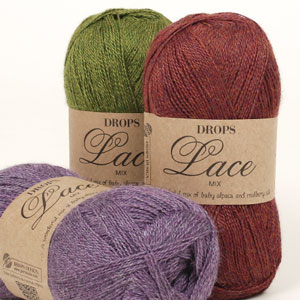
Knitted DROPS half-moon shaped shawl in stocking st with lace pattern in ”Lace”.
DROPS 171-47 |
|||||||||||||||||||
|
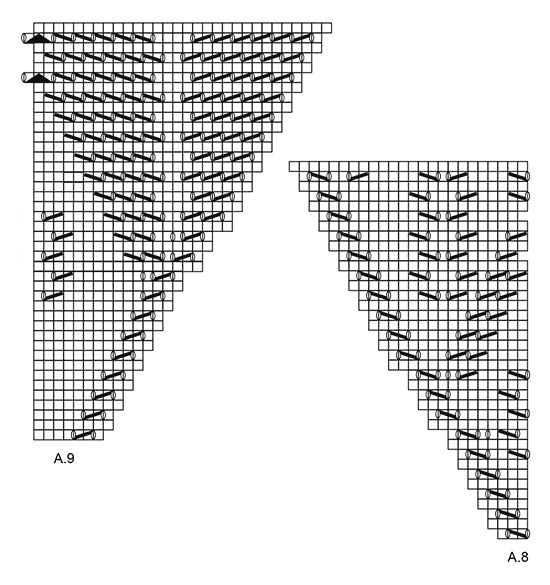
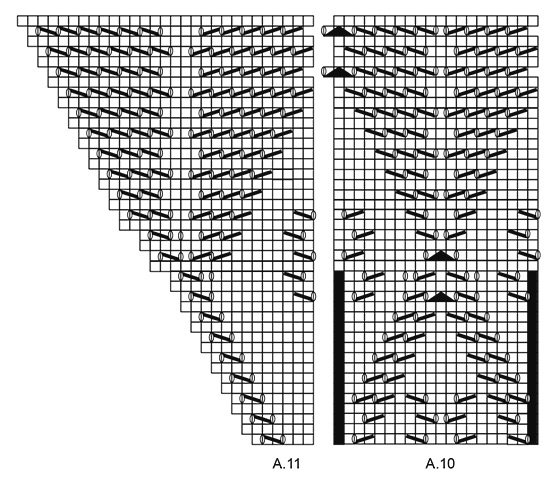
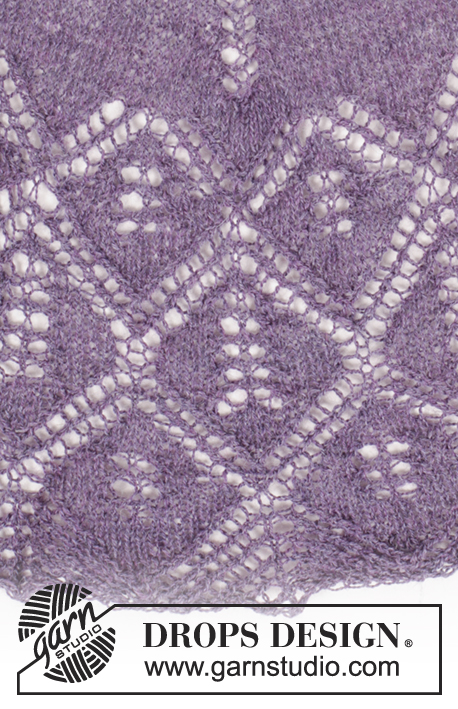
GARTER ST (back and forth): K all rows. 1 ridge = 2 rows K. PATTERN: See diagrams A.1 to A.11. The diagrams show all rows in pattern seen from RS. KNITTING TIP: The shawl can be knitted with other needle sizes than those given here. Use smaller needles for a smaller shawl and larger needles for a larger shawl. Stretch the shawl to shape at the end, possible uneven places should then even out. SHAPING: When using another yarn from yarn group A, there is no need to stretch the shawl to measurements, but place it gently out in shape. Leave to dry. Repeat the process when the shawl has been washed. ---------------------------------------------------------- SHAWL: Cast on 3 sts on circular needle size 3 mm with Lace - read KNITTING TIP above. Then work and inc as follows: ROW 1: 1 edge st in GARTER ST - see explanation above, 1 YO, 1 st in stocking st, 1 YO, 1 edge st in garter st. Insert a marker in the middle st = 5th st. ROW 2 and all rows from WS: Work 1 edge st in garter st in each side (K from WS) and P all sts and YOs. ROW 3: 1 edge st in garter st, K 1, 1 YO, K 1, 1 YO, K 1 and 1 edge st in garter st = 7 sts. ROW 5: 1 edge st in garter st, 1 YO, K 1, 1 YO, K 3, 1 YO, K 1, 1 YO and 1 edge st in garter st = 11 sts. ROW 7: 1 edge st in garter st, 1 YO, K 3, 1 YO, K 3, 1 YO, K 3, 1 YO and 1 edge st in garter st = 15 sts. ROW 9: 1 edge sts in garter st, 1 YO, K 1, 1 YO, K 3 and insert a marker in the middle of these st, 1 YO, K 1, 1 YO, K 3 (there is a marker in the sts in the middle of these sts = mid st), 1 YO, K 1, 1 YO, K 3 and insert a marker in the middle of these sts, 1 YO, K 1, 1 YO and 1 edge st in garter st = 23 sts. Row 11: 1 edge st in garter st, 1 YO, K until mid st, 1 YO, K1 (= mid st), 1 YO and K until 1 edge st remain, 1 YO and 1 edge st in garter st = 27 sts. Work according to diagram A.1 to A.5 as follows from RS: Work 1 edge st in garter st, A.1 over 3 sts, A.2 over 5 sts (first marker is in the middle of A.2), A.3 over 4 sts, 1 st in stocking st (second marker is in the middle of this st = mid st), A.4 over 4 sts, A.2 over 5 sts (third marker is in the middle of A.2), A.5 over 3 sts and 1 edge st in garter st = 31 sts. REMEMBER THE KNITTING TENSION. When A1-A.5 has been worked 1 time vertically, there are 51 sts on needle. Repeat inc as shown in A.x, inc alternately 4 and 8 sts on every row from RS (i.e. 12 sts for every repetition vertically), work the inc sts in stocking st on each side of every A.2. Move the markers upwards when working to mark mid st and middle of A.2. Repeat as shown in A.x 24 times in total vertically, there are 339 sts in total on needle (piece measures approx. 35 cm). On next row from RS work and inc 4 sts as shown on first row of A.x = 343 sts. P 1 row from WS (work edge sts in each side of piece in garter st until finished measurements). K 1 row from RS and inc 1 st inside 1 edge st in garter st in each side = 345 sts on needle and P 1 row from WS. Work according to diagram A.6 to A.8 as follows from RS: 1 edge st in garter st, A.6 over 4 sts, repeat A.7 21 times (4 sts remain on needle), A.8 over 3 sts and 1 edge st in garter st. NOTE: In diagram 2 sts are inc on the 11th row in every repetition of diagram A.7, A.6 and A.8. And 2 sts are inc on 17th row of A.6 and A.8. Work diagrams 1 time vertically = 429 sts. Work according to diagram A.9 to A.11 as follows from RS: 1 edge st in garter st, A.9 over 7 sts, repeat A.10 23 times (7 sts remain on needle), A.11 over 6 sts and 1 edge st in garter st. NOTE: In diagram 2 sts are inc on the 17th row in every repetition of diagram A.9, A.11 and A.10. And 2 sts are inc on 21st row in A.9 and A.11. Work diagrams 1 time vertically = 521 sts, but on last row from WS loosely cast off with P. BLOCKING: Place the shawl in lukewarm water until it is soaking wet. Carefully squeeze the water out of the shawl - do not twist the shawl - then roll the shawl in a towel and squeeze to remove more water - the shawl will now only be moist. If another yarn from yarn group A is used - read SHAPING above. Place the shawl on a carpet or mattress - carefully stretch it out to size and fasten it with pins. If desired shape the edge by stretching a little bit in the area between the leaves to form tips and fasten these tips with pins along the cast off edge. Leave shawl to dry. Repeat the process when the shawl has been washed. |
|||||||||||||||||||
Diagram explanations |
|||||||||||||||||||
|
|||||||||||||||||||
 |
|||||||||||||||||||
 |
|||||||||||||||||||
 |
|||||||||||||||||||
 |
|||||||||||||||||||
Have you finished this pattern?Tag your pictures with #dropspattern #angeliquescarf or submit them to the #dropsfan gallery. Do you need help with this pattern?You'll find 20 tutorial videos, a Comments/Questions area and more by visiting the pattern on garnstudio.com. © 1982-2026 DROPS Design A/S. We reserve all rights. This document, including all its sub-sections, has copyrights. Read more about what you can do with our patterns at the bottom of each pattern on our site. |
|||||||||||||||||||







Post a comment to pattern DROPS 171-47
We would love to hear what you have to say about this pattern!
If you want to leave a question, please make sure you select the correct category in the form below, to speed up the answering process. Required fields are marked *.