
Popular categories
Looking for a yarn?


Comments / Questions (51)
![]() Charlotte M Ledonne wrote:
Charlotte M Ledonne wrote:
I followed the directions, including gauge and ran short on 100g of yarn for this shawl. I needed to unravel and rework the pattern to use the 100g I had on hand. Is it possible that the pattern requires 150g of yarn?
30.06.2024 - 22:44DROPS Design answered:
Dear Charlotte, a lot depends on your personal gauge, the yarn you are using, etc. According to Ravelry , a number of people have knit this shawl from about a 100 gramms of lace yarn, and some of our translators also have knitted it from a 100 gramms of DROPS laceyarn as well. Happy Knitting!
30.06.2024 - 23:04
![]() Nicole wrote:
Nicole wrote:
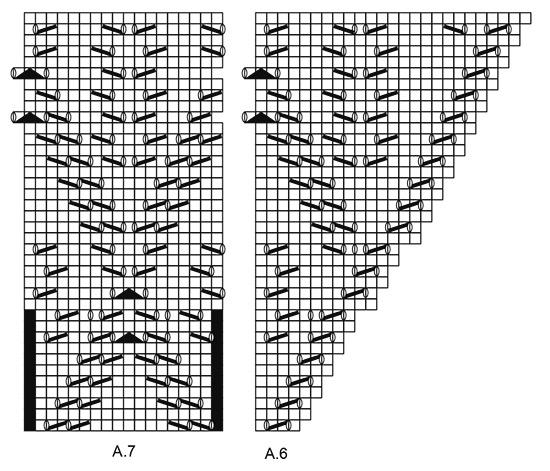
Bonjour Que voulez vous dire au deuxième paragraphe A.6 au dessus des 4 mailles suivantes et répéter 21 fois A.7
24.06.2024 - 03:31DROPS Design answered:
Bonjour Nicole, vous tricotez les 4 mailles suivantes (après la maille lisière au point mousse) en suivant le diagramme A.6, puis vous répétez 27 fois le diagramme A.7; il va vous rester 4 mailles sur l'aiguille gauche avant la fin du rang, tricotez maintenant A.8 et terminez par 1 maille lisière au point mousse. Bon tricot!
24.06.2024 - 10:02
![]() Nicole wrote:
Nicole wrote:
Bonjour Lorsque nous faisons le deuxième patron du A.4 et A.2 qui se suivent, nous nous trouvons à faire deux jeté de suite Est-ce correct Merci
24.06.2024 - 00:00DROPS Design answered:
Bonjour Nicole, vous n'aurez jamais 2 jetés qui se suivent, les jetés de A.x dans A.4 se font au début de A.4 (= après la maille centrale en jersey), et les jetés de A.2 se font au milieu de A.2 (ces jetés doivent être alignés sur ceux du A.2 précédent), tout comme dans les diagrammes A.x de A.1 et A.2 au début du rang. Bon tricot!
24.06.2024 - 09:59
![]() Nicole wrote:
Nicole wrote:
Bonsoir Lorsque j'arrive pour faire comme un A.4 au dessus d'un autre et que j'ai plus de point que le celui dans dessous que fais je Merci
20.06.2024 - 05:04DROPS Design answered:
Bonjour Nicole, tricotez A.4 au-dessus des premières mailles juste après la maille centrale en jersey, tricotez les mailles suivantes en jersey jusqu'à A.2, tricotez A.2, puis en jersey et terminez par A.5 et 1 m lisière au point mousse. Bon tricot!
20.06.2024 - 08:12
![]() Nicole wrote:
Nicole wrote:
Bonjour Vous dites de faire A.1 à A.5 mais après le A.4 vous dites A.2 avant de terminer avec le A.5
20.06.2024 - 02:21DROPS Design answered:
Bonjour Nicole, effectivement vous tricotez d'abord A.1, puis A.2 puis A.3, 1 maille jersey (maille centrale) puis A.4, A.2 et enfin A.5; lorsque vous avez tricoté les 8 rangs des diagrammes, répétez les 4 derniers rang - cf réponse ci-dessous. Bon tricot!
20.06.2024 - 08:11
![]() Nicole wrote:
Nicole wrote:
Bonjour Lorsque nous sommes renduent à Tricoter les diagrammes A.1 à A.5 Recommençons nous au début avec A.1 et au A.3 au-dessus des 4 m suivantes , 1 m jersey (cette m jersey est t'elle en plus des 4 m de A.3 Merci
19.06.2024 - 17:43DROPS Design answered:
Bonjour Nicole, lorsque vous avez tricoté 1 fois en hauteur les diagrammes A.1 à A.5 (= les 8 rangs, y compris les 4 derniers rangs de A.x), reprenez en répétant la partie A.x = les 4 derniers rangs de chacun de ces diagrammes. autrement dit, tricotez A.1/A.4 au-dessus des premières mailles du A.1/A.4 précédent, A.2 aligné au-dessus des A.2 précédents, A.3./.A5 au-dessus des dernières mailles du A.3/A.5 précédent. Bon tricot!
20.06.2024 - 08:06
![]() Nicole wrote:
Nicole wrote:
Bonsoir Comment faites vous le rang 13 svp Merci
18.06.2024 - 04:15DROPS Design answered:
Bonjour Nicole, de quel rang 13 parlez-vous? Le 13ème rang à partir du début du châle? Si oui, c'est le 2me rang des diagrammes (que vous lisez sur l'envers de gauche à droite). Bon tricot!
18.06.2024 - 08:00
![]() Nicole wrote:
Nicole wrote:
Bonjour Que voulez vous dire lorsque vous dites Répéter ainsi 24 fois A.x en hauteur et que veux dire les tirets a côté des A.x Merci
17.06.2024 - 23:42DROPS Design answered:
Bonjour Nicole, vous devez tricoter 24 fois au total les 4 rangs indiqués entre les tirets à la fin de A.1, A.2, A.3, A.4, et A.5. Bon tricot!
18.06.2024 - 07:54
![]() Ana María wrote:
Ana María wrote:
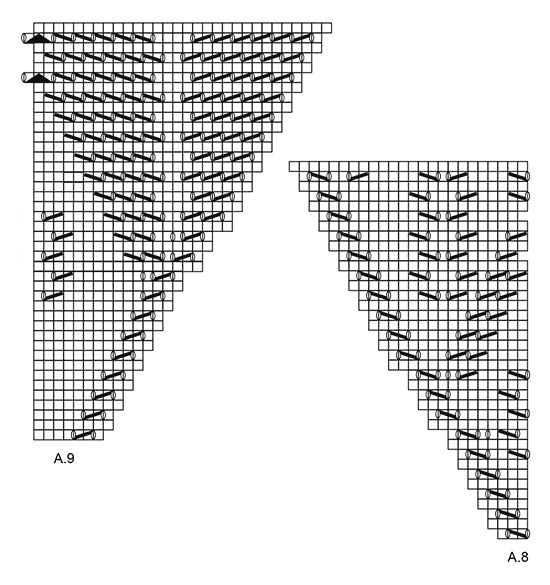
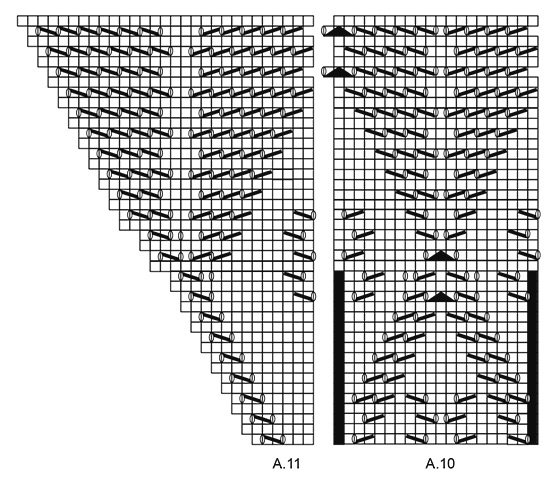
Trabajar según el diagrama A.9-A.11 como sigue por el LD: 1 pt orillo en pt musgo. A.9 sobre 25 pts, repetir A.10 21 vcs (quedan 25 pts en ag), A.11 sobre 24 pts y 1 pt orillo en pt musgo. “ Esto está equivocado. Busqué las instrucciones en inglés: Work according to diagram A.9 to A.11 as follows from RS: 1 edge st in garter st, A.9 over 7sts, repeat A.10 23 times (7 sts remain on needle), A.11 over 6 sts and 1 edge st in garter st. Así resulta bien.
30.05.2023 - 01:32
![]() Charlyne P wrote:
Charlyne P wrote:
Bonjour, Au rang numéro 11, vous dîtes de tricoter jusqu'au marqueur, de faire un jeté et ensuite vous mentionnez la maille centrale. Se pourrait-il que lorsque vous mentionnez de tricoter jusqu'au marqueur, il s'agirait en fait du deuxième marqueur (celui contenant la maille centrale) et non le premier? Merci.
30.12.2022 - 20:37DROPS Design answered:
Bonjour Charlyne, il s'agit ici effectivement du 2ème marqueur, celui qui est dans la maille centrale. Bon tricot!
02.01.2023 - 16:48
|
|||||||||||||||||||
Angelique#angeliquescarf |
|||||||||||||||||||
 |
 |
||||||||||||||||||
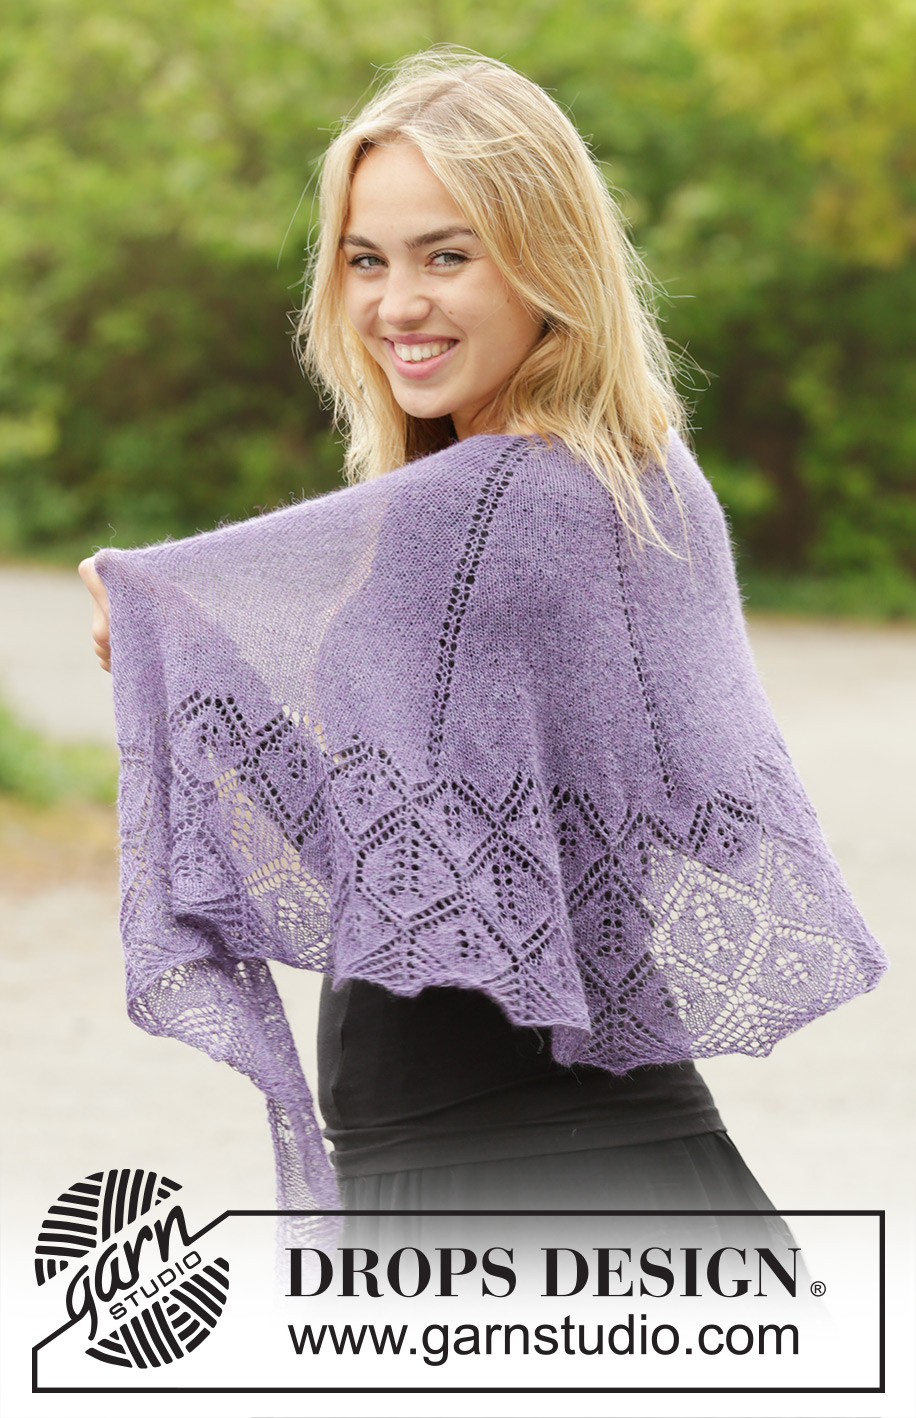
Knitted DROPS half-moon shaped shawl in stocking st with lace pattern in ”Lace”.
DROPS 171-47 |
|||||||||||||||||||
|
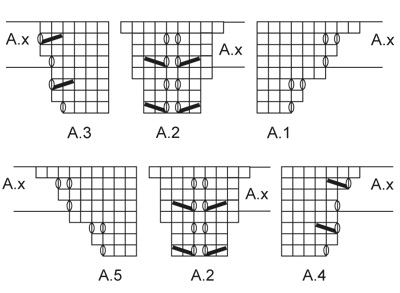
GARTER ST (back and forth): K all rows. 1 ridge = 2 rows K. PATTERN: See diagrams A.1 to A.11. The diagrams show all rows in pattern seen from RS. KNITTING TIP: The shawl can be knitted with other needle sizes than those given here. Use smaller needles for a smaller shawl and larger needles for a larger shawl. Stretch the shawl to shape at the end, possible uneven places should then even out. SHAPING: When using another yarn from yarn group A, there is no need to stretch the shawl to measurements, but place it gently out in shape. Leave to dry. Repeat the process when the shawl has been washed. ---------------------------------------------------------- SHAWL: Cast on 3 sts on circular needle size 3 mm with Lace - read KNITTING TIP above. Then work and inc as follows: ROW 1: 1 edge st in GARTER ST - see explanation above, 1 YO, 1 st in stocking st, 1 YO, 1 edge st in garter st. Insert a marker in the middle st = 5th st. ROW 2 and all rows from WS: Work 1 edge st in garter st in each side (K from WS) and P all sts and YOs. ROW 3: 1 edge st in garter st, K 1, 1 YO, K 1, 1 YO, K 1 and 1 edge st in garter st = 7 sts. ROW 5: 1 edge st in garter st, 1 YO, K 1, 1 YO, K 3, 1 YO, K 1, 1 YO and 1 edge st in garter st = 11 sts. ROW 7: 1 edge st in garter st, 1 YO, K 3, 1 YO, K 3, 1 YO, K 3, 1 YO and 1 edge st in garter st = 15 sts. ROW 9: 1 edge sts in garter st, 1 YO, K 1, 1 YO, K 3 and insert a marker in the middle of these st, 1 YO, K 1, 1 YO, K 3 (there is a marker in the sts in the middle of these sts = mid st), 1 YO, K 1, 1 YO, K 3 and insert a marker in the middle of these sts, 1 YO, K 1, 1 YO and 1 edge st in garter st = 23 sts. Row 11: 1 edge st in garter st, 1 YO, K until mid st, 1 YO, K1 (= mid st), 1 YO and K until 1 edge st remain, 1 YO and 1 edge st in garter st = 27 sts. Work according to diagram A.1 to A.5 as follows from RS: Work 1 edge st in garter st, A.1 over 3 sts, A.2 over 5 sts (first marker is in the middle of A.2), A.3 over 4 sts, 1 st in stocking st (second marker is in the middle of this st = mid st), A.4 over 4 sts, A.2 over 5 sts (third marker is in the middle of A.2), A.5 over 3 sts and 1 edge st in garter st = 31 sts. REMEMBER THE KNITTING TENSION. When A1-A.5 has been worked 1 time vertically, there are 51 sts on needle. Repeat inc as shown in A.x, inc alternately 4 and 8 sts on every row from RS (i.e. 12 sts for every repetition vertically), work the inc sts in stocking st on each side of every A.2. Move the markers upwards when working to mark mid st and middle of A.2. Repeat as shown in A.x 24 times in total vertically, there are 339 sts in total on needle (piece measures approx. 35 cm). On next row from RS work and inc 4 sts as shown on first row of A.x = 343 sts. P 1 row from WS (work edge sts in each side of piece in garter st until finished measurements). K 1 row from RS and inc 1 st inside 1 edge st in garter st in each side = 345 sts on needle and P 1 row from WS. Work according to diagram A.6 to A.8 as follows from RS: 1 edge st in garter st, A.6 over 4 sts, repeat A.7 21 times (4 sts remain on needle), A.8 over 3 sts and 1 edge st in garter st. NOTE: In diagram 2 sts are inc on the 11th row in every repetition of diagram A.7, A.6 and A.8. And 2 sts are inc on 17th row of A.6 and A.8. Work diagrams 1 time vertically = 429 sts. Work according to diagram A.9 to A.11 as follows from RS: 1 edge st in garter st, A.9 over 7 sts, repeat A.10 23 times (7 sts remain on needle), A.11 over 6 sts and 1 edge st in garter st. NOTE: In diagram 2 sts are inc on the 17th row in every repetition of diagram A.9, A.11 and A.10. And 2 sts are inc on 21st row in A.9 and A.11. Work diagrams 1 time vertically = 521 sts, but on last row from WS loosely cast off with P. BLOCKING: Place the shawl in lukewarm water until it is soaking wet. Carefully squeeze the water out of the shawl - do not twist the shawl - then roll the shawl in a towel and squeeze to remove more water - the shawl will now only be moist. If another yarn from yarn group A is used - read SHAPING above. Place the shawl on a carpet or mattress - carefully stretch it out to size and fasten it with pins. If desired shape the edge by stretching a little bit in the area between the leaves to form tips and fasten these tips with pins along the cast off edge. Leave shawl to dry. Repeat the process when the shawl has been washed. |
|||||||||||||||||||
Diagram explanations |
|||||||||||||||||||
|
|||||||||||||||||||
|
|||||||||||||||||||
|
|||||||||||||||||||
|
|||||||||||||||||||
|
|||||||||||||||||||
Have you finished this pattern?Tag your pictures with #dropspattern #angeliquescarf or submit them to the #dropsfan gallery. Do you need help with this pattern?You'll find 20 tutorial videos, a Comments/Questions area and more by visiting the pattern on garnstudio.com. © 1982-2025 DROPS Design A/S. We reserve all rights. This document, including all its sub-sections, has copyrights. Read more about what you can do with our patterns at the bottom of each pattern on our site. |
|||||||||||||||||||


With over 40 years in knitting and crochet design, DROPS Design offers one of the most extensive collections of free patterns on the internet - translated to 17 languages. As of today we count 314 catalogues and 11822 patterns translated into English (UK/cm).
We work hard to bring you the best knitting and crochet have to offer, inspiration and advice as well as great quality yarns at incredible prices! Would you like to use our patterns for other than personal use? You can read what you are allowed to do in the Copyright text at the bottom of all our patterns. Happy crafting!
Post a comment to pattern DROPS 171-47
We would love to hear what you have to say about this pattern!
If you want to leave a question, please make sure you select the correct category in the form below, to speed up the answering process. Required fields are marked *.