
Popular categories
Looking for a yarn?


Comments / Questions (237)
![]() Derksen Rita wrote:
Derksen Rita wrote:
Hab ich das mit der Zu- und Abnahmen richtig verstanden? Also erst das Bündchen stricken dann in der ersten Runde Zu und Abnahmen an den markierten Maschen zurück alle links dann eine Reihe alle Rechts, dann zurück alle links und dann erst wieder Zu- und Abnahme usw. Also ich komme dann bei auf 24 Reihen? und dann jede 2-te Hinreihe mit den Abnahmen beginnen. Hoffentlich war das nicht zu kompliziert erklärt. :-/
01.08.2016 - 19:44DROPS Design answered:
Liebe Rita, wir zeigen dies in dem verlinkten Video "Auf- und Abnahmen an einer Babymütze". Schauen Sie sich am besten dieses Videotutorial an und fragen Sie gerne nochmals, wenn es dann immer noch nicht klar ist.
08.08.2016 - 09:43
![]() Lena wrote:
Lena wrote:
Fällt die Mütze jetzt grössengerecht aus oder nicht ? die ganzen verschiedenen Aussagen dazu verwirren etwas :) Wenn man die richtigen Zu und Abnahmen befolgt passt sie obwohl die Maschenprobe scheinst nicht stimmt ? Danke und Grüße Lena
31.07.2016 - 20:27DROPS Design answered:
Liebe Lena, diese Mütze wurde schon sehr oft nachgestrickt und wenn Sie sich genau an die Anleitung halten, hat sie eine sehr gute Passform.
01.08.2016 - 07:49
![]() Derksen Rita wrote:
Derksen Rita wrote:
Die Auf/Zunahmen werden ja nur in der Hinreihe vorgenommen. Muss ich auf der Rückreihe einfach alle Maschen links stricken? Oder muss ich etwas beachten wegen den Raglanmuster?
25.07.2016 - 17:11DROPS Design answered:
Siehe unten.
26.07.2016 - 13:25
![]() Derksen Rita wrote:
Derksen Rita wrote:
Die Auf/Zunahmen werden ja nur in der Hinreihe vorgenommen. Muss ich auf der Rückreihe einfach alle Maschen links stricken? Oder muss ich etwas beachten wegen den Raglanmuster?
25.07.2016 - 17:08DROPS Design answered:
Liebe Rita, die Rückreihen werden bei dieser Mütze links gestrickt. Bezieht sich ihre Frage wirklich auf Modell 21-34 (es ist kein Raglanmodell sondern eine Mütze)?
26.07.2016 - 13:25
![]() Regina wrote:
Regina wrote:
Wird die 7. Markierung in die letzte Masche, also die Randmasche, gesetzt oder in die vorletzte Masche, also die vor der Randmasche ?
18.03.2016 - 12:51DROPS Design answered:
Liebe Regina, die Markierung wird in die vorletzte Masche gesetzt, die Formulierung in der deutschen Übersetzung ist wirklich missverständlich und wird gleich korrigiert.
21.03.2016 - 11:04
![]() Caroline Engen wrote:
Caroline Engen wrote:
Jeg har strikket denne luen i størrelse 6-9 mndr og har fulgt oppskriften til punkt og prikke. Strikkefastheten er riktige og avstand fra øreklaff til topp er 15 cm. Luen er imidlertid alt for liten. Den passer kanskje så vidt et nyfødt barn.
05.02.2016 - 20:21
![]() Elena wrote:
Elena wrote:
Buongiorno, Ho lavorato 8 ferri m. legaccio poi sul nono ferro ho messo i segni. La maglia rasata la devo cominciare dal decimo ferro facendo un ferro a rovescio oppure lavoro questo ferro ancora a legaccio e parto con le diminuzioni/ aumenti da quello successivo lavorandolo a dritto ? Grazie
28.01.2016 - 23:17DROPS Design answered:
Buongiorno Elena. Dopo i primi 8 ferri a legaccio, inserisce i segni senza lavorare. Al ferro successivo (quindi al nono ferro dall’inizio del lavoro), inizia a lavorare a maglia rasata e contemporaneamente, diminuisce e aumenta come indicato. Si ricordi di leggere anche il suggerimento per gli aumenti e per le diminuzioni all’inizio delle spiegazioni. Buon lavoro!
29.01.2016 - 09:56
![]() Reetta wrote:
Reetta wrote:
Käännöksessä "Tee sitten 2., 4., ja 6. merkin molemmin puolin kavennukset joka 4. krs, kunnes työssä on jäljellä 15 s." On virhe Kavennukset pitää tehdä joka 2. Krs.
05.01.2016 - 20:07DROPS Design answered:
Kiitos! Olemme korjanneet ohjeen!
18.01.2016 - 17:22
![]() Meike wrote:
Meike wrote:
Auch ich habe diese Mütze nun zweimal gestrickt und sie ist viiiieeel zu klein! Die Neugeborenengröße passte nichtmal der Puppe. Jetzt habe ich Größe 4 Jahre gestrickt (!) und sie passt meiner 12monatigen Tochter nicht. Schade... Der Umfang für 4 Jahre passt ihr. Ich strick sie jetzt nochmal und verlängere den Teil mit den Ab- und Zunahmen, dann müsste es passen.
16.12.2015 - 13:43
![]() Edith wrote:
Edith wrote:
Hallo! Bei mir gibt es auch viel zu wenig Volumen für den Kopf. D.h der Umfang am Anfang stimmt gut aber die Abnahmen fangen viel zu früh an, bevor überhaupt einen Kopf reinpasst. Meine Frage: sollte der Teil mit den Abnahmen und Aufnahmen (also wo der Umfang gleich gross bleibt) der nur 12 Reihen darstellt ( 6x die auf-ab-nahmen in der hinreihe) nicht viel länger sein?! Sicher doppelt oder dreifach ( 24R oder 36r) damit da ein Kopf reinpassen würde?merci
18.11.2015 - 13:40DROPS Design answered:
Liebe Edith, erreicht Ihre Mütze nicht die in der Anleitung angegebenen 15-15-16 (16-17) cm?
08.03.2016 - 14:24
|
|
Alladin#alladinhat |
|
|
|
|
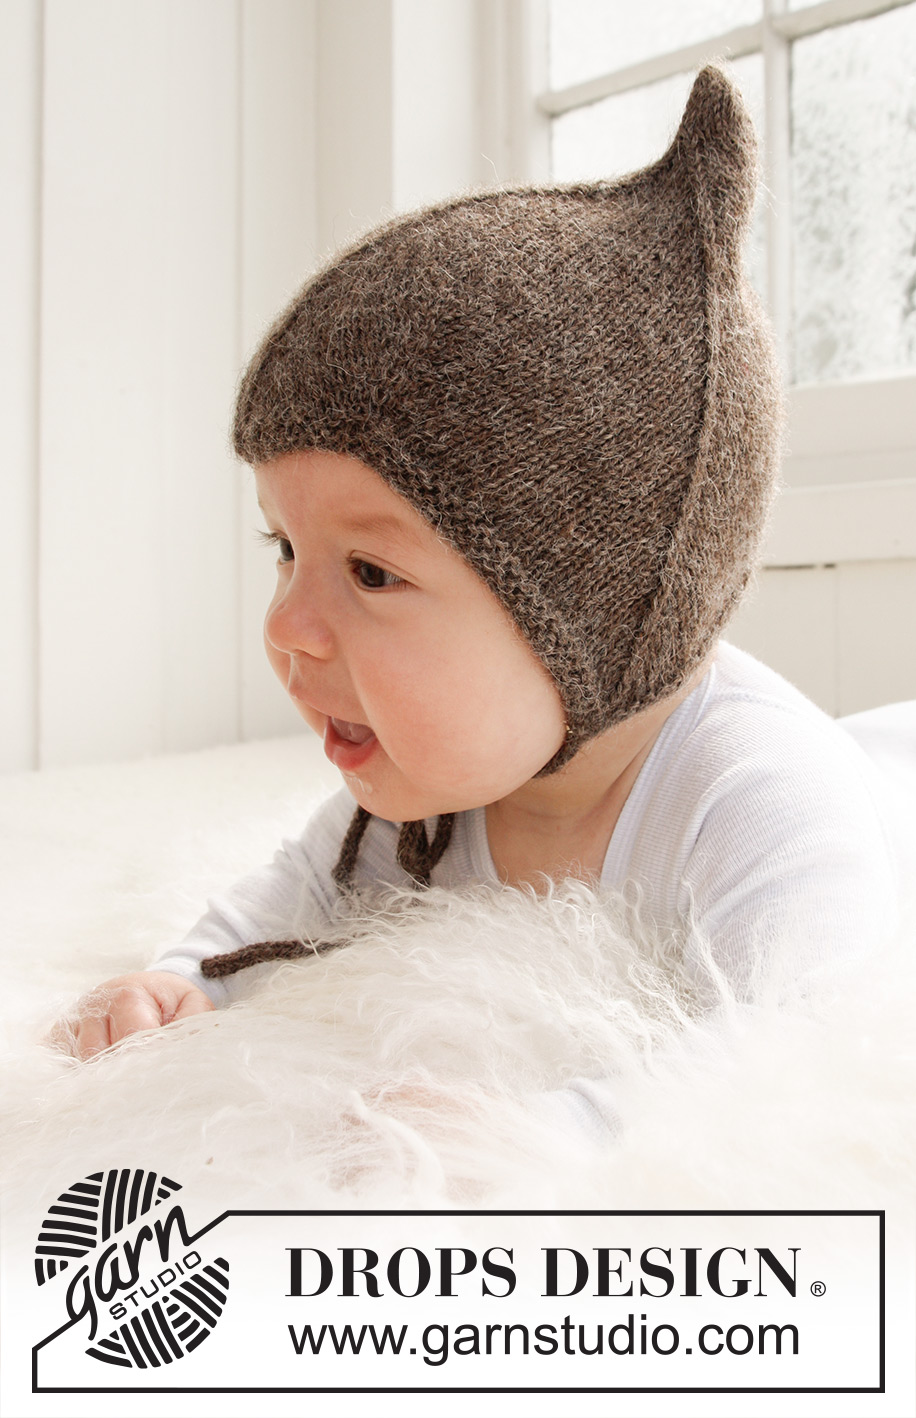
Knitted hat for baby and children in DROPS Alpaca
DROPS Baby 21-34 |
|
|
INCREASE TIP: All inc are done from RS. Inc 1 st before and after st with marker by making 1 YO. On next round P YO twisted (i.e. work in back loop of YO instead of front) to avoid holes. DECREASE TIP: All dec are done from RS. Dec 1 st on each side of st with marker. Beg 1 st before st with marker. Slip 1 st on a cable needle behind the piece, slip 1 st (= st with marker), K next st and st on cable needle tog, psso. -------------------------------------------------------- HAT: Worked back and forth on needle. Cast on 117-123-129 (135-141) sts (incl 1 edge st in each side) on needle size 2.5 mm with Alpaca. K 8 rows (1st row = RS). Insert 7 markers in piece from RS as follows: 1st marker in the 2nd st on needle, 2nd marker in the 24th-25th-26th (27th-28th) st, 3rd marker in the 48th-50th-52nd (54th-56th) st, 4th marker in the 59th-62nd-65th (68th-71st) st, 5th marker in the 70th-74th-78th (82nd-86th) st, 6th marker in the 94th-99th-104th (109th-114th) st, and the 7th marker in the next to last st on the needle. Continue in stocking st with 1 edge st in garter st in each side of piece - AT THE SAME TIME on 1st row beg to inc and dec - Read INCREASE TIP and DECREASE TIP above - on every other row as follows: Inc 1 st after 1st marker. Dec 1 st on each side of 2nd marker. Inc 1 st on each side of 3rd marker. Dec 1 st on each side of 4th marker. Inc 1 st on each side of 5th marker. Dec 1 st on each side of 6th marker. Inc 1 st before 7th marker. Continue to inc and dec from RS like this on every other row (. i.e., on every row from RS) a total of 6 times. The piece measures approx. 6 cm from cst on edge – if the tension in height is not correct you can work as before with the increase/decrease. Then dec on each side of the 2nd, 4thand 6th marker until 15 sts remain on needle (= 17-18-19 (20-21 times). Piece measures approx. 16-17-17 (18-19)cm from the bottom tip at the 2nd or 6th marker = ear flap. Work next row from RS as follows: K 1, K 2 tog, K 9, K 2 tog, K 1 = 13 sts. Repeat dec in each side on every row (from WS P the 2 sts before and after edge st tog) until 5 sts remain. On the last row from WS work 1 edge st, P 3 sts tog and work 1 edge st. Pull thread through the remaining sts. ASSEMBLY: Sew the hat tog mid back inside 1 edge st. The middle of the 3 whole tips on cast on edge goes down to the forehead at the front. TIES: Cast on 4 sts on needle size 2.5 mm. Work as follows: * K 1, place yarn in front of piece (towards you), slip 1 st as if to P, place yarn behind piece (from you) *, repeat from *-* on more time and on all rows. This results in a round ribbon. Cast off when the tie measures approx. 20-22-24 (26-28) cm. Knit a similar tie. Sew one ribbon at the bottom of each tip on ear flap on each side. |
|
Have you finished this pattern?Tag your pictures with #dropspattern #alladinhat or submit them to the #dropsfan gallery. Do you need help with this pattern?You'll find 17 tutorial videos, a Comments/Questions area and more by visiting the pattern on garnstudio.com. © 1982-2026 DROPS Design A/S. We reserve all rights. This document, including all its sub-sections, has copyrights. Read more about what you can do with our patterns at the bottom of each pattern on our site. |


With over 40 years in knitting and crochet design, DROPS Design offers one of the most extensive collections of free patterns on the internet - translated to 17 languages. As of today we count 324 catalogues and 12290 patterns translated into English (UK/cm). 12290
We work hard to bring you the best knitting and crochet have to offer, inspiration and advice as well as great quality yarns at incredible prices! Would you like to use our patterns for other than personal use? You can read what you are allowed to do in the Copyright text at the bottom of all our patterns. Happy crafting!
Post a comment to pattern DROPS Baby 21-34
We would love to hear what you have to say about this pattern!
If you want to leave a question, please make sure you select the correct category in the form below, to speed up the answering process. Required fields are marked *.