
Popular categories
Looking for a yarn?


Comments / Questions (154)
![]() Vanoo wrote:
Vanoo wrote:
Bonjour,je suis en train de tricoter le devant droit du gilet, et je ne comprends pas quand reprendre les mailles de bordure mis en attente pour l'encolure ? faut-il rabattre les mailles côté encolure avant ces mailles laissées de côté ? merci d'avance pour votre aide :)
25.01.2017 - 22:31DROPS Design answered:
Bonjour Mme Vanoo, vous reprendez ces mailles lorsque vous ferez la capuche, en même temps que vous relèverez les mailles le long de l'encolure du dos et des devants - cf CAPUCHE. Bon tricot!
26.01.2017 - 09:24
![]() Sara wrote:
Sara wrote:
Hej! Hur gör man på avigsidan på höger (och vänster) framstycke? Det står att "nästa varv stickas såhär från rätsidan: 5 m räts(= framkant), 1 am, M.3, 4 am, M.1, 2 am, 7m moss-st och 1 kantm. Fortsätt därefter enligt samma mönster" Hm: Menar ni att man skall följa beskrivningen baklänges för avigsidan då? Dvs tvärtom: 1 kantm, 7 moss-st, 2 am, M.1, 4 am, M.3, 1 am, 5 rm (framkanten)? Tack!
30.11.2016 - 20:07DROPS Design answered:
Hej Sara. Ja, naar du strikker vrangen, strikker du tilbage, saa mönstret skal ogsaa strikkes "baglaens" som du beskriver. Og husk at diagrammet ogsaa skal strikkes "baglaens" (vrangpinden laeses fra venstre mod höjre).
08.12.2016 - 13:37
![]() Inger wrote:
Inger wrote:
Kofta, bakstycket, avm för ärmhålen. Lite kort beskrivning här hur avm påverkar mönstret. Jag antar att mins bara skall påverka det mosstickade partiet? i mitt fall 7 maskor. Tex: avm 3 m, 1 gång. Då blir mosspartiet 5 m. (7m-3m: 5m) därefter avm 2 m 1 gång (5-2:3) osv. Eller skall mosstickningen behålla sitt antal trots minskning och gå in över flätningen? Tack för svar!
26.11.2016 - 00:59DROPS Design answered:
Hej Inger. Der bliver mindre mosstickade masker. Fletten forbliver hvor den er :)
30.11.2016 - 14:42
![]() Sara wrote:
Sara wrote:
Hur skall man göra på avigsidan med diagrammen. Skall man läsa hela beskrivningen baklänges för att få diagrammen att hamna rätt och över varandra? Dvs M2 -M3-M3-M2? Känns inte som att det hänger ihop riktigt..
16.11.2016 - 23:04DROPS Design answered:
Hej. Varv 1, 3, 5 osv i diagrammet (rätsidan) läses från höger till vänster, varv 2, 4, 6 osv läses från vänster till höger. Lycka till!
17.11.2016 - 12:29
![]() Sara wrote:
Sara wrote:
Hej, Gällande koftan: Diagram M3 skall upprepas 2ggr/ varv - betyder det två rader i M3 diagrammet eller 1 rad? Dvs blir det på varv 3 eller 6 som hjst används där? Varför har M3 inte lika många rader som M1 och M2? Skall man hålla upp med M3 och vänta in de fyra extra varv som M1 och M2 har? Fråga 2: "diagr. ses från rätsidan" Skall jag då läsa varv 2 vänster- höger?
16.11.2016 - 21:31DROPS Design answered:
Hej. När det står M.3 2 gånger på samma v så upprepar du den raden (det blir alltså inte 2 rader). M.3 har mindre antal v för att flätan vrids med det antal v mellan som uppges, du fortsätter bara med M.3 hela tiden. Varv 2, 4, 6 osv läser du från vänster till höger. Lycka till!
17.11.2016 - 12:25
![]() Bep Van Ree wrote:
Bep Van Ree wrote:
Dan moet niet in het patroon beschreven staan: Het telpatroon geeft de goede kant van het werk weer.
27.07.2016 - 11:31
![]() Bep Van Ree wrote:
Bep Van Ree wrote:
Dan moet er niet staan Het telpatroon geeft de goede kant van het werk aan.
27.07.2016 - 11:27
![]() Bep Van Ree wrote:
Bep Van Ree wrote:
Er staat in het patroon dat alleen de naald aan de goede kant staat aangegeven maar als ik het patroon brei zoals het er staat is mijn kabel veel lang gerekter dan dat de foto aangeeft.
21.07.2016 - 10:03DROPS Design answered:
Hoi Bep. Het patroon wordt van de goede kant weergegeven, maar zowel de goede als de verkeerde kant staat in het telpatroon. Lees ook hier hoe je onze telpatronen moet lezen en breien/haken
22.07.2016 - 11:05
![]() Ursula wrote:
Ursula wrote:
Mul on kootud parem hõlm kuni tö on 26cm ja kahandasin M.3: mustri 6 silmust=30s.Miks pean võtma nööbiliistu silmused (8)sabivardale kaelaaugu jaoks?Kui koon kaelaaugu jaoks maha 2s 1kord ja 1s 2korda,on õpetuses,et jääb 18s õlale.Kui mul oli 30s ja kudusin maha 2s 1 kord ja 1s 2 korda,jääb ju 30s-4s=26s.Kus tuleb see 18s õlale.Koon kampsunit üldse esimest korda.
04.07.2016 - 07:35DROPS Design answered:
Tere Ursula! Nööbiliistusilmustel jätkatakse kudumist kapuutsi tehes, need jäävad kapuutsi ääreks. Teil on 30 s. 8 nööbiliistusilmust tõstate abivardale ootele. 30-8= 22 s. Kaelakaarel kaob veel 2+1+1= 4 s. 22-4= 18 s. Sealt see number tulebki. Head kudumist!
09.07.2016 - 15:30
![]() Irene Milillo wrote:
Irene Milillo wrote:
Ho una domanda generale: i ferri n°3,5 e n°4 con cui bisogna lavorare sono rispettivamente i 3,5 mm e 4mm oppure si riferiscono alla notazione americana? Grazie
16.06.2016 - 20:29DROPS Design answered:
Buonasera Irene, i ferri sono 3,5 mm e 4 mm. Buon lavoro!
16.06.2016 - 21:11
|
|||||||||||||||||||||||||
Matheo#matheojacket |
|||||||||||||||||||||||||
 |
 |
||||||||||||||||||||||||
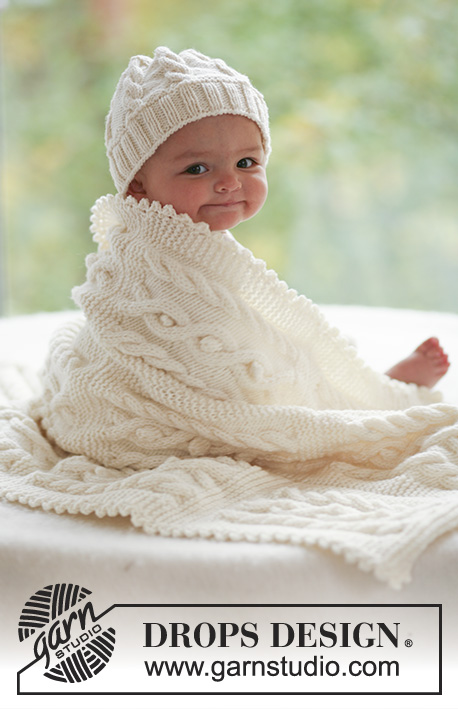
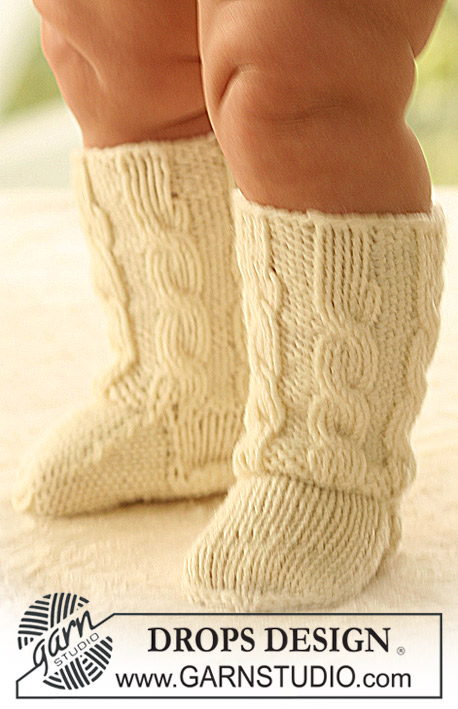
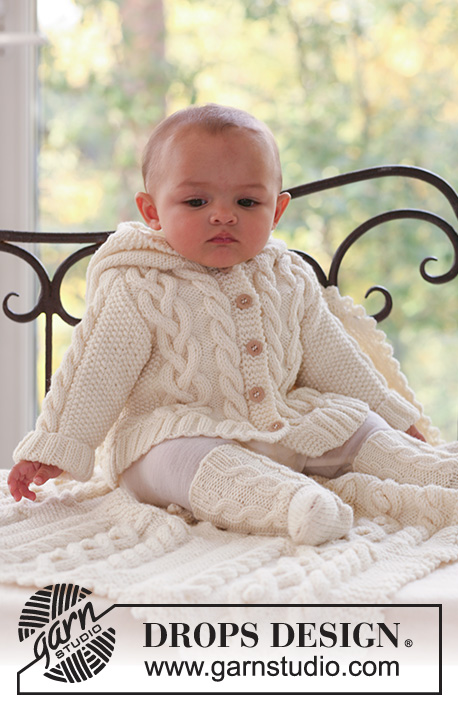
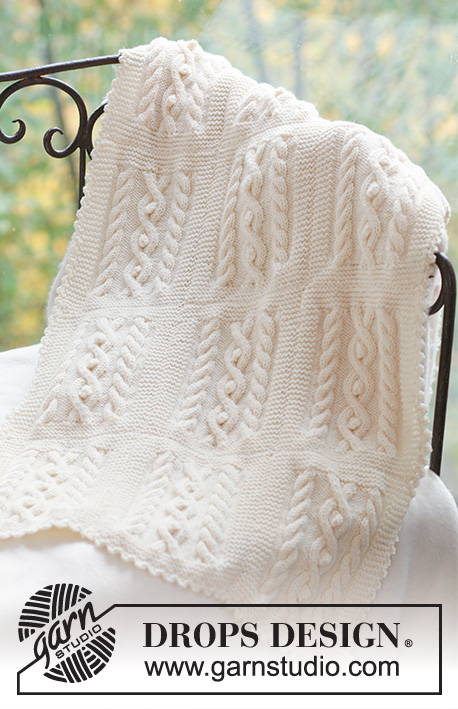
Set of knitted jacket with hood, socks and blanket with cables for baby and children in DROPS Merino Extra Fine. Theme: Baby blanket
DROPS Baby 17-2 |
|||||||||||||||||||||||||
|
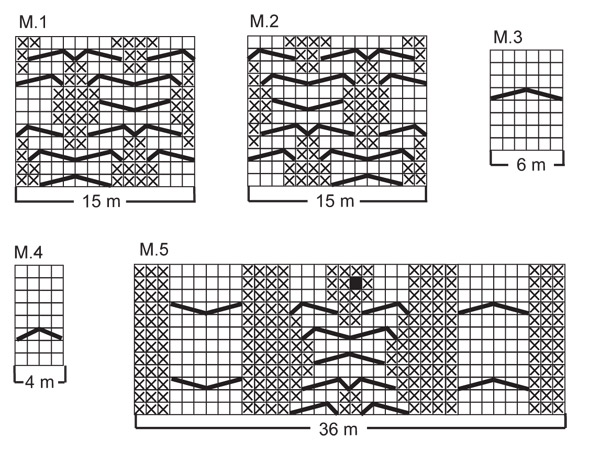
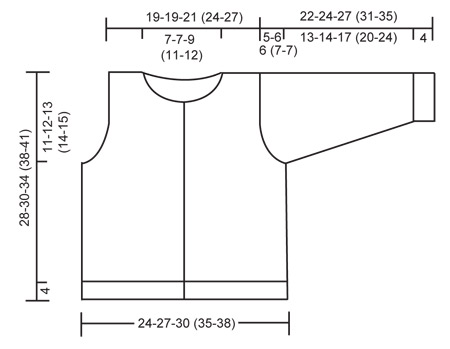
JACKET: MOSS ST: Row 1: * K1, P1 *, repeat from *-*. Row 2: K over P and P over K. Repeat row 2. PATTERN: See diagram M.1, M.2 and M.3. The diagrams show the pattern from the RS. BUTTONHOLES: Make buttonholes on right front band by K tog 2nd and 3rd st from edge and make 1 YO. Make buttonholes when piece measures: SIZE 1/3 months: 3, 8, 13, 18 and 23 cm SIZE 6/9 months: 5, 10, 15, 20 and 25 cm SIZE 12/18 months: 5, 11, 17, 23 and 29 cm SIZE 2 years: 5, 11, 16, 21, 27 and 32 cm SIZE 3/4 years: 5, 11, 17, 23, 29 and 35 cm ---------------------------------------------------------- BACK PIECE: Worked back and forth on needle. Cast on 72-80-84 (96-104) sts (includes 1 edge st each side) on needle size 3.5 mm with Merino Extra Fine. Work rib as follows (first row = RS): 1 edge st, * K2, P2 *, repeat from *-*, and finish with K2 and 1 edge st. When rib measures 4 cm change to needle size 4.5 mm and K 1 row from RS, AT THE SAME TIME dec 6-8-6 (8-10) sts evenly = 66-72-78 (88-94) sts. K 1 row from WS and continue as follows from RS: 1 edge st, 4-7-8 (11-11) moss sts – SEE ABOVE – P 2, M.1 (= 15 sts), P 4-4-6 (8-11), M.3 (= 6 sts), P 2, M.3 (= 6 sts), P 4-4-6 (8-11), M.2 (= 15 sts), P 2, 4-7-8 (11-11) moss sts and 1 edge st. Continue in pattern like this. REMEMBER THE KNITTING TENSION! When piece measures 17-18-21 (24-26) cm cast off for armhole each side at the beg of every row from the side: 3 sts 1 time, 2 sts 0-1-2 (3-3) times and 1 st 2-3-2 (2-2) times = 56-56-60 (66-72) sts. When piece measures 26-28-32 (36-39) cm work the 6 sts on M.3 tog 2 by 2 = 50-50-54 (60-66) sts. On next row cast off the middle 12-12-16 (20-22) sts for neck and complete each side separately. Cast off 1 st on neckline on next row = 18-18-18 (19-21) sts left on shoulder. When piece measures 28-30-34 (38-41) cm dec 6 sts evenly on row = 12-12-12 (13-15) sts left on shoulder, cast off on next row. RIGHT FRONT PIECE: Worked back and forth on needle from mid front. Cast on 42-46-50 (54-58) sts (includes 1 edge st at side and 5 front band sts towards mid front) on needle size 3.5 mm with Merino Extra Fine. Work rib as follows from mid front (first row = RS): 5 garter sts (= front band), * K2, P2 *, repeat from *-* and finish with 1 edge st. Remember buttonholes on front band - SEE ABOVE. When piece measures 4 cm change to needle size 4.5 mm, K 1 row from RS, AT THE SAME TIME dec 4-5-6 (5-6) sts evenly (do not dec on front band) = 38-41-44 (49-52) sts. K 1 row from WS and work next row as follows from RS: 5 garter sts (= front band), P 1, M.3 (= 6 sts), P 4-4-6 (8-11), M.1 (= 15 sts), P 2, 4-7-8 (11-11) moss sts and 1 edge st. Continue in pattern like this. When piece measures 17-18-21 (24-26) cm cast off for armhole at the side as described for back piece = 33-33-35 (38-41) sts. When piece measures 24-26-30 (33-36) cm work the 6 sts on M.3 tog 2 by 2 = 30-30-32 (35-38) sts. Now slip the 8-8-10 (12-13) sts towards mid front on a stitch holder for neck. Cast off to shape the neckline at the beg of every row from mid front: 2 sts 1 time and 1 st 2 times = 18-18-18 (19-21) sts left on shoulder. When piece measures 28-30-34 (38-41) cm dec 6 sts evenly = 12-12-12 (13-15) sts left on shoulder, cast off LEFT FRONT PIECE: Cast on and work like right front piece, but mirrored, i.e. work first row as follows from the side: 1 edge st * P2, K2 *, repeat from *-*, and finish with 5 garter sts (= front band). When working pattern work row from RS as follows: 1 edge st, 4-7-8 (11-11) moss sts, P 2, M.2 (= 15 sts), P 4-4-6 (8-11), M.3 (= 6 sts), P 1 and 5 garter sts (= front band). Do not make buttonholes! SLEEVE: Worked back and forth on needle. Cast on 46-46-46 (50-50) sts (includes 1 edge st each side) on needle size 3.5 mm with Merino Extra Fine. Work 4 cm rib, K2/P2, with 1 edge st each side. Change to needle size 4.5 mm and K 1 row from RS, AT THE SAME TIME dec 10-8-8 (10-10) sts evenly = 36-38-38 (40-40) sts. K 1 row from WS and work next row as follows from RS: 1 edge st, 12-13-13 (14-14) moss sts, P 2, M.3 (= 6 sts), P 2, 12-13-13 (14-14) moss sts and 1 edge st. Continue in pattern like this. AT THE SAME TIME when piece measures 7 cm inc 1 st each side and repeat the inc on every 4th row a total of 6-7-9 (10-12) times = 48-52-56 (60-64) sts – work the inc sts in moss st. When piece measures 17-18-21 (24-28) cm cast off for sleeve cap each side at the beg of every row: 4 sts 1 time, and then 2 sts until piece measures 21-23-26 (30-34) cm, now cast off 3 sts each side 1 time, AT THE SAME TIME on the last row work the 6 sts on M.3 tog 2 by 2. Cast off remaining sts on next row. Piece measures approx 22-24-27 (31-35) cm. ASSEMBLY: Sew shoulder seams. HOOD: Pick up approx 46 to 68 sts (incl sts on stitch holders at front) round neckline on needle size 4.5 mm. K 2 rows, AT THE SAME TIME on second row inc evenly to 68-72-76 (80-84) sts. Continue in reverse stocking st with 5 garter sts each side until hood measures 21-23-25 (27-28) cm, cast off. Sew hood tog at the top, edge to edge to avoid a chunky seam. Set in sleeves. Sew sleeve and side seams inside 1 edge st. Sew on buttons. ---------------------------------------------------------- SOCK: PATTERN: See diagram M.4. The diagram shows the pattern from the RS. DECREASING TIP: Dec as follows before marker: K 2 tog. Dec as follows after marker: Slip 1 st as if to K, K1, psso. HEEL DECREASES: ROW 1 (= RS): Work row until 5-5-6 (6-6) sts remain, slip next st as if to K, K1, psso, turn piece, ROW 2 (= WS): Work row until 5-5-6 (6-6) sts remain, slip next st as if to P, P1, psso, turn piece, ROW 3 (= RS): Work row until 4-4-5 (5-5) sts remain, slip next st as if to K, K1, psso, turn piece, ROW 4 (= WS): Work row until 4-4-5 (5-5) sts remain, slip next st as if to P, P1, psso, turn piece. Continue dec like this with 1 less st between each dec until there are 9-9-12 (12-12) sts on row. ---------------------------------------------------------- SOCK: Worked in the round on double pointed needles. Cast on 36-36-42 (42-42) sts on double pointed needles size 3 mm with Merino Extra Fine and work 2 cm rib, K3/P3. Work 1 round rib, AT THE SAME TIME inc all K3 to K4 = 42-42-49 (49-49) sts. Work 1 round K4/P3. Now continue as follows: * M.4, P3 *, repeat from *-* a total of 6-6-7 (7-7) times. After 3 vertical repeats of M.4 work sts in M.4 tog 2 by 2 = 30-30-35 (35-35) sts. Now keep the first 17-17-22 (22-22) sts on needle for heel and slip remaining 13 sts on a stitch holder (= upper foot). Work 3-3.5-4 (4-4.5) cm stocking st back and forth on heel sts. Insert a marker in piece and now dec for heel – SEE ABOVE. After heel dec pick up 7-8-9 (9-10) sts on each side of heel and slip sts from stitch holder back on needle = 36-38-43 (43-45) sts. Continue in stocking st on all sts, AT THE SAME TIME dec as follows on each side of the 13 sts on upper foot: K tog the 2 sts before the 13 sts on upper foot into back of loop and K tog the 2 sts after the 13 sts. Dec on every other row a total of 5-6-7 (6-6) times = 26-26-29 (31-33) sts. When piece measures approx 8-9-9.5 (11.5-12.5) cm from marker on heel (approx 2-2-2.5 (2.5-3.5) cm remain) insert 1 marker each side with 13-13-15 (15-17) sts on upper foot and 13-13-14 (16-16) sts under foot. Dec on each side of both markers – SEE DECREASING TIP – on every other round 2-2-3 (3-5) times and then on every round 3-3-3 (3-2) times = 6-6-5 (7-5) sts. Cut the thread, pull through remaining sts and fasten. Sock measures approx 10-11-12 (14-16) cm. ---------------------------------------------------------- : BLANKET GARTER ST (back and forth on needle): K all rows. INCREASING TIP: Make all inc from RS. Inc 1 st by making 1 YO. Work YO into back of loop on return row to avoid a hole. PATTERN: See diagram M.5. The diagram shows the pattern from the RS. --------------------------------------------------------- BLANKET: Blanket is made up of 12 squares, sewn tog 3 by 4. 1 square measures approx: width 18 cm, length 22.5 cm 1 SQUARE: Cast on 36 sts on needle size 5 mm with Merino Extra Fine. Work 8 rows garter st – SEE ABOVE. K 1 row from RS, AT THE SAME TIME inc 10 sts evenly on the middle 26 sts = 46 sts. Work next row from WS as follows: 5 garter sts, K3, P6, K 4, P3, K4, P3, K4, P6, K3 and 5 garter sts. Continue as follows from RS: 5 garter sts, M.5 on the next 36 sts, 5 garter sts. Work 4 vertical repeats of M.5 like this, but on the last repeat finish when 2 rows of diagram remain. K 1 row from RS on all sts, AT THE SAME TIME dec 10 sts on the middle 36 sts = 36 sts. Work 8 rows garter st on all sts and cast of loosely. Note: You may work 4 squares in a row without casting off, i.e. beg a new square after the last 8 rows in garter st. ASSEMBLY: Sew the squares tog, 3 by 4. Sew in outer loops of sts to avoid a chunky seam. CROCHET BORDER: Crochet a border round the whole blanket with crochet hook size 5 mm as follows: * 1 dc in edge st, 3 ch, 1 dc in the first of these 3 ch, skip 1 cm *, repeat from *-*, and finish with 1 sl st in first dc from beg of round. |
|||||||||||||||||||||||||
Diagram explanations |
|||||||||||||||||||||||||
|
|||||||||||||||||||||||||
 |
|||||||||||||||||||||||||
 |
|||||||||||||||||||||||||
Have you finished this pattern?Tag your pictures with #dropspattern #matheojacket or submit them to the #dropsfan gallery. Do you need help with this pattern?You'll find 34 tutorial videos, a Comments/Questions area and more by visiting the pattern on garnstudio.com. © 1982-2026 DROPS Design A/S. We reserve all rights. This document, including all its sub-sections, has copyrights. Read more about what you can do with our patterns at the bottom of each pattern on our site. |
|||||||||||||||||||||||||


With over 40 years in knitting and crochet design, DROPS Design offers one of the most extensive collections of free patterns on the internet - translated to 17 languages. As of today we count 324 catalogues and 12290 patterns translated into English (UK/cm). 12290
We work hard to bring you the best knitting and crochet have to offer, inspiration and advice as well as great quality yarns at incredible prices! Would you like to use our patterns for other than personal use? You can read what you are allowed to do in the Copyright text at the bottom of all our patterns. Happy crafting!
Post a comment to pattern DROPS Baby 17-2
We would love to hear what you have to say about this pattern!
If you want to leave a question, please make sure you select the correct category in the form below, to speed up the answering process. Required fields are marked *.