
Popular categories
Looking for a yarn?


Comments / Questions (154)
![]() Danielle wrote:
Danielle wrote:
Bonjour Je suis entrain de faire le dos de la veste. Je me retrouve avec des "erreurs" au niveau des torsades: lorsque je regarde l endroit du tricot alors que toutes les mailles des torsades sont à l endroit, j'ai parfois des mailles envers . Il y a donc quelque chose qui ne va pas. Nous sommes d'accord que pour les diagrammes M1 M2 Etc... on lis les rangs endroits de droite à gauche Et les rangs envers de gauche à droite, n'est ce pas ? Merci
17.02.2025 - 18:16DROPS Design answered:
Bonjour Danielle, tout à fait, sur l'envers, on lit les diagrammes de gauche à droite, mais notez bien que sur l'envers, on va parfois tricoter les mailles différemment du rang précédent sur l'endroit car les mailles ont été décalées. Placez éventuellement un marqueur entre chaque diagramme pour mieux les repérer. Bon tricot!
18.02.2025 - 09:11
![]() Beate wrote:
Beate wrote:
Hei! Jeg holder på med bakstykket til jakke i størrelse 12/18 måneder, og lurer på hvordan jeg skal felle til ermehullene. Det står at jeg skal felle på "begge av hver pinne i hver side" – kan du forklare? Skal det felles både i vrangen og rett og mens jeg strikker pinnene skal det da strikkes mønster?
13.01.2025 - 22:03DROPS Design answered:
Hej Beate, du skal felle i begyndelsen/starten af hver pinne, det vil sige først 3 masker i hver side (i starten af de næste 2 pinde), så 2 masker i starten af de næste 2 pinde. Ja du fortsætter med at strikke mønster over de andre masker :)
15.01.2025 - 07:18
![]() Paola wrote:
Paola wrote:
Salve per quanto riguarda la lavorazione della copertina non ho ben capito nella descrizione si dice che durante l’ultima ripetizione del diagramma quando mancano due ferri quindi subito prima di quello dove c’è la nocciolina bisogna lavorare un ferro tutto a dritto con le diminuzioni; Dopo questo ferro come si prosegue? Non si lavorano gli ultimi 2 del diagramma si passa direttamente a quelli del legaccio? Dall’immagine nell’ultima ripetiz la nocciolina non c’è. Grazie
02.11.2024 - 20:22DROPS Design answered:
Buonasera Paola, è corretto, sull'ultima ripetizione si deve fermare prima della nocciolina e lavorare il ferro a diritto con le diminuzioni come indicato. Buon lavoro!
02.11.2024 - 23:47
![]() Paola wrote:
Paola wrote:
Salve Ci dev’essere un errore nel diagramma M5 la fine del diagramma non corrisponde con la parte finale di ciascun modulo riportato in immagine della copertina Potreste aiutarmi Grazie
29.10.2024 - 22:00DROPS Design answered:
Buongiorno Paola, non ci sono errori nelle spiegazioni del diagramma: i diagrammi si leggono dal basso verso l'alto, da destra verso sinistra per i ferri di andata e da sinistra a destra per i ferri di ritorno. Buon lavoro!
02.11.2024 - 12:06
![]() Aurélie wrote:
Aurélie wrote:
Bonjour, Je souhaite faire la veste. J'ai vu que pour l'échantillon vous proposez de faire uniquement du jersey. Or, ce modèle ayant des torsades, celles-ci réduisent le tricot. Comment faire pour savoir si notre travail va correspondre aux dimensions du modèle ? Merci d'avance pour votre retour.
14.02.2024 - 14:45DROPS Design answered:
Bonjour Aurélie, si votre échantillon en jersey est juste, et que vous conservez la même tension en tricotant par la suite, alors les mesures finales seront justes car les ajustements sont faits dans le nombre de mailles pour chaque taille. Bon tricot!
14.02.2024 - 16:28
![]() Lene Hallingore wrote:
Lene Hallingore wrote:
Jeg kan ikke se i vejledningen, hvad jeg skal strikke mellem diagrammerne på vrangpindene.
27.11.2023 - 09:52DROPS Design answered:
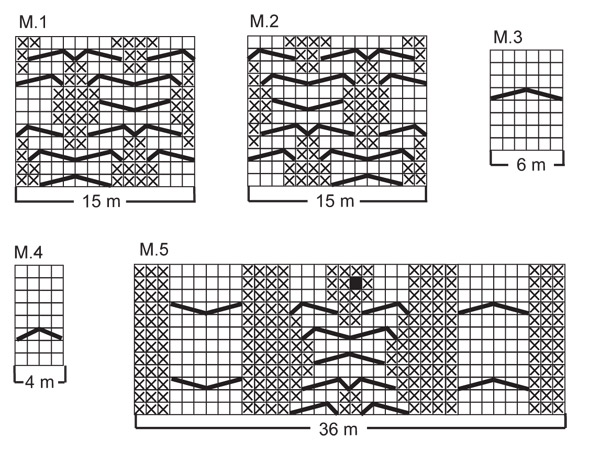
Hei Lene. Fra vrangen strikker vrangmaskene rett og perlestrikk over perlestrikk. Om du ser på bildet vil du se at det bare er vrangmasker mellom f.eks diagram M.3 og M.1. mvh DROPS Design
27.11.2023 - 10:30
![]() Anne-Berit Storrød wrote:
Anne-Berit Storrød wrote:
Hei. Jeg strikker jakken i str 6/9 mnd og holder på med bakstykket. Når jeg har felt til ermer har jeg 56 m på pinnen. Da er det kun mønster og vrangmaskene før, mellom og etter igjen. (Det er felt 8 masker i hver side og det utgjør 7 m perlestrikk og 1 stk kantmaske.) Skal man da ikke fortsette med 1 stk kantmaske ?
21.01.2023 - 23:26DROPS Design answered:
Hei Anne-Berit, Nei, det er ikke nødvendig med kantmasker langs ermhullene. Ermene sys i vrangmaskene. God fornøyelse!
22.01.2023 - 08:23
![]() Kati Salonius wrote:
Kati Salonius wrote:
Voisiko ohjeen tehdä ilman huppua?
18.09.2022 - 17:58DROPS Design answered:
Voit neuloa jakun ilman huppua. Poimi tällöin silmukoita pääntien reunasta ja neulo esim. joustinneuleinen pääntien reunus.
20.09.2022 - 18:44
![]() Valentina wrote:
Valentina wrote:
Potete verificare nello schema M5 che la treccia centrale, quella con la nocciolina, sia corretta? Ho seguito tutto lo schema ma non viene come nella foto. Grazie mille
11.09.2022 - 22:24DROPS Design answered:
Buonasera Valentina, in quale punto trova difficoltà? ha seguito lo schema dal basso verso l'alto e da destra verso sinistra? Buon lavoro!
12.09.2022 - 21:44
![]() Velma wrote:
Velma wrote:
Im starting the back now and you only give instructions for the first row. What do i knit for the second row and does these 2 rows form the pattern
17.07.2022 - 13:08DROPS Design answered:
Dear Velma, in fact, the rib pattern is formed by the first row already. For second row you knit stitches just as you see it: i.e. 1 edge st, P2, K2, ... Happy knitting!
18.07.2022 - 15:22
|
|||||||||||||||||||||||||
Matheo#matheojacket |
|||||||||||||||||||||||||
 |
 |
||||||||||||||||||||||||
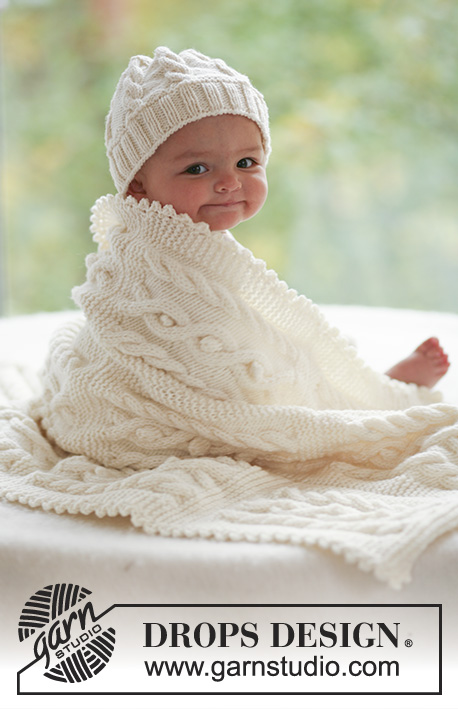
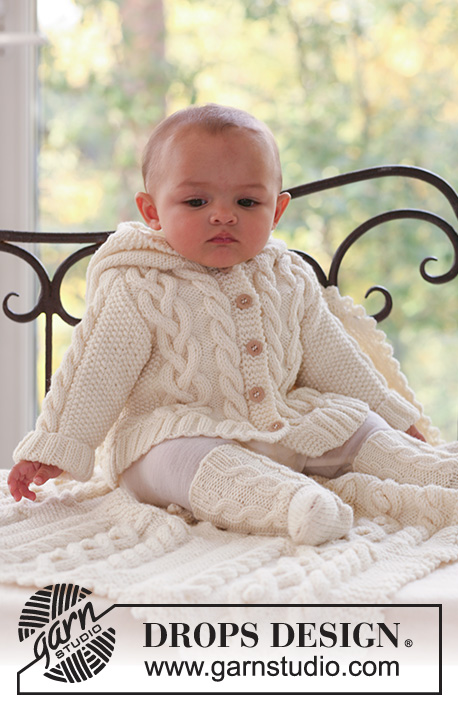
Set of knitted jacket with hood, socks and blanket with cables for baby and children in DROPS Merino Extra Fine. Theme: Baby blanket
DROPS Baby 17-2 |
|||||||||||||||||||||||||
|
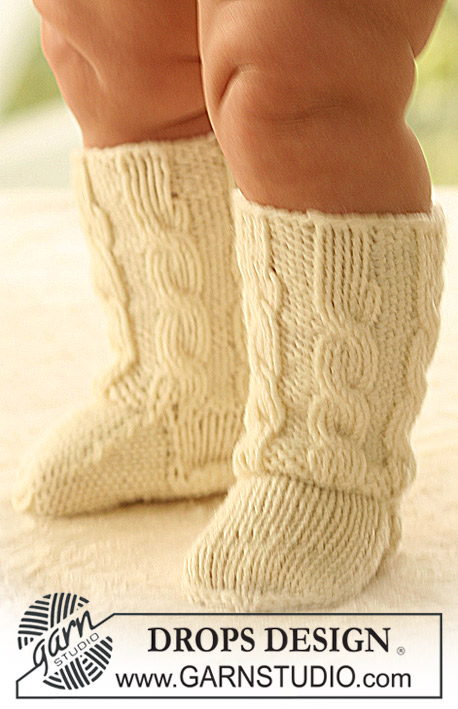
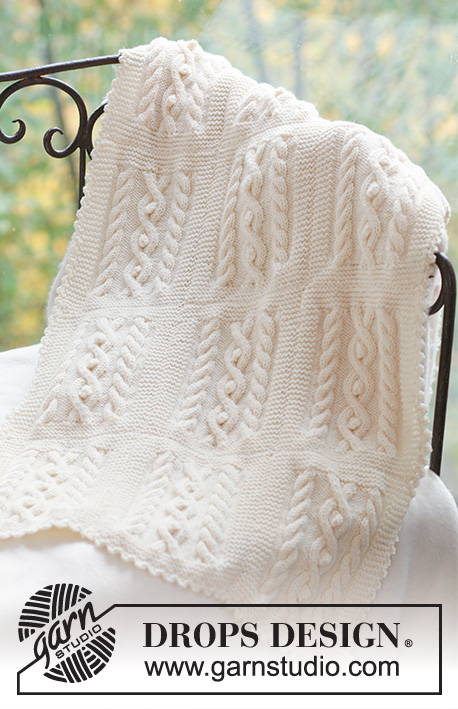
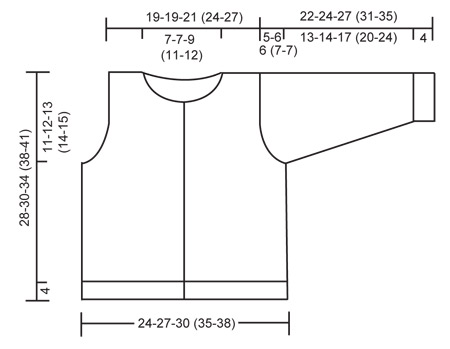
JACKET: MOSS ST: Row 1: * K1, P1 *, repeat from *-*. Row 2: K over P and P over K. Repeat row 2. PATTERN: See diagram M.1, M.2 and M.3. The diagrams show the pattern from the RS. BUTTONHOLES: Make buttonholes on right front band by K tog 2nd and 3rd st from edge and make 1 YO. Make buttonholes when piece measures: SIZE 1/3 months: 3, 8, 13, 18 and 23 cm SIZE 6/9 months: 5, 10, 15, 20 and 25 cm SIZE 12/18 months: 5, 11, 17, 23 and 29 cm SIZE 2 years: 5, 11, 16, 21, 27 and 32 cm SIZE 3/4 years: 5, 11, 17, 23, 29 and 35 cm ---------------------------------------------------------- BACK PIECE: Worked back and forth on needle. Cast on 72-80-84 (96-104) sts (includes 1 edge st each side) on needle size 3.5 mm with Merino Extra Fine. Work rib as follows (first row = RS): 1 edge st, * K2, P2 *, repeat from *-*, and finish with K2 and 1 edge st. When rib measures 4 cm change to needle size 4.5 mm and K 1 row from RS, AT THE SAME TIME dec 6-8-6 (8-10) sts evenly = 66-72-78 (88-94) sts. K 1 row from WS and continue as follows from RS: 1 edge st, 4-7-8 (11-11) moss sts – SEE ABOVE – P 2, M.1 (= 15 sts), P 4-4-6 (8-11), M.3 (= 6 sts), P 2, M.3 (= 6 sts), P 4-4-6 (8-11), M.2 (= 15 sts), P 2, 4-7-8 (11-11) moss sts and 1 edge st. Continue in pattern like this. REMEMBER THE KNITTING TENSION! When piece measures 17-18-21 (24-26) cm cast off for armhole each side at the beg of every row from the side: 3 sts 1 time, 2 sts 0-1-2 (3-3) times and 1 st 2-3-2 (2-2) times = 56-56-60 (66-72) sts. When piece measures 26-28-32 (36-39) cm work the 6 sts on M.3 tog 2 by 2 = 50-50-54 (60-66) sts. On next row cast off the middle 12-12-16 (20-22) sts for neck and complete each side separately. Cast off 1 st on neckline on next row = 18-18-18 (19-21) sts left on shoulder. When piece measures 28-30-34 (38-41) cm dec 6 sts evenly on row = 12-12-12 (13-15) sts left on shoulder, cast off on next row. RIGHT FRONT PIECE: Worked back and forth on needle from mid front. Cast on 42-46-50 (54-58) sts (includes 1 edge st at side and 5 front band sts towards mid front) on needle size 3.5 mm with Merino Extra Fine. Work rib as follows from mid front (first row = RS): 5 garter sts (= front band), * K2, P2 *, repeat from *-* and finish with 1 edge st. Remember buttonholes on front band - SEE ABOVE. When piece measures 4 cm change to needle size 4.5 mm, K 1 row from RS, AT THE SAME TIME dec 4-5-6 (5-6) sts evenly (do not dec on front band) = 38-41-44 (49-52) sts. K 1 row from WS and work next row as follows from RS: 5 garter sts (= front band), P 1, M.3 (= 6 sts), P 4-4-6 (8-11), M.1 (= 15 sts), P 2, 4-7-8 (11-11) moss sts and 1 edge st. Continue in pattern like this. When piece measures 17-18-21 (24-26) cm cast off for armhole at the side as described for back piece = 33-33-35 (38-41) sts. When piece measures 24-26-30 (33-36) cm work the 6 sts on M.3 tog 2 by 2 = 30-30-32 (35-38) sts. Now slip the 8-8-10 (12-13) sts towards mid front on a stitch holder for neck. Cast off to shape the neckline at the beg of every row from mid front: 2 sts 1 time and 1 st 2 times = 18-18-18 (19-21) sts left on shoulder. When piece measures 28-30-34 (38-41) cm dec 6 sts evenly = 12-12-12 (13-15) sts left on shoulder, cast off LEFT FRONT PIECE: Cast on and work like right front piece, but mirrored, i.e. work first row as follows from the side: 1 edge st * P2, K2 *, repeat from *-*, and finish with 5 garter sts (= front band). When working pattern work row from RS as follows: 1 edge st, 4-7-8 (11-11) moss sts, P 2, M.2 (= 15 sts), P 4-4-6 (8-11), M.3 (= 6 sts), P 1 and 5 garter sts (= front band). Do not make buttonholes! SLEEVE: Worked back and forth on needle. Cast on 46-46-46 (50-50) sts (includes 1 edge st each side) on needle size 3.5 mm with Merino Extra Fine. Work 4 cm rib, K2/P2, with 1 edge st each side. Change to needle size 4.5 mm and K 1 row from RS, AT THE SAME TIME dec 10-8-8 (10-10) sts evenly = 36-38-38 (40-40) sts. K 1 row from WS and work next row as follows from RS: 1 edge st, 12-13-13 (14-14) moss sts, P 2, M.3 (= 6 sts), P 2, 12-13-13 (14-14) moss sts and 1 edge st. Continue in pattern like this. AT THE SAME TIME when piece measures 7 cm inc 1 st each side and repeat the inc on every 4th row a total of 6-7-9 (10-12) times = 48-52-56 (60-64) sts – work the inc sts in moss st. When piece measures 17-18-21 (24-28) cm cast off for sleeve cap each side at the beg of every row: 4 sts 1 time, and then 2 sts until piece measures 21-23-26 (30-34) cm, now cast off 3 sts each side 1 time, AT THE SAME TIME on the last row work the 6 sts on M.3 tog 2 by 2. Cast off remaining sts on next row. Piece measures approx 22-24-27 (31-35) cm. ASSEMBLY: Sew shoulder seams. HOOD: Pick up approx 46 to 68 sts (incl sts on stitch holders at front) round neckline on needle size 4.5 mm. K 2 rows, AT THE SAME TIME on second row inc evenly to 68-72-76 (80-84) sts. Continue in reverse stocking st with 5 garter sts each side until hood measures 21-23-25 (27-28) cm, cast off. Sew hood tog at the top, edge to edge to avoid a chunky seam. Set in sleeves. Sew sleeve and side seams inside 1 edge st. Sew on buttons. ---------------------------------------------------------- SOCK: PATTERN: See diagram M.4. The diagram shows the pattern from the RS. DECREASING TIP: Dec as follows before marker: K 2 tog. Dec as follows after marker: Slip 1 st as if to K, K1, psso. HEEL DECREASES: ROW 1 (= RS): Work row until 5-5-6 (6-6) sts remain, slip next st as if to K, K1, psso, turn piece, ROW 2 (= WS): Work row until 5-5-6 (6-6) sts remain, slip next st as if to P, P1, psso, turn piece, ROW 3 (= RS): Work row until 4-4-5 (5-5) sts remain, slip next st as if to K, K1, psso, turn piece, ROW 4 (= WS): Work row until 4-4-5 (5-5) sts remain, slip next st as if to P, P1, psso, turn piece. Continue dec like this with 1 less st between each dec until there are 9-9-12 (12-12) sts on row. ---------------------------------------------------------- SOCK: Worked in the round on double pointed needles. Cast on 36-36-42 (42-42) sts on double pointed needles size 3 mm with Merino Extra Fine and work 2 cm rib, K3/P3. Work 1 round rib, AT THE SAME TIME inc all K3 to K4 = 42-42-49 (49-49) sts. Work 1 round K4/P3. Now continue as follows: * M.4, P3 *, repeat from *-* a total of 6-6-7 (7-7) times. After 3 vertical repeats of M.4 work sts in M.4 tog 2 by 2 = 30-30-35 (35-35) sts. Now keep the first 17-17-22 (22-22) sts on needle for heel and slip remaining 13 sts on a stitch holder (= upper foot). Work 3-3.5-4 (4-4.5) cm stocking st back and forth on heel sts. Insert a marker in piece and now dec for heel – SEE ABOVE. After heel dec pick up 7-8-9 (9-10) sts on each side of heel and slip sts from stitch holder back on needle = 36-38-43 (43-45) sts. Continue in stocking st on all sts, AT THE SAME TIME dec as follows on each side of the 13 sts on upper foot: K tog the 2 sts before the 13 sts on upper foot into back of loop and K tog the 2 sts after the 13 sts. Dec on every other row a total of 5-6-7 (6-6) times = 26-26-29 (31-33) sts. When piece measures approx 8-9-9.5 (11.5-12.5) cm from marker on heel (approx 2-2-2.5 (2.5-3.5) cm remain) insert 1 marker each side with 13-13-15 (15-17) sts on upper foot and 13-13-14 (16-16) sts under foot. Dec on each side of both markers – SEE DECREASING TIP – on every other round 2-2-3 (3-5) times and then on every round 3-3-3 (3-2) times = 6-6-5 (7-5) sts. Cut the thread, pull through remaining sts and fasten. Sock measures approx 10-11-12 (14-16) cm. ---------------------------------------------------------- : BLANKET GARTER ST (back and forth on needle): K all rows. INCREASING TIP: Make all inc from RS. Inc 1 st by making 1 YO. Work YO into back of loop on return row to avoid a hole. PATTERN: See diagram M.5. The diagram shows the pattern from the RS. --------------------------------------------------------- BLANKET: Blanket is made up of 12 squares, sewn tog 3 by 4. 1 square measures approx: width 18 cm, length 22.5 cm 1 SQUARE: Cast on 36 sts on needle size 5 mm with Merino Extra Fine. Work 8 rows garter st – SEE ABOVE. K 1 row from RS, AT THE SAME TIME inc 10 sts evenly on the middle 26 sts = 46 sts. Work next row from WS as follows: 5 garter sts, K3, P6, K 4, P3, K4, P3, K4, P6, K3 and 5 garter sts. Continue as follows from RS: 5 garter sts, M.5 on the next 36 sts, 5 garter sts. Work 4 vertical repeats of M.5 like this, but on the last repeat finish when 2 rows of diagram remain. K 1 row from RS on all sts, AT THE SAME TIME dec 10 sts on the middle 36 sts = 36 sts. Work 8 rows garter st on all sts and cast of loosely. Note: You may work 4 squares in a row without casting off, i.e. beg a new square after the last 8 rows in garter st. ASSEMBLY: Sew the squares tog, 3 by 4. Sew in outer loops of sts to avoid a chunky seam. CROCHET BORDER: Crochet a border round the whole blanket with crochet hook size 5 mm as follows: * 1 dc in edge st, 3 ch, 1 dc in the first of these 3 ch, skip 1 cm *, repeat from *-*, and finish with 1 sl st in first dc from beg of round. |
|||||||||||||||||||||||||
Diagram explanations |
|||||||||||||||||||||||||
|
|||||||||||||||||||||||||
 |
|||||||||||||||||||||||||
 |
|||||||||||||||||||||||||
Have you finished this pattern?Tag your pictures with #dropspattern #matheojacket or submit them to the #dropsfan gallery. Do you need help with this pattern?You'll find 34 tutorial videos, a Comments/Questions area and more by visiting the pattern on garnstudio.com. © 1982-2026 DROPS Design A/S. We reserve all rights. This document, including all its sub-sections, has copyrights. Read more about what you can do with our patterns at the bottom of each pattern on our site. |
|||||||||||||||||||||||||


With over 40 years in knitting and crochet design, DROPS Design offers one of the most extensive collections of free patterns on the internet - translated to 17 languages. As of today we count 324 catalogues and 12290 patterns translated into English (UK/cm). 12290
We work hard to bring you the best knitting and crochet have to offer, inspiration and advice as well as great quality yarns at incredible prices! Would you like to use our patterns for other than personal use? You can read what you are allowed to do in the Copyright text at the bottom of all our patterns. Happy crafting!
Post a comment to pattern DROPS Baby 17-2
We would love to hear what you have to say about this pattern!
If you want to leave a question, please make sure you select the correct category in the form below, to speed up the answering process. Required fields are marked *.