
Popular categories
Looking for a yarn?


Comments / Questions (44)
![]() Bianc wrote:
Bianc wrote:
Ich bin gerade bei dem Ärmel und von den vielen Hilfen begeistert. Nach Ende des Mustersatz 3 soll ich, wenn der Ärmel eine Länge von 2 cm nach der Teilung hat, an der Ärmelunterseite zwei Maschen abnehmen. Meine Frage ist, ob die Abnahmen dann 2 cm nach Beendigung des Mustersatzes erfolgen soll.
20.03.2026 - 19:30DROPS Design answered:
Liebe Frau Bianc, A.3 wird nicht fertig sein, wenn man die Abnahmen unter den Ärmel beginnt, aber trotztem sollen Sie in jedem A.3 wie im Diagram abnehmen, sonnst wird die Maschenanzahl nicht stimmen. Viel Spaß beim Stricken!
23.03.2026 - 07:36
![]() Dagmar wrote:
Dagmar wrote:
Ich möchte ihn ohne Schlitze machen, muss ich die 49 Maschen trotzdem zunehmen?
08.03.2026 - 11:18DROPS Design answered:
Liebe Dagmar, dann sollen Sie vielleicht lieber 49 Maschen x 2 zunehmen, da 49 Maschen sind für je Vorder- und Rückenteil. Viel Spaß beim Stricken!
09.03.2026 - 09:48
![]() Hélène wrote:
Hélène wrote:
Bonjour, votre vidéo pour rabattre à l\'italienne débute directement sur les côtes 1/1 mais ce modèle de pull comporte 3 points de mousse de chaque côté. Si je débute de la même manière que la vidéo il y a un décalage dans les mailles et le résultat n\'est pas aussi net. Cette technique est toute nouvelle pour moi et je ne sais pas comment la modifier pour l\'adapter à ce tricot.
12.12.2025 - 18:57DROPS Design answered:
Bonjour Hélène, j'ai transmis à nos stylistes, en attendant, vous pouvez rabattre les mailles point mousse à l'endroit simplement. Bon tricot!
22.12.2025 - 17:10
![]() Hildegard Rummelhagen wrote:
Hildegard Rummelhagen wrote:
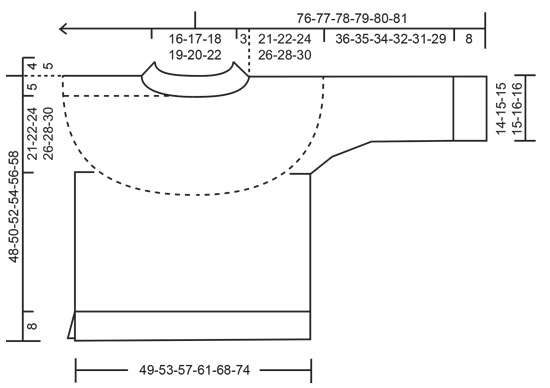
Wo finde ich das Diagramm A.2A?
22.09.2025 - 22:37DROPS Design answered:
Hi, Hildegard, diagram A.2 is below the pattern, make sure you use the correct diagram for the size you are knitting. Regards, DROPS Design
22.10.2025 - 09:25
![]() Lilith wrote:
Lilith wrote:
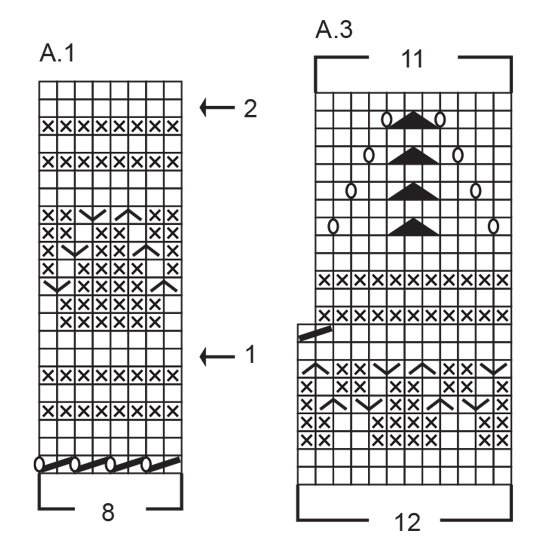
On the 11th row of A.1, the first stitch, is it the video linked of doing a cable over 2 stitches? The description has a knit and purl, but the video has two knit stitches. Help and/or clarification would be greatly appreciated
02.02.2025 - 15:15DROPS Design answered:
Dear Lilith, we don't have specific video for this cable, just follow the symbols to displace the knit stitches towards the middle of each A.1, so that there will be less and less purled stitches in the middle of A.1 and more and more purled stitches between each repeat (at the beg of A.1 + at the end of A.1). Happy knitting!
03.02.2025 - 14:03
![]() Katie R wrote:
Katie R wrote:
I am trying to figure out the first row for A.1. Any help would be appreciated.
12.01.2025 - 22:39DROPS Design answered:
Dear Katie, in the first row of A.1 you work: knit 2 together, yarn over, knit 2 together, yarn over, knit 2 together, yarn over, knit 2 together, yarn over. So the number of stitches in the row remains the same but you get small holes (thanks to the yarn overs). Happy knitting!
12.01.2025 - 22:45
![]() Kraenzlin wrote:
Kraenzlin wrote:
Finde komisch dass man bei dem Vorderteil noch 64 Maschen aufnehmen muss (macht etwa 30cm) und die Zeichnung eine gerade Linie zeigt… Was ist richtig
25.11.2024 - 20:34DROPS Design answered:
Liebe Frau Kraenzlin, meinen Sie die 64 Zunahmen in XXL kurz vor Bündchen? Für die gleiche Breite braucht man mehr Maschen mit den kleineren Nadeln und Bündchen als mit den grösseren Nadeln und Glattrechts, deshalb wird man zunehmen, damit das Bündchen die Arbeit nicht zusammenzieht. Viel Spaß beim Stricken!
26.11.2024 - 09:41
![]() Christina Rønnow wrote:
Christina Rønnow wrote:
Jeg kan ikke finde ud af jeres størrelsesguide. Jeg er 126 cm over brystet. Ud fra målene over hoften skal jeg have en xl (2x61=122 cm) eller en xxl (2x68=136cm). Er det korrekt?
23.07.2024 - 01:01DROPS Design answered:
Hej Christina, ja det stemmer :)
01.08.2024 - 08:15
![]() Breuil wrote:
Breuil wrote:
Bonjour. Je tricote le modele \"Avalanche Sweater\" , et je ne comprends pas ou placer les augmentations dans le diagramme A1. Pourriez vous s\'il vous plaît, m\'éclairer sur ce point ? Merci d\'avance. Cordialement.
02.05.2024 - 13:28DROPS Design answered:
Bonjour Mme Breuil, les augmentations pendant le diagramme A.1 (flèches -1 et -2) doivent être placées à intervalles réguliers aux rangs marqués par les flèches; cette leçon explique comment calculer où augmenter (ou diminuer) en fonction du nombre de mailles. Bon tricot!
02.05.2024 - 15:36
![]() Seidy wrote:
Seidy wrote:
Hut menar ni att man ska sticka diagrammet A2 och B2 när man stickar fram o tillbaka. Börjar med 388 m och ska sticka 26 rapporter a 14 m + 14 kantmaskor = 378 m Ska jag sticka först A2 och fortsätta med B2 (rapport 10 m) och hur stickar jag de aviga varven ? Tacksam för snabbt och lätt förstående svar
28.01.2024 - 22:45DROPS Design answered:
Hei Seidy. Vi skal hjelpe deg så godt vi kan, men hvilken str. strikker du og hva mener du med "+ 14 kantmaskor". I oppskriften ser jeg kun 3 kantmasker. Skriv gjerne nøyaktig hvor du er i oppskriften. mvh DROPS Design
05.02.2024 - 12:46
|
||||||||||||||||||||||||||||||||||
Avalanche Sweater#avalanchesweater |
||||||||||||||||||||||||||||||||||
 |
 |
|||||||||||||||||||||||||||||||||
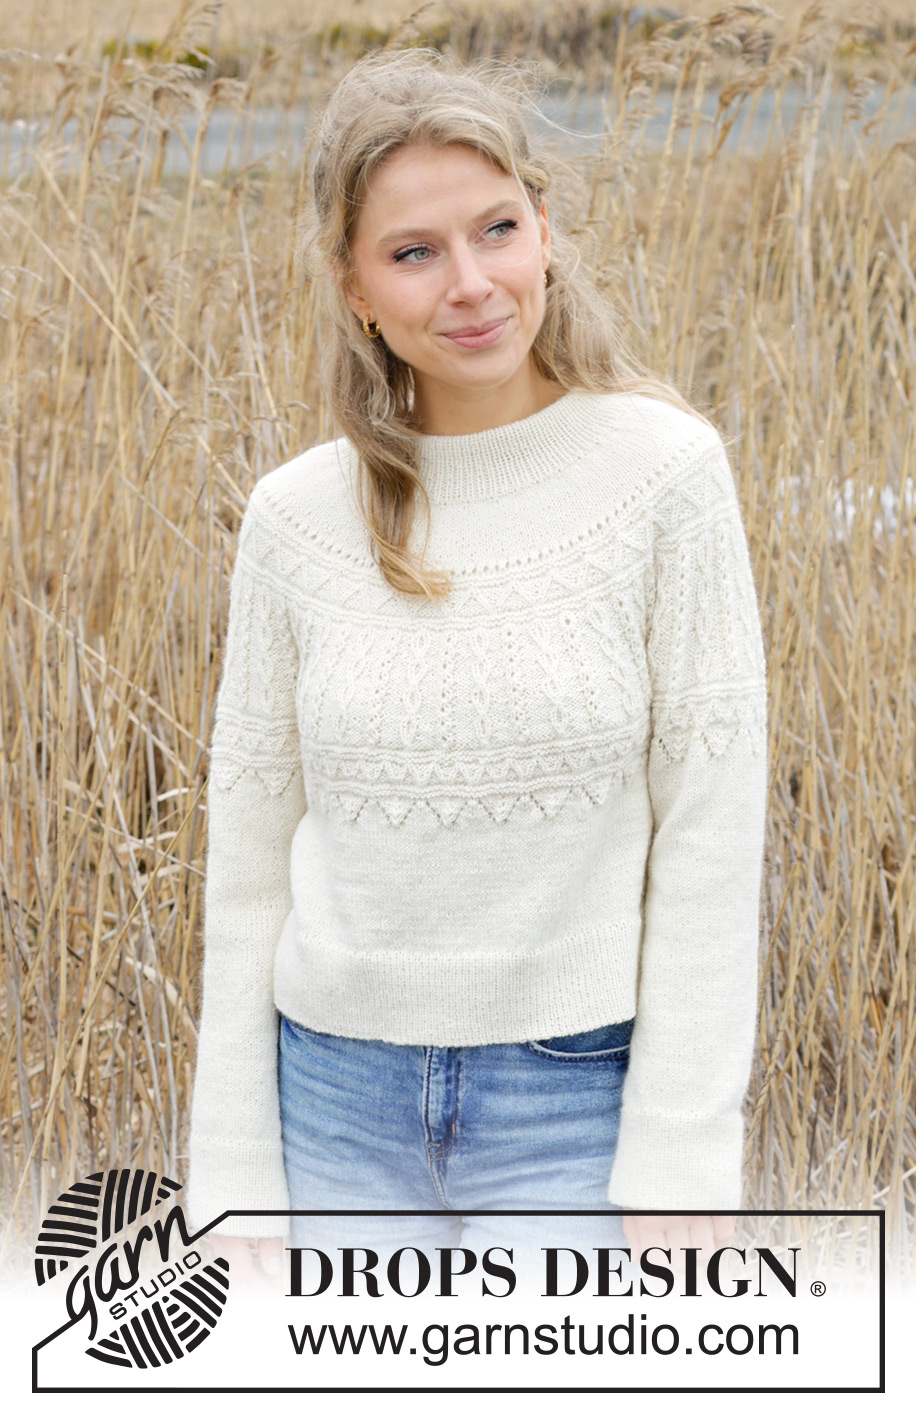
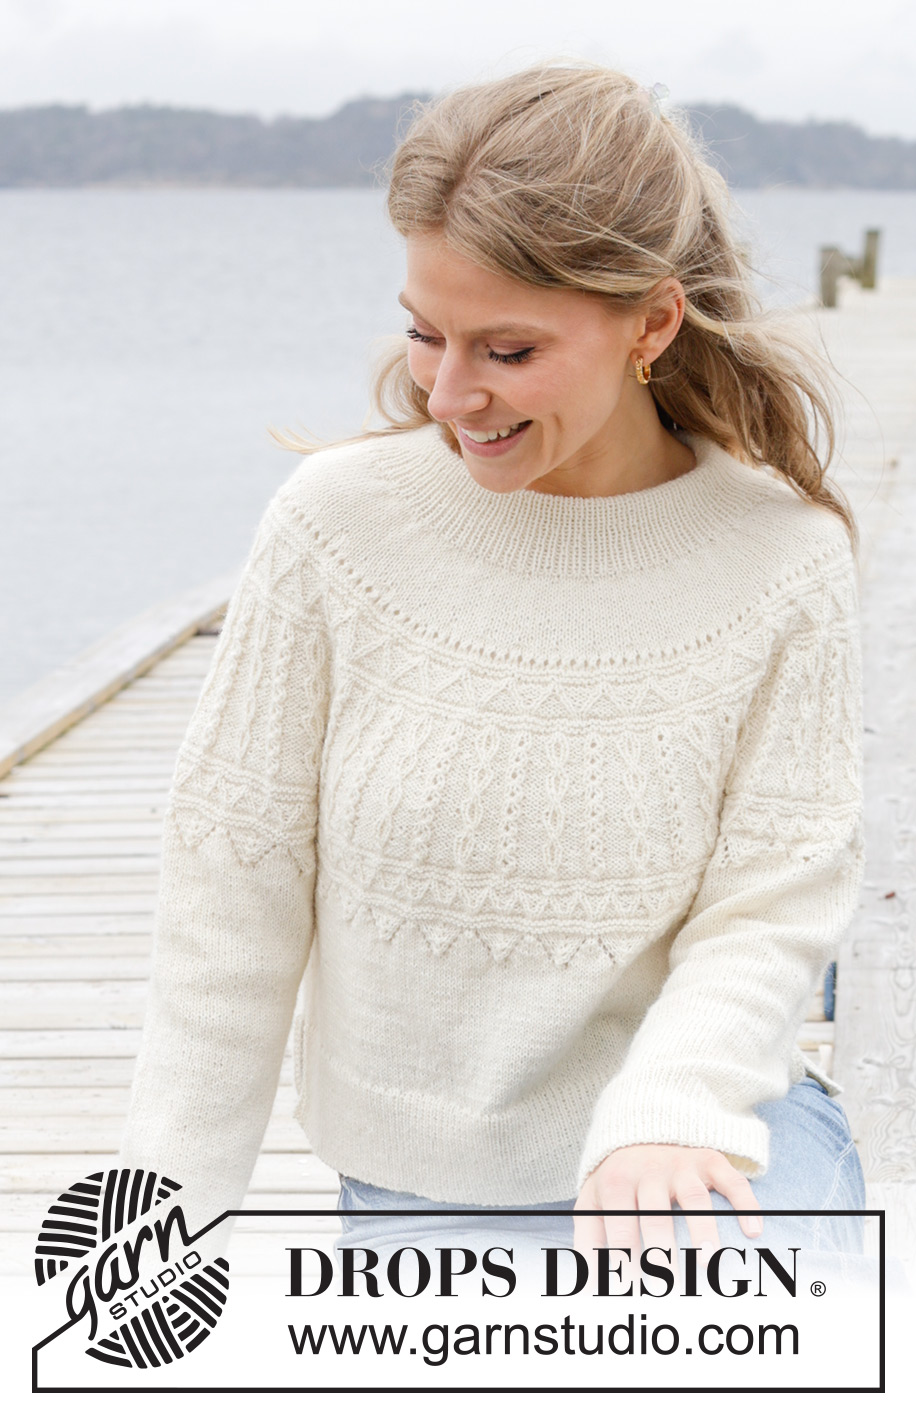
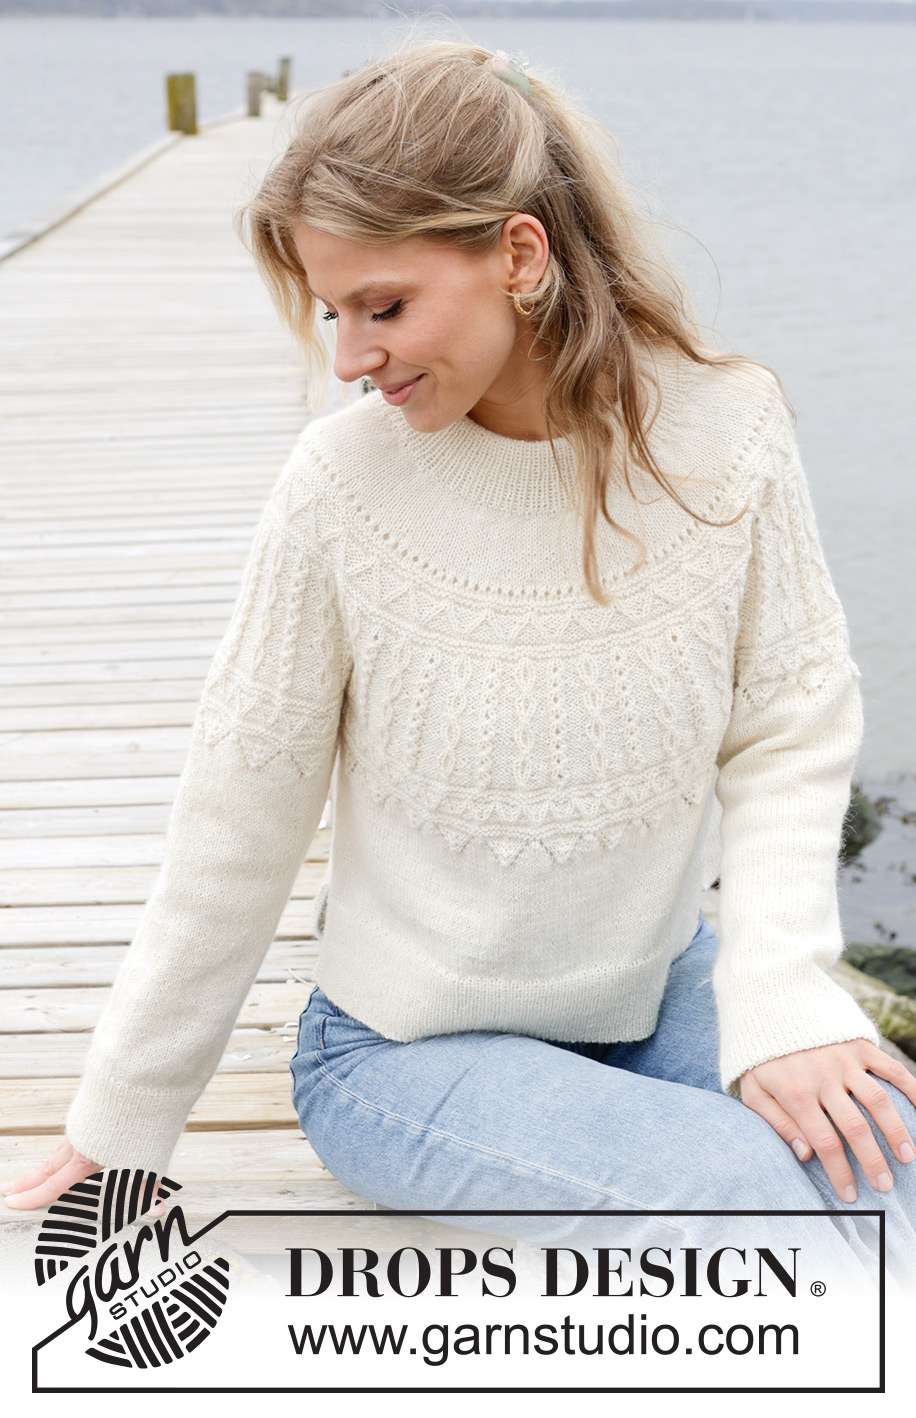
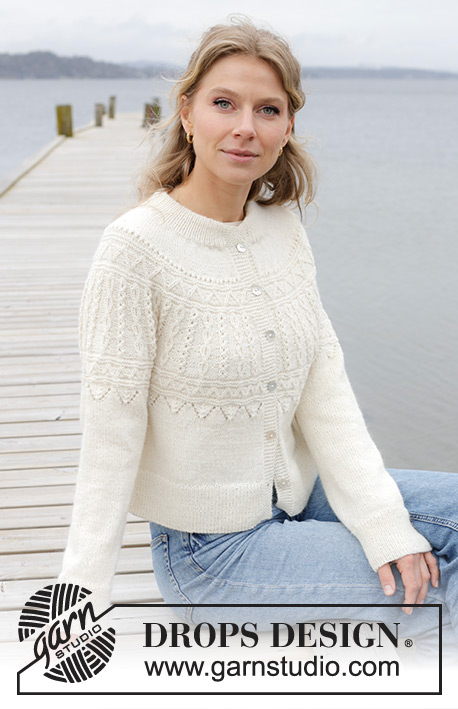
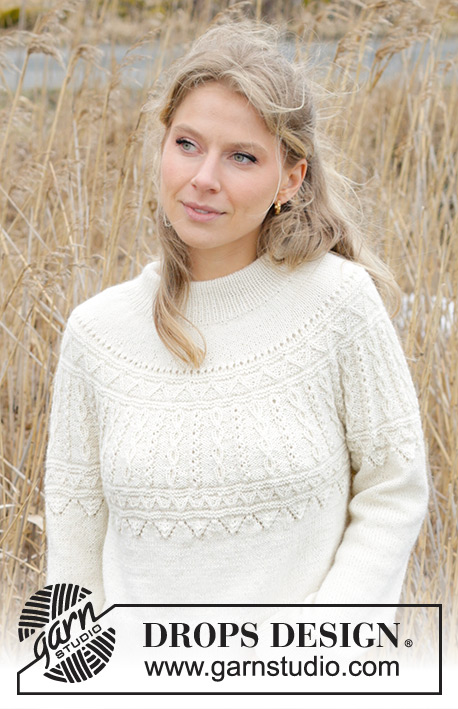
Knitted jumper in DROPS Nord. The piece is worked top down with double neck, round yoke, relief-pattern and split in sides. Sizes S - XXXL.
DROPS 243-8 |
||||||||||||||||||||||||||||||||||
|
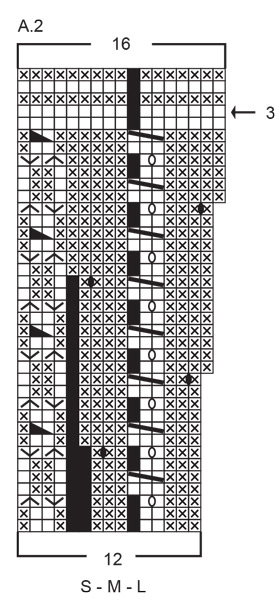
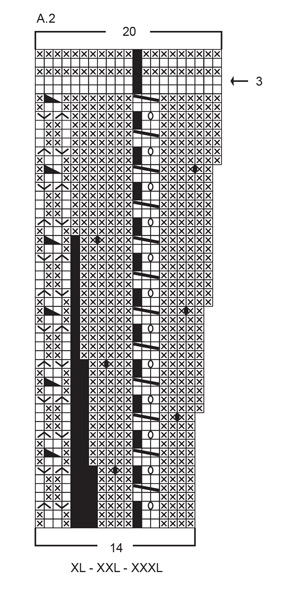
------------------------------------------------------- EXPLANATIONS FOR THE PATTERN: ------------------------------------------------------- EDGE STITCHES (for rib at bottom): 3 edge stitches are worked on each side of the piece. They are knitted from both the right and wrong side (garter stitch). ELEVATION: To make the jumper a little higher at the back you can work the following elevation. Skip this section if you do not want an elevation. Insert 1 marker at the beginning of the round (mid-back). Start from the right side and knit 16-17-18-19-20-21 stitches past the marker, turn, tighten the strand and purl 32-34-36-38-40-42 back. Turn, tighten the strand and knit 48-51-54-57-60-63, turn, tighten the strand and purl 64-68-72-76-80-84 back. Turn, tighten the strand and knit 80-85-90-95-100-105, turn, tighten the strand and purl 96-102-108-114-120-126 back. Turn, tighten the strand and knit to mid-back. PATTERN: See diagrams A.1 to A.3. Choose diagram for your size (applies to A.2). INCREASE TIP (evenly spaced): Increase 1 stitch by making 1 yarn over which is worked twisted on the next round to avoid a hole. DECREASE TIP (for sleeves): Decrease 1 stitch on each side of the marker-thread as follows: Work until there are 3 stitches left before the marker-thread, knit 2 together, knit 2 (marker-thread sits between these 2 stitches), slip 1 stitch knit-wise, knit 1 and pass the slipped stitch over the knitted stitch. ------------------------------------------------------- START THE PIECE HERE: ------------------------------------------------------- JUMPER – SHORT OVERVIEW OF THE PIECE: The neck and yoke are worked in the round with circular needle, from mid back and top down. You can work an elevation at the back if you wish. The yoke is divided for body and sleeves and the body is continued in the round with circular needle as far as the split in each side, then each piece is finished separately back and forth with circular needle. The sleeves are worked in the round with circular needle/double pointed needles. DOUBLE NECK: Cast on 136-140-146-150-156-166 stitches with DROPS Nord, using short circular needles size 2.5 and 3 mm held together. Remove the needle size 3 mm (this gives you an elastic cast-on edge). Work rib in the round (knit 1, purl 1) for 9-9-9-11-11-11 cm. Fold the neck double to the inside and work 1 more round of rib, working every 4th stitch together with its corresponding stitch on the cast-on edge. You now have a double neck. YOKE: Change to circular needle size 3 mm. Knit 1 round and increase 34-36-36-38-40-42 stitches evenly spaced – read INCREASE TIP = 170-176-182-188-196-208 stitches. Insert 1 marker in the middle of the round (mid-front) – this is used to measure the yoke. You can now work an ELEVATION at the back – read description above. If you do not want an elevation, go straight to the next section. Work stocking stitch. REMEMBER THE KNITTING TENSION! When the yoke measures 3-4-6-2-3-4 cm from the marker, increase 38-40-42-40-40-42 stitches evenly spaced = 208-216-224-228-236-250 stitches. The increases for the relief-pattern are now finished in sizes S, M and L. SIZES XL, XXL and XXXL: When the yoke measures 4-6-8 cm from the marker, increase 36-36-38 stitches evenly spaced = 264-272-288 stitches. ALL SIZES: = 208-216-224-264-272-288 stitches. Continue with stocking stitch until the yoke measures 4-5-7-5-7-9 cm from the marker. Work A.1 26-27-28-33-34-36 times on the round. Continue this pattern and AT THE SAME TIME increase stitches evenly spaced on each round marked with an arrow in A.1 as follows: Arrow-1: Increase 40-48-56-48-56-56 stitches evenly spaced = 248-264-280-312-328-344 stitches. Arrow-2: Increase 40-48-56-38-50-48 stitches evenly spaced = 288-312-336-350-378-392 stitches. When A.1 is finished the yoke measures approx. 10-11-13-11-13-15 cm from the marker on mid front. Now work A.2, 24-26-28-25-27-28 times on the round. Continue this pattern and increase as shown in the diagram. When you have worked as far as the round marked with arrow-3 in the diagram, there are 384-416-448-500-540-560 stitches. Continue the pattern and increase 12-4-6-0-6-18 stitches evenly on the round marked with arrow-3 = 396-420-454-500-546-578 stitches. When A.2 is finished the yoke measures approx. 21-22-24-26-28-30 cm from the marker. Now divide for the body and sleeves as follows: Work the first round in A.3 over the first 59-65-69-75-82-90 stitches and increase 6-6-7-7-8-9 stitches evenly over these (= 65-71-76-82-90-99 stitches on half back piece), place the next 80-80-89-100-109-109 stitches on 1 thread for the sleeve, cast on 8-8-10-10-12-12 stitches (in side under sleeve), work the first round in A.3 over the next 118-130-138-150-164-180 stitches and increase 12-12-14-14-16-18 stitches evenly over these (= 130-142-152-164-180-198 stitches on front piece), place the next 80-80-89-100-109-109 stitches on 1 thread for the sleeve, cast on 8-8-10-10-12-12 stitches (in side under sleeve), work the first round in A.3 over the last 59-65-69-75-82-90 stitches and increase 6-6-7-7-8-9 stitches evenly over these (= 65-71-76-82-90-99 stitches on half back piece). Cut the strand. The body and sleeves are finished separately! The piece is now measured from here. BODY: = 276-300-324-348-384-420 stitches. Insert 1 marker in the middle of the 8-8-10-10-12-12 stitches cast on under 1 sleeve. Start at the marker and work A.3, 23-25-27-29-32-35 times on the round. When A.3 is finished, you have decreased 1 stitch in each repeat (23-25-27-29-32-35 decreased stitches) = 253-275-297-319-352-385 stitches. Continue with stocking stitch and adjust the stitch count to 254-276-296-318-354-384 on the first round. When the piece measures 14-15-15-15-15-15 cm from the division, divide for the split in each side. Place the first 127-138-148-159-177-192 stitches on circular needle size 2.5 mm (front piece). Leave the other 127-138-148-159-177-192 stitches on the needle size 3 mm. FRONT PIECE: Knit 1 row from the right side and increase 46-49-53-58-64-71 stitches evenly spaced = 173-187-201-217-241-263 stitches. From the wrong side: Work 3 EDGE STITCHES – read description above, * purl 1, knit 1 *, work from *-* until there are 4 stitches left, purl 1 and 3 edge stitches. Work this rib back and forth for 8 cm. Cast off – you can use Italian cast off. The jumper measures approx. 48-50-52-54-56-58 cm from the shoulder. BACK PIECE: Place the 127-138-148-159-177-192 stitches on circular needle size 2.5 mm and work in the same way as the front piece. SLEEVES: Start mid-under one sleeve, knit up 1 stitch in each of 4-4-5-5-6-6 cast-on stitches, place the 80-80-89-100-109-109 stitches from the thread on short circular needle size 3 mm. Work the first round in A.3 over these stitches and increase 8-8-9-10-11-11 stitches evenly spaced, then knit up 1 stitch in each of the remaining 4-4-5-5-6-6 cast-on stitches under the sleeve = 96-96-108-120-132-132 stitches. Insert a marker-thread in the middle of the 8-8-10-10-12-12 stitches under the sleeve; allow it to follow your work onwards – it is used when decreasing under the sleeve. Work A.3, 8-8-9-10-11-11 times on the round. When A.3 is finished you have decreased 1 stitch in each repeat (8-8-9-10-11-11 decreased stitches). Continue with stocking stitch. AT THE SAME TIME, when the sleeve measures 2 cm, decrease 1 stitch on each side of the marker-thread – read DECREASE TIP. Decrease like this every 2nd round a total of 2-0-3-7-10-10 times, then every 4th round 6-6-8-8-8-8 times = 72-76-77-80-85-85 stitches. Continue working until the sleeve measures 36-35-34-32-31-29 cm from the division (try the jumper on, there is approx. 8 cm left before the rib). Change to double pointed needles size 2.5 mm. Knit 1 round and increase 26-26-29-30-31-31 stitches evenly spaced = 98-102-106-110-116-116 stitches. Work rib (knit 1, purl 1) for 8 cm. Cast off in the same way as on the body. Work the other sleeve in the same way. |
||||||||||||||||||||||||||||||||||
Diagram explanations |
||||||||||||||||||||||||||||||||||
|
||||||||||||||||||||||||||||||||||
 |
||||||||||||||||||||||||||||||||||
 |
||||||||||||||||||||||||||||||||||
 |
||||||||||||||||||||||||||||||||||
 |
||||||||||||||||||||||||||||||||||
Have you finished this pattern?Tag your pictures with #dropspattern #avalanchesweater or submit them to the #dropsfan gallery. Do you need help with this pattern?You'll find 38 tutorial videos, a Comments/Questions area and more by visiting the pattern on garnstudio.com. © 1982-2026 DROPS Design A/S. We reserve all rights. This document, including all its sub-sections, has copyrights. Read more about what you can do with our patterns at the bottom of each pattern on our site. |
||||||||||||||||||||||||||||||||||


With over 40 years in knitting and crochet design, DROPS Design offers one of the most extensive collections of free patterns on the internet - translated to 17 languages. As of today we count 324 catalogues and 12290 patterns translated into English (UK/cm). 12290
We work hard to bring you the best knitting and crochet have to offer, inspiration and advice as well as great quality yarns at incredible prices! Would you like to use our patterns for other than personal use? You can read what you are allowed to do in the Copyright text at the bottom of all our patterns. Happy crafting!
Post a comment to pattern DROPS 243-8
We would love to hear what you have to say about this pattern!
If you want to leave a question, please make sure you select the correct category in the form below, to speed up the answering process. Required fields are marked *.