
Popular categories
Looking for a yarn?


Comments / Questions (58)
![]() TIna Kaffka Gershardt wrote:
TIna Kaffka Gershardt wrote:
Strikker str.2år. Forstår ikke 1.pind fra vrangen strik 2 masker forbi 1. Mærker på arbejdet Vend arbejde. Nu problem -for hvordan strikker jeg fra retsiden, hvis jeg ikke først strikker maskerne tilbage, så jeg kan strikke på ret siden?
14.04.2026 - 17:15DROPS Design answered:
Hei Tina. Før du starter med Halsringningen, strikker du 1 pinne fra retten der det felles masker = 84 masker. Så byttes det pinne str. og nå skal det strikkes forkortede pinner og raglan, og det strikkes fra vrangen. Strikk 6 stolpemasker + 10 masker på forstykket + 16 masker på ermet + 20 masker på bakstykket + 16 masker på neste erm, du er nå kommet til 1. merke. Strikk 2 masker forbi dette merke (= 2 masker av forstykket). På neste pinne (= retten, starter økning til raglan. samtidig som det strikkes forkortede pinner. mvh DROPS Design
20.04.2026 - 09:16
![]() Ellen wrote:
Ellen wrote:
Guten Tag Bin soeben bei der Strickarbeit „little cloud blue cardigan“ Halsausschnitt;1.Reihe Was heisst das genau….wenden und den Faden anziehen…. Bitte um einen verständlichen Antwort. Danke
27.03.2026 - 12:21DROPS Design answered:
Liebe Ellen, so werden die verkürzten Reihen gestrickt, damit kein Loch entsteht, in diesem Video zeigen wir, wie man diese verkürzten Reihen strickt. Viel Spaß beim Stricken!
27.03.2026 - 15:57
![]() Mirjam wrote:
Mirjam wrote:
Danke für die Antwort - leider klärt sie nicht meine Frage! Die Reihe nach der ersten Wende ist eine Hinreihe!! Bitte schauen Sie sich Ihre Anleitung nochmal genau an: nach der Wende muss demnach die erste Raglanzunahme unmittelbar nach nur EINER Masche gemacht werden?? Das ist ziemlich eng und klappt nicht wirklich richtig gut. Vielleicht hat eine andere Strickerin einen Tipp?? Danke und Grüße
05.03.2026 - 10:49DROPS Design answered:
Liebe Mirjam, in dieser Anleitung ist die Technik mit der Doppelmasche (German Short Rows) nicht von vornherein berücksichtigt, der Faden wird einfach nur etwas fester angezogen, ohne dadurch eine Doppelmasche bilden zu müssen, daher kann es sein, dass es wie bei Ihnen etwas eng wird, wenn Sie diese Technik verwenden (was ja eine gute Sache ist). Es sollte funktionieren, wenn Sie am Anfang der verkürzten Reihen einfach an beiden Seiten eine Masche mehr stricken, bevor Sie wenden, und dann im beschrieben Rhythmus weitermachen. Das wirkt sich nur geringfügig aus und sollte Ihr Problem beheben. Viel Spaß beim Weiterstricken!
06.03.2026 - 11:07
![]() Mirjam wrote:
Mirjam wrote:
Beim Halsauschnitt mit verkürzten Reihen: wenn ich, wie in der Anleitung beschrieben, in der 1. Reihe (Rück) bis 2 Maschen nach dem ersten Markierungsfaden stricke, dann auf die 2. Reihe (Hin) wende und eine Masche rechts stricke (Doppelmasche als "German Short Rows" ist übrigens nicht ausreichend erklärt!), müsste ich die erste Raglanzunahme (also Umschlag) sofort machen, da die zwei glatten rechten Maschen anschließend folgen. Das wird ziemlich eng ... wie ist das machbar?
01.03.2026 - 13:20DROPS Design answered:
Liebe Mirjam, die Zunahmen bei den verkürzten Reihen stricken Sie nur bei den Hinreihen, nicht bei den Rückreihen. hier finden Sie Videos, wie man die verkürzten Reihen strickt, das kann Ihnen sicher helfen. Viel Spaß beim Stricken!
02.03.2026 - 10:16
![]() Shoshana wrote:
Shoshana wrote:
I don’t understand the passage after the neckline After the six stiches band What do you means to turn and tighten strand? How do I continue the next row knitting?
29.01.2026 - 09:45DROPS Design answered:
Hi Shoshana, It sounds like you are working the elevation, which is the section describing short rows at the back to make the neckline higher at the back. On the first row, you work the band-stitches, then purl to 2 stitches past the first marker-thread. Now you turn and tighten the strand to avoid a hole, then knit back from the right side, increasing for raglan, until you are 2 stitches past the 4th marker-thread. Turn and tighten the strand and work back from the wrong side as described in the text onwards. Regards, Drops Team.
30.01.2026 - 06:38
![]() Britt-Marie wrote:
Britt-Marie wrote:
Jag har köpt detta mönster i Aftonblades sticktidning. Finns det någon video att titta på när det gäller halsringning med förkortade varv? Jag börjar med avigt varv fram till 2 m efter första markören, vänder tillbaka och stickar från rätsidan. Därefter ska jag sticka varv 2 från rätsida ända fram förbi 4:e markören. Det stämmer ju inte. Är det tryckfel i mönstret? Tacksam för hjälp M v h BME
22.10.2025 - 17:07DROPS Design answered:
Hei Britt-Marie. Husk at alle våre oppskrifter er gratis :) Om du går til oppskriften på vår side og klikker på Videor, kan du ta en titt på den generelle videoen om: Hur man ökar till raglan samtidigt som man stickar förkortade varv. mvh DROPS Design
27.10.2025 - 13:08
![]() Mary wrote:
Mary wrote:
Hi! So far so good. Now I am starting the sleeves. The pattern says to knit up 1 stitch in each of he cast on stitches under the sleeve and to add the marker thread in between those 12 stitches. Then it says to start the stockinette at the marker thread. My question is, how do I get to the middle to start the stockinette if my working yarn is at the end of the 12 stitches from adding them? Thank you?
24.09.2025 - 03:06DROPS Design answered:
Hi Mary, You continue knitting round the sleeve to the marker-thread (after knitting up the stitches). Regards, Drops team.
24.09.2025 - 06:41
![]() Dorthe wrote:
Dorthe wrote:
Väldigt förvirrande med hela oket fattar inget öka fram/ bak vad menas med det skal man öka både fram och bak eller???????🤔fatta inget
05.09.2025 - 21:44DROPS Design answered:
Hej Dorthe. Du kommer senare under oket öka olika på fram- & bakstycket och ärmarna till raglan. Du ökar 8 gånger på ett varv till raglan om du ökar både på fram/bakstycke och på ärmar, men ökar du bara på fram/bakstycke så blir det bara 4 ökningar på ett varv. Mvh DROPS Design
09.09.2025 - 11:05
![]() Mary wrote:
Mary wrote:
Hi! The pattern says "knit 1 row and adjust the stitch count", and then says to knit to the marker-thread and decrease 2 or 4 (depending on the section) by decreasing over these stitches. 1. Am I passing them over the last stitch of the section (the one that has the stitch marker right after)? 2. When decreasing 4 stitch, do I pass all 4 on the same stitch?
31.08.2025 - 17:23DROPS Design answered:
Dear Mary, you increase/ decrease in the sections between markers or between the bands and the markers but these increases/decreases are evenly. So you work the stocking stitch section up to the first thread and, over all these stitches, increase 1 stitch somewhere. On the section between markers 1 and 2 decrease 2 stitches evenly, not all together. These stitches are decreased normally (by knitting 2 together, for example or slipping it over the next stitch). The same with the 4 decreases. Don't increase or decrease over the 2 knit stitches next to the marker, since these form the raglan line. Happy knitting!
31.08.2025 - 20:46
![]() Monica Lindell wrote:
Monica Lindell wrote:
Oklart när jag skall använda st. 5 och när jag skall använda st 3,5.
24.08.2025 - 14:10DROPS Design answered:
Hej Monica. Sticka 3,5 används till resår (dvs halskant, längst ner på tröjan samt längst ner på ärmar). Mvh DROPS Design
26.08.2025 - 11:28
|
|
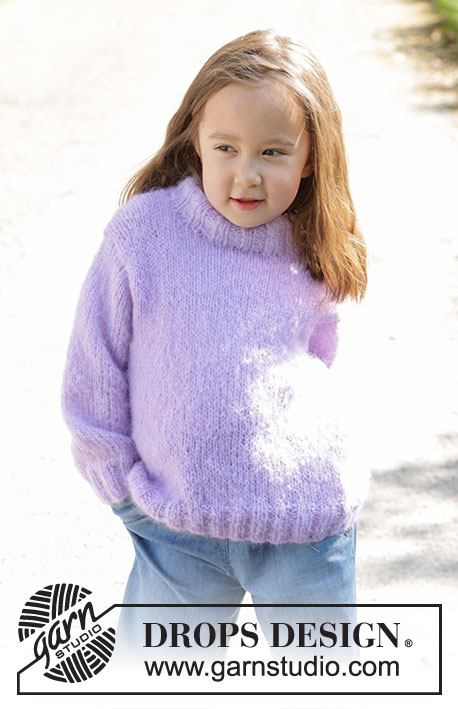
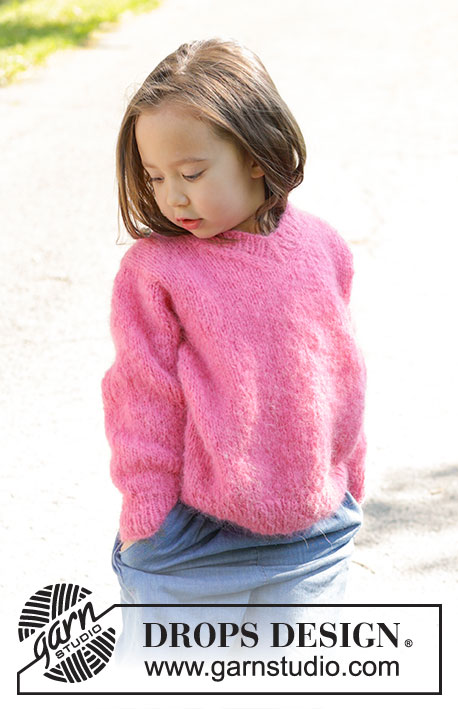
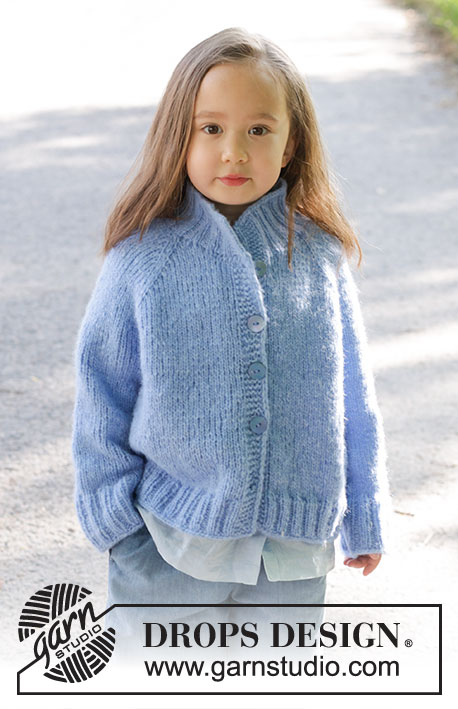
Little Cloud Blue Cardigan#littlecloudbluecardigan |
|
 |
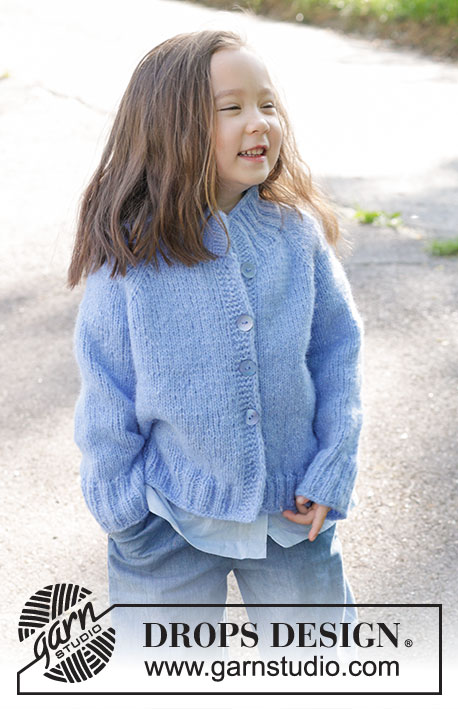 |
Knitted jacket for children in DROPS Air. The piece is worked top down with stocking stitch, high neck and raglan. Sizes 2 – 12 years.
DROPS Children 47-3 |
|
|
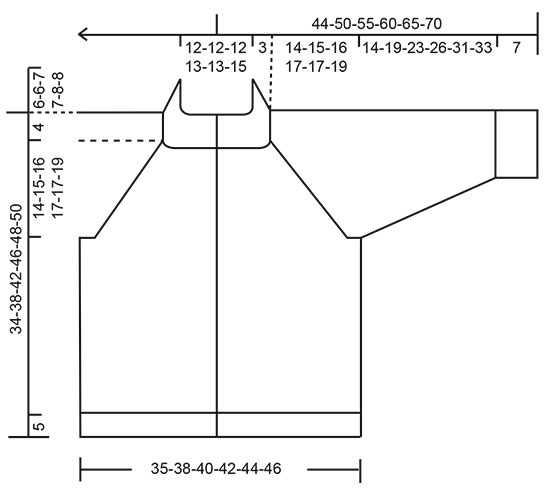
------------------------------------------------------- EXPLANATIONS FOR THE PATTERN: ------------------------------------------------------- GARTER STITCH (worked back and forth): Knit all rows. 1 ridge = knit 2 rows. EDGE STITCHES: 2 EDGE STITCHES AT BEGINNING OF ROW: Slip 1 stitch purl-wise with strand in front, knit 1. 2 EDGE STITCHES AT END OF ROW: Work until there are 2 stitches left, slip 1 purl-wise with strand in front, knit 1. Repeat at the beginning and end of all rows with 2 edge stitches. RAGLAN: Increase 1 stitch before/after 2 stocking stitches in each transition between the body and sleeves. The marker-thread sits between these 2 stitches. Increase 1 stitch by making 1 yarn over. On the next row (wrong side), work the yarn overs as follows: BEFORE MARKER-THREAD: Purl the back loop = no hole. AFTER MARKER-THREAD: Slip the yarn over and place it back on the left needle the other way round (insert the left needle from the back when replacing it). Purl the front loop = no hole. Work the new stitches in stocking stitch. INCREASE TIP (evenly spaced): Increase 1 stitch by making 1 yarn over which is worked twisted on the next row/round to avoid a hole. DECREASE TIP (for sleeves): Decrease 1 stitch on either side of the marker-thread as follows: Work until there are 3 stitches left before the marker-thread, knit 2 together, knit 2 (marker-thread sits between these 2 stitches), slip 1 stitch knit-wise, knit 1 and pass the slipped stitch over the knitted stitch. BUTTONHOLES: Work buttonholes on the right band (when the garment is worn). Work from the right side when there are 4 stitches left on the row as follows: Make 1 yarn over, knit 2 together and knit 2. On the next row (wrong side), knit the yarn over to leave a hole. The first buttonhole is worked when the neck is finished. Then work the other 4-4-5-5-5-5 buttonholes with approx. 6-7-6-7-8-8 cm between each one. ------------------------------------------------------- START THE PIECE HERE: ------------------------------------------------------- JACKET – SHORT OVERVIEW OF THE PIECE. The neck is worked back and forth with circular needle, from mid front and top down. A neckline is worked with short rows before continuing the yoke back and forth with circular needle. The yoke is divided for body and sleeves and the body continued back and forth with circular needle. The sleeves are worked in the round with double pointed needles/short circular needle. NECK: Cast on 90-90-90-94-94-102 stitches with circular needle size 5 mm and DROPS Air. Change to circular needle size 3.5 mm and purl 1 row from the wrong side. Work the next row as follows from the right side: 2 EDGE STITCHES and 4 GARTER STITCHES – read explanations above (6 band stitches), * knit 2, purl 2 *, work from *-* until there are 8 stitches left, knit 2, 4 garter stitches and 2 edge stitches (6 band stitches) – remember explanation above. Continue this rib back and forth for 6-6-7-7-8-8 cm – with the next row from the right side. Insert 4 marker-threads without working the stitches. NOTE: Each thread is inserted between 2 knitted stitches and mark the raglan-lines. Count 15-15-15-19-19-19 stitches (front piece), insert marker-thread 1 before the next stitch, count 20-20-20-16-16-20 stitches (sleeve), insert marker-thread 2 before the next stitch, count 20-20-20-24-24-24 stitches (back piece), insert marker-thread 3 before the next stitch, count 20-20-20-16-16-20 stitches (sleeve), insert marker-thread 4 before the next stitch. There are 15-15-15-19-19-19 stitches left after the last marker-thread (front piece). Knit 1 row and adjust the stitch count as follows: SIZES 2 - 3/4 - 5/6 YEARS: Work the 6 band stitches as before, stocking stitch as far as marker-thread 1 and increase 1 stitch over these stitches (do not increase/decrease the 2 knitted stitches in the raglan-line – applies at all marker-threads), work stocking stitch as far as marker-thread 2 and decrease 4 stitches evenly over these stitches, stocking stitch as far as marker-thread 3 without decreasing, work stocking stitch as far as marker-thread 4 and decrease 4 stitches evenly over these stitches, stocking stitch until there are 6 stitches left, increasing 1 stitch over these stitches, finish with 6 band stitches as before = 84 stitches. SIZES 7/8 - 9/10 YEARS: Work the 6 band stitches as before, stocking stitch as far as marker-thread 1 and decrease 2 stitches over these stitches (do not decrease the 2 knitted stitches in the raglan-line – applies at all marker-threads), work stocking stitch as far as marker-thread 2 without decreasing, stocking stitch as far as marker-thread 3 and decrease 2 stitches evenly over these stitches, work stocking stitch as far as marker-thread 4 without decreasing, stocking stitch until there are 6 stitches left and decrease 2 stitches evenly over these stitches, finish with 6 band stitches as before = 88 stitches. SIZE 11/12 YEARS: Work the 6 band stitches as before, stocking stitch as far as marker-thread 1 and decrease 2 stitches over these stitches (do not decrease the 2 knitted stitches in the raglan-line – applies at all marker-threads), work stocking stitch as far as marker-thread 2 and decrease 4 stitches evenly over these stitches, stocking stitch as far as marker-thread 3 and decrease 2 stitches evenly over these stitches, work stocking stitch as far as marker-thread 4 and decrease 4 stitches evenly over these stitches, stocking stitch until there are 6 stitches left, decreasing 2 stitches evenly over these stitches, finish with 6 band stitches as before = 88 stitches. ALL SIZES: = 84-84-84-88-88-88 stitches (16-16-16-17-17-17 stitches on each front piece, 16 stitches on each sleeve and 20-20-20-22-22-22 stitches on the back piece). NECKLINE: Change to circular needle size 5 mm. Now work a neckline with short rows and increase for raglan as described below. REMEMBER THE KNITTING TENSION! ROW 1 (wrong side): Work 6 band stitches as before, purl to 2 stitches past marker-thread 1 (front left of neck when the garment is worn), turn, tighten the strand. ROW 2 (right side): Knit and increase for RAGLAN on each side of all 4 marker-threads – read description above, to 2 stitches past marker-thread 4 (front right of neck = 8 stitches increased), turn, tighten the strand. ROW 3 (wrong side): Purl to 2 stitches past the last turn by marker-thread 1 (remember the yarn overs are worked as described under Raglan), turn, tighten the strand. ROW 4 (right side): Knit and increase for raglan on each side of all 4 marker-threads, to 2 stitches past the last turn by marker-thread 4 (= 8 stitches increased), turn, tighten the strand. ROW 5 (wrong side): Purl to 2 stitches past the last turn by marker-thread 1, turn, tighten the strand. ROW 6 (right side): Knit and increase for raglan on each side of all 4 marker-threads, to 2 stitches past the last turn by marker-thread 4 (= 8 stitches increased), turn, tighten the strand. ROW 7 (wrong side). Purl until there are 6 stitches left on the row, work the 6 band stitches as before. The short rows are finished and you have increased 3 times for raglan on each side of all 4 marker-threads = 108-108-108-112-112-112 stitches. Continue the yoke over all stitches. Remember the BUTTONHOLES on the right band – read description above. YOKE: Continue with stocking stitch and 6 band stitches on each side as before. Continue to increase for raglan as follows: Increase on each side of all 4 marker-threads every 2nd row (each row from the right side) 2-2-1-2-2-2 more times (5-5-4-5-5-5 times including the increases on the short rows) = 124-124-116-128-128-128 stitches. Continue increasing every 2nd row (each row from the right side) but every 2nd increase is only on the front and back pieces (4 increased stitches), i.e., increase on the front/back pieces every 2nd row and on the sleeves every 4th row. Increase like this 10-12-14-14-14-16 times on the front/back pieces (5-6-7-7-7-8 times on the sleeves). You have increased a total of 15-17-18-19-19-21 times on the front/back pieces and 10-11-11-12-12-13 times on the sleeves. There are 184-196-200-212-212-224 stitches (31-33-34-36-36-38 stitches to the marker thread on each front piece, 36-38-38-40-40-42 stitches between marker threads on the sleeves and 50-54-56-60-60-64 stitches between marker threads on the back piece) The yoke measures approx. 14-15-16-17-17-19 cm measured after the neck, mid-back. If necessary, continue working to the correct length. Now divide for the body and sleeves as follows: Work the first 32-34-35-37-37-39 stitches as before (front piece), place the next 34-36-36-38-38-40 stitches on a thread for the sleeve, cast on 8-8-10-10-12-12 stitches (in side under sleeve), work 52-56-58-62-62-66 stitches (back piece), place the next 34-36-36-38-38-40 stitches on a thread for the sleeve, cast on 8-8-10-10-12-12 stitches (in side under sleeve), work the last 32-34-35-37-37-39 stitches (front piece). The body and sleeves are finished separately. The piece is now measured from here! BODY: = 132-140-148-156-160-168 stitches. Continue with stocking stitch and 6 band stitches on each side as before for a further 11-14-17-20-22-22 cm. Knit 1 row from the right side and increase 22-26-26-26-30-30 stitches evenly spaced – read INCREASE TIP (do not increase over the bands) = 154-166-174-182-190-198 stitches. Change to circular needle size 3.5 mm and work as follows from the wrong side: 6 band stitches as before, * purl 2, knit 2 *, work from *-* until there are 8 stitches left, purl 2 and 6 band stitches as before. Continue this rib for 5 cm. Cast off a little loosely. The jacket measures approx. 34-38-42-46-48-50 cm from the shoulder. SLEEVES: Place the 34-36-36-38-38-40 stitches from the thread on the one side of the piece on short circular needle/double pointed needles size 5 mm and knit up 1 stitch in each of the new stitches cast on under the sleeve = 42-44-46-48-50-52 stitches. Insert a marker-thread in the middle of the 8-8-10-10-12-12 new stitches under the sleeve. Start at the marker-thread and work stocking stitch in the round. When the sleeve measures 3 cm, decrease 2 stitches mid under sleeve – read DECREASE TIP. Decrease like this every 2-3-4-5-5½-5½ cm a total of 5-5-5-5-5-6 times = 32-34-36-38-40-40 stitches. Continue working until the sleeve measures 14-19-23-26-31-33 cm from the division. There is approx. 7 cm left. try the jacket on and work to desired length before the rib. Knit 1 round and increase 8-10-12-10-12-12 stitches evenly spaced = 40-44-48-48-52-52 stitches. Change to double pointed needles size 3.5 mm and work rib (knit 2, purl 2) for 7 cm. Cast off a little loosely. The sleeve measures approx. 21-26-30-33-38-40 cm from the division. Work the other sleeve in the same way. ASSEMBLY: Sew the buttons onto the left band. If you want a double neck, fold it double to the inside and fasten down with a couple of stitches in each raglan-line. |
|
 |
|
Have you finished this pattern?Tag your pictures with #dropspattern #littlecloudbluecardigan or submit them to the #dropsfan gallery. Do you need help with this pattern?You'll find 33 tutorial videos, a Comments/Questions area and more by visiting the pattern on garnstudio.com. © 1982-2026 DROPS Design A/S. We reserve all rights. This document, including all its sub-sections, has copyrights. Read more about what you can do with our patterns at the bottom of each pattern on our site. |
|


With over 40 years in knitting and crochet design, DROPS Design offers one of the most extensive collections of free patterns on the internet - translated to 17 languages. As of today we count 324 catalogues and 12290 patterns translated into English (UK/cm). 12290
We work hard to bring you the best knitting and crochet have to offer, inspiration and advice as well as great quality yarns at incredible prices! Would you like to use our patterns for other than personal use? You can read what you are allowed to do in the Copyright text at the bottom of all our patterns. Happy crafting!
Post a comment to pattern DROPS Children 47-3
We would love to hear what you have to say about this pattern!
If you want to leave a question, please make sure you select the correct category in the form below, to speed up the answering process. Required fields are marked *.