
Popular categories
Looking for a yarn?


|
|
Little Cloud Blue Cardigan |
|
 |
 |
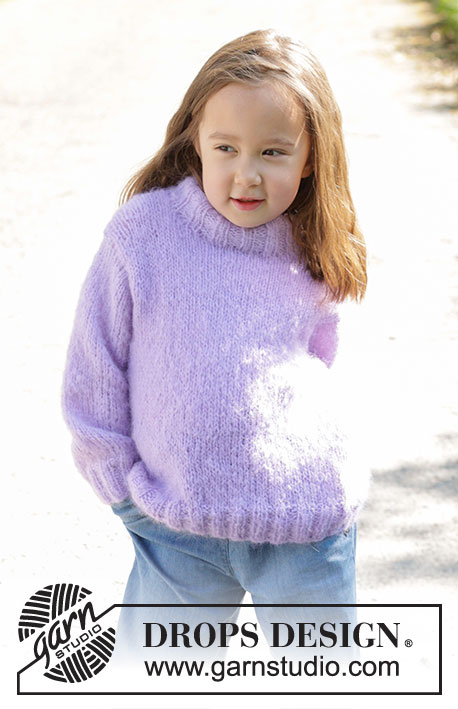
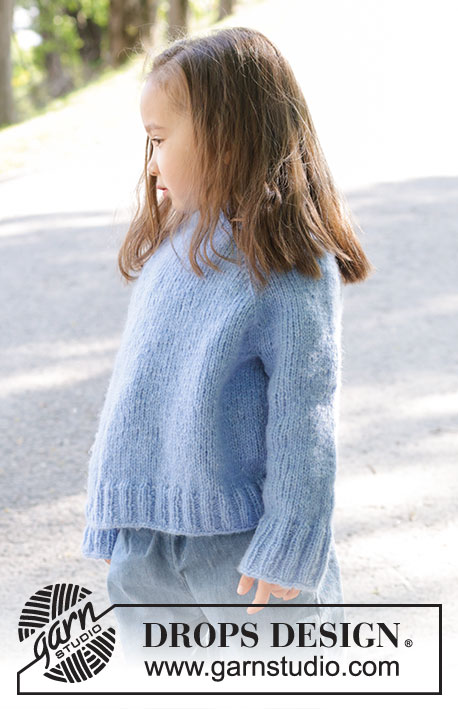
Knitted jacket for children in DROPS Air. The piece is worked top down with stocking stitch, high neck and raglan. Sizes 2 – 12 years.
DROPS Children 47-3 |
|
|
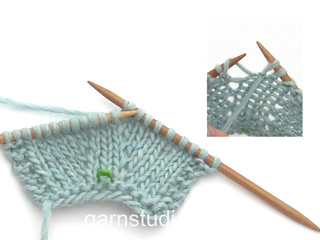
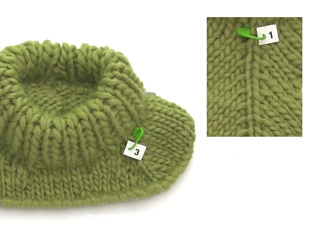
------------------------------------------------------- EXPLANATIONS FOR THE PATTERN: ------------------------------------------------------- GARTER STITCH (worked back and forth): Knit all rows. 1 ridge = knit 2 rows. EDGE STITCHES: 2 EDGE STITCHES AT BEGINNING OF ROW: Slip 1 stitch purl-wise with strand in front, knit 1. 2 EDGE STITCHES AT END OF ROW: Work until there are 2 stitches left, slip 1 purl-wise with strand in front, knit 1. Repeat at the beginning and end of all rows with 2 edge stitches. RAGLAN: Increase 1 stitch before/after 2 stocking stitches in each transition between the body and sleeves. The marker-thread sits between these 2 stitches. Increase 1 stitch by making 1 yarn over. On the next row (wrong side), work the yarn overs as follows: BEFORE MARKER-THREAD: Purl the back loop = no hole. AFTER MARKER-THREAD: Slip the yarn over and place it back on the left needle the other way round (insert the left needle from the back when replacing it). Purl the front loop = no hole. Work the new stitches in stocking stitch. INCREASE TIP (evenly spaced): Increase 1 stitch by making 1 yarn over which is worked twisted on the next row/round to avoid a hole. DECREASE TIP (for sleeves): Decrease 1 stitch on either side of the marker-thread as follows: Work until there are 3 stitches left before the marker-thread, knit 2 together, knit 2 (marker-thread sits between these 2 stitches), slip 1 stitch knit-wise, knit 1 and pass the slipped stitch over the knitted stitch. BUTTONHOLES: Work buttonholes on the right band (when the garment is worn). Work from the right side when there are 4 stitches left on the row as follows: Make 1 yarn over, knit 2 together and knit 2. On the next row (wrong side), knit the yarn over to leave a hole. The first buttonhole is worked when the neck is finished. Then work the other 4-4-5-5-5-5 buttonholes with approx. 6-7-6-7-8-8 cm between each one. ------------------------------------------------------- START THE PIECE HERE: ------------------------------------------------------- JACKET – SHORT OVERVIEW OF THE PIECE. The neck is worked back and forth with circular needle, from mid front and top down. A neckline is worked with short rows before continuing the yoke back and forth with circular needle. The yoke is divided for body and sleeves and the body continued back and forth with circular needle. The sleeves are worked in the round with double pointed needles/short circular needle. NECK: Cast on 90-90-90-94-94-102 stitches with circular needle size 5 mm and DROPS Air. Change to circular needle size 3.5 mm and purl 1 row from the wrong side. Work the next row as follows from the right side: 2 EDGE STITCHES and 4 GARTER STITCHES – read explanations above (6 band stitches), * knit 2, purl 2 *, work from *-* until there are 8 stitches left, knit 2, 4 garter stitches and 2 edge stitches (6 band stitches) – remember explanation above. Continue this rib back and forth for 6-6-7-7-8-8 cm – with the next row from the right side. Insert 4 marker-threads without working the stitches. NOTE: Each thread is inserted between 2 knitted stitches and mark the raglan-lines. Count 15-15-15-19-19-19 stitches (front piece), insert marker-thread 1 before the next stitch, count 20-20-20-16-16-20 stitches (sleeve), insert marker-thread 2 before the next stitch, count 20-20-20-24-24-24 stitches (back piece), insert marker-thread 3 before the next stitch, count 20-20-20-16-16-20 stitches (sleeve), insert marker-thread 4 before the next stitch. There are 15-15-15-19-19-19 stitches left after the last marker-thread (front piece). Knit 1 row and adjust the stitch count as follows: SIZES 2 - 3/4 - 5/6 YEARS: Work the 6 band stitches as before, stocking stitch as far as marker-thread 1 and increase 1 stitch over these stitches (do not increase/decrease the 2 knitted stitches in the raglan-line – applies at all marker-threads), work stocking stitch as far as marker-thread 2 and decrease 4 stitches evenly over these stitches, stocking stitch as far as marker-thread 3 without decreasing, work stocking stitch as far as marker-thread 4 and decrease 4 stitches evenly over these stitches, stocking stitch until there are 6 stitches left, increasing 1 stitch over these stitches, finish with 6 band stitches as before = 84 stitches. SIZES 7/8 - 9/10 YEARS: Work the 6 band stitches as before, stocking stitch as far as marker-thread 1 and decrease 2 stitches over these stitches (do not decrease the 2 knitted stitches in the raglan-line – applies at all marker-threads), work stocking stitch as far as marker-thread 2 without decreasing, stocking stitch as far as marker-thread 3 and decrease 2 stitches evenly over these stitches, work stocking stitch as far as marker-thread 4 without decreasing, stocking stitch until there are 6 stitches left and decrease 2 stitches evenly over these stitches, finish with 6 band stitches as before = 88 stitches. SIZE 11/12 YEARS: Work the 6 band stitches as before, stocking stitch as far as marker-thread 1 and decrease 2 stitches over these stitches (do not decrease the 2 knitted stitches in the raglan-line – applies at all marker-threads), work stocking stitch as far as marker-thread 2 and decrease 4 stitches evenly over these stitches, stocking stitch as far as marker-thread 3 and decrease 2 stitches evenly over these stitches, work stocking stitch as far as marker-thread 4 and decrease 4 stitches evenly over these stitches, stocking stitch until there are 6 stitches left, decreasing 2 stitches evenly over these stitches, finish with 6 band stitches as before = 88 stitches. ALL SIZES: = 84-84-84-88-88-88 stitches (16-16-16-17-17-17 stitches on each front piece, 16 stitches on each sleeve and 20-20-20-22-22-22 stitches on the back piece). NECKLINE: Change to circular needle size 5 mm. Now work a neckline with short rows and increase for raglan as described below. REMEMBER THE KNITTING TENSION! ROW 1 (wrong side): Work 6 band stitches as before, purl to 2 stitches past marker-thread 1 (front left of neck when the garment is worn), turn, tighten the strand. ROW 2 (right side): Knit and increase for RAGLAN on each side of all 4 marker-threads – read description above, to 2 stitches past marker-thread 4 (front right of neck = 8 stitches increased), turn, tighten the strand. ROW 3 (wrong side): Purl to 2 stitches past the last turn by marker-thread 1 (remember the yarn overs are worked as described under Raglan), turn, tighten the strand. ROW 4 (right side): Knit and increase for raglan on each side of all 4 marker-threads, to 2 stitches past the last turn by marker-thread 4 (= 8 stitches increased), turn, tighten the strand. ROW 5 (wrong side): Purl to 2 stitches past the last turn by marker-thread 1, turn, tighten the strand. ROW 6 (right side): Knit and increase for raglan on each side of all 4 marker-threads, to 2 stitches past the last turn by marker-thread 4 (= 8 stitches increased), turn, tighten the strand. ROW 7 (wrong side). Purl until there are 6 stitches left on the row, work the 6 band stitches as before. The short rows are finished and you have increased 3 times for raglan on each side of all 4 marker-threads = 108-108-108-112-112-112 stitches. Continue the yoke over all stitches. Remember the BUTTONHOLES on the right band – read description above. YOKE: Continue with stocking stitch and 6 band stitches on each side as before. Continue to increase for raglan as follows: Increase on each side of all 4 marker-threads every 2nd row (each row from the right side) 2-2-1-2-2-2 more times (5-5-4-5-5-5 times including the increases on the short rows) = 124-124-116-128-128-128 stitches. Continue increasing every 2nd row (each row from the right side) but every 2nd increase is only on the front and back pieces (4 increased stitches), i.e., increase on the front/back pieces every 2nd row and on the sleeves every 4th row. Increase like this 10-12-14-14-14-16 times on the front/back pieces (5-6-7-7-7-8 times on the sleeves). You have increased a total of 15-17-18-19-19-21 times on the front/back pieces and 10-11-11-12-12-13 times on the sleeves. There are 184-196-200-212-212-224 stitches (31-33-34-36-36-38 stitches to the marker thread on each front piece, 36-38-38-40-40-42 stitches between marker threads on the sleeves and 50-54-56-60-60-64 stitches between marker threads on the back piece) The yoke measures approx. 14-15-16-17-17-19 cm measured after the neck, mid-back. If necessary, continue working to the correct length. Now divide for the body and sleeves as follows: Work the first 32-34-35-37-37-39 stitches as before (front piece), place the next 34-36-36-38-38-40 stitches on a thread for the sleeve, cast on 8-8-10-10-12-12 stitches (in side under sleeve), work 52-56-58-62-62-66 stitches (back piece), place the next 34-36-36-38-38-40 stitches on a thread for the sleeve, cast on 8-8-10-10-12-12 stitches (in side under sleeve), work the last 32-34-35-37-37-39 stitches (front piece). The body and sleeves are finished separately. The piece is now measured from here! BODY: = 132-140-148-156-160-168 stitches. Continue with stocking stitch and 6 band stitches on each side as before for a further 11-14-17-20-22-22 cm. Knit 1 row from the right side and increase 22-26-26-26-30-30 stitches evenly spaced – read INCREASE TIP (do not increase over the bands) = 154-166-174-182-190-198 stitches. Change to circular needle size 3.5 mm and work as follows from the wrong side: 6 band stitches as before, * purl 2, knit 2 *, work from *-* until there are 8 stitches left, purl 2 and 6 band stitches as before. Continue this rib for 5 cm. Cast off a little loosely. The jacket measures approx. 34-38-42-46-48-50 cm from the shoulder. SLEEVES: Place the 34-36-36-38-38-40 stitches from the thread on the one side of the piece on short circular needle/double pointed needles size 5 mm and knit up 1 stitch in each of the new stitches cast on under the sleeve = 42-44-46-48-50-52 stitches. Insert a marker-thread in the middle of the 8-8-10-10-12-12 new stitches under the sleeve. Start at the marker-thread and work stocking stitch in the round. When the sleeve measures 3 cm, decrease 2 stitches mid under sleeve – read DECREASE TIP. Decrease like this every 2-3-4-5-5½-5½ cm a total of 5-5-5-5-5-6 times = 32-34-36-38-40-40 stitches. Continue working until the sleeve measures 14-19-23-26-31-33 cm from the division. There is approx. 7 cm left. try the jacket on and work to desired length before the rib. Knit 1 round and increase 8-10-12-10-12-12 stitches evenly spaced = 40-44-48-48-52-52 stitches. Change to double pointed needles size 3.5 mm and work rib (knit 2, purl 2) for 7 cm. Cast off a little loosely. The sleeve measures approx. 21-26-30-33-38-40 cm from the division. Work the other sleeve in the same way. ASSEMBLY: Sew the buttons onto the left band. If you want a double neck, fold it double to the inside and fasten down with a couple of stitches in each raglan-line. |
|

|
|
|
Have you made this or any other of our designs? Tag your pictures in social media with #dropsdesign so we can see them! Do you need help with this pattern?You'll find tutorial videos, a Comments/Questions area and more by visiting the pattern on garnstudio.com. © 1982-2024 DROPS Design A/S. We reserve all rights. This document, including all its sub-sections, has copyrights. Read more about what you can do with our patterns at the bottom of each pattern on our site. |
|


With over 40 years in knitting and crochet design, DROPS Design offers one of the most extensive collections of free patterns on the internet - translated to 17 languages. As of today we count 304 catalogues and 11422 patterns - 11422 of which are translated into English (UK/cm).
We work hard to bring you the best knitting and crochet have to offer, inspiration and advice as well as great quality yarns at incredible prices! Would you like to use our patterns for other than personal use? You can read what you are allowed to do in the Copyright text at the bottom of all our patterns. Happy crafting!
Comments / Questions (18)
Bonjour j’ai mis un marqueur 1 apres 19 mailles donc il est entre deux mailles endroit mon aug pour mon raglan je fais un jete apres ces deux mailles endroit ce qui veut dire apres avoir tricote 20 mailles j’aug si c’est ca je vais la meme chose pour les autres aug merci
21.04.2024 - 20:59DROPS Design answered:
Bonjour Mme Rodier, pour le raglan, on va augmenter de part et d'autre de 2 mailles jersey - cf RAGLAN; autrement dit, si vous avez votre 1er marqueur après 19 mailles, vous augmentez la 1ère fois après 18 mailles ainsi: 18 mailles, 1 augmentation pour le raglan, 2 mailles jersey (le fil marqueur est entre ces 2 mailles), 1 augmentation, tricotez jusqu'à ce qu'il reste 1 maille avant le marqueur suivant et répétez ces augmentations. Bon tricot!
22.04.2024 - 08:56Is yarn group C equivalent to American weight 4?
29.03.2024 - 06:39DROPS Design answered:
Dear Sharon, Yarn group C is equivalent to aran/worsted weight, knits up to about 17 stitches X22 rows = 10X10 cm. I hope that helps. Happy Knitting!
29.03.2024 - 08:23Hallo, leider versthe ich folgende Anweisung nicht: "1. REIHE (Rück-Reihe): 6 Blenden-Maschen wie zuvor stricken, links stricken bis 2 Maschen nach dem 1. Markierungsfaden gestrickt wurden (d.h. an der linken Seite des vorderen Halsausschnitts beim Tragen der Jacke), wenden und den Faden anziehen." Muss nun die verkürzte Reihe zurückgestrickt werden, danach die 1. Reihe über die ganze Nadel und dann die 2. Reihe? Freue mich auf Ihre Antwort
02.03.2024 - 16:30DROPS Design answered:
Liebe Frau Possa, die 1. von den verkürzten Reihen ist eine Rückreihe, man wird von dem rechten Vorderteil bis zu dem 1. Markierer (linken Vorderteil) stricken, dann wenden und die nächste Reihe = Hinreihe bis 2 M nach dem 4. Markierer (rechten Vorderteil) stricken und gleichzeitig für den Raglan zunehmen, so weiter stricken dh immer 2 Maschen mehr am Ende jeder Reihe stricken, und gleichzeitig bei jeder Hin-Reihe für den Raglan zunehmen. Vile Spaß beim Stricken!
04.03.2024 - 08:13What is meant in neckline instructions by "wrong side - purl 2 stitches past marker , then turn"? followed by knitting the entire row on the right side? Wouldn't the left needle have just one front panel plus 2 stitches on it at that point?
01.03.2024 - 01:21DROPS Design answered:
Dear Mrs King, you will work some short rows now, ie work always more stitches to get more rows for the neck on back piece; you will start these short rows from wrong side, work as before until 2 sts remain after 1st marker (the first of the 4 markers inserted = between left sleeve and left front piece, turn leaving remaining stitches unworked; turn and work next row from right side until 2 sts after the 4th marker (between right sleeve and right front piece), and continue like this working always 2 sts more and increasing at the same time for raglan on every row from RS. Happy knitting!
01.03.2024 - 08:27Bonjour, vous me demandez de préciser ce qui me semble être une erreur :\r\nQuand toutes les augmentations sont faites, 33 mailles chaque devant, 38 mailles chaque manche, 54 pour le dos ...\r\nMais quand on divise l\'ouvrage on a 34 mailles pour le devant 36 pour la manche 56 pour le dos.....\r\nSi il n\'y a pas d\'erreur où est ce que je me suis trompée ?\r\nLa différence est pour toutes les tailles
26.02.2024 - 09:59DROPS Design answered:
Bonjour Mme Thomazi, tout simplement parce que les mailles du début/de la fin de la manche vont être attribuées aux devants et au dos, et on aura donc moins de mailles pour les manches à mettre en attente que celles entre les marqueurs pour l'empiècement. Bon tricot!
26.02.2024 - 10:16N\'y a t il pas une erreur dans la répartition des mailles après les diminutions de raglan pour les devant les manches et le dos ?
24.02.2024 - 21:35DROPS Design answered:
Bonjour Mme Thomazi, qu'est-ce qui vous fait penser qu'il pourrait y avoir une erreur? Et dans quelle taille? Merci de bien vouloir préciser votre pensée, nous pourrons ainsi vérifier ensemble.
26.02.2024 - 08:39Salve! Ho finito i 6 cm di collo per la taglia 3/4 anni e non mi è chiaro dove inserire i segnapunti e il giro successivo , dove fare aumenti e diminuzioni. Potrei ricevere una spiegazione più dettagliata? Grazie mille!
24.02.2024 - 12:53DROPS Design answered:
Buonasera Barbara, deve inserire i segnapunti prima delle maglie indicate, ad esempio per la taglia 3/4 deve lavorare 15 maglie, inserire 1 segnapunti prima della maglia successiva, contare 20 maglie, inserire 1 segnapunti prima della maglia successiva, contare 20-20-20-24-24-24 maglie, inserire 1 segnapunti prima della maglia successiva, contare 20-20-20-16-16-20 maglie, inserire 1 segnapunti prima della maglia successiva. Buon lavoro!
25.02.2024 - 15:28Hallo, ich verstehe diesen Part nicht: „Beidseitig jedes der 4 Markierungsfäden in jeder 2. Reihe (= in jeder Hin-Reihe) insgesamt 2-2-1-2-2-2 x in der Höhe zunehmen (5-5-4-5-5-5 x in der Höhe einschließlich der Zunahmen am Halsausschnitt) = 124-124…“ Welche Zunahmen am Halsausschnitt? Mir fehlen jetzt Maschen, da ich nur die Raglanzunahmen gemacht habe… Liebe Grüße Jutta
17.01.2024 - 22:38DROPS Design answered:
Liebe Jutta, bei den verkürzten Reihen für den HALSAUSSCHNITT hat man 3 Mal für den Raglan (in jeder den Hin-Reihen) zugenommen, für die Passe strickt man alle Maschen wieder und nimmt man noch 2 Mal für den Raglan zu, so wurde es insgesamt 5 Mal zugenommen. Viel Spaß beim stricken!
18.01.2024 - 08:59C'è lo stesso modello per donna? Grazie mille
29.11.2023 - 08:39DROPS Design answered:
Buonasera Giuliana, tra i nostri modelli può trovare tanti esempi di cardigan da donna. Buon lavoro!
30.11.2023 - 22:46Beidseitig jedes der 4 Markierungsfäden in jeder 2. Reihe (= in jeder Hin-Reihe) insgesamt 2-2-1-2-2-2 x in der Höhe zunehmen (5-5-4-5-5-5 x in der Höhe einschließlich der Zunahmen am Halsausschnitt) = 124-124-116-128-128-128 Maschen. Was bedeutet die Angabe in den Klammern ?
28.11.2023 - 07:38