
Popular categories
Looking for a yarn?


Comments / Questions (17)
![]() Marianne Kenny wrote:
Marianne Kenny wrote:
Hi when picking up stitches for the sleeve is the bottom of the armhole where you have cast off for the armhole?
01.10.2022 - 03:26DROPS Design answered:
Dear Marianne, yes, the bottom of the armhole is where you have cast off for the armhole. Happy knitting!
03.10.2022 - 01:14
![]() Marianne Kenny wrote:
Marianne Kenny wrote:
Hi I don’t understand how you can start from the wrong side when you divide for the front and back pieces as you have cast off for the armholes on an odd row? Regards Marianne Kenny
28.09.2022 - 18:55DROPS Design answered:
Dear Mrs Kenny, when casting off for the armhole, you have to adjust so that the casting off row will be an odd round in A.3, then continue each piece separately starting from wrong side so that the cables will always be worked from right side. Happy knitting!
29.09.2022 - 08:27
![]() Marianne Kenny wrote:
Marianne Kenny wrote:
Hi I want to knit this garment in cotton as I’m allergic to wool. Can I use 2 strands of Paris? and how much yarn do I need for the XL size in just one colour?
16.08.2022 - 05:28DROPS Design answered:
Dear Mrs Kenny, yes you can use here 2 strands Paris instead, just make sure you get the correct tension. Use the yarn converter or read more how to calculate new yarn amount here. Your DROPS Store will assist you even per mail or telephone if you need any help. Happy knitting!
16.08.2022 - 08:39
![]() Claudine wrote:
Claudine wrote:
Je souhaiterais effectuer ce modèle mais l adapter pour le groupe C Comment faire ? Voir un autre modèle ressemblant du groupe C ? Avez vous une idée où un modèle précis Merci de votre retour
17.02.2022 - 14:12DROPS Design answered:
Bonjour Claudine, il vous faudra tout recalculer en fonction de votre tension ou bien - plus simplement: consultez nos différents pulls réalisés avec une laine du groupe C - ajustez les filtres si besoin. Bon tricot!
17.02.2022 - 16:11
![]() Hilal wrote:
Hilal wrote:
Hei, skal bestille garn til denne oppskriften. Står i oppskriften at man trenger nesten dobbelt så mer Drops Air garn enn Drops brushed alpakka Silk garn, men samtidig at hele arbeidet skal strikkes med 1 tråd av hver av de to garntypene (2 tråder). Vil man ikke trenge lik mengde av hver garntype?
06.02.2020 - 13:37DROPS Design answered:
Hei Hilal. Husk å velge "question"om du trenger svar når du legger inne et spørsmål. Velger du "Comments", blir det ikke registret som et spørsmål og du vil ikke få svar. DROPS Air har en løpelengde på 150 meter på 50 gram, men DROPS Brushed Alpaca har en løpelengde på 280 meter på 50 gram, altså du trenger flere nøster Air enn Brushed. Men det kan se ut som det mangler et nøste eller to av Brushed for å få den totale samme løpelengde. Oppskriften er oversendt design avd for en sjekke. mvh DROPS design
07.02.2020 - 14:54
![]() Brigitte wrote:
Brigitte wrote:
Liebes DROPS-Team, ich habe French Chic gestrickt und soeben fertig gestellt. Er gefällt mir sehr gut und ist sehr kuschelig. Was ich aber nach wie vor nicht verstehe, ist, warum bei den angegebenen Garnmengen immer zwei Knäuel mehr Air angegeben sind. Air hat 10 m mehr Lauflänge als Brushed Alpaca Silk und soll immer gleichzeitig verwendet werden. Warum dieser Unterschied in der Menge? (Ich habe jetzt zwei Knäuel Air übrig.). Herzliche Grüße.
15.01.2020 - 23:47
![]() Angie wrote:
Angie wrote:
Merci beaucoup de votre réponse et aide rapide. Bonne et belle journée à vous
17.12.2019 - 10:29
![]() Angie wrote:
Angie wrote:
Bonjour est il possible de le faire en aiguille droite et si oui il me suffit bien de diviser en deux le début de l'ouvrage, n'est-ce pas ? ? Auriez-vous les explications en aiguille droite svp ? J'attends votre réponse pour le commencer.
17.12.2019 - 07:40DROPS Design answered:
Bonjour Angie, tu dois voir la lecon DROPS Comment adapter un modèle sur aiguille circulaire pour des aiguilles droites. Bon tricot!
17.12.2019 - 08:37
![]() Lena Archenholtz wrote:
Lena Archenholtz wrote:
Kan jag, istället för rundsticka, sticka fram-och bakstycke varför sej?
07.12.2019 - 13:27DROPS Design answered:
Hei Lena! Det er mulig, vi har dessverre ikke mulighet akkurat nå til å skrive om mønsteret slik at genseren strikkes frem og tilbake. Lykke til!
09.12.2019 - 09:33
![]() Terry wrote:
Terry wrote:
When looking at the patterns on the garnstudio site some of patterns depict a small pink diamond on them. What does this represent?
01.12.2019 - 02:38DROPS Design answered:
Dear Terry, the patterns with a diamond are the one you can see as thumbmails on the home page. Happy knitting!
02.12.2019 - 10:04
|
||||||||||||||||
French Chic#frenchchicsweater |
||||||||||||||||
 |
 |
|||||||||||||||
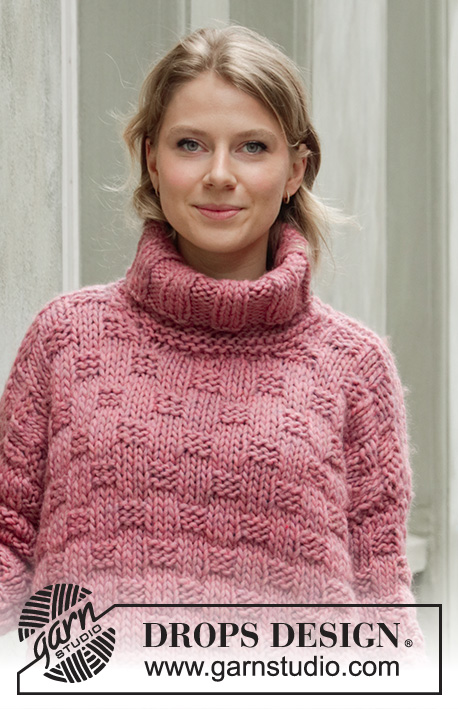
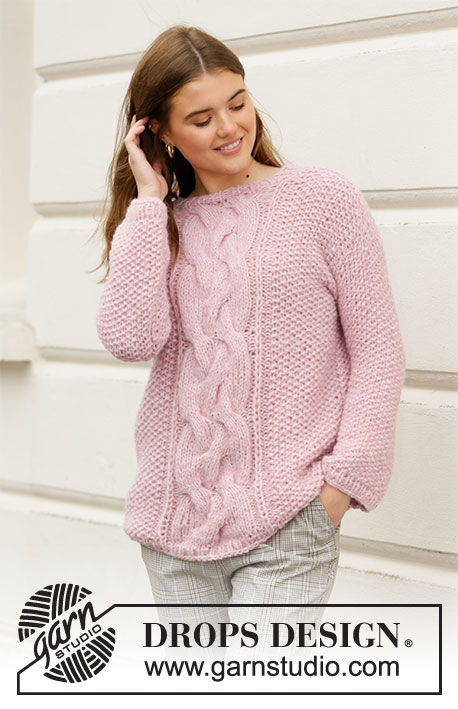
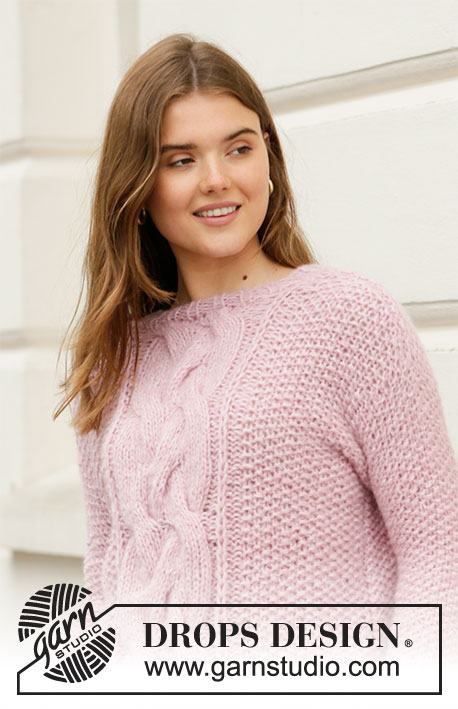
Knitted jumper with moss stitch and large cable. The piece is worked in DROPS Air and DROPS Brushed Alpaca Silk. Sizes S – XXXL.
DROPS 206-31 |
||||||||||||||||
|
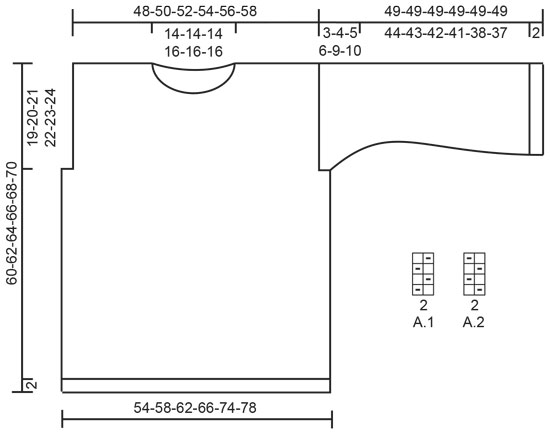
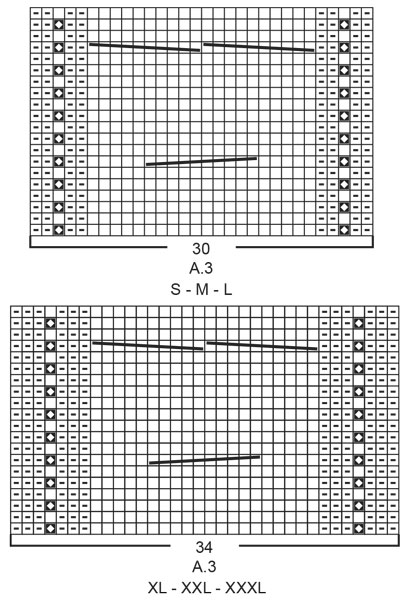
------------------------------------------------------- EXPLANATIONS FOR THE PATTERN: ------------------------------------------------------- RIDGE/GARTER STITCH (worked back and forth): Knit all rows. 1 ridge in height = Knit 2 rows. PATTERN: See diagrams A.1 to A.3. Choose diagram for your size. The diagrams show all rows in the pattern seen from the right side. KNITTING TIP: When casting off for the armhole on the body, it is important to cast off on an odd round in the diagram. This is so you avoid cabling from the wrong side when the piece is continued back and forth on the circular needle. INCREASE/DECREASE TIP (evenly spaced): To work out how to increase/decrease evenly, count the total number of stitches on needle (e.g. 118 stitches) and divide by number of increases/decreases to be made (e.g. 10) = 11.8. In this example, increase by making 1 yarn over after approx. each 12th stitch. On the next round/row work the yarn overs twisted to avoid holes. When decreasing, knit together approx. each 11th and 12th stitch. DECREASE TIP (for mid under sleeve): Start 1 stitch before the stitch with the marker, slip 2 stitches as if to knit together, knit 1 and pass the 2 slipped stitches over the knitted stitch (= 2 stitches decreased). INCREASE TIP (for mid under sleeves): Start just before the stitch with the marker, make 1 yarn over, knit the stitch with the marker and make 1 yarn over (= 2 stitches increased). On the next round work the yarn overs twisted to avoid holes. Then work the new stitches into A.1. ------------------------------------------------------- START THE PIECE HERE: ------------------------------------------------------- JUMPER – SHORT OVERVIEW OF THE PIECE: The body is worked in the round with circular needle, bottom up as far as the armholes. Stiches are cast off for the armholes and the front and back pieces are then finished separately, back and forth with circular needle. The shoulder seams are sewn together. Then stitches are knitted up along the armholes for the sleeves. The sleeves are worked back and forth with circular needle until the sleeve cap is finished and then continued in the round with double pointed needles, top down to finished length. Finally, the bottom of the armholes are sewn together and the neck is worked. The whole garment is worked with 1 strand Air and 1 strand Brushed Alpaca Silk (= 2 strands). BODY: Cast on 118-126-134-142-158-166 stitches with circular needle size 8 mm and 1 strand Air and 1 strand Brushed Alpaca Silk (= 2 strands). Knit 1 round then work rib in the round (= knit 1/ purl 1) for 2 cm. Knit 1 round where you increase 10 stitches evenly spaced in all sizes – read INCREASE/DECREASE TIP = 128-136-144-152-168-176 stitches. Change to circular needle size 9 mm. The next round is worked as follows: A.1 over the first 17-19-21-21-25-27 stitches, A.3 (= 30-30-30-34-34-34 stitches), work A.1 over the next 34-38-42-42-50-54 stitches, A.3 (= 30-30-30-34-34-34 stitches) and work A.2 over the remaining 17-19-21-21-25-27 stitches. Continue this pattern. REMEMBER THE KNITTING TENSION! When the piece measures approx. 41-42-43-44-45-46 cm, cast off for the armholes; i.e. adjust so the next round is an odd round in A.3 – read KNITTING TIP and work the next round as follows: Cast off 3-4-5-6-9-10 stitches for the armhole, continue as before over the next 58-60-62-64-66-68 stitches, cast off 6-8-10-12-18-20 stitches for the armhole, continue as before over the next 58-60-62-64-66-68 stitches and cast off the remaining 3-4-5-6-9-10 stitches for the armhole. Cut the strand. The back and front pieces are now finished separately, back and forth with circular needle. BACK PIECE: = 58-60-62-64-66-68 stitches. Start from the wrong side and continue the pattern back and forth with 1 edge stitch in GARTER STITCH on each side – read description above. When the piece measures 57-59-61-63-65-67 cm, decrease 10 stitches evenly spaced over the 30-30-30-34-34-34 stitches in A.3 = 48-50-52-54-56-58 stitches left. On the next row cast off the middle 12-12-12-14-14-14 stitches for the neck and each shoulder is finished separately. Continue the pattern and cast off 1 stitch on the next row from the neck = 17-18-19-19-20-21 stitches left on the shoulder. Continue working until the piece measures 59-61-63-65-67-69 cm. Knit 1 row from the wrong side. Loosely cast off with knit from the right side. Work the other shoulder in the same way. The jumper measures approx. 60-62-64-66-68-70 cm from the shoulder down. FRONT PIECE: = 58-60-62-64-66-68 stitches. Start from the wrong side and continue the pattern back and forth with 1 edge stitch in garter stitch on each side. When the piece measures 51-53-55-57-59-61 cm, decrease 10 stitches evenly over the 30-30-30-34-34-34 stitches in A.3 = 48-50-52-54-56-58 stitches left. On the next row place the middle 6-6-6-8-8-8 stitches on 1 thread for the neck and each shoulder is finished separately. Continue the pattern and cast off for the neck at the beginning of each row from the neck as follows: Cast off 2 stitches 1 time and 1 stitch 2 times = 17-18-19-19-20-21 stitches left on the shoulder. Continue working until the piece measures 59-61-63-65-67-69 cm. Knit 1 row from the wrong side. Loosely cast off with knit from the right side. Work the other shoulder in the same way. ASSEMBLY: Sew the shoulder seams inside the cast-off edges. SLEEVE: Knit up stitches along the edge of the armhole on the front and back pieces starting in the corner of the armhole on the one side of the piece, where stitches were cast off for the armhole. Knit up 38-40-42-44-46-48 stitches from the right side, inside the 1 edge stitch in garter stitch using circular needle size 9 mm and 1 strand of each quality (i.e. you do not knit up stitches along the bottom of the armhole). Work A.1 back and forth with 1 edge stitch in garter stitch on each side. When the sleeve measures 3-4-5-6-9-10 cm from where you knitted up the stitches, insert 1 marker on the row; this will later show you where the sleeve is to be sewn to the bottom of the armhole. The sleeve is now also measured from the marker! Change to double pointed needles size 9 mm, Insert 1 marker in the first stitch of the round and allow it to follow your work onwards; it will be used when decreasing/increasing mid under the sleeve. Work A.1 in the round. When the sleeve measures 2-2-2-3-3-3 cm from the marker decrease 2 stitches mid under the sleeve – read DECREASE TIP. Decrease like this every 2-2-2-1-1-1 cm a total of 6-6-6-8-8-8 times = 26-28-30-28-30-32 stitches. When the sleeve measures 16-16-16-14-14-14 cm from the marker, increase 2 stitches mid under sleeve – read INCREASE TIP. Increase like this every 7-7-6½-4½-4-4 cm a total of 4-4-4-6-6-6 times = 34-36-38-40-42-44 stitches. Continue working until the piece measures 44-43-42-41-38-37 cm from the marker (There is approx. 2 cm left to finished length; try the jumper on and continue working to desired length if necessary). Change to double pointed needles/short circular needle size 8 mm and work rib in the round (= knit 1/ purl 1) for 2 cm. Loosely cast off with knit. The sleeve measures approx. 49 cm in all sizes, measured from where the stitches were knitted up. Work the other sleeve in the same way. ASSEMBLY: Sew the sleeve to the armhole from the marker and to the corner on each side. NECK: Knit up from the right side approx. 40 to 46 stitches around the neck (including the stitches from the thread in front) with short circular needle size 8 mm. Work rib in the round (= knit 1/ purl 2) for 2 to 3 cm. Cast off with knit over knit and purl over purl. |
||||||||||||||||
Diagram explanations |
||||||||||||||||
|
||||||||||||||||
 |
||||||||||||||||
 |
||||||||||||||||
Have you finished this pattern?Tag your pictures with #dropspattern #frenchchicsweater or submit them to the #dropsfan gallery. Do you need help with this pattern?You'll find 32 tutorial videos, a Comments/Questions area and more by visiting the pattern on garnstudio.com. © 1982-2026 DROPS Design A/S. We reserve all rights. This document, including all its sub-sections, has copyrights. Read more about what you can do with our patterns at the bottom of each pattern on our site. |
||||||||||||||||


With over 40 years in knitting and crochet design, DROPS Design offers one of the most extensive collections of free patterns on the internet - translated to 17 languages. As of today we count 324 catalogues and 12290 patterns translated into English (UK/cm). 12290
We work hard to bring you the best knitting and crochet have to offer, inspiration and advice as well as great quality yarns at incredible prices! Would you like to use our patterns for other than personal use? You can read what you are allowed to do in the Copyright text at the bottom of all our patterns. Happy crafting!
Post a comment to pattern DROPS 206-31
We would love to hear what you have to say about this pattern!
If you want to leave a question, please make sure you select the correct category in the form below, to speed up the answering process. Required fields are marked *.