
Popular categories
Looking for a yarn?


Comments / Questions (9)
![]() Sólyom-Fekete Dóra wrote:
Sólyom-Fekete Dóra wrote:
A nyak 7. sora után 32 szemet kell szaporitanom. A 12.körben szaporítom a 32 szemet, vagy a 8-12.sorok mindegyikében 6-7 szemet úgy, hogy összesen 32 szemmel legyen több, mire a 12. sort befejezem?
22.10.2023 - 16:44
![]() Lisa wrote:
Lisa wrote:
Would it be possible to add a few short rows to this pattern to make the back sit a little higher up than the front? If so, where would you recommend that I add them? I've made this pattern twice and am about to start the third, but if it could sit up a little in the back, I think I'd like it even more, but don't know if it's possible. Thank you!
17.08.2022 - 18:04DROPS Design answered:
Dear Lisa, you can add some short rows to get an elevation on back piece - you can take inspiration from similar garment with same tension - and work them just before starting yoke. Happy knitting!
18.08.2022 - 08:55
![]() Gitte wrote:
Gitte wrote:
Hej igen, nej jeg mener de masker der skal tages ud imellem mønsterrapporterne. Med hensyn til raglanudtagningerne, står der at maskerne skal strikkes ret, ikke drejet, hvad er korrekt der? Hullerne kan da ses på billedet.
22.04.2020 - 22:13DROPS Design answered:
Hej Gitte, alle omslag i diagrammerne skal strikke ret, der skal blive hul. Og nu kan jeg se at det samme står under Raglan, der skal også blive hul ifølge opskriften. Men du bestemmer selvfølgelig selv ;)
24.04.2020 - 10:07
![]() Gitte wrote:
Gitte wrote:
De 2 masker hvor der tages ud imellem mønsterdelene, skal de strikke drejet ret eller bare ret så der kommer et hul?
17.04.2020 - 21:52DROPS Design answered:
Hej Gitte, mener du raglan udtagningerne? De skal strikkes drejet, så der kun bliver et lille hul :)
21.04.2020 - 14:42
![]() Fillastre wrote:
Fillastre wrote:
J'ai tricoter A1 et je n'ai que 238 mailles au lieu de 294
22.03.2019 - 10:55DROPS Design answered:
Bonjour Mme Fillastre, en taille XXL vous avez tricoté 21 fois A.1 (= 8 m au 1er tour) sur les 168 m. Quand A.1 est terminé, vous avez 14 m dans chaque A.1, soit 21 x 14 m = 294 m. Bon tricot!
22.03.2019 - 13:44
![]() Sylvie Deguire wrote:
Sylvie Deguire wrote:
Bonjour, je suis bloqué. Je suis rendue à 26 cm, donc je dois faire ce qui suit (tricoter le tour suivant ainsi: 55 m. jersey (= ½ dos), glisser les 86 m. suivantes en attente sur 1 fil pour la manche, monter 10 m. (= côté, sous la manche), tricoter 110 m. jersey (= devant)), mais je ne sais pas comment glisser mes 86 mailles sur un fil et réussir à reprendre mon tricot, car mon fil est resté avant mes 86 m. glissées. Merci de votre aide.
30.09.2018 - 02:43DROPS Design answered:
Bonjour Mme Deguire, cette vidéo montre comment tricoter un pull de haut en bas - avec des emmanchures raglan (la technique qui nous intéresse ici sera la même): à partir du time code 6:30: on montre d'abord l'ensemble de l'empiècement puis vous voyez comment glisser les mailles des manches en attente sur un fil et monter les mailles sous les manches. Bon tricot!
01.10.2018 - 10:03Alejandra wrote:
Gracias por añadir patrones para mujeres de mayor edad. 🤗
18.07.2018 - 23:27Me wrote:
How nice to see a real woman for a change! Yes, some patterns are only suited to the very young - but many are not.
09.01.2018 - 12:18
![]() Beti wrote:
Beti wrote:
Eine traumhaftes Modell. Ich würde es gern nacharbeiten.
22.12.2017 - 19:40
|
||||||||||||||||||||||
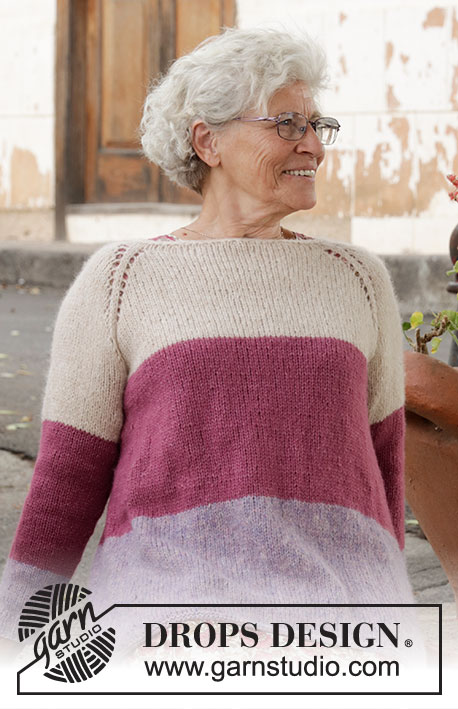
Summer Evening Jumper#summereveningjumper |
||||||||||||||||||||||
 |
 |
|||||||||||||||||||||
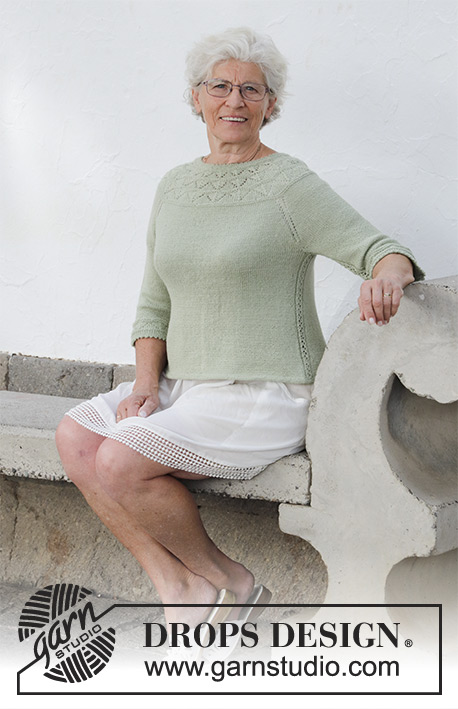
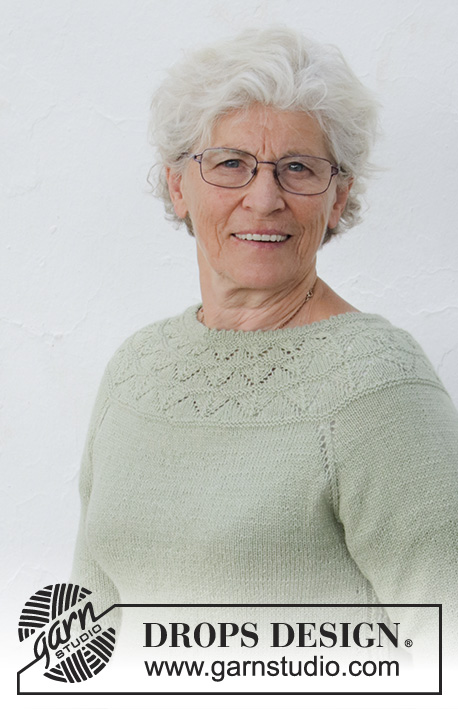
Knitted jumper with round yoke, lace pattern and ¾-length sleeves, worked top down. Sizes S - XXXL. The piece is worked in DROPS BabyAlpaca Silk.
DROPS 191-24 |
||||||||||||||||||||||
|
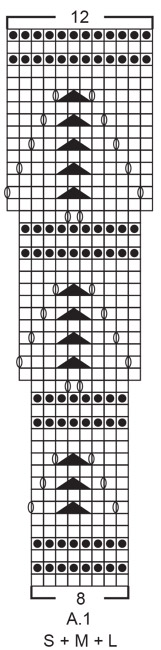
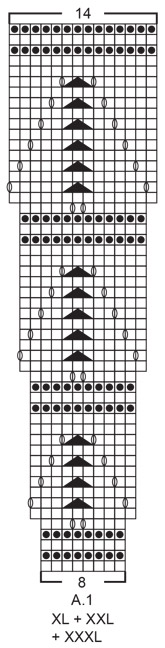
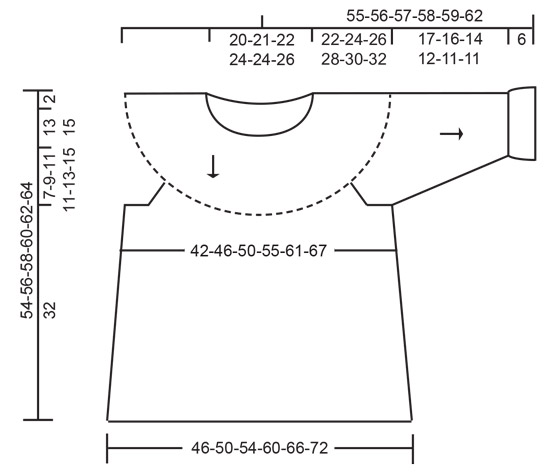
INFORMATION FOR THE PATTERN: RIDGE/GARTER STITCH (worked in the round): 1 ridge = 2 rounds. Knit 1 round and purl 1 round. INCREASE TIP-1: To work out how to increase evenly, count the total number of stitches on the needle (e.g. 116 stitches) and divide by the number of increases to be made (e.g. 28) = 4.1. In this example, increase by making 1 yarn over after approx. every 4th stitch; on the next round knit the yarn overs twisted to avoid holes. PATTERN: See diagrams A.1 to A.4. Choose diagram for your size (applies to A.1). The diagrams show all the rows in the pattern seen from the right side. RAGLAN: Increase to raglan on each side of the 4 marker threads in each transition between body and sleeves as follows: Start 1 stitch before the marker thread, make 1 yarn over, knit 2 (the marker thread sits in the middle of these 2 stitches), make 1 yarn over (= 2 stitches increased). On the next round knit the yarn overs to leave holes. INCREASE TIP-2 (for sides of body): Start 6 stitches before the marker thread in the side, make 1 yarn over, knit 2, continue A.3 (the marker thread sits in the middle of A.3), knit 2 and make 1 yarn over (= 2 stitches increased). On the next round knit the yarn overs twisted to avoid holes. DECREASE TIP (for mid under sleeve): Start 2 stitches before A.3, knit 2 together, knit A.3 (= 8 stitches), slip the next stitch as if to knit, knit 1 and pass the slipped stitch over the knitted stitch (= 2 stitches decreased). ---------------------------------------------------------- JUMPER: The piece is worked in the round with circular needle and from top down. The sleeves are worked in the round with short circular needle/double pointed needles, top down. NECK EDGE: Cast on 116-120-124-132-136-144 stitches with short circular needle size 3 mm and BabyAlpaca Silk. Change to circular needle size 2.5 mm and work 6 rounds stocking stitch for lining. Then work the next round as follows: * Knit 2 together, make 1 yarn over *, work from *-* to end of round. You have now worked a folding edge. Work 5 rounds stocking stitch and increase AT THE SAME TIME 28-32-36-28-32-32 stitches evenly on the last round – read INCREASE TIP-1 = 144-152-160-160-168-176 stitches. Then work the yoke as described below. YOKE: Change to circular needle size 3 mm. Work A.1 in the round (= 18-19-20-20-21-22 repeats of 8 stitches). Continue the pattern like this and increase as shown in the diagram. REMEMBER THE KNITTING TENSION! When A.1 has been completed there are 216-228-240-280-294-308 stitches on the needle and the piece measures approx. 15-15-15-17-17-17 cm from the folding edge in the neck. Knit 1 round where you increase 24-28-32-24-34-32 stitches evenly on round = 240-256-272-304-328-340 stitches. Now insert 4 marker threads in the piece without working the stitches: The first marker thread is inserted after the first 36-38-40-46-51-55 stitches (= ½ back piece), 2nd marker thread after the next 48-52-56-60-62-60 stitches (= sleeve), 3rd marker thread after the next 72-76-80-92-102-110 stitches (= front piece) and the 4th marker thread is inserted after the next 48-52-56-60-62-60 stitches (= sleeve). There are now 36-38-40-46-51-55 stitches after the last marker thread for half the back piece. Continue with stocking stitch in the round. AT THE SAME TIME on the first round increase to RAGLAN – see description above (= 8 stitches increased). Continue the increase to raglan every 2nd round until you have increased a total of 10-13-15-15-16-18 times on each side of the 4 marker threads = 320-360-392-424-456-484 stitches. Continue working without increasing to raglan, but to avoid stopping the line of holes along each raglan line, work A.2 in each transition between body and sleeves (the marker thread sits in the middle of A.2). When the piece measures 22-24-26-28-30-32 cm work the next round as follows: Work 46-51-55-61-67-73 stitches stocking stitch (= ½ back piece), place the next 68-78-86-90-94-96 stitches on 1 thread for sleeve, cast on 8-8-10-10-12-14 new stitches on the needle (= in side under sleeve), work 92-102-110-122-134-146 stitches stocking stitch (= front piece), place the next 68-78-86-90-94-96 stitches on a thread for sleeve, cast on 8-8-10-10-12-14 new stitches on the needle (= in side under sleeve) and work the last 46-51-55-61-67-73 stitches in stocking stitch (= ½ back piece). Body and sleeves are finished separately. THE PIECE IS NOW MEASURED FROM HERE! BODY: = 200-220-240-264-292-320 stitches. Insert 1 marker thread in the middle of the 8-8-10-10-12-14 stitches cast on under the sleeves in each side. Continue with stocking stitch, in addition work A.3 over the middle 8 stitches in each side (the marker thread sits in the middle of A.3). When the piece measures 5-5-5-3-3-3 cm from the separation, increase 1 stitch on each side of A.3 in each side – read INCREASE TIP-2 (= 4 stitches increased). Increase like this every 5 cm a total of 5-5-5-6-6-6 times in each side = 220-240-260-288-316-344 stitches. When the piece measures 31 cm from the separation, work 3 ridges in the round over all stitches. Then cast off with knit, but to avoid the cast-off edge being tight, make 1 yarn over after approx. every 8th stitch at the same time as you cast off (the yarn overs are cast off as normal stitches). The jumper measures approx. 54-56-58-60-62-64 cm from the shoulder down. SLEEVE: Place the stitches from the thread on one side of the piece on double pointed needles or short circular needle size 3 mm and in addition knit up 1 stitch in each of the 8-8-10-10-12-14 stitches mid under sleeve = 76-86-96-100-106-110 stitches. Insert 1 marker thread in the middle of the 8-8-10-10-12-14 stitches under the sleeve. Work A.3 over the middle 8 stitches under the sleeve, the other stitches are worked in stocking stitch. When the piece measures 2-2-2-1-1-1 cm from the separation, decrease 1 stitch on each side of A.3 – read DECREASE TIP. Decrease like this a total of 8-11-15-16-17-17 times in Size S: Every 6th round, in Size M: Every 4th round, in Size L: Alternately every 2nd and 3rd round and in Sizes XL + XXL + XXXL: Every 2nd round = 60-64-66-68-72-76 stitches. Continue working until the sleeve measures 17-16-14-12-11-11 cm from the separation, but adjust so that the decreases mid under sleeve have been completed (NOTE: shorter lengths in larger sizes because of wider neck and longer yoke). On the next round increase 10-6-4-12-8-4 stitches evenly on round = 70-70-70-80-80-80 stitches. Then work A.4 in the round (= 7-7-7-8-8-8 repeats of 10 stitches). When A.4 has been completed, there are 84-84-84-96-96-96 stitches on the needle. Work 6 rounds stocking stitch. The next round is worked as follows: * Knit 2 together, make 1 yarn over *, work from *-* to end of round (= folding edge). Work 6 rounds stocking stitch and cast off with knit, but to avoid the cast-off edge being tight, make 1 yarn over after approx. every 6th stitch at the same time as you cast off (the yarn overs are cast off as normal stitches). Work the other sleeve in the same way. ASSEMBLY: Fold the lining on the neck in towards the wrong side and sew down neatly with small loose stitches. Do the same at the bottom of both sleeves |
||||||||||||||||||||||
Diagram explanations |
||||||||||||||||||||||
|
||||||||||||||||||||||
 |
||||||||||||||||||||||
 |
||||||||||||||||||||||
 |
||||||||||||||||||||||
 |
||||||||||||||||||||||
Have you finished this pattern?Tag your pictures with #dropspattern #summereveningjumper or submit them to the #dropsfan gallery. Do you need help with this pattern?You'll find 28 tutorial videos, a Comments/Questions area and more by visiting the pattern on garnstudio.com. © 1982-2026 DROPS Design A/S. We reserve all rights. This document, including all its sub-sections, has copyrights. Read more about what you can do with our patterns at the bottom of each pattern on our site. |
||||||||||||||||||||||


With over 40 years in knitting and crochet design, DROPS Design offers one of the most extensive collections of free patterns on the internet - translated to 17 languages. As of today we count 324 catalogues and 12290 patterns translated into English (UK/cm). 12290
We work hard to bring you the best knitting and crochet have to offer, inspiration and advice as well as great quality yarns at incredible prices! Would you like to use our patterns for other than personal use? You can read what you are allowed to do in the Copyright text at the bottom of all our patterns. Happy crafting!
Post a comment to pattern DROPS 191-24
We would love to hear what you have to say about this pattern!
If you want to leave a question, please make sure you select the correct category in the form below, to speed up the answering process. Required fields are marked *.