
Popular categories
Looking for a yarn?


Comments / Questions (19)
![]() Sandra wrote:
Sandra wrote:
Hola. Estoy haciendo la chaqueta en la talla L. Terminé A2 y ahora el patrón dice tejer hasta completar la medida. Qué medida es? Las 12 cm.?
31.05.2019 - 18:52DROPS Design answered:
Hola Sandra. Después de terminar A.2 ( que se trabaja con varios colores) , tienes que trabajar según el patrón con sólo el color mostaza hasta terminar la chaqueta (hasta finalizar las medidas de la chaqueta como se explica en el patrón).
03.06.2019 - 23:05
![]() Daniele wrote:
Daniele wrote:
Bonjour, j'ai beaucoup de mal pour que le motif soit régulier avec les augmentations j'aimerais savoir combien d augmentations il y a au rang 4 de A1A XL combien il y en a au rang 10. Merci beaucoup
26.04.2019 - 09:51DROPS Design answered:
Bonjour Daniele, on répète 10 fois A.1 en largeur en XL, on augmente 2 m au rang 3 (=soit 2 augm x 10 = 20 augmentations au total) et 2 m au rang 9 (= 20 augmentations au total). Bon tricot!
02.05.2019 - 08:48
![]() Anne wrote:
Anne wrote:
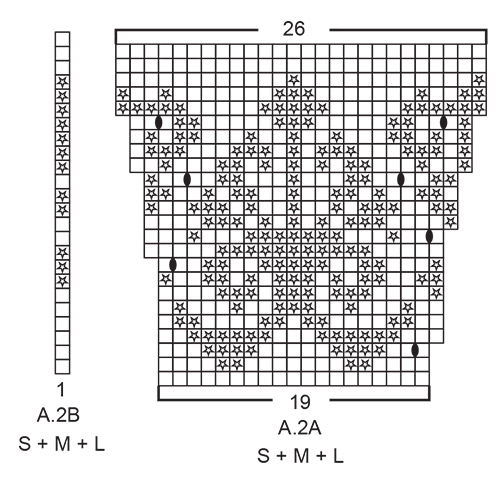
Hei. Er det en feil i runde 3 i mønsteret i A2.A? (Str S, M og L) Jeg må strikke en ekstra maske m gul i begynnelsen for at mønsteret skal bli riktig. Da blir det en for lite gul på slutten av pinnen. Jeg har talt flere ganger at maskeantallet er riktig og at jeg har strikket runde nr 2 riktig. Takk for svar. Mvh Anne
14.12.2018 - 23:15DROPS Design answered:
Hei Anne. Mønsteret stemmer. Runde 3 i A.2a strikkes slik: 1maske gul, 1 kast, 2 masker gul, ( = 4 gule masker på pinnen), 4 masker hvit (de 2 hvite maskene på forrige omgang er nå under de midterste 2 hvite maskene på denne omgangen. Når du har gjentatt A.2a 8-9-9 ganger, avslutter du med A.2b som før (=1 maske gul). God fornøyelse.
17.12.2018 - 11:06
![]() Monica wrote:
Monica wrote:
Tror dere må sjekke oppskriften før dere svarer. Mønster A3 skal strikkes i overgangen for at hullraden skal fortsette. Står i oppskriften..
24.06.2018 - 10:08DROPS Design answered:
Hei Monica. Du har helt rett i at A.3 strikkes for at hullmønsteret i raglanen skal fortsette, beklager det. A.3 strikkes kun til bærestykke er ferdig. Så når du setter av masker til ermer og går over til bolen strikkes ikke lenger A.3 God fornøyelse.
25.06.2018 - 08:19
![]() Monica wrote:
Monica wrote:
Heia, jeg lurer på om mønster A3 skal strikkes hele veien ned på bolen? Eller avsluttes det under armene?
21.06.2018 - 20:52DROPS Design answered:
Hei Monica, Det er ikke noe A.3 i denne oppskriften. A.1 og A.2 er mønsteret på bærestykket og resten av bolen er strikket i glattstrikk, bortsett fra stolpene. God fornøyelse!
24.06.2018 - 08:40Judy wrote:
For drops 187-11 what do the symbols in A.3 tell me to do?
10.06.2018 - 20:19DROPS Design answered:
Dear Judy, on row 1 and 3 in A.3 work 6 sts as follows: K2 tog, YO, K2, YO, slip 1 stitch as if to knit, knit 1, pass the slipped stitch over the knit stitch = 6 sts. On row 2 and 4 in A.3, purl all the 6 sts. Happy knitting!
11.06.2018 - 09:47
![]() M. Bundsgaard wrote:
M. Bundsgaard wrote:
Mangler der ikke en udtagnings markering i række 3 i mønster A.2A? Str.xl, XXL og XXL?
27.05.2018 - 08:49DROPS Design answered:
Hej, jeg tror du har ret, den er sendt videre til design, vi skal se på den i løbet af nogle dage. Tak for info! :)
30.05.2018 - 13:18
![]() Elizabeth Statmore wrote:
Elizabeth Statmore wrote:
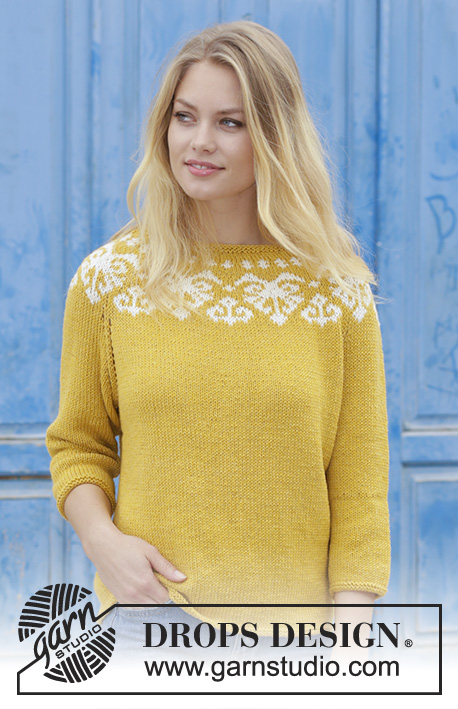
I love the happy, lemon curd construction and swirls of cream in the yoke!
19.12.2017 - 05:52
![]() Tenna Olsen wrote:
Tenna Olsen wrote:
Spring sunshine
14.12.2017 - 22:13
|
||||||||||||||||||||||
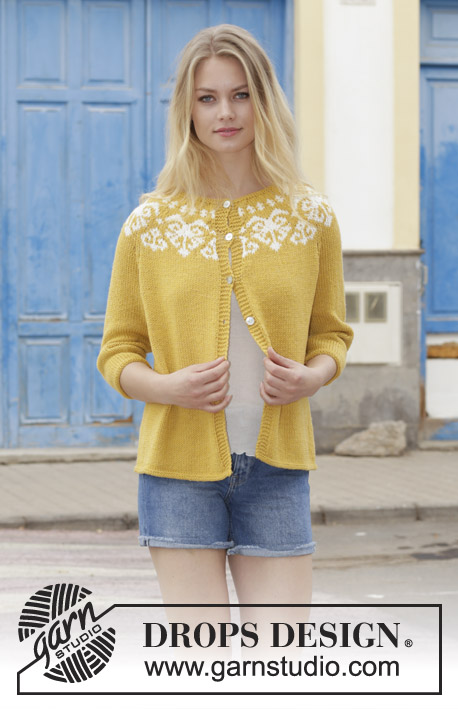
Golden Heart Jacket#goldenheartjacket |
||||||||||||||||||||||
 |
 |
|||||||||||||||||||||
Knitted jacket with round yoke, multi-coloured Norwegian pattern and ¾-length sleeves, worked top down. Sizes S - XXXL. The piece is worked in DROPS Cotton Merino.
DROPS 187-11 |
||||||||||||||||||||||
|
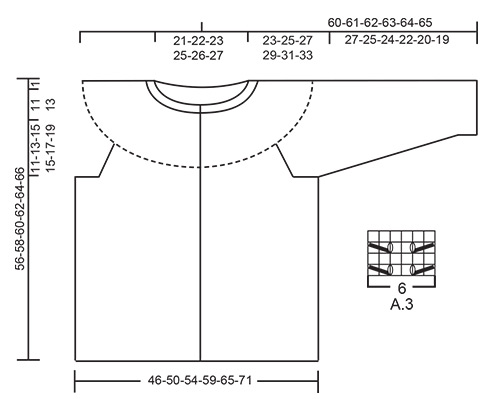
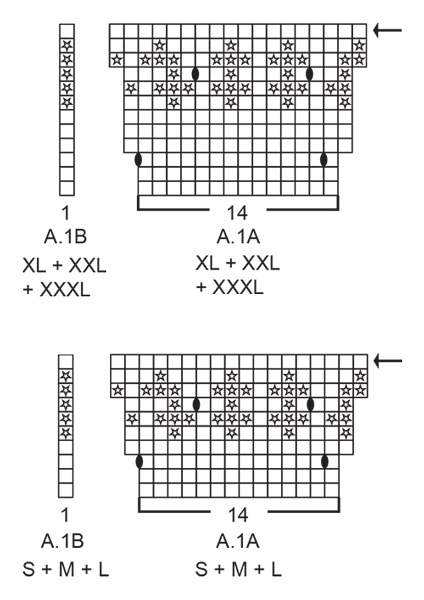
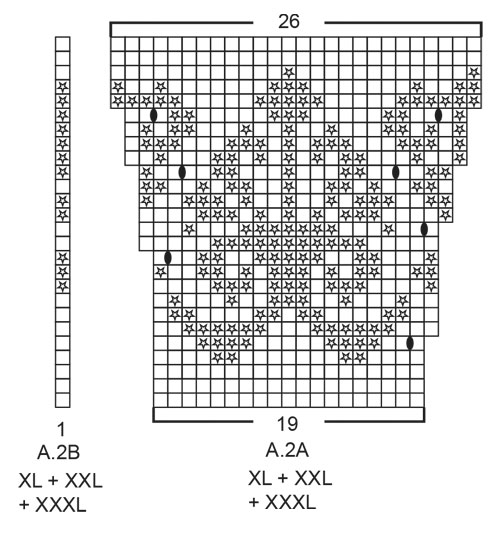
INFORMATION FOR THE PATTERN: RIDGE/GARTER STITCH (worked in the round): 1 ridge = 2 rounds. Knit 1 round and purl 1 round. RIDGE/GARTER STITCH (worked back and forth): 1 ridge = Knit 2 rows. INCREASE TIP(for round yoke): To work out how to increase evenly, count the total number of stitches on the needle (e.g. 110 stitches), minus the bands (e.g. 10 stitches) and divide the remaining stitches by the number of increases to be made (e.g. 13) = 7.7. In this example, increase by making 1 yarn over after approx. every 8th stitch; on the next round knit the yarn overs twisted to avoid holes. Do not increase over the bands. PATTERN: See diagrams A.1 to A.3. Choose diagram for your size (applies to A.1 and A.2). The diagrams show all the rows in the pattern seen from the right side. The whole pattern is worked in stocking stitch. RAGLAN: All increases are made from the right side! Increase 1 stitch on each side of the 4 marker threads in each transition between body and sleeves as follows: Start 1 stitch before the marker thread, make 1 yarn over, knit 2 (the marker thread sits in the middle of these 2 stitches), make 1 yarn over (= 2 stitches increased). On the next row (the wrong side) purl the yarn overs to leave holes. DECREASE TIP (for mid under sleeve): Start 3 stitches before the marker thread, knit 2 together, knit 2 (the marker thread sits in the middle of these 2 stitches), slip 1 stitch as if to knit, knit 1 and pass the slipped stitch over the knitted stitch (= 2 stitches decreased). BUTTONHOLES: Work buttonholes on the right band (when the garment is worn): Work from the right side until there are 3 stitches left at the end of the row, make 1 yarn over, knit the next 2 stitches together and knit the last stitch. On the next row (the wrong side) knit the yarn over to leave a hole. The first buttonhole is worked on the first row from the right side after the garter stitch edge in the neck. Then work the other 5-5-5-6-6-6 buttonholes with approx. 8-8½-8½-8-8-8½ cm between each one . ---------------------------------------------------------- JACKET: The piece is worked back and forth on circular needle from mid front and worked top down. The sleeves are worked in the round on short circular needle, top down. Change to double pointed needles when necessary. NECK: Cast on 110-114-120-126-130-136 stitches (including 5 band stitches in each side towards mid front) with circular needle size 3 mm and mustard. Work 2 RIDGES – see description above. Knit 1 row from the right side where you increase 13-23-17-25-21-29 stitches evenly on row – read INCREASE TIP and remember BUTTONHOLES on the right band – see description above = 123-137-137-151-151-165 stitches. Change to circular needle size 4 mm and purl 1 row from the wrong side with 5 knitted stitches in each side for bands. Then continue the yoke as described below. REMEMBER THE KNITTING TENSION! YOKE: The first row is worked as follows from the right side: 5 band stitches in garter stitch, work A.1A until there are 6 stitches left on the row (= 8-9-9-10-10-11 repeats of 14 stitches), work A.1B (= 1 stitch) and finish with 5 band stitches in garter stitch. Continue the pattern in this way and increase as shown in A.1A. AT THE SAME TIME on the last row in A.1 (wrong side) increase 8-9-9-10-10-11 stitches evenly on row. When A.1 has been completed there are 163-182-182-201-201-220 stitches on the needle. The next row is worked as follows from the right side: 5 band stitches in garter stitch, work A.2A until there are 6 stitches left on the row (= 8-9-9-10-10-11 repeats of 19 stitches), work A.2B (= 1 stitch) and finish with 5 band stitches in garter stitch. Continue the pattern in this way and increase as shown in A.2. When A.2 has been completed there are 219-245-245-271-271-297 stitches on the needle and the piece measures approx. 12-12-12-14-14-14 cm from the cast on edge mid front. Then work with mustard to finished length. Knit 1 row from the right side where you increase 7-5-1-3-3-5 stitches evenly on row = 226-250-246-274-274-302 stitches. Purl 1 row from the wrong side with 5 knitted stitches in each side. Now insert 4 marker threads in the piece without working the stitches: The first marker thread is inserted after the first 39-42-42-47-49-55 stitches (= front piece), 2nd marker thread is inserted after the next 40-46-44-48-44-46 stitches (= sleeve), 3rd marker thread is inserted after the next 68-74-74-84-88-100 stitches (= back piece) and the 4th marker thread is inserted after the next 40-46-44-48-44-46 stitches (= sleeve). There are now 39-42-42-47-49-55 stitches after the last marker thread on the front piece. Continue with stocking stitch and 5 band stitches in garter stitch in each side towards mid front. AT THE SAME TIME on the first row from the right side increase to RAGLAN – see description above (= 8 stitches increased). Continue the increases to raglan every 2nd row (i.e. every row from the right side) until you have increased a total of 11-12-16-16-19-19 times on each side of the 4 marker threads = 314-346-374-402-426-454 stitches on needle. Continue working as before without increases to raglan, but to avoid stopping the line of holes along each raglan line, work A.3 in each transition between body and sleeves (the marker threads sit in the middle of A.3). When the piece measures 23-25-27-29-31-33 cm, work the next row as follows from the wrong side: Work as before over the first 50-54-58-63-68-74 stitches (= front piece), place the next 62-70-76-80-82-84 stitches on 1 thread for sleeve, cast on 6-6-8-8-10-12 new stitches on the needle (= in side under the sleeve), purl 90-98-106-116-126-138 stitches (= back piece), place the next 62-70-76-80-82-84 stitches on 1 thread for sleeve, cast on 6-6-8-8-10-12 new stitches on needle (=in side under the sleeve) and work as before over the remaining 50-54-58-63-68-74 stitches (= front piece). Body and sleeves are finished separately. THE PIECE IS NOW MEASURED FROM HERE! BODY: = 202-218-238-258-282-310 stitches. Continue with stocking stitch and 5 band stitches in garter stitch in each side towards mid front. When the piece measures 32-32-32-32-32-32 cm from the separation, change to circular needle size 3 mm. Work 2 ridges back and forth. Change back to circular needle size 4 mm and cast off with knit from the right side. The jacket measures approx. 56-58-60-62-64-66 cm from the shoulder down. SLEEVE: Place the stitches from the thread in the one side of the piece on short circular needle size 4 mm and, in addition, knit up 1 stitch in each of the 6-6-8-8-10-12 stitches cast on under the sleeve = 68-76-84-88-92-96 stitches. Insert 1 marker thread in the middle of the 6-6-8-8-10-12 stitches. Work stocking stitch in the round. When the piece measures 2 cm from the separation, decrease 2 stitches mid under sleeve – read DECREASE TIP. Decrease like this a total of 9-12-15-15-16-17 times in Size S: Every 8th round, in Size M: Every 5th round, in Size L: Every 4th round, in Size XL: Alternately every 3rd and 4th round, in Size XXL: Every 3rd round and in Size XXXL: Alternately every 2nd and 3rd round = 50-52-54-58-60-62 stitches. Continue working until the sleeve measures 26-24-23-21-19-18 cm from the separation. Change to double pointed needles size 3mm and work 2 ridges in the round. Change back to double pointed needles size 4 mm and cast off with knit. Work the other sleeve in the same way. ASSEMBLY: Sew on the buttons. |
||||||||||||||||||||||
Diagram explanations |
||||||||||||||||||||||
|
||||||||||||||||||||||
 |
||||||||||||||||||||||
 |
||||||||||||||||||||||
 |
||||||||||||||||||||||
 |
||||||||||||||||||||||
Have you finished this pattern?Tag your pictures with #dropspattern #goldenheartjacket or submit them to the #dropsfan gallery. Do you need help with this pattern?You'll find 28 tutorial videos, a Comments/Questions area and more by visiting the pattern on garnstudio.com. © 1982-2026 DROPS Design A/S. We reserve all rights. This document, including all its sub-sections, has copyrights. Read more about what you can do with our patterns at the bottom of each pattern on our site. |
||||||||||||||||||||||


With over 40 years in knitting and crochet design, DROPS Design offers one of the most extensive collections of free patterns on the internet - translated to 17 languages. As of today we count 324 catalogues and 12291 patterns translated into English (UK/cm). 12291
We work hard to bring you the best knitting and crochet have to offer, inspiration and advice as well as great quality yarns at incredible prices! Would you like to use our patterns for other than personal use? You can read what you are allowed to do in the Copyright text at the bottom of all our patterns. Happy crafting!
Post a comment to pattern DROPS 187-11
We would love to hear what you have to say about this pattern!
If you want to leave a question, please make sure you select the correct category in the form below, to speed up the answering process. Required fields are marked *.