
Popular categories
Looking for a yarn?


Comments / Questions (25)
![]() Enrica wrote:
Enrica wrote:
Buongiorno, sono riuscita a fare il pocho come modello vs. ma, il lavoro a buchi vicino alle trecce mi viene male, chiedevo se è possibile aumentare in altro modo senza i buchi. Grazie e buona giornata.
24.11.2021 - 15:44DROPS Design answered:
Buonasera Enrica, gli aumenti sono lavorati con gettati lavorati a ritorto sul ferro successivo. Se preferisce può utilizzare un altro tipo di aumento. Buon lavoro!
26.11.2021 - 00:24
![]() Nicoletta wrote:
Nicoletta wrote:
Buonasera, per il poncho non riesco a capire il seguente passaggio verso la fine del lavoro: 'Poi lavorare 1 costa su tutte le maglie, sull’ultimo ferro della costa, aumentare 25-29-31 maglie in modo uniforme sul ferro'. Ho fatto il giro a dritto lavorando A.1/A.3 insieme 2 a 2 a diritto. Adesso devo fare un giro a rovescio o lavoro sempre a dritto aumentando le maglie (con gettato?). Grazie mille Nicoletta
06.07.2021 - 19:40DROPS Design answered:
Buonasera Nicoletta, lavorare "1 costa" significa lavorare 2 ferri/giri a maglia legaccio, per cui deve lavorare un giro a diritto aumentando le maglie come indicato e poi un giro a rovescio. Buon lavoro!
07.07.2021 - 18:55
![]() Zayda Zarza wrote:
Zayda Zarza wrote:
Me encantó este modelo, el patrón es muy claro y exacto, tiene su grado de dificultad pero queda hermoso, gracias por compartir su conocimiento, espero seguir haciendo más modelos de su sitio. Me gustaría compartir una foto de mi capa, pero no sé donde pueda hacerlo.
03.03.2021 - 03:09
![]() Karina Engel wrote:
Karina Engel wrote:
Hvorfor er der valgmulighed/str.indikation både ift. antal masker der skal slåes op, ind- og udtagning + på diagrammet m.m når det er en onesize ?
16.02.2020 - 12:11DROPS Design answered:
Hej Karina, Vi har 3 størrelser i Poncoen men kun en i pulsvarmerne. God fornøjelse!
18.02.2020 - 10:53
![]() Imma wrote:
Imma wrote:
Salve, non riesco a capire questo passo delle spiegazioni: "Quando sono stati lavorati 16 cm dallo spacco, lavorare le maglie di A.1/A.3 insieme 2 a 2 a diritto (= 127-147-163 maglie)". Le maglie da diminuire sono quelle prima di A1/A3, giusto?
09.01.2019 - 12:26DROPS Design answered:
Buongiorno Imma. Abbiamo modificato leggermente il testo. Deve lavorare insieme a 2 a 2 a diritto le maglie dei due diagramma A.1 e A.3 lavorate a diritto. Diminuisce quindi in tutto 6 maglie, 3 in ogni diagramma. Buon lavoro!
09.01.2019 - 14:18
![]() Mimi wrote:
Mimi wrote:
Hi there, instructions say "When you have worked 16 cm / 6 1/4'' from the split, work the knitted stitches in A.1/A.3 together 2 and 2 (= 127-147-163 stitches). " Do you mean work decreases in the cables' section by knitting two together all 6 knit stitches? Also, do the front and back panel join together before last ribbing section or do they stay separate until bind off? Thank you
23.12.2018 - 04:44DROPS Design answered:
Dear Mimi, you need to decrease here a total of 6 sts, so that you will dec 6 sts (= K2 tog a total of 6 times the K stitches in diagrams). Front and back piece will be worked separately after the 2 ridges worked over the 6 sts on each side (top of vents). Happy knitting!
02.01.2019 - 08:46
![]() Mimi wrote:
Mimi wrote:
Hi, I did the one ridge and the 24 decreases for size L/XL and I am about to start the first row of A motifs. Do I start increasing with yarn overs at the same time I start that first row (pattern says increase before and after A1 and A3)? Thanks!
06.12.2018 - 15:42DROPS Design answered:
Dear Mimi, you can start increasing on first row with pattern or on next round. Happy knitting!
07.12.2018 - 08:10Begoña wrote:
Me encanta el poncho ,eh intento hacerlo pero en la primera vuelta después del cuello se repiten los aumentos de 2-4-6? Inmediatamente si no no cuadra
21.11.2018 - 09:01DROPS Design answered:
Hola Begoña. Aclara, por favor, de que aumentos estas hablando. Los patrones de Drops están preparados para varias tallas. Cuando hay una secuencia de varios números , como 2-4-6 , tienes que aplicar el número según la talla que trabajas.
15.12.2018 - 23:47
![]() Martine Lavoie wrote:
Martine Lavoie wrote:
Que veut dire la Note: Bien veiller à ce que le 1er rang point mousse soit un rang ajouré dans A.2.
12.11.2018 - 18:45
![]() Genie Stanton wrote:
Genie Stanton wrote:
Thanks so much! With my limited eyesight I missed the YO on both sides of the middle P stitch! Great help! THANX AGAIN
24.05.2018 - 22:29
|
||||||||||||||||||||||
Fleetwood#fleetwoodponcho |
||||||||||||||||||||||
 |
 |
|||||||||||||||||||||
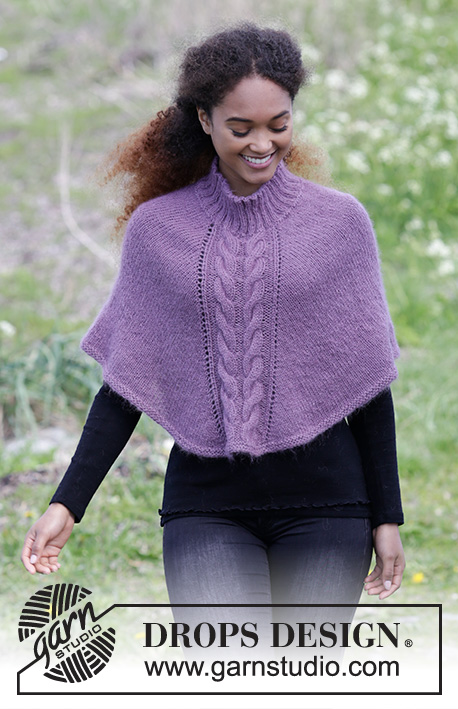
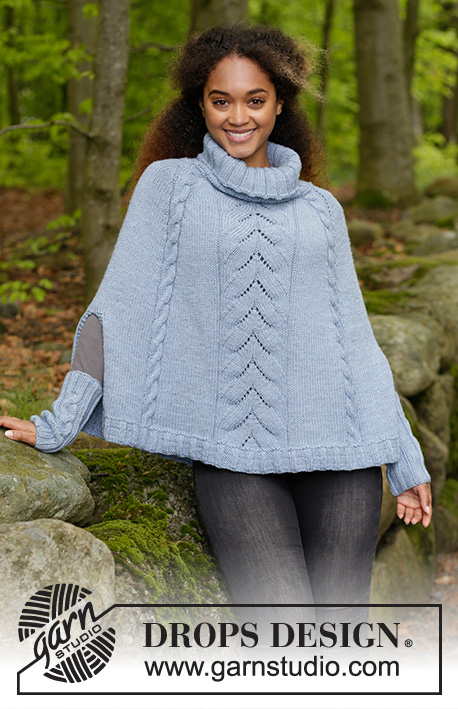
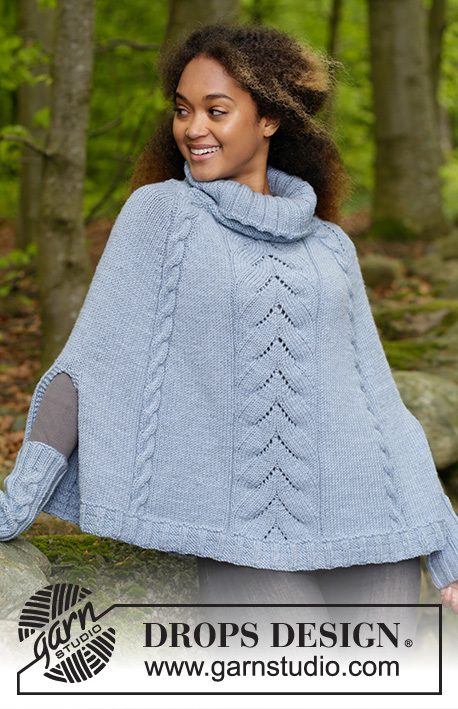
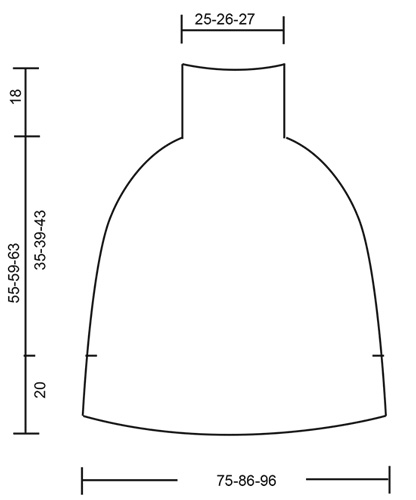
The set consists of: Knitted poncho with cables and lace pattern, worked top down and wrist warmers with cables. Sizes S - XXXL. The set is worked in DROPS Big Merino.
DROPS 184-30 |
||||||||||||||||||||||
|
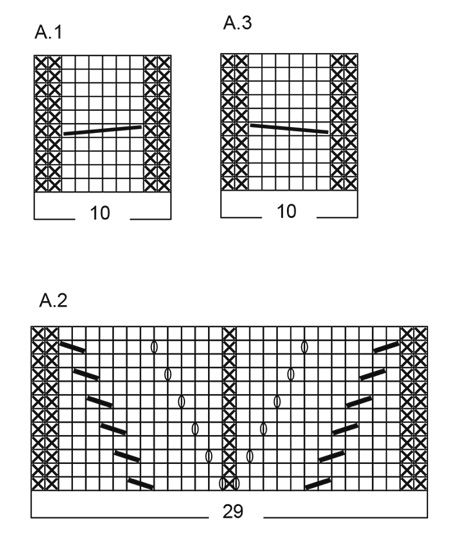
RIDGE/GARTER STITCH (worked in the round): 1 ridge = 2 rounds. Knit 1 round and purl 1 round. RIDGE/GARTER STITCH (worked back and forth): 1 ridge = Knit 2 rows. PATTERN: See diagrams A.1, A.2 and A.3. The diagrams show all the rows in the pattern seen from the right side. ---------------------------------------------------------- PONCHO: The piece is worked in the round with circular needle, top down. Cast on 132-138-144 stitches with circular needle size 4.5 mm and Big Merino. Knit 1 round, then work rib, knit 2 / purl 4, over all stitches. Work rib for 18 cm, then work 1 RIDGE over all stitches – see description above. Change to circular needle size 5 mm. Then knit 1 round where you decrease 26-24-22 stitches evenly on round = 106-114-122 stitches. Insert 1 marker thread in each side, 1 at the beginning of the round and 1 after 53-57-61 stitches = in the sides. Knit 1-2-3, A.1(= 10 stitches), knit 1-2-3, A.2 (= 29 stitches), knit 1-2-3, A.3 (= 10 stitches), knit 2-4-6, A.1, knit 1-2-3, A.2, knit 1-2-3, A.3, knit 1-2-3. Continue this pattern, at the same time increase 1 stitch on each side of each A.1/A.3 (= 8 stitches increased). Increase by making 1 yarn over, on the next round knit the yarn overs twisted to prevent holes. Increase every 2nd round 10-14-17 times, then every 4th round 5 times and every 6th round 5 times (in total 20-24-27 times) = 266-306-338 stitches. Change to longer circular needle when necessary. REMEMBER THE KNITTING TENSION! When the piece measures 35-39-43 cm (measured without the neck) work garter stitch over 6 stitches in each side (= 3 stitches on each side of the marker threads). NOTE! make sure the first row of garter stitch is on a row where you are working pattern in A.2. When you have worked 2 ridges place the first 133-153-169 stitches on a thread for the back piece and continue over the last 133-153-169 stitches on the needle (= front piece). You are now working back and forth on the needle. Continue pattern as before, 3 stitches in each side are now worked in GARTER STITCH – see description above. When you have worked 16 cm from the split, work the knitted stitches in A.1/A.3 together 2 and 2 (= 127-147-163 stitches). Then work 1 ridge over all stitches, on the last row of the ridge, increase 25-29-31 stitches evenly on row = 152-176-194 stitches. Continue by working as follows – from the right side: 3 stitches garter stitch,* knit 2, purl 4 *, repeat from *-* until there are 5 stitches left, knit 2 and work 3 stitches garter stitch. On every 4th row (every other row on the right side) knit over all stitches so that the rib does not tighten. Work rib for 4 cm, then cast off with knit over knit and purl over purl. BACK PIECE: Place the 133-153-169 stitches on the thread back on the needle and work as for front piece. ---------------------------------------------------------- WRIST WARMERS: The piece is worked in the round with double pointed needles. Cast on 42 stitches with double pointed needles size 4.5 mm and Big Merino. Knit 1 round, then work rib, purl 2, knit 2, purl 2, knit 2, purl 2, * knit 2, purl 4 *, repeat from *-* until there are 2 stitches left, knit 2 stitches. Continue this rib until the piece measures 4 cm. Change to double pointed needles size 5 mm and continue as follows: A.1 over the first 10 stitches, rib as before over the remaining 32 stitches. Continue this pattern until the piece measures 18 cm. REMEMBER THE KNITTING TENSION! Change to double pointed needles size 4.5 mm and work rib as follows: Purl 2, knit 2, purl 2, knit 2, purl 2, * knit 2, purl 4 *, repeat from *-* until there are 2 stitches left, knit 2 stitches. Work rib for 4 cm, then cast off with knit over knit and purl over purl. Cut and fasten the strands well. Work one more wrist warmer in the same way. |
||||||||||||||||||||||
Diagram explanations |
||||||||||||||||||||||
|
||||||||||||||||||||||
 |
||||||||||||||||||||||
 |
||||||||||||||||||||||
Have you finished this pattern?Tag your pictures with #dropspattern #fleetwoodponcho or submit them to the #dropsfan gallery. Do you need help with this pattern?You'll find 27 tutorial videos, a Comments/Questions area and more by visiting the pattern on garnstudio.com. © 1982-2026 DROPS Design A/S. We reserve all rights. This document, including all its sub-sections, has copyrights. Read more about what you can do with our patterns at the bottom of each pattern on our site. |
||||||||||||||||||||||


With over 40 years in knitting and crochet design, DROPS Design offers one of the most extensive collections of free patterns on the internet - translated to 17 languages. As of today we count 324 catalogues and 12290 patterns translated into English (UK/cm). 12290
We work hard to bring you the best knitting and crochet have to offer, inspiration and advice as well as great quality yarns at incredible prices! Would you like to use our patterns for other than personal use? You can read what you are allowed to do in the Copyright text at the bottom of all our patterns. Happy crafting!
Post a comment to pattern DROPS 184-30
We would love to hear what you have to say about this pattern!
If you want to leave a question, please make sure you select the correct category in the form below, to speed up the answering process. Required fields are marked *.