
Popular categories
Looking for a yarn?


Comments / Questions (47)
![]() Lisa wrote:
Lisa wrote:
Please disregard my previous question as I found my mistake. Thanks.
27.10.2025 - 18:33
![]() Lisa wrote:
Lisa wrote:
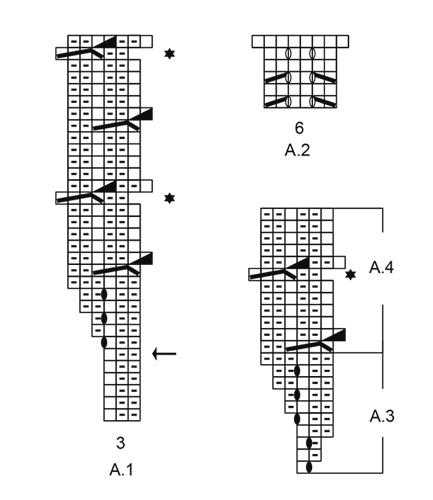
Hello-I'm knitting the hat and I'm at the very end of R1 of chart A.4. I have 2 purl stitches at the end and am not sure what to do w/them. Should I just purl them and continue? Thank you.
27.10.2025 - 17:32DROPS Design answered:
Hi Lisa, Yes, the 2 purled stitches at the end of row 1 are purled onwards. Regards, Drops Team.
28.10.2025 - 07:09
![]() Gin wrote:
Gin wrote:
Hi, I'm excited to knit this pattern (size M), but would prefer the body to be straight, rather than the A-line shape it appears to be in the photos/diagram. Please can you tell me how to achieve this - do I just omit the increases after the sleeves? If so, is it possible to still keep the design detail at the side seams? Many thanks for your advice.
27.08.2025 - 16:15DROPS Design answered:
Dear Gin, yes, you can keep a straight body shaping if you work without increases under the sleeves in the BODY section. So you would repeat rows 1 to 4 of chart A.2 (which would form the holes), without increases, while working the rest of the piece in stocking stitch. Happy knitting!
31.08.2025 - 19:16
![]() Marcela wrote:
Marcela wrote:
Dobrý den. Jak docílím výstřihu 3 cm, který je zobrazen na rozkresu? Když budu plést podle návodu, budu mít přední i zadní díl stejný. Myslela jsem, že někde budou použity zkrácené řady. Děkuji za odpověď.
07.01.2024 - 18:14
![]() Mickael wrote:
Mickael wrote:
Bonjour je suis au 19e rang du motif A1 je fais la première maille endroit comme indiqué et je répète tout le long les 6 mailles du motif mais je me retrouve à la fin avec deux mailles je ne sais pas quoi faire je démarrer avec 264 mailles je suis en taille XL
06.12.2023 - 08:27DROPS Design answered:
Bonjour Mickael, le diagramme est juste un peu décalé mais vos mailles vont s'aligner, tricotez simplement les mailles comme indiqué dans le diagramme. Retrouvez la vidéo de A.1 ici. Bon tricot!
15.02.2024 - 08:59
![]() Lisa wrote:
Lisa wrote:
In working chart A.1, when I'm at the end of R 19 I have 3 stitches left before the marker (as it comes it would be K-P-P). I followed the video for the beginning of the R and knit the first stitch. Everything else looks right. It almost looks like I need to do one more pull through between 4-5 stitches, then K-P-P-K, but that would be going over the end of R marker to achieve that. Thanks for your help.
21.04.2023 - 05:47DROPS Design answered:
Dear Lisa, make sure that you get (K1, P2, K1, P2) on previous round, then work: (K1 = first stitch in diagram, will be worked at the end of the round); *P2, insert needle down between 4th and 5th stitch, pull yarn through (= 1 new stitch), knit 1, purl 2, knit 1 (this knit 1 is the first stitch next repeat*, repeat from *-* all the round; on last repeat you will end working the first stitch of the round together with the last repeat (K1, p2, k1). See also time code approx. 09:00 in this video. Happy knitting!
21.04.2023 - 08:27
![]() Domi wrote:
Domi wrote:
Bonjour, j’aimerais faire ce modèle (pull et bonnet) en kid Silk et alpaca. Est ce possible et combien me faudrait il de laine . Merci pour votre réponse
29.03.2023 - 22:55DROPS Design answered:
Bonjour Domi, un mélange kid-Silk + Alpaca correspond à une épaisseur de laine du type groupe de fils C, or, ce modèle se tricote en Puna, groupe du fils B, vous ne pourrez pas utiliser ce mélange car votre tension serait différente. Retrouvez ici tous les modèles de tension 17-16 m où vous pourrez utiliser ce mélange (utilisez alors le convertisseur pour calculer les nouvelles quantités correspondantes). Bon tricot!
11.04.2023 - 09:40
![]() Pelletier wrote:
Pelletier wrote:
Les augmentations sous les bras sous les bras se font en tricotant le diagramme A2, donc avec des jetés. Au tour suivant, dois-je tricoter les jetés torses ? Il me semble que si je tricote les jetés normalement, les trous que cela va créer font faire bizarre sur les côtés du pull. Que feriez-vous?
01.01.2023 - 20:01DROPS Design answered:
Bonjour Mme Pelletier, les jetés de A.2 se tricotent normalement, à l'endroit pour qu'ils forment des jours, vous aurez ainsi une ligne de 2 jours sous chaque manche, le long des côtés. Vous pouvez bien sûr les tricoter torse si vous ne voulez pas de trous. Bon tricot!
02.01.2023 - 15:56
![]() Claudia wrote:
Claudia wrote:
Buongiorno, mi piace tantissimo questo modello è approfittando dell' Alpaca party volevo ordinare questo stesso filato ma non trovo il colore nel puna
21.09.2022 - 23:11DROPS Design answered:
Buonasera Claudia, questo colore non è più presente nella cartella colori di Puna, ma può scegliere tra gli altri bellissimi colori!. Buon lavoro!
22.09.2022 - 16:14
![]() Catherine Vaesken wrote:
Catherine Vaesken wrote:
Lorsque vous dites : sauter la premiere maille endroit du diagramme et tricoter les mailles restantes , est ce que je dois passer cette premiere maille sur l'aiguille de droite sans la tricoter , merci de votre reponse
08.06.2021 - 10:13DROPS Design answered:
Bonjour Mme Vaesken, tout à fait, elle sera tricotée à la fin du tour avec les 2 dernières mailles du diagramme (= quand on tricote: piquer l’aiguille entre la 4ème et la 5ème maille, ramener une boucle (= 1 nouvelle maille), tricoter 1 maille endroit, 2 mailles envers, 1 maille endroit). Bon tricot!
08.06.2021 - 11:38
|
|||||||||||||||||||||||||||||||
Namdalen#namdalensweater |
|||||||||||||||||||||||||||||||
 |
 |
||||||||||||||||||||||||||||||
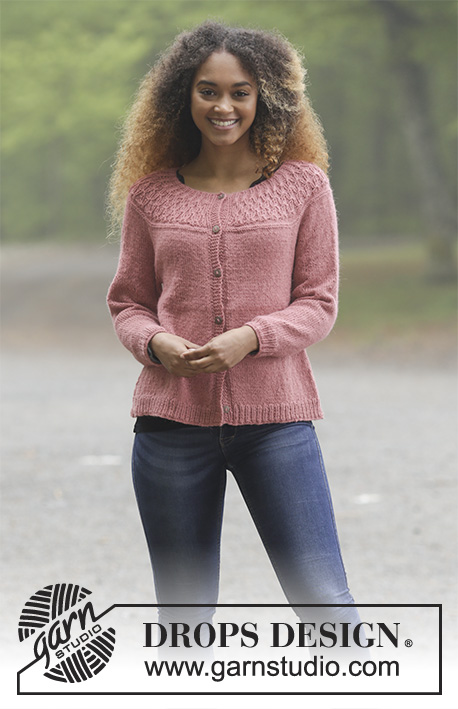
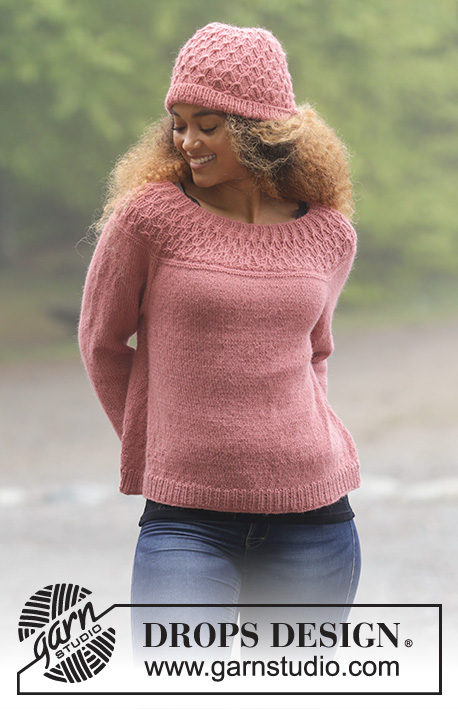
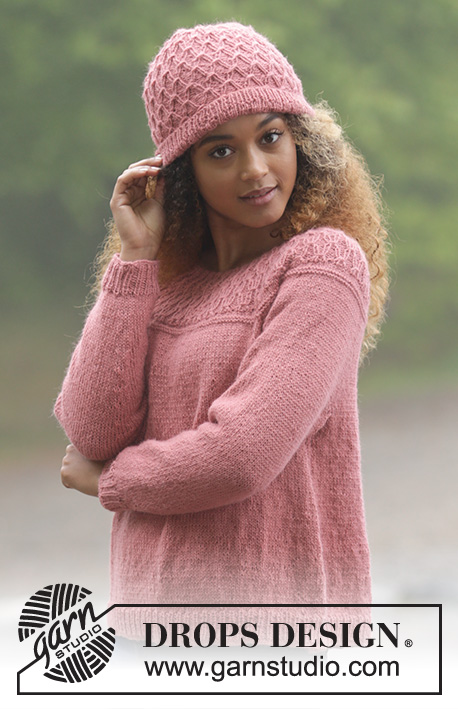
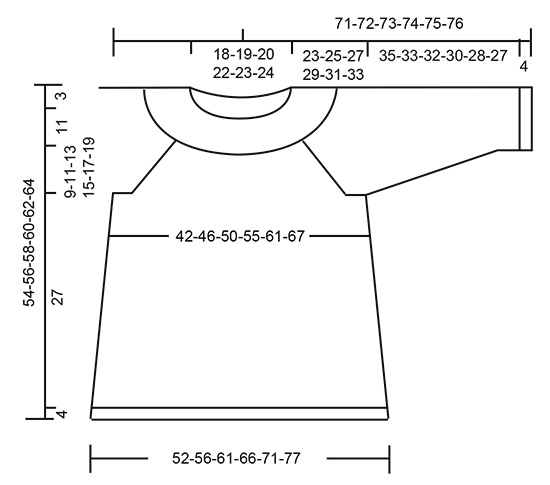
Set consists of: Knitted hat with texture and jumper with round yoke, raglan and texture, worked top down. Size: S - XXXL Set is knitted in DROPS Puna.
DROPS 179-1 |
|||||||||||||||||||||||||||||||
|
INFORMATION FOR PATTERN: GARTER STITCH (worked in the round): 1 ridge = 2 rounds. Knit 1 round and purl 1 round. PATTERN: Jumper: See diagrams A.1 and A.2. Hat: See diagrams A.3 and A.4. Diagrams show all rows in pattern seen from the right side. INCREASE TIP (evenly): To calculate how to increase evenly, use the total number of stitches on row (e.g. 240 stitches) and divide number of stitches by number of increases to be done (e.g. 8) = 30. In this example increase after approx. every 30th stitch. Increase 1 stitch by making a yarn over. On next round work yarn overs twisted to avoid holes. RAGLAN: Increase 1 stitch on each side of marker thread as follows: Work until 2 stitches remain before marker thread, 1 yarn over, knit 4 (marker thread is in the middle of these 4 stitches), 1 yarn over. Repeat at the remaining marker threads on round (= 8 stitches increased on round). On next round knit yarn overs twisted to avoid holes. DECREASE TIP (applies to mid under sleeve): Begin 3 stitches before marker and knit 2 together, knit 2 (marker is between these 2 stitches), slip 1 stitch knitwise, knit 1, pass slipped stitch over stitch worked (= 2 stitches decreased). ---------------------------------------------------------- JUMPER: Worked in the round on circular needle, top down. Beginning of round = mid back. Work sleeves in the round on double pointed needles/a short circular needle. Cast on 114-120-126-132-138-144 stitches on circular needle size 3.5 mm with Puna. Knit 1 round. Then work PATTERN - see explanation above, according to diagram A.1 (= 38-40-42-44-46-48 repetitions of 3 stitches on first round). When 6 rounds have been worked of diagram (to and with round marked with arrow in diagram) switch to circular needle size 4 mm. REMEMBER THE KNITTING TENSION! Continue until A.1 has been worked vertically. There are 228-240-252-264-276-288 stitches on round and piece measures 10 cm from cast-on edge. Work 2 rounds in stocking stitch and increase 2-8-16-24-20-34 stitches evenly on last round – read INCREASE TIP - see explanation above = 230-248-268-288-296-322 stitches. Work 2 ridges in GARTER STITCH - see explanation above. Insert 4 marker threads in piece without working as follows: Insert 1st marker thread after 34-36-39-43-46-51 stitches, 2nd marker thread after another 47-52-56-58-56-59 stitches, 3rd marker thread after another 68-72-78-86-92-102 stitches, and 4th marker thread after another 47-52-56-58-56-59 stitches. There are now 34-36-39-43-46-51 stitches left on round. Continue in stocking stitch and on next round begin increase for RAGLAN – see explanation above. Increase like this every 4th round 6-8-9-10-12-13 times in total = 278-312-340-368-392-426 stitches. Continue with stocking stitch without increasing stitches until piece measures 23-25-27-29-31-33 cm from cast-on edge. Work next round as follows: Work first 40-44-48-53-58-64 stitches (= half back piece), slip the next 59-68-74-78-80-85 stitches on a stitch holder (= sleeve), cast on 8-8-10-10-12-12 new stitches under sleeve, work the next 80-88-96-106-116-128 stitches (= front piece), slip the next 59-68-74-78-80-85 stitches on a stitch holder (= sleeve), cast on 8-8-10-10-12-12 new stitches under sleeve, work the remaining 40-44-48-53-58-64 stitches on round (= half back piece). BODY: = 176-192-212-232-256-280 stitches. Insert a marker thread in the middle of the new stitches cast-on under sleeves in each side (= 4-4-5-5-6-6 stitches on each side of marker thread). NOW MEASURE THE PIECE FROM HERE! Work in stocking stitch in the round. When piece measures 3 cm, work A.2 (= 6 stitches) mid under each sleeve so that there are 3 stitches of diagram on each side of marker thread. For every time A.2 has been worked vertically, 4 stitches have been increased on round. Work the new stiches in stocking stitch. Continue like this until A.2 has been worked 11 times vertically = 220-236-256-276-300-324 stitches. Piece measures approx. 27 cm. Knit 1 round while increasing 20-22-23-24-27-30 stitches evenly = 240-258-279-300-327-354 stitches. Knit 1 round. Switch to circular needle size 3.5 mm. Now work rib = knit 1/purl 2 until rib measures 4 cm. Switch back to circular needle size 4 mm. Knit 1 round and loosely cast off by knitting. To avoid a tight cast-off edge use a larger needle or make a yarn over that is casted off after approx. every 4th stitch. Jumper measures approx. 54-56-58-60-62-64 cm from shoulder and down. SLEEVES: Work sleeves in the round on double pointed needles/a short circular needle. Slip the 59-68-74-78-80-85 stitches from stitch holder on double pointed needles size 4 mm. Pick in addition up 1 stitch in each of the 8-8-10-10-12-12 stitches cast on under sleeve = 67-76-84-88-92-97 stitches. Insert 1 marker thread in the middle of the new stitches (= mid under sleeve). NOW MEASURE THE PIECE FROM HERE! Work in stocking stitch in the round. When piece measures 3 cm, decrease 2 stitches mid under sleeve - read DECREASE TIP. Decrease like this every 8th-6th-5th-4th-4th-3rd round 11-14-16-18-19-20 times in total = 45-48-52-52-54-57 stitches. Knit 1 round while decreasing 0-0-1-1-0-0 stitches = 45-48-51-51-54-57 stitches. Continue in stocking stitch until piece measures 35-33-32-30-28-27 cm (NOTE: shorter measurements in the larger sizes because of longer yoke). Switch to double pointed needles size 3.5 mm. Now work rib = knit 1/purl 2 until rib measures 4 cm. Switch back to circular needle size 4 mm. Knit 1 round. Then cast off by knitting. To avoid a tight cast-off edge use a larger needle or make a yarn over that is casted off after approx. every 4th stitch. Sleeve measures approx. 39-37-36-34-32-31 cm. Work the other sleeve the same way. ---------------------------------------------------------- HAT: Worked in the round, top down on double pointed needles. Switch to a short circular needle when increasing. Cast on 11-12 stitches on double pointed needles size 4 mm with Puna. NOTE! Leave approx. 30 cm yarn end to tighten the hat at the top when finished. ROUND 1: Knit all stitches. ROUND 2: Knit 1-1, * knit 1, 1 yarn over *, work from *-* = 21-23 stitches. ROUND 3: Knit all stitches. Knit all yarn overs twisted to avoid holes. Now work PATTERN – see explanation above, as follows: Work diagram A.3 (= 1 stitch on first round) 21-23 times on round. When A.3 has been worked vertically, there are 126-138 stitches on round. REMEMBER THE KNITTING TENSION! Work diagram A.4 (= 6 stitches) over every repetition of A.3. When A.4 has been worked 5 times vertically, piece measures approx. 26 cm. Work rib (= knit 1/purl 1) until hat measures 28-28 cm. Cast off stitches with knit over knit and purl over purl. Fasten off. Tighten together top of hat by basting yarn up and down in one and one stitch, tighten, fasten yarn. |
|||||||||||||||||||||||||||||||
Diagram explanations |
|||||||||||||||||||||||||||||||
|
|||||||||||||||||||||||||||||||
 |
|||||||||||||||||||||||||||||||
 |
|||||||||||||||||||||||||||||||
Have you finished this pattern?Tag your pictures with #dropspattern #namdalensweater or submit them to the #dropsfan gallery. Do you need help with this pattern?You'll find 28 tutorial videos, a Comments/Questions area and more by visiting the pattern on garnstudio.com. © 1982-2026 DROPS Design A/S. We reserve all rights. This document, including all its sub-sections, has copyrights. Read more about what you can do with our patterns at the bottom of each pattern on our site. |
|||||||||||||||||||||||||||||||


With over 40 years in knitting and crochet design, DROPS Design offers one of the most extensive collections of free patterns on the internet - translated to 17 languages. As of today we count 324 catalogues and 12290 patterns translated into English (UK/cm). 12290
We work hard to bring you the best knitting and crochet have to offer, inspiration and advice as well as great quality yarns at incredible prices! Would you like to use our patterns for other than personal use? You can read what you are allowed to do in the Copyright text at the bottom of all our patterns. Happy crafting!
Post a comment to pattern DROPS 179-1
We would love to hear what you have to say about this pattern!
If you want to leave a question, please make sure you select the correct category in the form below, to speed up the answering process. Required fields are marked *.