
Popular categories
Looking for a yarn?


Comments / Questions (16)
![]() Sylvie wrote:
Sylvie wrote:
Bonjour je fait la grandeur XXL et je suis rendue a la séparation pour mettre les manches de côté Ma question est pourquoi j’arrive pas en dessous les manche pour mon design j’ai 5 mailles 8 mailles montées et 5 mailles et c est écrit (Continuer en rond en jersey avec A.1 au-dessus des 9 mailles au milieu de chaque côté (sous les manches). MOI J’ARRIVE PLUS avec le design
01.11.2025 - 10:36DROPS Design answered:
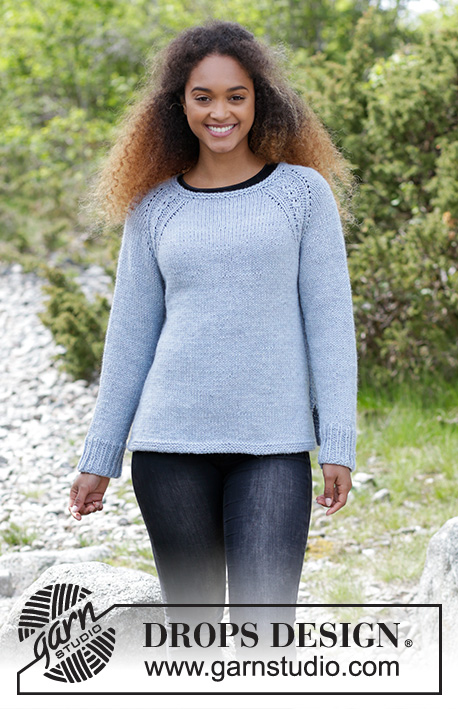
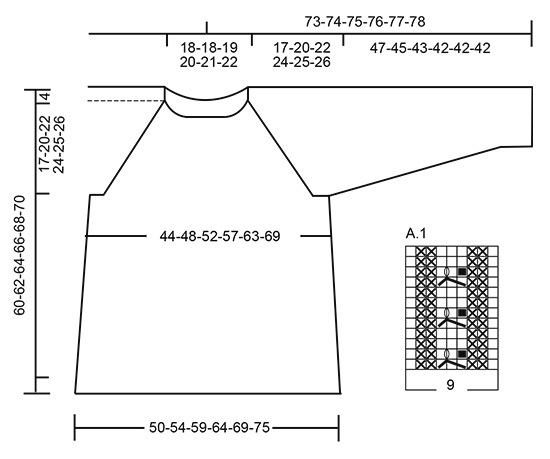
Bonjour Sylvie, lorsque la division est faite, vous ne tricotez plus les A.1 aux mêmes endroits qu'avant mais uniquement sur les côtés du pull (cf. 2ème photo), autrement dit, à la transition entre le dos et le devant, de chaque côté. Bon tricot!
03.11.2025 - 09:01
![]() Veronique wrote:
Veronique wrote:
Bonjour. Je suis en train de terminer le pull en DROPS BIG MERINO. Les côtes mousses du devant et du dos se replient systématiquement et spontanément vers le haut du tricot. Que faire pour qu elles restent en place ? Merci
06.12.2020 - 09:58DROPS Design answered:
Bonjour Véronique, vous pouvez laver le pull (en suivant bien les consignes de l'étiquette, du nuancier ainsi que ces généralités) et le faire sécher bien à plat, avec des épingles si besoin pour maintenir la bordure bien à plat. Bon tricot!
07.12.2020 - 08:24
![]() Eva-Lena wrote:
Eva-Lena wrote:
Hur stickar man flätan på rundsticka? Mönstret verkar vara för vanliga stickning med fram och baksida.
16.08.2020 - 15:15DROPS Design answered:
Hej Eva -Lena. Mönstret är skrivet för att sticka runt på rundsticka. Du stickar flätan enligt diagrammet och alla varv i diagrammet är sett från rätsidan. Lycka till!
17.08.2020 - 10:48
![]() Marie wrote:
Marie wrote:
Hej. I diagrammet står att ett kryss är = avigmaska från rätsidan, rätmaska från avigsidan. Men hela mönstret stickas väl från rätsidan? Eller tänker jag fel? /Marie
23.11.2019 - 11:42DROPS Design answered:
Hei Mari. Du tenker riktig. Diagramteksten henger nok igjen fra jakken som er lik genseren, og jakken strikkes frem og tilbake. Vi skal få slettet den unødvendige teksten. Takk for at du gjorde oss oppmerksom på dette. mvh DROPS design
25.11.2019 - 11:58
![]() Brumelot Gab wrote:
Brumelot Gab wrote:
Je n'arrive pas au nombre de mailles prévu pour la plus petite taille avec 66 mailles si a 13 maille je fais 6x2 mailles d’augmentation puis à 28 mailles 6x2mailles d’augmentation puis encore à 13 mailles 6x2 mailles d'augmentation , j'arrive à 90 mailles et non 84 où me suis je trompée
03.02.2019 - 16:20DROPS Design answered:
Bonjour Brumelot Gab. Vous tricotez 13 mailles endroit en augmentant EN MÊME TEMPS 2 mailles à intervalles réguliers (13+2=15), ensuite on a 6 jetes (6 nouvelles mailles), tricotez 28 mailles endroit en augmentant EN MÊME TEMPS 2 mailles à intervalles réguliers (28+2=30), 6 jetes, 13 mailles endroit en augmentant EN MÊME TEMPS 2 mailles à intervalles réguliers (13+2=15). Au total vous avez 3x2 mailles augmentees et 2x6 mailles augmentees > 6+12=18 > 66+18=84. Bon tricot!
03.02.2019 - 23:57
![]() Susanne Rijnen wrote:
Susanne Rijnen wrote:
Wat is maat xxxl?
24.01.2019 - 17:15DROPS Design answered:
Dag Susanne,
Onderaan in het schema kun je zien wat de afmetingen zijn van maat xxxl. Om de juiste maat te kiezen kan het handig zijn om een bestaand kledingstuk erbij te pakken en dan de maten te vergelijken.
27.01.2019 - 14:12
![]() Cécile Thirifays wrote:
Cécile Thirifays wrote:
Bonjour les explications pour réaliser ce modèle avec des aiguilles classiques existent-elles ? est-ce facile d\'adapter ?
18.12.2018 - 12:52DROPS Design answered:
Bonjour Mme Thirifays, vous trouverez ici comment adapter un modèle sur aiguilles droites - il est parfois bien plus facile de tricoter en rond, n'hésitez pas à "dompter" les aiguilles circulaires à l'aide de nos vidéos. Bon tricot!
19.12.2018 - 09:37AliceBetty wrote:
Jeg forstår ikke begyndelsen med at strikke 13 masker og tage 2m på.
16.08.2018 - 22:55DROPS Design answered:
Hej Alice, jo du strikker de 13 masker samtidig som du tager 2 masker ud (i de 13) = 15, fortsætter som der står mellem stjernerne 6 gange og så 28 masker ret samtidig som du tager 2 masker ud (i de 28) og så videre :)
21.08.2018 - 15:16
![]() Noellie wrote:
Noellie wrote:
Bonjour, débutant le tricot j'ai des difficultés à comprendre à partir de quel moment commencer les augmentations de chaque côtés de A1. Dois-je les commencer au moment du 2eme rang du diagramme (9eme tour du modèle) ou plutôt au niveau du 3eme rang de A1 (10eme tour du modèle)? Par avance merci de votre réponse.
21.02.2018 - 22:46DROPS Design answered:
Bonjour Noellie, augmentez de chaque côté de chaque A.1 à partir du 2ème tour tricoté avec A.1 à chaque transition, et répétez ainsi ces augmentations tous les 2 tours (= 1 tour sans augmentations, 1 tour avec augmentations). Bon tricot!
22.02.2018 - 08:52
![]() Heather wrote:
Heather wrote:
I think I got it! The 2 cables merge into one as you increase the sleeve! I took out what I had done and re did it just counting the way the pattern says and it wors out. I was thrown off because the pattern doesn’t really state the cable moves. Love your patterns but hard to read sometimes and I am a pretty darn experienced knitter. Thanks for your help. Also not sure why saying Ireland cause I am in Canada. Click other but it isn’t working it seems.
07.11.2017 - 12:21
|
||||||||||||||||
Beloved#belovedsweater |
||||||||||||||||
 |
 |
|||||||||||||||
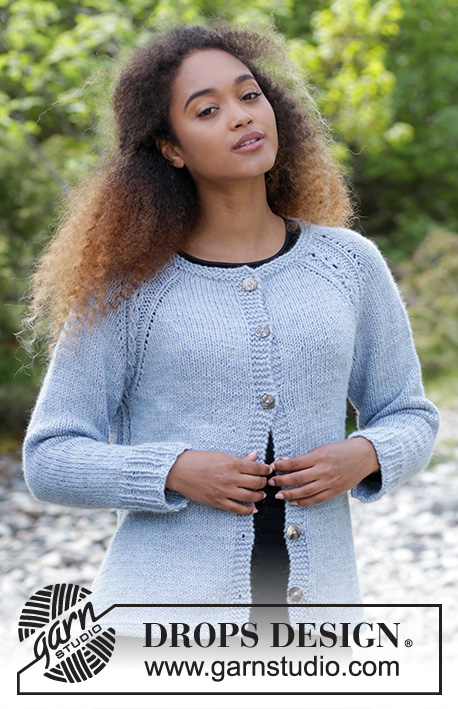
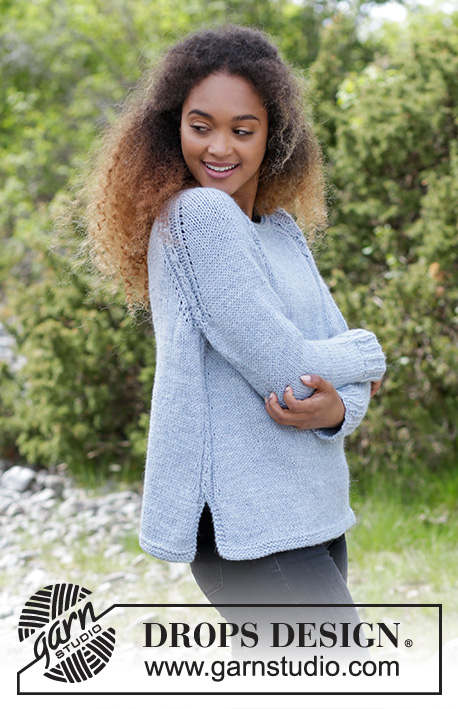
Knitted jumper with cables and raglan, worked top down. Sizes S - XXXL. The piece is worked in DROPS Nepal.
DROPS 181-6 |
||||||||||||||||
|
RIDGE/GARTER STITCH (worked in the round): 1 ridge = 2 rounds. Knit 1 round and purl 1 round. RIDGE/GARTER STITCH (worked back and forth): 1 ridge = Knit 2 rows. PATTERN: See diagram A.1. The diagram shows all the rows in the pattern seen from the right side. RAGLAN: Increase to raglan on each side of A.1 (= 8 increased stitches per increase round). Increase by making 1 yarn over, on the next round knit the yarn overs twisted to prevent holes. DECREASE TIP: Decrease 1 stitch on each side of the marker thread as follows: Work until there are 3 stitches left before the marker thread, slip 1 stitch as if to knit, knit 1, pass the slipped stitch over, knit 2 stitches (marker thread sits in the middle of these stitches), knit the next 2 stitches together. ---------------------------------------------------------- The piece is worked in the round with circular needle from mid back, top down. JUMPER: Cast on 66-66-70-76-82-86 stitches with circular needle size 5.5 mm and Nepal. Work 2 RIDGES – see description above. The beginning of the round = mid back. The next round is worked as follows: Knit 13-13-14-16-17-18 stitches, AT THE SAME TIME as you increase 2-2-2-2-4-6 stitches evenly over these stitches, *1 yarn over, knit 1 *, work from *-* 6 times in total, knit 28-28-30-32-36-38 stitches, AT THE SAME TIME as you increase 2-2-2-4-6-10 stitches evenly over theses stitches, *1 yarn over, knit 1 *, work from *-* 6 times in total, knit 13-13-14-16-17-18 stitches, AT THE SAME TIME as you increase 2-2-2-2-4-6 stitches evenly over these stitches = 84-84-88-96-108-120 stitches. Knit 1 round, the yarn overs are knitted twisted to prevent holes. REMEMBER THE KNITTING TENSION! Work the next round as follows: Knit 10-10-11-13-16-19 stitches (= half the back piece), A.1 (= 9 stitches), knit 4 stitches (= sleeve), A.1 (= 9 stitches), knit 20-20-22-26-32-38 stitches (= front piece), A.1, knit 4 stitches (= sleeve), A.1, knit 10-10-11-13-16-19 stitches (= half the back piece). Continue with this pattern, at the same time as you increase 1 stitch on each side of A.1 to raglan – SEE DESCRIPTION ABOVE. Increase every 2nd round a total of 17-20-22-24-25-26 times. After all the increases, there are 220-244-264-288-308-328 stitches on the needle. Continue with pattern and stocking stitch (without increases) until the piece measures 18-21-23-25-26-28 cm from the cast-on edge mid front. Work the next round as follows: Work 32-35-38-42-46-50 stitches (= half the back piece), place the next 46-52-56-60-62-64 stitches on 1 thread (= sleeve), cast on 6-6-8-8-8-10 new stitches on the needle (= under the sleeve), work 64-70-76-84-92-100 stitches (= front piece), place the next 46-52-56-60-62-64 stitches on 1 thread (= sleeve), cast on 6-6-8-8-8-10 new stitches on the needle (= under the sleeve) and work the remaining 32-35-38-42-46-50 stitches (= half the back piece). BODY: = 140-152-168-184-200-220 stitches. Continue in the round with stocking stitch and A.1 over the 9 middle stitches in each side (under the sleeves). Insert 1 marker here, the piece is now measured from here. When the piece measures 3 cm increase 1 stitch on each side of A.1 in each side (= 4 stitches increased). Increase every 5 cm a total of 5 times = 160-172-188-204-220-240 stitches. When the piece measures 28-27-27-27-28-28 cm place the stitches for the front piece on a thread, now you only work the stitches on the back piece (= 80-86-94-102-110-120 stitches). Continue with stocking stitch with 3 stitches garter stitch in each side. When the piece measures 36-35-35-35-36-36 cm (the split measures 8 cm) work 3 RIDGES back and forth – see description above. Then cast off. Place the stitches from the front piece back on the needle and work in the same way as the back piece. SLEEVE: The piece is worked in the round with short circular needle/double pointed needles. Place the 46-52-56-60-62-64 stitches from the thread in the one side of the piece on double pointed needles size 5.5 mm and, in addition, cast on 6-6-8-8-8-10 new stitches mid under the sleeve = 52-58-64-68-70-74 stitches on the needle. Insert one marker thread in the middle of these new stitches – The piece is now measured from here! Work stocking stitch in the round. AT THE SAME TIME after 3 cm decrease 2 stitches mid under the sleeve –READ DECREASE TIP. Decrease every 4-3-2-2-2-1½ cm a total of 10-12-15-16-16-17 times = 32-34-34-36-38-40 stitches. When the piece measures 40-38-36-35-35-35 cm knit 1 round where you increase 4-5-5-6-7-8 stitches evenly on round = 36-39-39-42-45-48 stitches. Change to double pointed needles size 5 mm and work rib, knit 1/ purl 2. Continue with rib for 7 cm, then cast off with knit over knit and purl over purl. The sleeve measures approx. 47-45-43-42-42-42 cm. Work the other sleeve in the same way. ASSEMBLY: Sew the openings under the sleeves. |
||||||||||||||||
Diagram explanations |
||||||||||||||||
|
||||||||||||||||
 |
||||||||||||||||
Have you finished this pattern?Tag your pictures with #dropspattern #belovedsweater or submit them to the #dropsfan gallery. Do you need help with this pattern?You'll find 29 tutorial videos, a Comments/Questions area and more by visiting the pattern on garnstudio.com. © 1982-2026 DROPS Design A/S. We reserve all rights. This document, including all its sub-sections, has copyrights. Read more about what you can do with our patterns at the bottom of each pattern on our site. |
||||||||||||||||


With over 40 years in knitting and crochet design, DROPS Design offers one of the most extensive collections of free patterns on the internet - translated to 17 languages. As of today we count 324 catalogues and 12290 patterns translated into English (UK/cm). 12290
We work hard to bring you the best knitting and crochet have to offer, inspiration and advice as well as great quality yarns at incredible prices! Would you like to use our patterns for other than personal use? You can read what you are allowed to do in the Copyright text at the bottom of all our patterns. Happy crafting!
Post a comment to pattern DROPS 181-6
We would love to hear what you have to say about this pattern!
If you want to leave a question, please make sure you select the correct category in the form below, to speed up the answering process. Required fields are marked *.