
Popular categories
Looking for a yarn?


Comments / Questions (28)
![]() Dominique wrote:
Dominique wrote:
Comment réaliser ce pull en vert clair ou bleu clair avec la Merino extra fine et la kid silk? Quelles sont les couleurs qu'il est possible d'associer?
10.04.2023 - 11:19DROPS Design answered:
Bonjour Dominique, pour toute assistance au choix des couleurs, merci de bien vouloir contacter directement votre magasin DROPS, on pourra vous proposer, même par mail ou téléphone, les alternatives possibles. Bon tricot!
11.04.2023 - 14:09
![]() Mrs Sue Torkington wrote:
Mrs Sue Torkington wrote:
Hello! I have been knitting forever! but I do not understand why the pattern states to cast on and then purl from wrong side for the first row when the first row would be the right side facing. Should there be a knit row first? I have looked at this so many times and cannot understand how the 2nd row would then be the right side. Help! Sue
11.03.2023 - 23:55DROPS Design answered:
Dear Mrs Torkington, we do this, because it makes the start of teh ribbing more flexible, and look nicer. When you do this the side you are knitting your second row will be the right side of your piece. I hope this helps. Happy Knitting!
12.03.2023 - 15:28
![]() Silvia wrote:
Silvia wrote:
Buongiorno, la spiegazione parla di un campione con 16 maglie in larghezza e 20 ferri in verticale a maglia rasata e 1 capo di ogni qualità = 10 x 10 cm. Ma con quali ferri deve essere eseguito? 4 o 5,5? Grazie
15.02.2023 - 21:09DROPS Design answered:
Buonasera Silvia, deve lavorare il campione con i ferri che le permettono di ottenere quelle misure: solitamente sono quelli più grandi riportati, ma la misura potrebbe variare in base alla sua tensione durante la lavorazione. Buon lavoro!
16.02.2023 - 19:09
![]() Pe wrote:
Pe wrote:
Hallo, ich stricke gerade in Größe S. Bei Muster A 5 geht es sich mit der Maschenzahl nicht aus. Bei 92 Maschen habe ich im Mustersatz eine Masche zuviel. Kann das sein oder habe ich einen Fehler? Vielen Dank.
17.01.2023 - 09:13DROPS Design answered:
Liebe Pe, es sollte klappen, so stricken Sie die 92 Maschen: 1 Randmasche kraus rechts, wiederholen Sie jetzt 18 Mal die 5 Maschen in A.5 (= 18*5=90 Maschen), und enden Sie mit 1 Randmasche kraus rechts = 1+90+1=92. Viel Spaß beim stricken!
17.01.2023 - 10:25
![]() Ina Van Velzen wrote:
Ina Van Velzen wrote:
Het kwartje is inmiddels gevallen. Ga vrolijk verder. Groet van mij.
01.11.2022 - 22:57
![]() Ina Van Velzen wrote:
Ina Van Velzen wrote:
Goedemorgen, het betreft drops 237"cracked walnuts, 6 en later 7'nieuwe steken erbij, deze 13 steken blijven breien in ribbel? Want als ik alleen de laatste 7 in ribbel brei en de eerste 6 opneem in het patroon dan komen er nog meer steken bij ( was 99 + 17 x 3(omslag) = 150. Dan wordt het geen 17x 3 maar veel meer steken en dat kan niet. Hoop dat ik het goed heb uitgelegd. Graag uw hulp. Mvg. Ina.
31.10.2022 - 09:30DROPS Design answered:
Dag Ina,
Je breit die nieuwe 6 steken inderdaad in ribbelsteek. Er komen later geen nieuwe steken meer bij, maar je breit de buitenste 7 steken in ribbelsteek.
16.11.2022 - 19:36
![]() Ina Van Velzen wrote:
Ina Van Velzen wrote:
Bedankt voor uw antwoord ik staarde mij blind op de tekst"alleen de naalden aan de goede kant (rechts)laten zien"". Ik kan gelukkig weer verder. Hartelijke groeten van Ina.
20.10.2022 - 16:59
![]() Ina Van Velzen wrote:
Ina Van Velzen wrote:
Hier n vervolg op mijn eerdere vraag, drops 237-9 cracked was, in telpatroon A1 is bij mijn weten 20 pennen gebreid is al 10 cm, enA2 is dan 16 pennen gebreid is 8 cm + de gebreide pennen van A1 is al 18 cm. Dan moet ik nog beginnen met A3. Maar ik mag maar gaan tot n lengte van 19 cm. Ik hoop dat ik het goed heb uitgelegd. Helpt u mij svp. Groet van Ina.
20.10.2022 - 16:54DROPS Design answered:
Dag Ina,
Aan je volgende bericht te zien was je er al uit gekomen. Bedankt voor de terugkoppeling en veel breiplezier!
20.10.2022 - 20:22
![]() Ina Van Velzen wrote:
Ina Van Velzen wrote:
Hallo in drops 237 cracked walnuts short sleeve. Bij herhaal A3 in de hoogte tot het werk 16 cm meet , betreft dit de totale lengte? Maar voordat ik aan A3 ga beginnen zit ik al op op ruim 30 cm!!. De telpatronen laten toch alleen de goede kant zien. Wat doe ik niet goed.?? Heel graag antwoord van u. Groet ina.
17.10.2022 - 21:37DROPS Design answered:
Dag Ina,
Met de 16 cm wordt de totale hoogte bedoeld, dus vanaf de opzet. In het telpatroon zijn alle naalden aangegeven, dus zowel de heengaande als de teruggaande naalden. Heb je hier rekening mee gehouden?
19.10.2022 - 20:00
![]() Jytte Silleborg wrote:
Jytte Silleborg wrote:
Jeg synes ikke, strikkefasthed stemmer overens med størrelsen (M) på diagrammet? 16 m = 10 cm, dvs. at 110 masker giver 68 cm, men tegningen viser 56 cm. Hvad gør jeg galt?
17.10.2022 - 21:25DROPS Design answered:
Hej Jytte, de forskellige mønstre fylder forskelligt. Snoninger bruger flere masker. Når du strikker A.4 tager du ind til 92 m som modsvarer strikkefastheden i glatstrik :)
25.10.2022 - 11:12
|
||||||||||||||||
Cracked Walnuts Short Sleeve#crackedwalnutsshortsleeve |
||||||||||||||||
 |
 |
|||||||||||||||
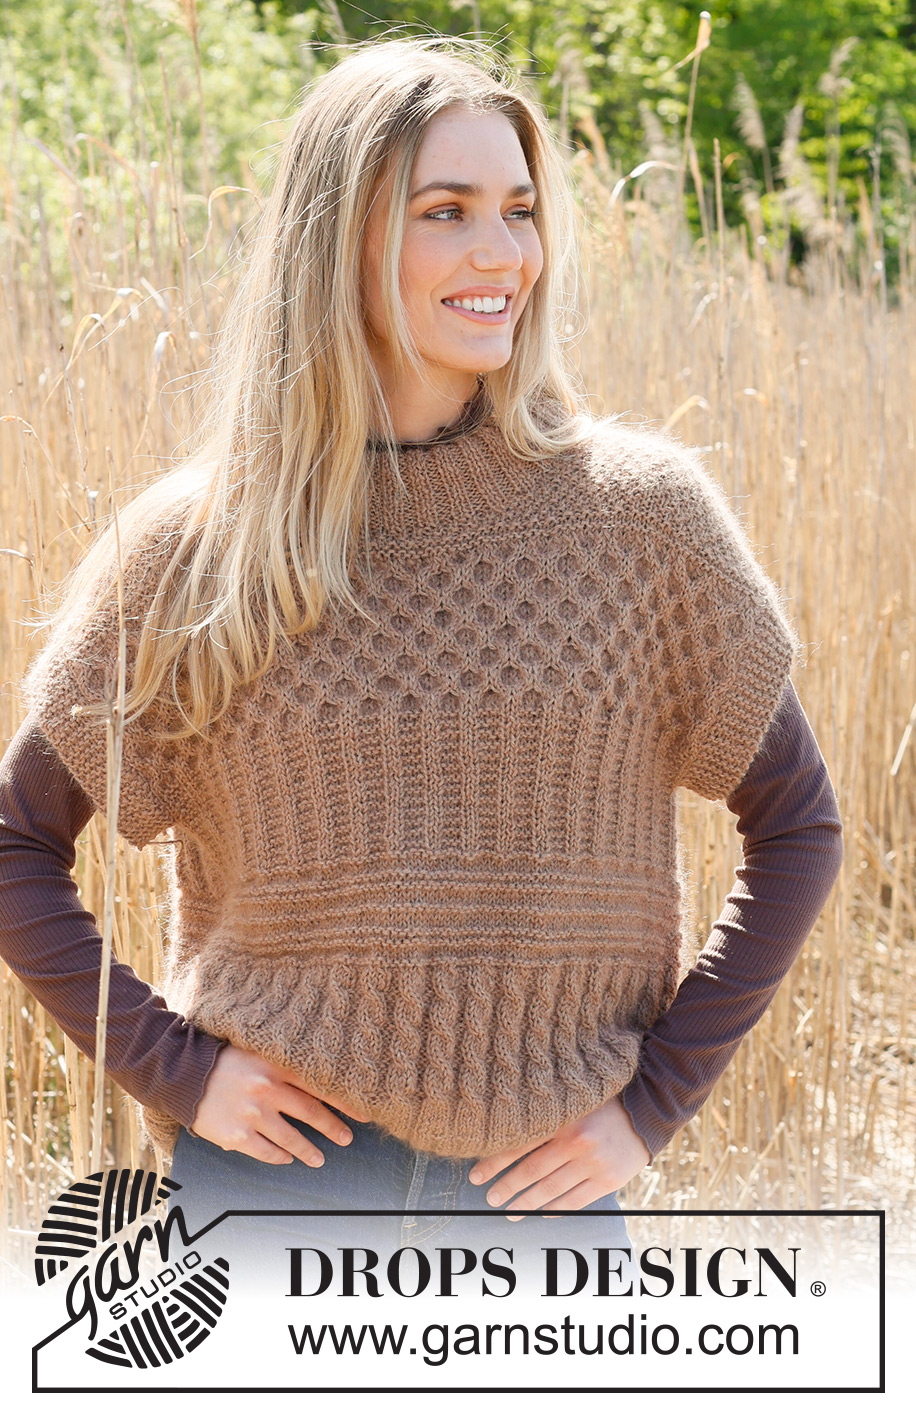
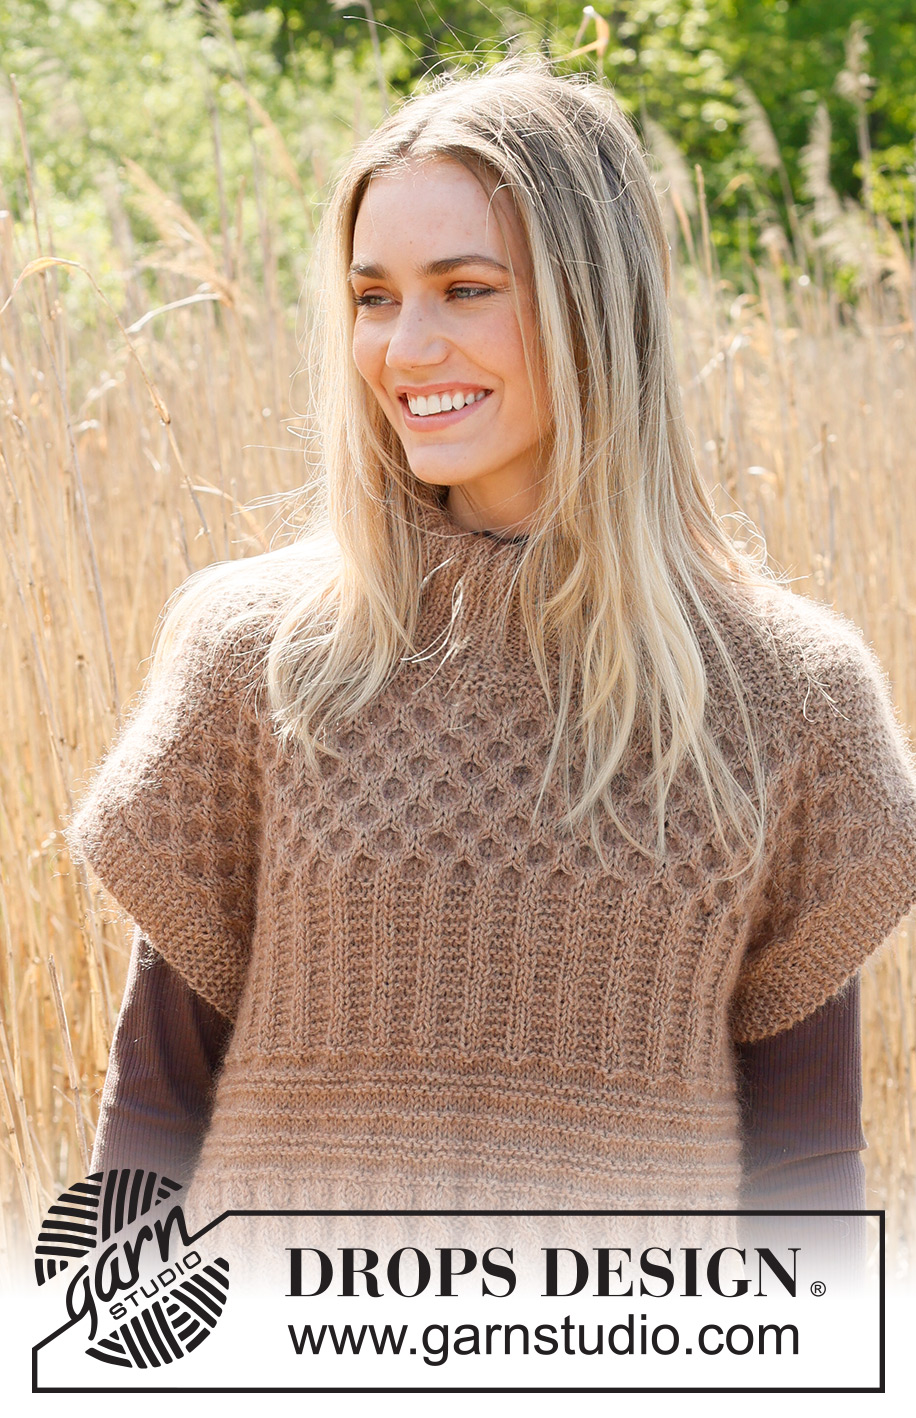
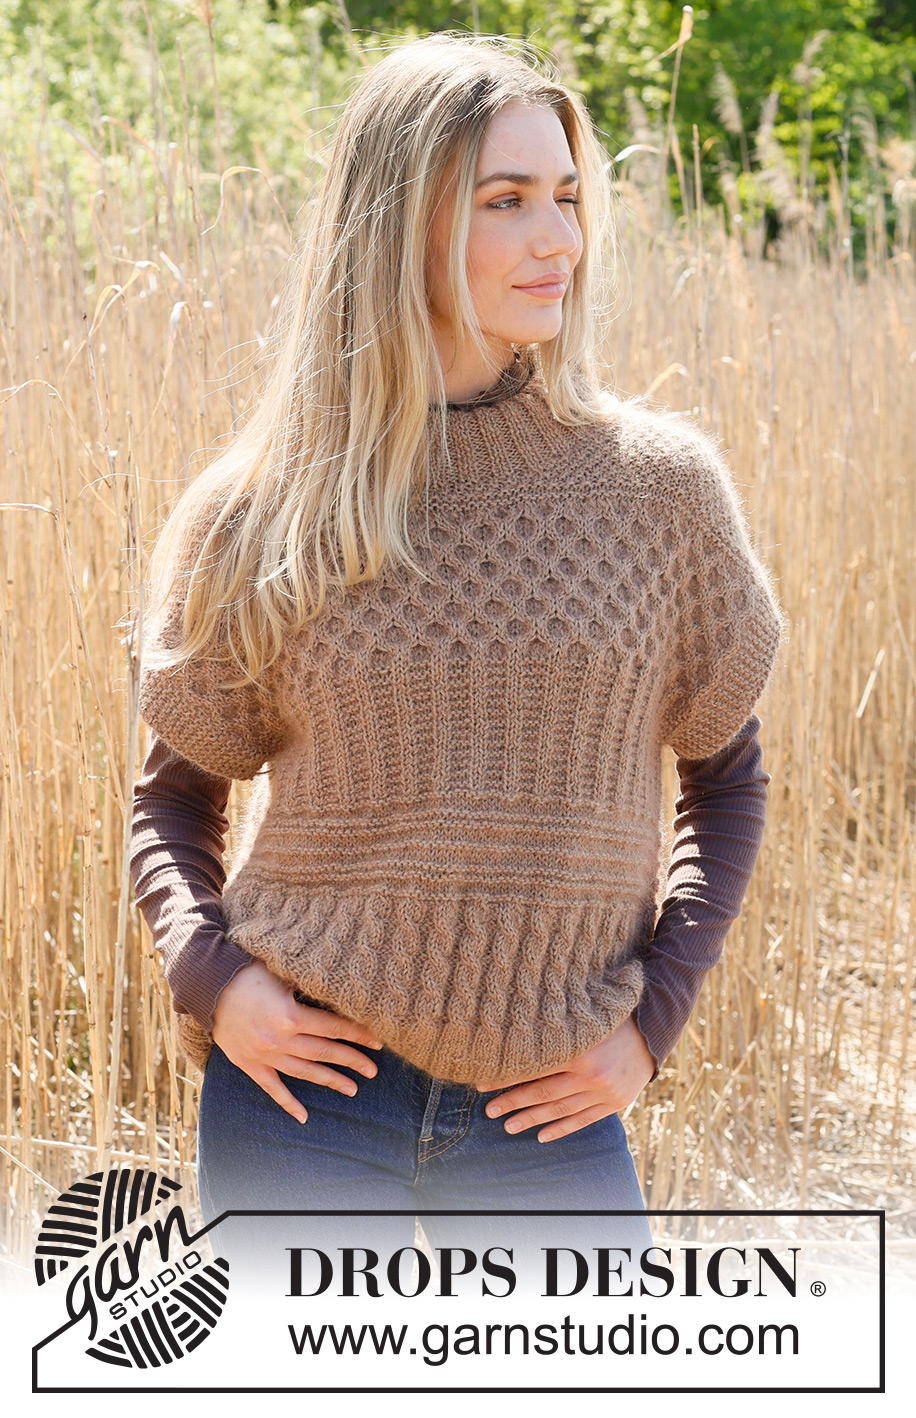
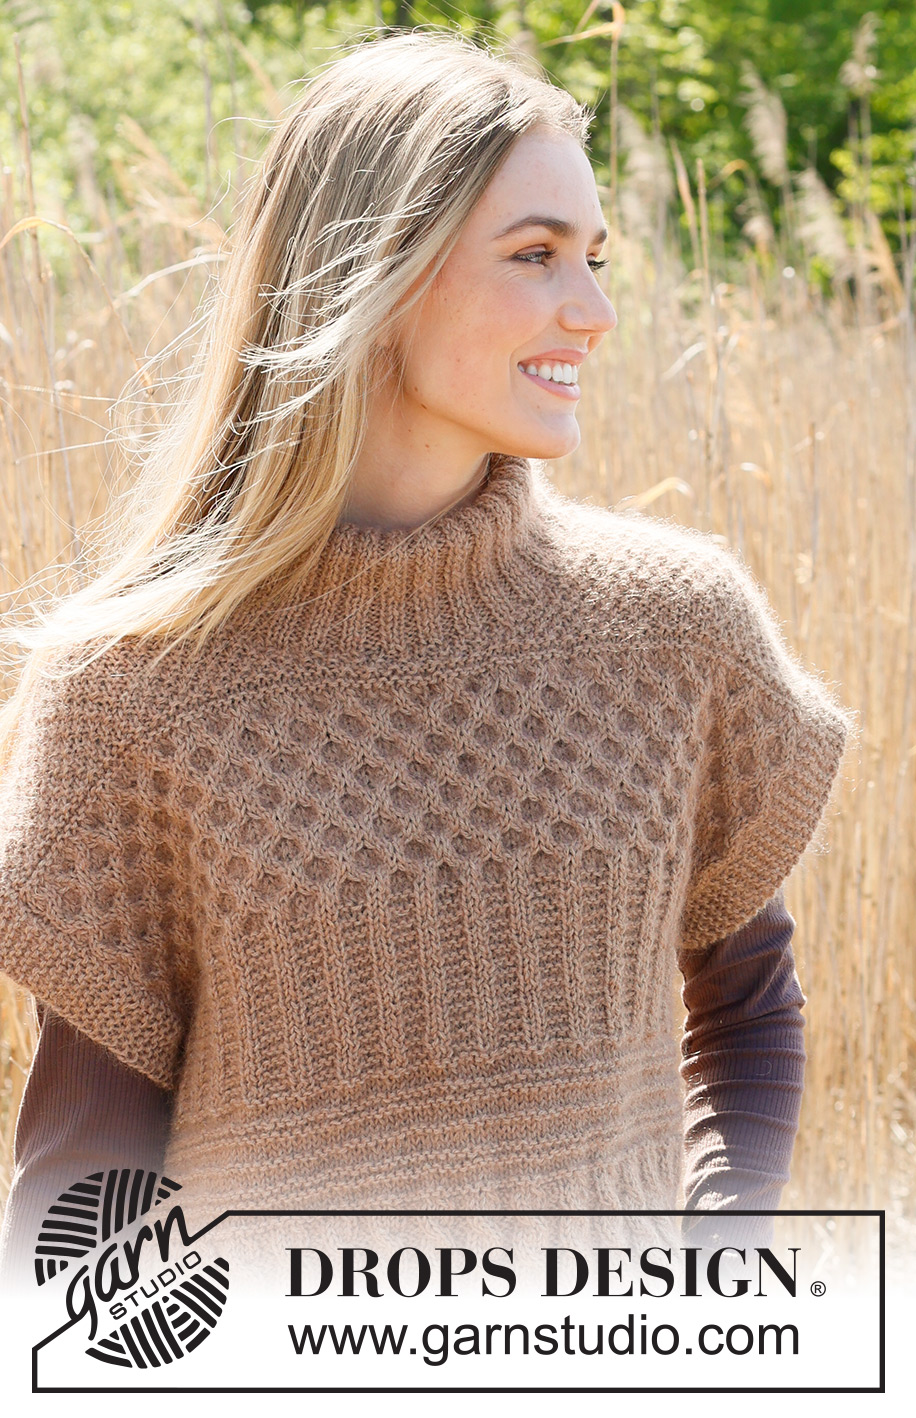
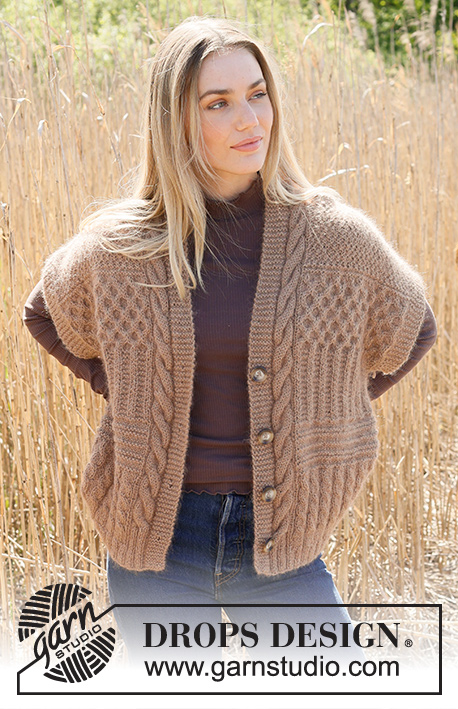
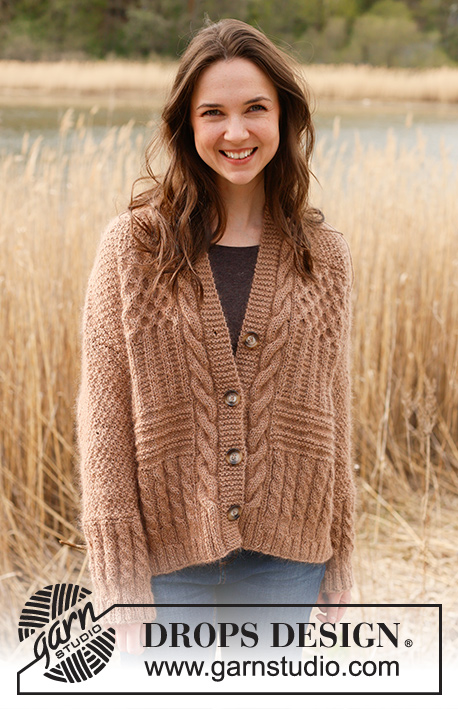
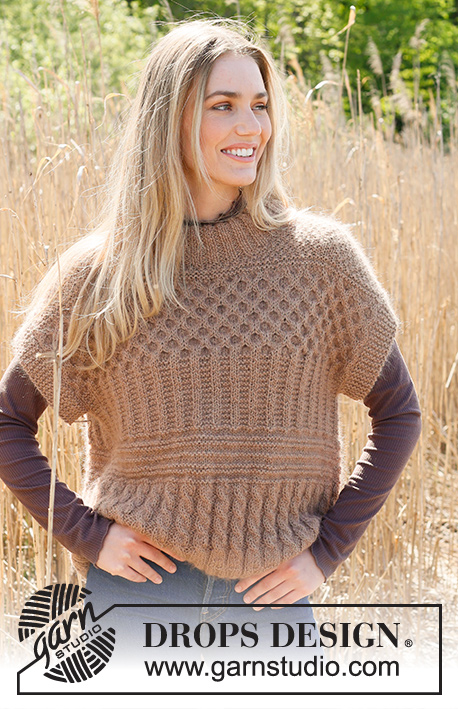
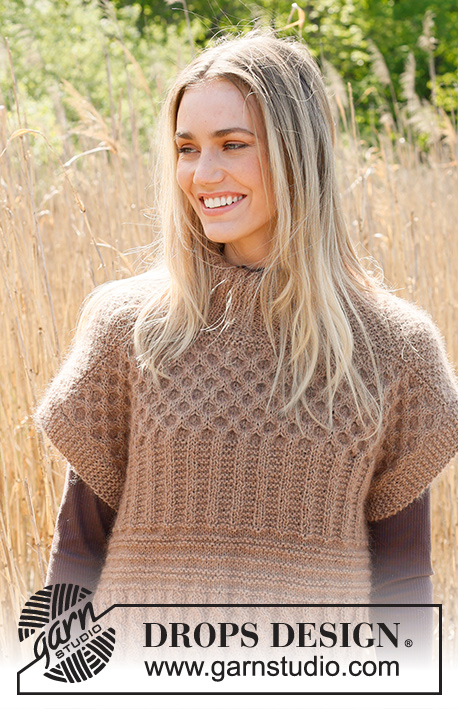
Knitted vest in DROPS Kid-Silk and DROPS Puna / DROPS Merino Extra Fine. Piece is knitted bottom up with textured pattern, ridges, cables, double neck and rib. Size XS – XXL.
DROPS 237-9 |
||||||||||||||||
|
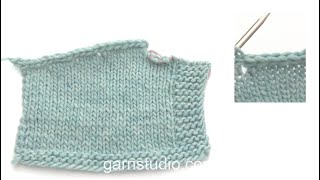
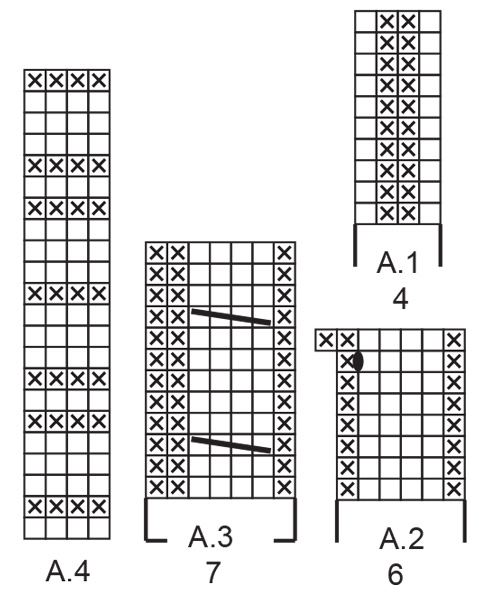
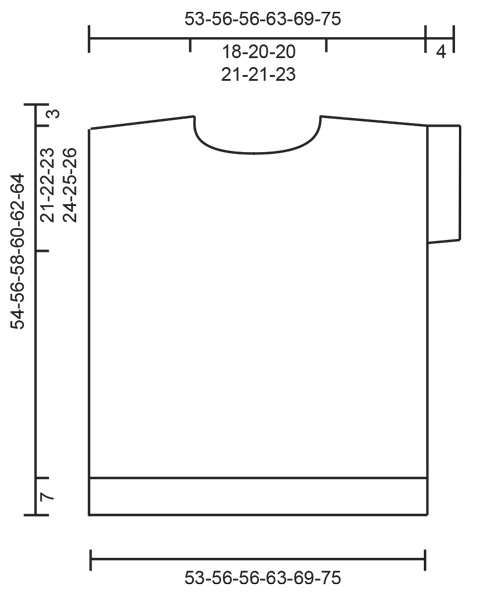
---------------------------------------------------------- EXPLANATION FOR THE PATTERN: ---------------------------------------------------------- GARTER STITCH (back and forth): Knit all rows. 1 ridge vertically = knit 2 rows. PATTERN: See diagrams A.1 to A.8. Diagrams show all rows in pattern seen from the right side. KNIT TOGETHER: FROM RIGHT SIDE: Slip 1 stitch knitwise, knit 1, pass slipped stitch over stitch worked. FROM WRONG SIDE: Purl 2 together. STOCKING STITCH: When working from wrong side, purl and when working from right side, knit. ---------------------------------------------------------- START THE PIECE HERE: ---------------------------------------------------------- VEST – SHORT SUMMARY OF PIECE: Work front and back piece back and forth separately. Finish with a double neck. BACK PIECE: Cast on 98-110-110-122-134-146 stitches on circular needle size 4 mm with 1 strand of each quality (2 strands). Purl 1 row from wrong side. Work next row as follows from right side: 1 edge stitch in GARTER STITCH – read explanation above, work A.1 until 1 stitch remain, 1 stitch in garter stitch. When A.1 has been worked 1 time vertically, work pattern as follows: 1 edge stitch in garter stitch, work A.2 until 1 stitch remains, 1 edge stitch in garter stitch. When A.2 has been worked 1 time vertically, there are 114-128-128-142-156-170 stitches on needle. Switch to circular needle size 5.5 mm. Work pattern as follows: 1 edge stitch in garter stitch, work A.3 until 1 stitch remains, 1 edge stitch in garter stitch. REMEMBER THE KNITTING TENSION! Repeat A.3 vertically until piece measures 16-17-19-19-21-22 cm. Work pattern, begin from right side as follows: 1 edge stitch in garter stitch, work A.4 until 1 stitch remains and decrease at the same time 27-36-36-40-44-48 stitches evenly, 1 edge stitch in garter stitch = 87-92-92-102-112-122 stitches. When A.4 has been worked 1 time vertically, work pattern as follows: 1 edge stitch in garter stitch, work A.5 until 1 stitch remains, 1 edge stitch in garter stitch. Repeat A.5 vertically. When piece measures 30-31-32-33-34-35 cm, cast on 6 new stitches at the end of the next 2 rows = 99-104-104-114-124-134 stitches. Work the new stitches in garter stitch until finished measurements. Continue pattern like this until piece measures 33-35-36-38-39-41 cm. Work pattern, begin from right side as follows: 7 stitches in garter stitch, work A.6 until 7 stitches remain, 7 stitches in garter stitch. When A.6 has been worked 1 time vertically, there are 150-158-158-174-190-206 stitches on needle. Work pattern as follows: 7 stitches in garter stitch, work A.7 until 7 stitches remain, 7 stitches in garter stitch. Work A.7 3 times in total vertically. Piece measures approx. 45-47-48-50-51-53 cm. Work pattern as follows: 7 stitches in garter stitch, work A.8 until 7 stitches remain and decrease at the same time 51-54-54-60-66-72 stitches evenly, 7 stitches in garter stitch = 99-104-104-114-124-134 stitches. When A.8 has been worked 1 time vertically, work A.8a vertically until finished measurements. When piece measures 49-51-53-55-57-59 cm, cast off the middle 27-30-30-32-32-34 stitches for neck and finish each shoulder (36-37-37-41-46-50 stitches) separately. On next row from neck cast off 1 stitch at the beginning of row = 35-36-36-40-45-49 stitches. On next towards the neck cast off the first 7 stitches = 28-29-29-33-38-42 stitches. Then work diagonal shoulder, begin on next row from the neck as follows: * Work pattern as before until 7-7-7-8-9-10 stitches remain, turn and work back *, work from *-* 3 times in total. I.e. work 7-7-7-8-9-10 stitches less on every row from the neck. On last row towards neck, cast on 2 new stitches at the end of row = 30-31-31-35-40-44 stitches. Now work and cast off with an edge over shoulder stitches. Work stitches cast on with shoulder stitches as follows: Work * 1 stitch in STOCKING STITCH – read explanation above, work next stitch together with first/next stitch from shoulder – read KNIT TOGETHER, pass the 2 stitches back on the needle they came from with strand on wrong side of piece, make sure not to tighten yarn too much *, work from *-* until all stitches from shoulder have been worked together with the 2 new stitches that were cast on. Cast off the 2 stitches. Work the other shoulder the same way. FRONT PIECE: Cast on and work as back piece until piece measures 46-48-49-51-52-54 cm = 99-104-104-114-124-134 stitches. Now slip the middle 15-18-18-20-20-22 stitches on a thread for neck and finish each shoulder (42-43-43-47-52-56 stitches) separately. Now cast off stitches for neck on every row from neck as follows: Cast off 2 stitches 2 times in total and 1 stitch 3 times in total = 35-36-36-40-45-49 stitches remain on shoulder. Then work each shoulder as on back piece. ASSEMBLY: Sew shoulder seams inside 1 stitch on edge and sew stitches in garter stitch together. Sew side seams inside 1 edge stitch. DOUBLE COLLAR: Begin in one shoulder seam, pick up approx. 76 to 104 stitches around the neck (including stitches on thread) from right side, on a short circular needle size 4 mm with 1 strand in each quality. Number of stitches must be divisible by 4. Work rib (purl 2/knit 2) over all stitches. When neck measures 14 cm, cast off with knit over knit and purl over purl with circular needle size 5.5 mm (make sure to avoid a tight cast neck-off edge). Fold the rib down on inside of garment. Fasten rib to get a double neck edge. To avoid a tight neck edge that sticks out it is important to keep the seam elastic. |
||||||||||||||||
Diagram explanations |
||||||||||||||||
|
||||||||||||||||
 |
||||||||||||||||
 |
||||||||||||||||
 |
||||||||||||||||
Have you finished this pattern?Tag your pictures with #dropspattern #crackedwalnutsshortsleeve or submit them to the #dropsfan gallery. Do you need help with this pattern?You'll find 33 tutorial videos, a Comments/Questions area and more by visiting the pattern on garnstudio.com. © 1982-2026 DROPS Design A/S. We reserve all rights. This document, including all its sub-sections, has copyrights. Read more about what you can do with our patterns at the bottom of each pattern on our site. |
||||||||||||||||


With over 40 years in knitting and crochet design, DROPS Design offers one of the most extensive collections of free patterns on the internet - translated to 17 languages. As of today we count 324 catalogues and 12290 patterns translated into English (UK/cm). 12290
We work hard to bring you the best knitting and crochet have to offer, inspiration and advice as well as great quality yarns at incredible prices! Would you like to use our patterns for other than personal use? You can read what you are allowed to do in the Copyright text at the bottom of all our patterns. Happy crafting!
Post a comment to pattern DROPS 237-9
We would love to hear what you have to say about this pattern!
If you want to leave a question, please make sure you select the correct category in the form below, to speed up the answering process. Required fields are marked *.