
Popular categories
Looking for a yarn?


Comments / Questions (29)
![]() Alessia wrote:
Alessia wrote:
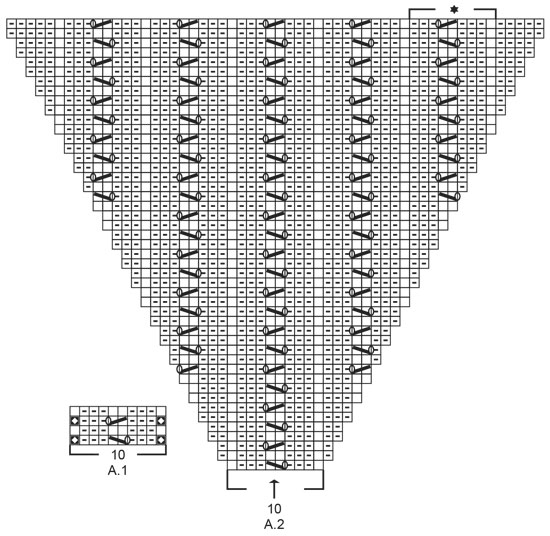
Buongiorno, quando ho finito gli aumenti raglan e devo continuare la lavorazione fino a quando il lavoro non misura 23 cm dal segno del collo (per una L), devo continuare a lavorare anche il motivo A1?
27.05.2020 - 17:34DROPS Design answered:
Buongiorno Alessia. Sì, continua a lavorare il diagramma A.1 fino a quando non divide il lavoro per davanti / dietro e maniche. Buon lavoro!
28.05.2020 - 19:38
![]() Alessia wrote:
Alessia wrote:
Come dovrei fare se volessi allungare la manica e farla lunga?
21.05.2020 - 18:20DROPS Design answered:
Buongiorno Alessia. Per una manica più lunga, prosegue fino alla lunghezza desiderata continuando a diminuire al centro, sotto la manica. Per un'assistenza più personalizzata può contattare il suo rivenditore Drops di fiducia. Buon lavoro!
21.05.2020 - 21:37
![]() Milena wrote:
Milena wrote:
Hallo, kann man die Garne auch online kaufen?
15.05.2020 - 21:10DROPS Design answered:
Liebe Milena, gerne, hier finden Sie die Liste von den DROPS Onlineshop in Deutschland. Viel Spaß beim stricken!
18.05.2020 - 06:58
![]() Maria wrote:
Maria wrote:
Die Jacke gefällt mir sehr gut. Wäre es möglich das Muster der Ärmel auf die gesamte Jacke zu übertragen?
13.04.2020 - 22:54DROPS Design answered:
Liebe Maria, wahrscheinlich, aber leider können wir nicht jede Anleitung nach jeder Wunsch anpassen nor umrechnen. Gerne wird Ihnen aber Ihr DROPS Laden weiterhelfen. Viel Spaß beim stricken!
14.04.2020 - 14:18
![]() GRAELLS wrote:
GRAELLS wrote:
Magnifique raglan, je vais le faire à manches longues et le porter certainement tout l'été!!!
22.03.2020 - 19:58
![]() Gellée wrote:
Gellée wrote:
Comment réaliser une rehausse sur ce gilet ? Et à quelle niveau ?Merci
08.03.2020 - 09:29DROPS Design answered:
Bonjour Mme Gellée, nous ne sommes malheureusement pas en mesure de pouvoir adapter chacun de nos modèles à chaque demande, vous pouvez vous inspirer d'un modèle de même échantillon avec réhausse - pour toute assistance complémentaire, vous pouvez également contacter votre magasin DROPS et/ou un forum de tricot. Bon tricot!
09.03.2020 - 11:21
![]() Angela Italia wrote:
Angela Italia wrote:
Grazie per la vostra risposta prontissima. Il fatto è che, pur sapendo lavorare benissimo a maglia, trovo difficoltà nel capire come e quando fare gli aumenti sul dorso e sulle le maniche. Vedrò di capire meglio e , nel caso io continui ad essere dura di comprendonio, vi riscriverò. Buona fine setimana
07.03.2020 - 14:58
![]() Angela wrote:
Angela wrote:
La lavorazione top down per me è difficile, per cui è possibile eseguire questo lavoro in modo tradizionale? Se possibile come posso fare? Grazie per la vostra professionalità e gentilezza.
06.03.2020 - 17:06DROPS Design answered:
Buongiorno Angela, in quale punto trova difficoltà? Se segue passo passo il modello riuscirà a lavorarlo, e potrà sempre choedere aiuto qui. In ogni caso se lo vuole lavorare bottom up può chiedere un aiuto personalizzato al suo rivenditore DROPS di fiducia. Buon lavoro!
07.03.2020 - 10:10
![]() Lyne wrote:
Lyne wrote:
Les rangs envers sur l'empiecement sont sont ils tricoter en jersey ?
05.02.2020 - 02:59DROPS Design answered:
Bonjour Lyne, les mailles jersey de l'empiècement vont se tricoter à l'envers sur l'envers, en revanche, les rangs envers des diagrammes se tricotent comme le montrent les diagrammes. Bon tricot!
05.02.2020 - 08:26
|
||||||||||||||||||||||
Evening Glow Jacket#eveningglowjacket |
||||||||||||||||||||||
 |
 |
|||||||||||||||||||||
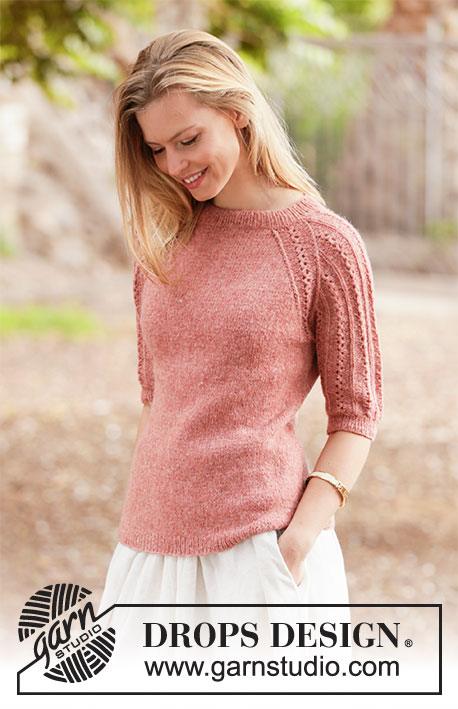
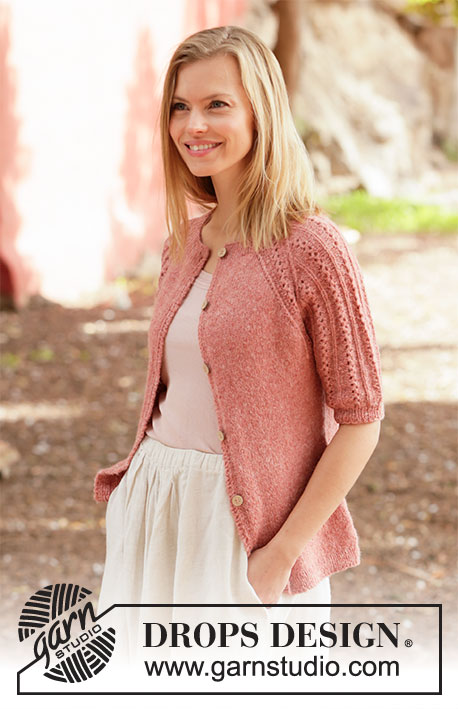
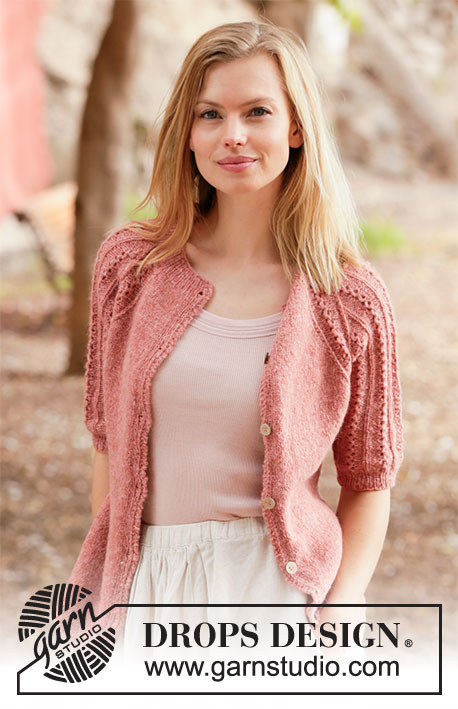
Knitted jacket in DROPS Sky. The piece is worked top down with raglan, short sleeves and lace pattern. Sizes S - XXXL.
DROPS 212-2 |
||||||||||||||||||||||
|
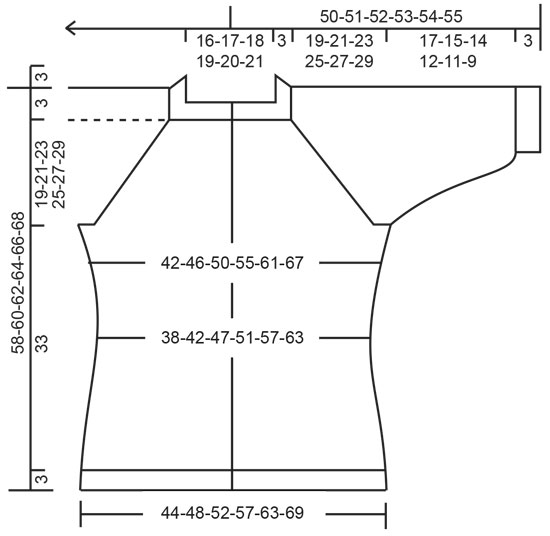
------------------------------------------------------- EXPLANATIONS FOR THE PATTERN: ------------------------------------------------------- RIDGE/GARTER STITCH (worked back and forth): Knit all rows. 1 ridge in height = Knit 2 rows. LEFT BAND (= 6 stitches): Work as follows from the right side: 2 stitches in garter stitch, 1 stitch in stocking stitch, 1 stitch in garter stitch, 1 stitch in stocking stitch, 1 stitch in garter stitch. Continue with garter stitch over garter stitch stocking stitch over stocking stitch. RIGHT BAND (= 6 stitches): Work as follows from the right side: 1 stitch in garter stitch, 1 stitch in stocking stitch, 1 stitch in garter stitch, 1 stitch in stocking stitch and 2 stitches in garter stitch. Continue with garter stitch over garter stitch and stocking stitch over stocking stitch. INCREASE/DECREASE TIP (evenly spaced): To work out how to increase/decrease evenly, count the total number of stitches on needle (e.g. 105 stitches), minus the bands (e.g. 12 stitches) and divide the remaining stitches with number of increases/decreases to be made (e.g. 3) = 31. In this example, increase by making 1 yarn over after each 31st stitch (do not increase on the bands; they are worked as before). On the next row work the yarn overs twisted to avoid holes. When decreasing, knit together each 30th and 31st stitch. PATTERN: See diagrams A.1 (raglan-line) and A.2 (pattern on sleeves). The diagrams show all rows in the pattern seen from the right side. RAGLAN: Increase 1 stitch on each side of the 10 stitches in A.1, in each transition between front/back pieces and sleeves (= 8 stitches increased on an increase-row). Increase by making 1 yarn over. On the next row (wrong side) purl the yarn overs twisted to avoid holes. Then work the new stitches in stocking stitch on the front/back pieces and in A.2 on the sleeves. DECREASE TIP-1 (for sides of body): Decrease 1 stitch on each side of the marker thread as follows: Work until there are 3 stitches left before the marker thread, knit 2 together, knit 2 (marker thread sits between these 2 stitches) slip 1 stitch as if to knit, knit 1 and pass the slipped stitch over the knitted stitch (= 2 stitches decreased). DECREASE TIP-2 (for mid under sleeves): Decrease 1 stitch on each side of the marker thread as follows: Work until there are 3 stitches left before the marker thread, purl 2 together, purl 2 (marker thread sits between these 2 stitches), purl 2 twisted together (= 2 stitches decreased). INCREASE TIP (for sides of body): All increases are worked from the wrong side! Work until there is 1 stitch left before the marker thread, make 1 yarn over, work 2 stitches in stocking stitch (marker thread sits between these 2 stitches) make 1 yarn over (= 2 stitches increased). On the next row (right side) knit the yarn overs twisted to avoid holes. Then work the new stitches in stocking stitch. BUTTONHOLES: Work buttonholes on the right band (when the garment is worn). Work from the right side when there are 4 stitches left on the row as follows: Make 1 yarn over, knit 2 together and work the last 2 stitches in garter stitch. On the next row (wrong side), knit the yarn over to leave a hole. The first buttonhole is worked when the rib on the neck measures approx. 2 cm. Then work the other 5-5-6-6-7-7 buttonholes with approx. 9-9½-8½-9-8-8 cm between each one. CASTING-OFF TIP: To avoid the cast-off edge being tight you can cast off with a larger size needle. If the edge is still tight, make 1 yarn over after approx. each 8th stitch at the same time as casting off and the yarn overs are cast off as normal stitches. ------------------------------------------------------- START THE PIECE HERE: ------------------------------------------------------- JACKET – SHORT OVERVIEW OF THE PIECE: The neck and yoke are worked back and forth with circular needle from mid front and top down. The yoke is divided for body and sleeves and the body continued back and forth. The sleeves are worked in the round with short circular needle/double pointed needles, top down. NECK: Cast on 105-109-113-119-123-127 stitches (including 6 band stitches on each side towards mid front) with circular needle size 3 mm and Sky. Purl 1 row (= wrong side). The next row is worked as follows from the right side: Work LEFT BAND (= 6 stitches) – read description above, * knit 1, purl 1 *, work from *-* until there are 7 stitches left on the row, knit 1 and finish by working RIGHT BAND (= 6 stitches) – read description above. Continue this rib for 3 cm, remember BUTTONHOLES on right band – read description above. NOTE: The bands are worked as described above to finished length. When the rib is finished, knit 1 row from the right side (bands worked as before) where you increase 3-7-7-5-1-5 stitches evenly spaced – read INCREASE/DECREASE TIP = 108-116-120-124-124-132 stitches. Insert 1 marker after the band at the beginning of the row; the yoke will be measured from this marker. Change to circular needle size 4 mm and purl 1 row from the wrong side with 6 band stitches on each side as before (yarn overs are purled twisted). Then work the yoke as described below. REMEMBER THE KNITTING TENSION! YOKE: Insert 4 marker threads in the piece as described below (without working the stitches): Count 20-22-23-24-24-26 stitches (= left front piece), insert 1 marker thread before the next stitch, count 20 stitches (= sleeve), insert 1 marker thread before the next stitch, count 28-32-34-36-36-40 stitches (= back piece), insert 1 marker thread before the next stitch, count 20 stitches (= sleeve), insert 1 marker thread before the next stitch. There are 20-22-23-24-24-26 stitches on the right needle after the last thread. On the next row begin the pattern as described below, AT THE SAME TIME increase to RAGLAN – read description above. Work the next row as follows from the right side: Work 6 band stitches as before, 9-11-12-13-13-15 stitches in stocking stitch, increase 1 stitch to raglan, work A.1 (= 10 stitches with marker thread in the middle), increase 1 stitch to raglan, work A.2 (= 10 stitches), increase 1 stitch to raglan, work A.1 (= 10 stitches with marker thread in the middle), increase 1 stitch to raglan, work 18-22-24-26-26-30 stitches in stocking stitch, increase 1 stitch to raglan, work A.1 (= 10 stitches with marker thread in the middle), increase 1 stitch to raglan, work A.2 (= 10 stitches), increase 1 stitch to raglan, work A.1 (= 10 stitches with marker thread in the middle), increase 1 stitch to raglan, work 9-11-12-13-13-15 stitches in stocking stitch and finish with 6 band stitches as before. Continue this pattern and increase to raglan every 2nd row (i.e. each row from the right side) a total of 23-25-29-33-37-40 times in height including the increase on the first row. NOTE: The increased stitches on the sleeves are worked into the pattern until there are a total of 5-5-7-7-7-7 repeats in width across the sleeve, then the next increased stitches are purled from the right side and knitted from the wrong side to finished length (A.2 shows the sleeves with all the increases in size S). After the last increase to raglan there are 292-316-352-388-420-452 stitches on the needle. Continue working without further increases until the piece measures 19-21-23-25-27-29 cm from the marker on the neck. Now divide the yoke for the body and sleeves by working the next row as follows: Work 46-50-55-60-66-72 stitches as before (= front piece), place the next 60-64-72-80-84-88 stitches on 1 thread for the sleeve, cast on 8 new stitches on the needle (= in side under the sleeve), work 80-88-98-108-120-132 stitches as before (= back piece), place the next 60-64-72-80-84-88 stitches on 1 thread for the sleeve, cast on 8 new stitches on the needle (= in side under the sleeve) and work the remaining 46-50-55-60-66-72 stitches as before (= front piece). Body and sleeves are finished separately. BODY: = 188-204-224-244-268-292 stitches. Insert 1 marker thread 50-54-59-64-70-76 stitches in from each side (= sides of body). There are 88-96-106-116-128-140 stitches between marker threads on the back piece. Allow the threads to follow your work onwards; they will be used when decreasing and increasing in the sides. Continue back and forth with stocking stitch and 6 band stitches on each side towards mid front as before. When the piece measures 3 cm from the division, decrease 1 stitch on each side of both marker threads – read DECREASE TIP-1 (= 4 stitches decreased). Decrease like this every 3 cm a total of 4 times on each side = 172-188-208-228-252-276 stitches. Continue working until the piece measures 16 cm from the division. On the next row from the wrong side increase 1 stitch on each side of both marker threads – read INCREASE TIP (= 4 stitches increased). Increase like this every 2½ cm a total of 6 times on each side = 196-212-232-252-276-300 stitches. Continue working until the piece measures 33 cm from the division (there is approx. 3 cm left to finished length; you can try the jacket on and work to desired length). Change to circular needle size 3 mm. Knit 1 row from the right side (bands worked as before) and increase at the same time 37-41-45-49-53-57 stitches evenly spaced – remember INCREASE/DECREASE TIP = 233-253-277-301-329-357 stitches. Work rib as follows from the wrong side: 6 band stitches as before, * purl 1, knit 1 *, work from *-* until there are 7 stitches left on the row, purl 1 and finish with 6 band stitches as before. Continue this rib for 3 cm. Cast off with garter stitch over garter stitch, knit over knit and purl over purl – read CASTING-OFF TIP! The jacket measures approx. 58-60-62-64-66-68 cm from the shoulder down. SLEEVES: Place the 60-64-72-80-84-88 stitches from the thread on the one side of the piece on short circular needle size 4 mm and knit up 1 stitch in each of the 8 stitches cast on under the sleeve = 68-72-80-88-92-96 stitches. Insert a marker thread in the middle of the 8 stitches under the sleeve. Allow the thread to follow your work onwards; it will be used when decreasing under the sleeve. Start the round at the marker thread and continue the pattern in the round with A.2 over the middle 46-46-64-64-64-64 stitches on top of the sleeve and the remaining 22-26-16-24-28-32 stitches purled. When the sleeve measures 2 cm from the division in all sizes, decrease 2 stitches mid under the sleeve – read DECREASE TIP-2. Decrease like this every 3-2-1½-1-½-½ cm a total of 5-6-8-10-12-13 times = 58-60-64-68-68-70 stitches. Continue working until the sleeve measures 17-15-14-12-11-9 cm from the division (there is approx. 3 cm left to finished length; you can try the jacket on and work to desired length). NOTE: Shorter measurements in larger sizes due to wider neck and longer yoke. Knit 1 row where you decrease 6-6-8-10-8-8 stitches evenly spaced – remember INCREASE/DECREASE TIP = 52-54-56-58-60-62 stitches. Change to double pointed needles size 3 mm and work rib in the round (= knit 1, purl 1) for 3 cm. Cast off with knit over knit and purl over purl – read CASTING-OFF TIP! The sleeve measures approx. 20-18-17-15-14-12 cm from the division. Work the other sleeve in the same way. ASSEMBLY: Sew buttons onto left band. |
||||||||||||||||||||||
Diagram explanations |
||||||||||||||||||||||
|
||||||||||||||||||||||
 |
||||||||||||||||||||||
 |
||||||||||||||||||||||
Have you finished this pattern?Tag your pictures with #dropspattern #eveningglowjacket or submit them to the #dropsfan gallery. Do you need help with this pattern?You'll find 30 tutorial videos, a Comments/Questions area and more by visiting the pattern on garnstudio.com. © 1982-2026 DROPS Design A/S. We reserve all rights. This document, including all its sub-sections, has copyrights. Read more about what you can do with our patterns at the bottom of each pattern on our site. |
||||||||||||||||||||||


With over 40 years in knitting and crochet design, DROPS Design offers one of the most extensive collections of free patterns on the internet - translated to 17 languages. As of today we count 324 catalogues and 12290 patterns translated into English (UK/cm). 12290
We work hard to bring you the best knitting and crochet have to offer, inspiration and advice as well as great quality yarns at incredible prices! Would you like to use our patterns for other than personal use? You can read what you are allowed to do in the Copyright text at the bottom of all our patterns. Happy crafting!
Post a comment to pattern DROPS 212-2
We would love to hear what you have to say about this pattern!
If you want to leave a question, please make sure you select the correct category in the form below, to speed up the answering process. Required fields are marked *.