
Popular categories
Looking for a yarn?


Comments / Questions (31)
![]() Creations wrote:
Creations wrote:
Hello Please can you explain the purpose of decreasing some stitches at the top of the sleeve just before the bind off row? I have not come across this before and wondering what the reason is for it. Thank you
01.01.2025 - 19:19DROPS Design answered:
Hi, this decrease is used when we work cables. Otherwise the edge could be too long. Happy knitting!
01.01.2025 - 19:57
![]() Renata wrote:
Renata wrote:
Ik heb deze trui gebreid en ben er blij mee. Naar om hem goed passend te krijgen voor mij heb ik het patroon in S aangehouden, maat wel lengte van de maat L aan moeten houden. Normaal gebruik ik meestal patroon in maat L.
02.05.2023 - 08:13
![]() Pat Miller wrote:
Pat Miller wrote:
I've just completed the 2nd sleeve (without looking at the 1st sleeve or photo) and realised I've knitted the stitches in underarm section in garter stitch instead of stocking stitch - aargh! I have to re-do the 2nd sleeve now. It would help if there was a clearer photo of the underside of the arms. Also, I'm puzzled as to why the section at the side of ' ... A.4 (= 5 stitches), ...' doesn't have any garter stitch at all on the photo (I have a column of 3 garter stitches at side of A.4)?
29.12.2022 - 14:04DROPS Design answered:
Dear Mrs Miller, there was a mistake in the English pattern sorry for that, you should work stocking stitch instead of garter stitch inside the edge stitches in garter stitch - pattern has now been fixed, thanks for noticing. Happy knitting!
02.01.2023 - 11:56
![]() Mª José Alberto Cantizano wrote:
Mª José Alberto Cantizano wrote:
Buenas tardes, hay dos simbolos que se repiten, hay que corregirlo= colocar 2 puntos en la aguja para trenzar detrás de la labor, 2 derechos, 2 derechos desde la aguja para trenzar. Además en el tip para los aumentos de las mangas los aumentos se trabajan en punto jersey, cuando los puntos junto al punto de orillo son en punto musgo, ¿está correcto? o se trabajan en punto musgo los aumentos?
03.12.2022 - 19:25
![]() Anne BERNARD wrote:
Anne BERNARD wrote:
Bonjour Merci pour votre réponse mais je ne comprends pas les histoires de groupe pour les fils.Il faut multiplier le nombre de pelotes par le métrage de la première qualité et diviser par le nombre de métrage de la 2ème ? Désolé
17.10.2022 - 10:50DROPS Design answered:
Bonjour Mme Bernard, tous nos fils à tricoter sont classés par "groupes" - retrouvez-les ici, ainsi, vous pouvez changer la laine à l'intérieur d'un même groupe (ou jouer avec les groupes comme indiqué), et donc vous pourrez utiliser ici soit un fil du même groupe qu'Alaska = groupe C ou 2 fils du groupe A - utilisez notre convertisseur pour voir les alternatives possibles. Bon tricot!
17.10.2022 - 11:22
![]() Anne BERNARD wrote:
Anne BERNARD wrote:
Bonjour si je commande de la laine sky pour ce modèle en xl ou xxl combien de pelotes me faut-il ? Merci
16.10.2022 - 12:12DROPS Design answered:
Bonjour Mme Bernard, Sky appartient au groupe B de nos laines alors que ce modèle se tricote en Alaska, laine du groupe E; utilisez notre convertisseur pour voir les alternatives possibles ainsi que la nouvelle quantité correspondante. Bon tricot!
17.10.2022 - 09:58
![]() Debra wrote:
Debra wrote:
Hi I'm doing this pattern in Drops ALPACA BOUCLÉ GROUP C I would like to know if it is possible to use 2 threads together to make the jumper thicker I would like to say thankyou for all your patterns and also thankyou in advance for your time and effort in answering this 😊
21.09.2022 - 12:11DROPS Design answered:
Dear Debra, this pattern is worked with a yarn group C: Alaska, and you can use Alpaca Bouclé instead, but if you work with double strands, you will loose the tension 16 sts x 20 rows in stocking stitch = 10 x10 cm. You might have to re-calculate the pattern to match your new tension. Or maybe rather search for a pattern worked in yarn group E where you can use 2 strands yarn group C. Happy knitting!
21.09.2022 - 17:09
![]() Pat wrote:
Pat wrote:
Can you tell me if a 'ridge' on the front shoulder piece is all garter stitch or is still following the pattern stitch diagram please? The text I'm referring to is: 'Then work 1 ridge where you decrease 4 stitches evenly spaced on the first row = 37-40-42-48-56-59 stitches.' I can't really tell from looking at the photographs of the jumper. Many thanks, Pat
27.08.2022 - 19:23DROPS Design answered:
Dear Pat, a ridge is just 2 knitted rows (in garter stitch). You need to decrease the 4 stitches in the first one of the two knitted rows. Happy knitting!
27.08.2022 - 20:13
![]() Marianne wrote:
Marianne wrote:
Hei. Vil gjerne strikke denne, men det er ikke diagrammer på nett siden. Kan dere hjelpe meg? Mvh Marianne
01.04.2021 - 09:50
![]() Suzie wrote:
Suzie wrote:
Bonjour, Je suis rendue aux emmanchures du dos en taille L et je n'arrive pas à trouver le nombre de mailles qu'il faut tricoter en A.1 et A.9. Aussi faut-il faire une maille jersey après la maille lisière? Merci à l'avance.
23.02.2021 - 23:23DROPS Design answered:
Bonjour Suzie, quand vous avez rabattu 3 m de chaque côté (= 1 m lis, 1 m jersey, la 1ère m du premier A.1/la dernière m du dernier A.9 vu sur l'endroit), continuez avec 1 m lis au point mousse et tricotez les mailles de A.1 et A.9 restantes comme avant = il reste 2 m dans le 1er A.1/le dernier A.9, mais vous tricotez la 1ère et la dernière m du rang au point mousse (mailles lisières), il reste la 3ème m de A.1 = 1 m jersey endroit et la 1ère m de A.9 (vu sur l'endroit): 1 m jersey. Vous aurez donc: 1 m point mousse, 1 m jersey, 3 x A.1 ... et terminez par 3 x A.9, 1 m jersey, 1 m point mousse. Bon tricot!
24.02.2021 - 07:51
|
||||||||||||||||||||||||||||||||||
Mists of Time#mistsoftimesweater |
||||||||||||||||||||||||||||||||||
 |
 |
|||||||||||||||||||||||||||||||||
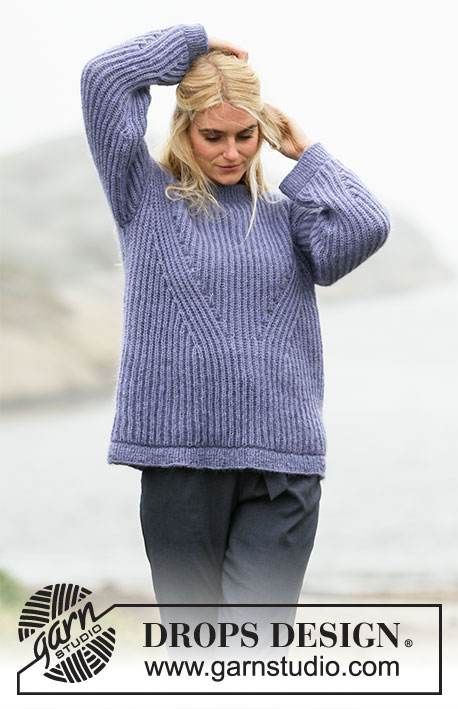
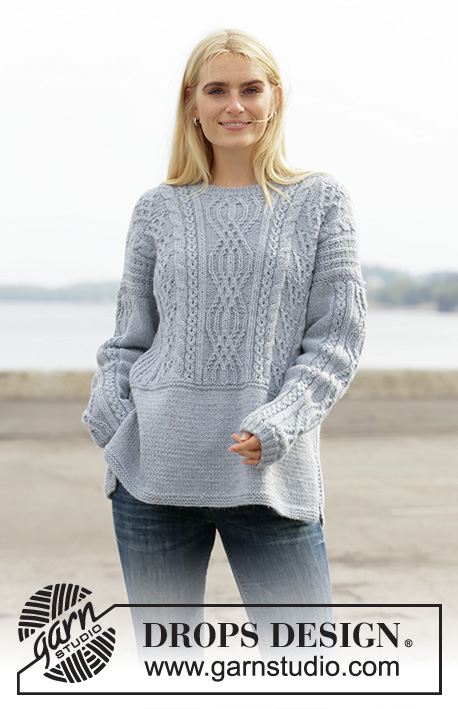
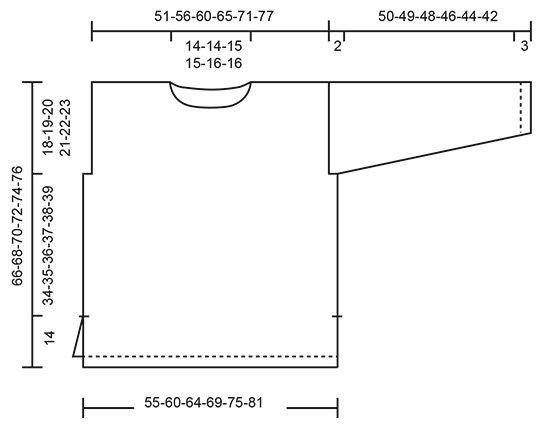
Knitted jumper in DROPS Alaska. The piece is worked with cables and texture. Sizes S - XXXL.
DROPS 205-28 |
||||||||||||||||||||||||||||||||||
|
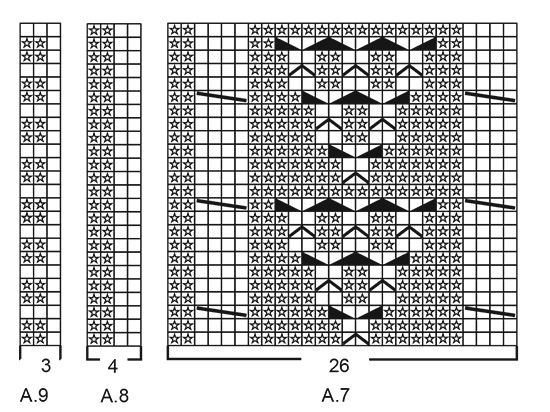
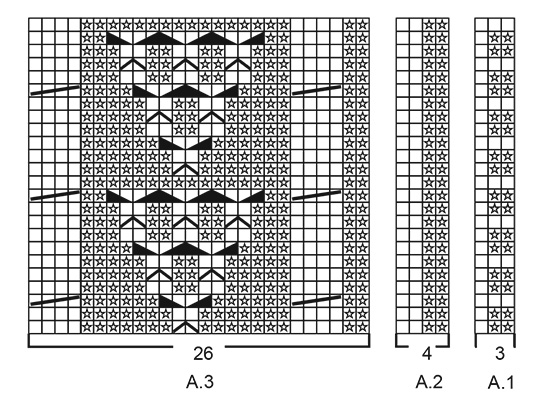
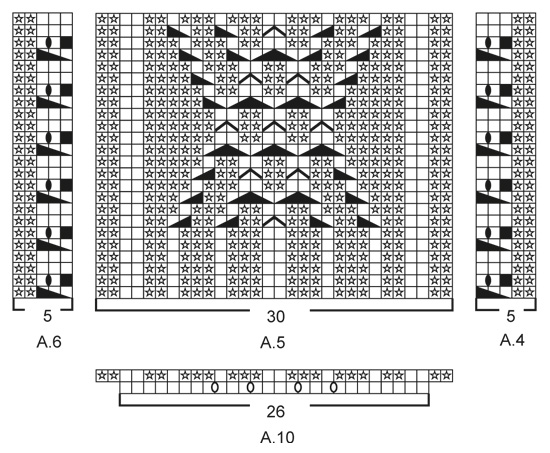
------------------------------------------------------- EXPLANATIONS FOR THE PATTERN: ------------------------------------------------------- RIDGE/GARTER STITCH (worked back and forth): Knit all rows. 1 ridge in height = Knit 2 rows. INCREASE TIP-1 (evenly spaced): To work out how to increase evenly, count the total number of stitches on needle (e.g. 90 stitches) and divide by the number of increases to be made (e.g. 24) = 3.75. In this example, increase by making 1 yarn over after approx. each 4th stitch. On the next row work the yarn overs twisted to avoid holes. PATTERN: See diagrams A.1 to A.10. Diagrams A.2 and A.8 apply only to sizes XXL and XXXL. DECREASE TIP: Decrease 1 stitch by purling 2 stitches together (decrease on a purled section). INCREASE TIP (for sleeves): All increases worked from the right side! Increase 1 stitch by making 1 yarn over. On the next row work the yarn over twisted to avoid a hole. The increased stitches are worked in stocking stitch. RIDGE/GARTER STITCH (worked in the round): 1 ridge = 2 rounds. Ie, knit 1 round and purl 1 round. ------------------------------------------------------- START THE PIECE HERE: ------------------------------------------------------- JUMPER - SHORT OVERVIEW OF THE PIECE: The piece is worked back and forth in sections and sewn together to finish. The sleeves are worked back and forth. The neck is worked in the round. BACK PIECE: Cast on 88-96-102-110-120-130 stitches with circular needle size 5 mm and Alaska. Work 3 RIDGES – read description above. Change to circular needle size 5.5 mm and work stocking stitch with 3 edge stitches in garter stitch on each side. REMEMBER THE KNITTING TENSION! When the piece measures 14 cm cast on 1 new stitch at the end of the next 2 rows (mark the split) = 90-98-104-112-122-132 stitches. Then work stocking stitch with 1 edge stitch in garter stitch on each side of the piece. When the piece measures approx. 18-19-19-20-20-21 cm – adjust to after a row from the wrong side and change to circular needle size 5 mm. Work 2 ridges – on the last row in the ridges increase 24-22-22-26-34-30 stitches evenly spaced – read INCREASE TIP = 114-120-126-138-156-162 stitches. SIZES S-M-L-XL: Change back to circular needle size 5.5 mm. Then work pattern as follows – from the right side: 1 edge stitch in garter stitch, 1 stitch in stocking stitch, A.1 (= 3 stitches) a total of 3-4-5-7 times, A.3 (= 26 stitches), A.4 (= 5 stitches), A.5 (= 30 stitches), A.6 (= 5 stitches), A.7 (= 26 stitches), A.9 (= 3 stitches) a total of 3-4-5-7 times, 1 stitch stocking stitch and 1 edge stitch in garter stitch. SIZES XXL-XXXL: Change back to circular needle size 5.5 mm. Then work pattern as follows – from the right side: 1 edge stitch in garter stitch, 1 stitch in stocking stitch, A.1 (= 3 stitches) a total of 7-8 times, A.2 (= 4 stitches), A.4 (= 5 stitches), A.3 (= 26 stitches), A.4 (= 5 stitches), A.5 (= 30 stitches), A.6 (= 5 stitches), A.7 (= 26 stitches), A.6 (= 5 stitches), A.8 (= 4 stitches), A.9 (= 3 stitches) a total of 7-8 times, 1 stitch in stocking stitch and 1 edge stitch in garter stitch. ALL SIZES: Continue this pattern and repeat the diagrams in height. When the piece measures 48-49-50-51-52-53 cm cast off 3-3-3-3-3-3 stitches at the beginning of the next 2 rows for the armholes = 108-114-120-132-150-156 stitches. Continue the pattern as before with 1 edge stitch in garter stitch on each side of the piece. When the piece measures 63-65-67-69-71-73 cm decrease (purled) 4 stitches evenly over the middle 22 stitches - read DECREASE TIP = 104-110-116-128-146-152 stitches. On the next row from the right side cast off the middle 20-20-22-22-24-24 stitches for neck and each shoulder is finished separately = 42-45-47-53-61-64 stitches. Then cast off 1 stitch on the next row from the neck = 41-44-46-52-60-63 stitches on shoulder. Continue working until the piece measures approx. 65-67-69-71-73-75 cm – adjust so you finish after a row from the wrong side. Then work 1 ridge where you decrease 4 stitches evenly spaced on the first row = 37-40-42-48-56-59 stitches. Knit 1 row from the right side and cast off with knit from the wrong side – make sure the cast-off edge is not tight! Work the other shoulder in the same way. FRONT PIECE: Cast on and work in the same way as the back piece. When the piece measures 57-59-61-62-64-66 cm work the next row as follows: Work the first 47-50-52-58-67-70 stitches as before, work the next 14-14-16-16-16-16 stitches at the same time as you decrease(purled) 4 stitches evenly spaced and then place these stitches on a thread for neck (= 10-10-12-12-12-12 stitches on thread) and work the remaining 47-50-52-58-67-70 stitches as before. Then cast off for neck on each row from the neck as follows: Cast off 2 stitches 2 times and 1 stitch 2-2-2-2-3-3 times = 41-44-46-52-60-63 stitches. Continue working until the piece measures approx. 65-67-69-71-73-75 cm – adjust so you finish after a row from the wrong side. Then work 1 ridge where you decrease 4 stitches evenly spaced on the first row = 37-40-42-48-56-59 stitches. Knit 1 row from the right side and cast off with knit from the wrong side – make sure the cast-off edge is not tight! Work the other shoulder in the same way. SLEEVE: The sleeve is worked back and forth with circular needle. Cast on 38-38-41-41-44-44 stitches (including 1 edge stitch on each side) with circular needle size 5 mm and Alaska. Work as follows from the right side: 1 edge stitch in garter stitch, (knit 1/ purl 2) until there is 1 stitch left and 1 edge stitch in garter stitch. Continue this rib for 3 cm. Change to circular needle size 5.5 mm, purl 1 row from the wrong side and increase 4-6-5-5-4-6 stitches evenly spaced = 42-44-46-46-48-50 stitches. The next row is worked as follows – from the right side: 1 edge stitch in garter stitch, 2-3-4-4-5-6 stitches in stocking stitch, A.4 (= 5 stitches), A.10 (= 26 stitches), A.6 (= 5 stitches), 2-3-4-4-5-6 stitches in stocking stitch and 1 edge stitch in garter stitch. When A.10 has been worked in height there are 46-48-50-50-52-54 stitches on the needle. Continue with A.5 (= 30 stitches) over A.10; the remaining stitches are continued as before. Repeat A.5 in height. When the piece measures 7-8-8-7-6-7 cm increase 1 stitch inside the 1 edge stitch on each side – read INCREASE TIP. Increase like this every 3½-3-3-2½-2½-2 cm a total of 12-13-13-15-15-16 times = 70-74-76-80-82-86 stitches. When the piece measures 48-47-46-44-42-40 cm insert 1 marker on both sides of the piece. They mark where the sleeve will be sewn to the armhole (marker = side seam on jumper). Continue working until the sleeve measures 49-48-47-45-43-41 cm. Then decrease (purled) 4 stitches evenly on A.5 from the right side = 66-70-72-76-78-82 stitches. Cast off on the next row from the right side. The sleeve measures 50-49-48-46-44-42 cm (shorter measurements in larger sizes due to longer yoke). Work the other sleeve in the same way. ASSEMBLY: Sew the shoulders seams with grafting stitches inside the cast-off edge. Sew in the sleeves and sew the bottom of the armholes (marker on the sleeve should match the side seam on the body). Sew the sleeve seams and side seams in one go inside the 1 edge stitch as far as the 1 edge stitch on the front/back piece (= approx. 14 cm split). NECK: The neck is worked in the round. Start from the right side and knit up 60-60-63-66-69-69 stitches (including the stitches from the thread on the front) with circular needle size 5 mm. Work rib (= knit 1 / purl 2) for 3 cm. Cast off with knit over knit and purl over purl. |
||||||||||||||||||||||||||||||||||
Diagram explanations |
||||||||||||||||||||||||||||||||||
|
||||||||||||||||||||||||||||||||||
 |
||||||||||||||||||||||||||||||||||
 |
||||||||||||||||||||||||||||||||||
 |
||||||||||||||||||||||||||||||||||
 |
||||||||||||||||||||||||||||||||||
Have you finished this pattern?Tag your pictures with #dropspattern #mistsoftimesweater or submit them to the #dropsfan gallery. Do you need help with this pattern?You'll find 29 tutorial videos, a Comments/Questions area and more by visiting the pattern on garnstudio.com. © 1982-2026 DROPS Design A/S. We reserve all rights. This document, including all its sub-sections, has copyrights. Read more about what you can do with our patterns at the bottom of each pattern on our site. |
||||||||||||||||||||||||||||||||||


With over 40 years in knitting and crochet design, DROPS Design offers one of the most extensive collections of free patterns on the internet - translated to 17 languages. As of today we count 324 catalogues and 12290 patterns translated into English (UK/cm). 12290
We work hard to bring you the best knitting and crochet have to offer, inspiration and advice as well as great quality yarns at incredible prices! Would you like to use our patterns for other than personal use? You can read what you are allowed to do in the Copyright text at the bottom of all our patterns. Happy crafting!
Post a comment to pattern DROPS 205-28
We would love to hear what you have to say about this pattern!
If you want to leave a question, please make sure you select the correct category in the form below, to speed up the answering process. Required fields are marked *.