
Popular categories
Looking for a yarn?


Comments / Questions (16)
![]() Nicole Blouin-Morin wrote:
Nicole Blouin-Morin wrote:
Dans le patron, je ne vois pas d'indication pour séparer les mailles destinées aux devants, dos, manches combien pour chaque partie? Où placer les marqueurs?
05.05.2021 - 02:35DROPS Design answered:
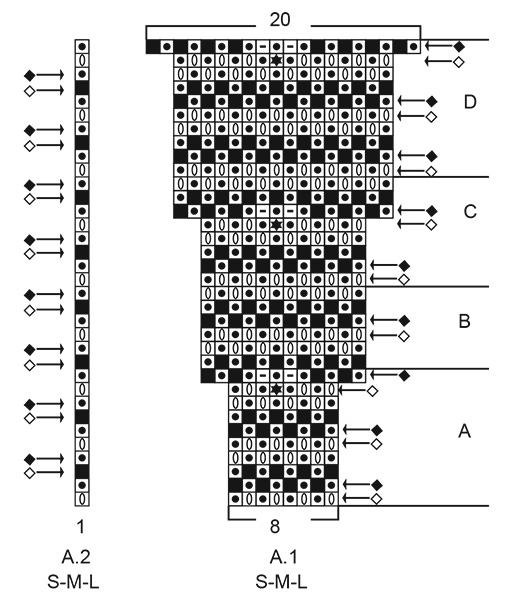
Bonjour Mme Blouin-Morin, cette partie figure à la fin de l'empiècement (dernier paragraphe) qui commence par: Tricoter les 25-25-27-30-33-36 premières mailles comme avant (= devant), glisser 30-30-36-34-40-46 mailles suivantes en attente sur 1 fil pour la manche, ... . À quels marqueurs pensez-vous? On n'en place pas pour l'empiècement, mais vous pouvez en mettre pour délimiter les diagrammes A.1 puis A.3 pour mieux vous repérer. Bon tricot!
05.05.2021 - 08:41
![]() Sylvia wrote:
Sylvia wrote:
Ich hab ein Problem mit dem Übergang von A1 und A2 zu A3 und A4. Wenn ich mich genau an die Anleitung halte, geht das Patentmuster verloren. Soll ich da dann schon ab hier das einfarbige Patentmuster Stricken? Und später wieder zu, Diagramm wechseln
23.03.2021 - 08:41DROPS Design answered:
Liebe Sylvia, A.1 wird wiederholt und A.2 wird nur einmal, vor der Blende gestrickt, A.2 wird gestrickt wie die 1. Masche in A.1, so wir das Muster symetrisch an den Blenden. Gleichfalls mit A.3 und A.4, bei den Hinreihen wiederholen Sie A.3 und enden mit A.4, A.4 wird wie die 1. M in A.3 gestrickt so wird das Muster auch symetrisch. Viel Spaß beim stricken!
24.03.2021 - 08:44
![]() Donatella Torcoletti wrote:
Donatella Torcoletti wrote:
Buongiono ho bisogno di un chiarimento. In riferimento ai diagrammi A1 e A2 quando finisco il ferro diritto corrispondente alla riga 1 e faccio scorrere le maglie in modo che ne lavoro ancora uno a diritto, questo ferro corrisponde alla riga due del diagramma? Grazie per l'attenzione
12.11.2020 - 11:01DROPS Design answered:
Buongiorno Donatella, è corretto. Buon lavoro!
13.11.2020 - 15:49
![]() Anne Helseth wrote:
Anne Helseth wrote:
Jag har nu kommit till diagram A3 och A4. Ser det är frågat om detta tidigare, men tycker inte det verkar riktigt att man ska sticka två stickor från avigsidan och sedan två stickor från rätsida. Det blir ju så många extra trådar att fästa, förstår att det måste göras när det är två färger, men inte när det är en färg
25.08.2020 - 21:53DROPS Design answered:
Hej Anne, du har ret, det behøver du ikke gøre når Hoved og Bifarve er samme. God fornøjelse!
03.09.2020 - 12:06
![]() Gitte wrote:
Gitte wrote:
På bærestykket er jeg nået til striber A.3 og A.4 str. XXL. Jeg skal starte fra vrangen med marineblå = helt ok. Iflg. diagram A.4 skal 2. pind også være fra vrangen og med marineblå? Skal jeg bryde garnet og strikke en vrangpind igen? Hvordan strikker jeg når flere pinde skal være samme hovedfarve? Strikker man frem og tilbage eller er det 2 pinde ret og 2 pinde vrang og så skal man bryde garnet?
09.02.2020 - 08:46DROPS Design answered:
Hei Gitte. På alle diagram i denne oppskriften er det markert hvor du skal starte og med hvilken farge (hoved eller bifarge) og fra hvilken side (rett eller vrang). Det er markert med hvit eller sort "diamant" og med pil. God Fornøyelse!
10.02.2020 - 19:26
![]() May-Britt Blomli wrote:
May-Britt Blomli wrote:
Hei, strikker urban Autumn jacket i str S. Skal nå strikke ermene, men det får ikke mønsteret til å stemme overens med resten av jakken. Ser på bildet at mønsteret skal kunne gå rett over fra jakken til ermene. Har dere noen tips/hjelp?
04.02.2020 - 16:27DROPS Design answered:
Hei May-Britt, Når du begynner på ermene, fortsetter med neste rad i mønsteret fra der du delte bærestykke til ermene og bolen. God fornøyelse!
05.02.2020 - 07:55
![]() Bente wrote:
Bente wrote:
Beste, Zou het kunnen dat er een fout in het patroon zit? Is er een gecorrigeerde versie? Bente
06.01.2020 - 18:26DROPS Design answered:
Dag Bente,
Als er correcties op een patroon zijn, worden deze gelijk doorgevoerd in het online patroon. Dit patroon heeft geen correcties.
08.01.2020 - 09:59
![]() Maj-Britt Vollesen wrote:
Maj-Britt Vollesen wrote:
Jeg fik den 5/12 en mail om at jeg har fået svar på mit sidste råb om hjælp . Jeg skrev tilbage med det samme at der ikke VAR noget svar !!!! Og nu sidder jeg her - 5 dage senere og ved ikke hvordan jeg skal komme videre .
10.12.2019 - 21:17
![]() Maj-Britt Vollesen wrote:
Maj-Britt Vollesen wrote:
Jeg prøver igen !! Skrev til jer for 2 dage siden. Mit problem er A3og A4. Der hjælper den video I henviser til IKKE (. Jeg kan godt A1 og 2 nu ) Jeg skal strikke ensfarvede striber. Kan ikke få diagrammet til at passe( til A 3 og 4) . Starter og gennemfører 1 pind på vrangen men så passer pind 2 ikke + at de 5 kantmasker får en stribe af den foregående farve .
05.12.2019 - 03:14
![]() Maj-Britt Vollesen wrote:
Maj-Britt Vollesen wrote:
Jeg kan ikke finde ud af at udføre : strik 5 masker i retmasken !!!
12.11.2019 - 01:16DROPS Design answered:
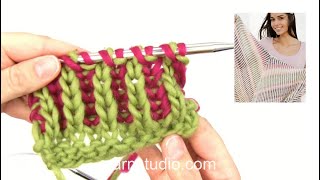
Hej Maj-Britt. Vi har en video på detta, se här. Lycka till!
12.11.2019 - 08:52
|
||||||||||||||||||||||
Urban Autumn Jacket#urbanautumnjacket |
||||||||||||||||||||||
 |
 |
|||||||||||||||||||||
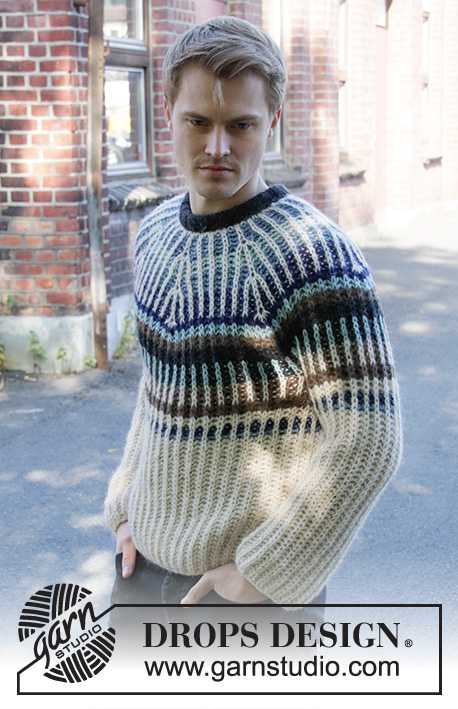
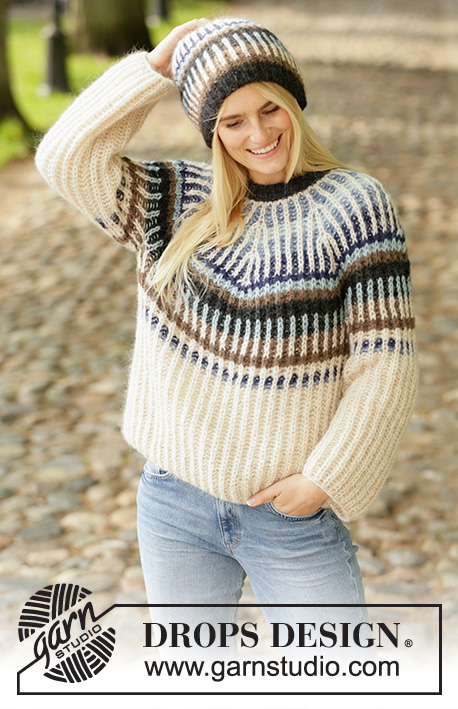
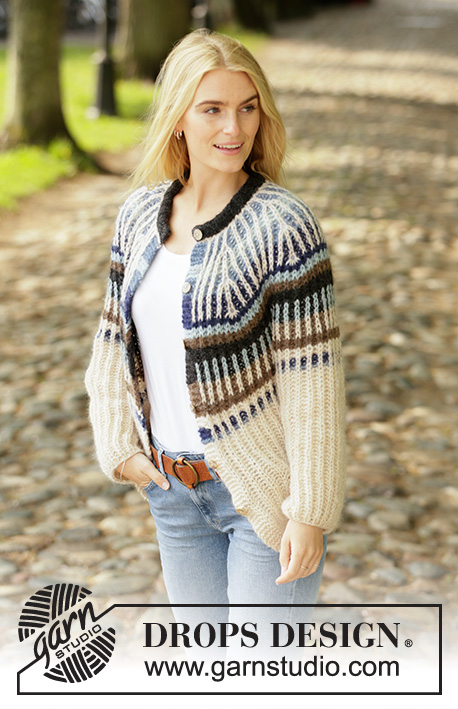
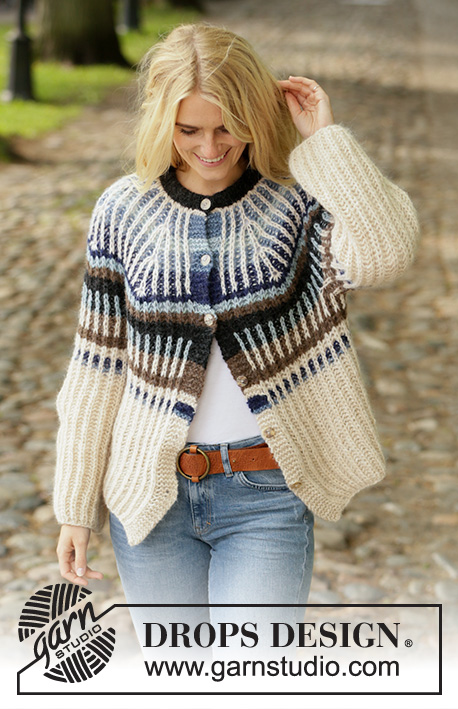
Knitted jacket with round yoke in DROPS Air. The piece is worked top down with 1-coloured English rib and 2-coloured English rib in stripes. Sizes S - XXXL.
DROPS 207-27 |
||||||||||||||||||||||
|
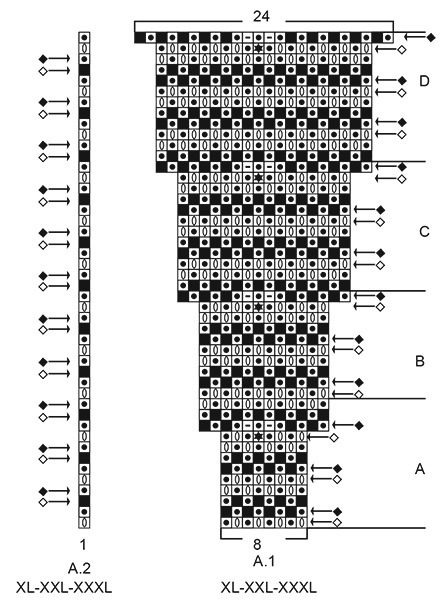
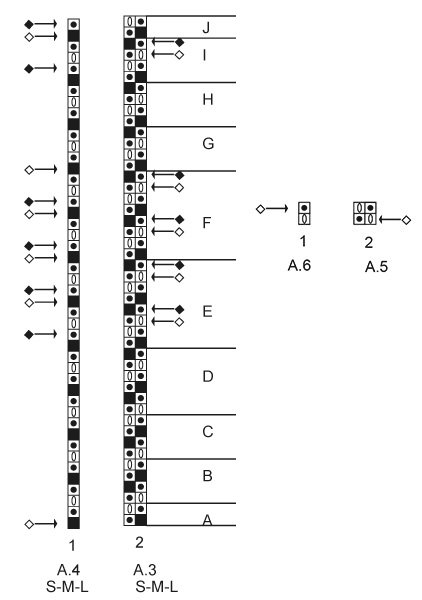
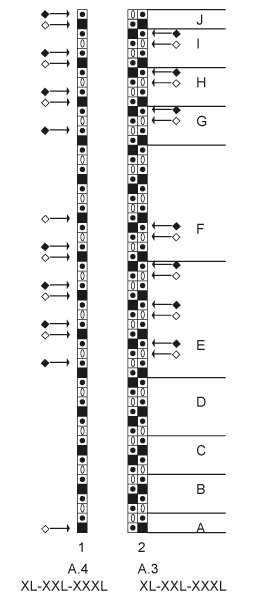
------------------------------------------------------- EXPLANATIONS FOR THE PATTERN: ------------------------------------------------------- RIDGE/GARTER STITCH (worked back and forth): Knit all rows. 1 ridge in height = Knit 2 rows. DECREASE TIP-1 (evenly spaced): To work out how to decrease evenly, count the total number of stitches on needle (e.g. 84 stitches) minus the bands (e.g. 10 stitches) and divide the remaining stitches by number of decreases to be made (e.g. 17) = 4.4. In this example decrease by knitting approx. each 3rd and 4th stitch together. PATTERN: See diagrams A.1 to A.6. Choose diagram for your size. KNITTING TIP (number of stitches): All stitch-numbers given when working English rib are without yarn overs; the yarn overs belong to the knitted stitches and are counted together as 1 stitch. 2-COLOURED PATTERN IN ENGLISH RIB (back and forth): The striped pattern is worked in English rib as shown in diagrams A.1 to A.4. To get the 2-coloured effect, work the stripes with alternate rows using the main colour and the second colour. * Knit 1 row from the right side with the main colour (H), push the stitches back on the circular needle so the next row is also worked from the right side. Then knit 1 row from the right side with the second colour (B). Purl 1 row from the wrong side with the main colour (H), push the stitches back on the circular needle so the next row is also worked from the wrong side. Then purl 1 row from the wrong side with the second colour (B) *, work from *-* to finished length. STRIPES A.1 AND A.2: The arrows in A.1 and A.2 show whether the row is worked from the right or wrong side. The arrows also show whether you work with the main colour (H) or the second colour (B). A: wheat (H), denim blue (B). B: wheat (H), sea green (B). C: wheat (H), denim blue (B). D: wheat (H), navy blue (B). BAND STITCHES IN GARTER STITCH (2-coloured English rib): Because you work 2 rows from the right side followed by 2 rows from the wrong side, the bands in garter stitch must be worked as follows: * Knit from the right side, purl from the right side, purl from the wrong side, knit from the wrong side *, work from *-*. Read KNITTING TIP-2 below. KNITTING TIP-2 (for bands): On the rows where you work 2-coloured English rib, change colours inside the band stitches on each side. The band stitches are only worked in the second colour (B), i.e. work 2 rows over the band stitches before changing to the next colour. To avoid holes, twist the strands together when changing colours. STRIPES A.3 AND A.4: The arrows in A.3 and A.4 show whether the row is worked from the right or wrong side. Where there is no arrow, work back and forth without pushing the stitches. The arrows also show whether you work with the main colour (H) or the second colour (B). A: navy blue (H/B) B: sea green (H/B). C: brown (H/B). D: black (H/B). E: sea green (H), black (B). F: wheat (H), brown (B). G: brown (H/B). H: wheat (H/B). I: wheat (H), navy blue (B). J: wheat (H), denim blue (B). 1-COLOURED ENGLISH RIB: Work back and forth without pushing back the stitches. Work with wheat to finished length. CASTING-OFF TIP: To avoid the cast-off edge being tight, you can cast off with 1 size larger needle. DECREASE TIP (for sleeves, in sizes L, XXL and XXXL only): Decrease alternately at beginning and end of row. Decrease 2 stitches at the beginning of the row from the right side as follows: Work 1 edge stitch in garter stitch, slip the first stitch and yarn over onto the right needle as if to knit together, purl 1, pass the slipped stitch and yarn-over over the purled stitch, slip the stitch back onto the left needle, pass the stitch and yarn-over over the stitch that was put back on the left needle and finally slip the remaining stitch onto the right needle (= 2 stitches decreased). Decrease 2 stitches at the end of the row from the right side as follows: Work until there are 5 stitches left on the row, slip the first stitch and yarn over onto the right needle as if to knit together, knit together the next 2 stitches (i.e. 1 purled stitch + stitch and yarn over), pass the slipped stitch and yarn-over over the knitted together stitches, 1 edge stitch in garter stitch (= 2 stitches decreased). BUTTONHOLES: Work buttonholes on the right band (when the garment is worn). Work from the right side when there are 3 stitches left on the row as follows: Make 1 yarn over, work 2 together and work 1. On the next row work the yarn over to leave a hole. The first buttonhole is worked when the rib on the neck measures approx. 1 cm, then again when the rib on the neck measures approx. 6 cm (due to folding edge). Then work the other 5-5-5-6-6-6 buttonholes with approx. 8½-9-9-8-8-8½ cm between each one. ------------------------------------------------------- START THE PIECE HERE: ------------------------------------------------------- JACKET – SHORT OVERVIEW OF THE PIECE: The neck (with folding edge), yoke and body are worked back and forth with circular needle from mid front, top down. The sleeves are worked back and forth with circular needle, top down. NECK: Cast on 84-84-88-96-100-100 stitches (including 5 band stitches on each side towards mid front) with circular needle size 4 mm and black. Knit 1 row. The next row is worked as follows from the right side: Work 5 band stitches in GARTER STITCH – read description above, * knit 2, purl 2 *, work from *-* until there are 7 stitches left on the row, knit 2 and finish with 5 band stitches in garter stitch. Work rib for 7 cm (= including the folding edge) – remember BUTTONHOLES on right band – read description above. Change to wheat and knit 1 row from the right side where you decrease 17-17-13-29-25-17 stitches evenly spaced – read DECREASE TIP = 67-67-75-67-75-83 stitches. Then work yoke as described below. THE PIECE IS NOW MEASURED FROM HERE! YOKE: Change to circular needle size 8 mm and work the next row as follows from the wrong side: 5 band stitches in garter stitch, * 1 yarn over the right needle, slip 1 stitch onto right needle as if to purl, purl 1 *, work from *-* until there are 6 stitches left on the row, 1 yarn over the right needle, slip 1 stitch onto right needle as if to purl and finish with 5 band stitches in garter stitch. Read KNITTING TIP-1. Now work 2-COLOURED ENGLISH RIB and STRIPES A.1 AND A.2 – read descriptions above, as follows from the right side: Work 5 BAND STITCHES IN GARTER STITCH (2-coloured English rib) – read description above, work A.1 until there are 6 stitches left on the row (= 7-7-8-7-8-9 repeats of 8 stitches), A.2 (= 1 stitch) and finish with 5 band stitches in garter stitch. REMEMBER THE KNITTING TENSION! When A.1 and A.2 have been completed in height there are 151-151-171-179-203-227 stitches on the needle. The yoke measures approx. 12-12-12-16-16-16 cm measured from the neck and down mid front. Work the next row in STRIPES A.3 AND A.4 – read description above, as follows from the wrong side: 5 band stitches in garter stitch, work A.4 (= 1 stitch), A.3 until there are 5 stitches left on the row (= 70-70-80-84-96-108 repeats of 2 stitches) and finish with 5 band stitches in garter stitch. Continue this pattern. When the yoke measures 22-24-25-27-29-31 cm from the neck mid front, work the next row from the wrong side as follows: Work the first 25-25-27-30-33-36 stitches as before (= front piece), place the next 30-30-36-34-40-46 stitches on 1 thread for sleeve, cast on 4-8-8-8-8-8 new stitches on the needle (= in side under sleeve), work as before over the next 41-41-45-51-57-63 stitches (= back piece), place the next 30-30-36-34-40-46 stitches on 1 thread for sleeve, cast on 4-8-8-8-8-8 new stitches on the needle (= in side under sleeve) and work as before over the remaining 25-25-27-30-33-36 stitches (= front piece). Body and sleeves are finished separately. THE PIECE IS NOW MEASURED FROM HERE! BODY: = 99-107-115-127-139-151 stitches. Continue according to diagrams A.3 and A.4 as before, with the band stitches in garter stitch – the 4-8-8-8-8-8 stitches under the sleeve are worked into the pattern as you go; i.e. on the first row purl the stitches (which should have been worked together with yarn overs). Continue until A.3 and A.4 have been completed in height. Then work 1-COLOURED ENGLISH RIB – read description above, as follows from the right side: 5 band stitches in garter stitch, A.5 until there are 6 stitches left on the row (= 44-48-52-58-64-70 repeats of 2 stitches), work A.6 (= 1 stitch) and finish with 5 band stitches in garter stitch. Continue like this until the piece measures 30-30-31-31-31-31 cm from the division (or to desired length; there is approx. 1 cm to finished length) – adjust to after a row worked from the wrong side. The next row is worked as follows – from the right side: 5 band stitches in garter stitch, * knit together the yarn over and stitch, slip 1 stitch onto right needle as if to purl, knit together the yarn over and stitch, 1 yarn over right needle, slip 1 stitch onto right needle as if to purl *, work from *-* until there are 6 stitches left on the row, knit together the yarn over and stitch and finish with 5 band stitches in garter stitch. The next row is worked as follows from the wrong side: 5 band stitches in garter stitch, purl 1, * purl together the yarn over and stitch, 1 yarn over right needle, slip 1 stitch onto right needle as if to purl, knit 1, purl 1 *, work from *-* until there are 5 stitches left and finish with 5 band stitches in garter stitch. Cast off with garter stitch over garter stitch, knit over knit and purl over purl; yarn overs cast off as normal stitches. Make sure the cast-off edge is not tight – read CASTING-OFF TIP! SLEEVE: Place the 30-30-36-34-40-46 stitches from the thread on the one side of the piece onto circular needle size 8 mm and cast on 3-5-5-5-5-5 stitches at the beginning and end of the row = 36-40-46-44-50-56 stitches (including 1 edge stitch on each side). Continue according to diagrams A.3 and A.4 as before; edge stitches are worked in garter stitch – the 2-4-4-4-4-4 stitches on each side mid under the sleeve are worked into the pattern as you go; i.e. on the first row purl the stitches (which should have been purled together with yarn overs). AT THE SAME TIME when the piece measures 3 cm, decrease 2 stitches mid under sleeve (applies only to sizes L, XXL and XXXL) – read DECREASE TIP. Decrease like this every 2 cm a total of 0-0-2-0-2-3 times = 36-40-42-44-46-50 stitches. Work until A.3 and A.4 have been completed in height. Now work 1-COLOURED ENGLISH RIB – read description above, as follows from the right side: Work 1 edge stitch in garter stitch, repeat A.5 (= 2 stitches) until there is 1 stitch left on the row and finish with 1 edge stitch in garter stitch. Continue like this until the sleeve measures 41-39-39-37-35-34 cm from the division (or to desired length; there is approx. 1 cm to finished length – NOTE: Shorter measurements in larger sizes due to wider neck and longer yoke) – adjust to after a row from the wrong side. The next row is worked as follows from the right side: 1 edge stitch in garter stitch, * knit together the yarn over and stitch, slip 1 stitch onto right needle as if to purl *, work from *-* until there is 1 stitch left on the row and finish with 1 edge stitch in garter stitch. The next row is worked as follows from the wrong side: 1 edge stitch in garter stitch, * knit 1, purl 1 *, work from *-* until there is 1 stitch left on the row and finish with 1 edge stitch in garter stitch. Cast off with garter stitch over garter stitch, knit over knit and purl over purl. Make sure the cast-off edge is not tight. Work the other sleeve in the same way. ASSEMBLY: Sew sleeve seams inside the 1 edge stitch. Fold the cast-on edge (neck) to the wrong side and sew down with small neat stitches in black – make sure the seam is not tight and that the stitches do not show on the right side. Sew buttons onto left band. |
||||||||||||||||||||||
Diagram explanations |
||||||||||||||||||||||
|
||||||||||||||||||||||
 |
||||||||||||||||||||||
 |
||||||||||||||||||||||
 |
||||||||||||||||||||||
 |
||||||||||||||||||||||
 |
||||||||||||||||||||||
Have you finished this pattern?Tag your pictures with #dropspattern #urbanautumnjacket or submit them to the #dropsfan gallery. Do you need help with this pattern?You'll find 28 tutorial videos, a Comments/Questions area and more by visiting the pattern on garnstudio.com. © 1982-2026 DROPS Design A/S. We reserve all rights. This document, including all its sub-sections, has copyrights. Read more about what you can do with our patterns at the bottom of each pattern on our site. |
||||||||||||||||||||||


With over 40 years in knitting and crochet design, DROPS Design offers one of the most extensive collections of free patterns on the internet - translated to 17 languages. As of today we count 324 catalogues and 12290 patterns translated into English (UK/cm). 12290
We work hard to bring you the best knitting and crochet have to offer, inspiration and advice as well as great quality yarns at incredible prices! Would you like to use our patterns for other than personal use? You can read what you are allowed to do in the Copyright text at the bottom of all our patterns. Happy crafting!
Post a comment to pattern DROPS 207-27
We would love to hear what you have to say about this pattern!
If you want to leave a question, please make sure you select the correct category in the form below, to speed up the answering process. Required fields are marked *.