
Popular categories
Looking for a yarn?


Comments / Questions (18)
![]() 김효정 wrote:
김효정 wrote:
I am not good at knitting yet, but this design is very simple and easy to me. I can knit this cardigan well. Thank you for sharing this great design for free.
04.05.2025 - 09:24
![]() Ulrika Nielsen wrote:
Ulrika Nielsen wrote:
Hej! Jag undrar om maskan mellan ökningarna för raglan räknas till ärmarnas maskantal eller till fram- o bakstyckena?
22.06.2023 - 08:15
![]() Celine wrote:
Celine wrote:
Bonjour Pouvez-vous m'indiquer comment faire pour ne pas voir La forme trapèze pour ce modèle de veste , je n'avais pas réalisé et je veux une forme droite normale Merci à l'avance de votre aide
10.11.2022 - 15:40DROPS Design answered:
Bonjour Céline, il vous suffit de ne pas faire les augmentations sur les côtés - en revanche, vous devrez ajuster le nombre d'augmentations avant les côtes car votre nombre de mailles ne correspondra pas. Bon tricot!
10.11.2022 - 17:05
![]() Christine wrote:
Christine wrote:
I’m knitting size small with 134 sts on my needle Then I inserted the marker threads and keep getting 45 sts for the back and not 40.!!!
18.10.2022 - 05:45DROPS Design answered:
Hi Christine, The first marker thread is inserted in the 26th stitch (remember in the stitch not between stitches), then the second in the 47th stitch, the 88th stitch and finally the 109th stitch. This leaves you with 25 stitches on the row. The back piece is measured between marker threads 2 and 3, which is 40 stitches (not counting the marker-stitches themselves). Happy knitting!
18.10.2022 - 07:06
![]() Heidi Jarbekk Bruun wrote:
Heidi Jarbekk Bruun wrote:
Hei, jeg er ferdig med alle økningene til raglan og har riktig antall masker (414 - strikker L), men arbeidet måler bare 19 cm. Har nok bommet litt på strikkefastheten, men vil det se pent om jeg bare fortsetter å strikke uten å øke mer til jeg får riktig lengde?
22.09.2021 - 20:10DROPS Design answered:
HEi Heidi. Du kan strikke til du får riktig mål (i høyden) uten økninger. mvh DROPS Design
28.09.2021 - 11:56
![]() Jane wrote:
Jane wrote:
Hei hvor mange gange skal det økes hver 2omgang og 4omgang? Mvh jane
05.05.2021 - 09:13DROPS Design answered:
Det kommer an på hvilken størrelse du strikker, se her: Fortsett økningen til raglan og det økes 1 maske på hver side av maskene med merketråd i på hver 2.pinne totalt 0-7-12-4-13-12 ganger og deretter på hver 4.pinne (dvs på annenhver pinne fra retten) totalt 6-4-3-7-4-5 ganger – LES STRIKKETIPS.
07.05.2021 - 09:38
![]() Siobhain wrote:
Siobhain wrote:
Hi, I would like to check what length double point needles I need for this pattern. Are 20cm needles suitable? Thank you.
10.03.2021 - 15:53DROPS Design answered:
Dear Siobhain, sure they are, the double pointed needles will be used for the sleeves - you can also use a longer circular needle and work magic loop. Happy knitting!
10.03.2021 - 16:15
![]() Noellie wrote:
Noellie wrote:
Ho inviato una mail perchè non mi tornavano le maglie aumentate. Ho rivisto il tutto con una amica esperta di maglia e mia ha spiegato bene. Mi scuso e vi ringrazio.
19.02.2021 - 16:21DROPS Design answered:
Buonasera Noellie, dove ha inviato la mail? Se in futuro dovesse avere altre difficoltà può scriverci compilando direttamente il modulo alla fine di ogni modello. Buon lavoro!
19.02.2021 - 21:04
![]() Emilia wrote:
Emilia wrote:
Hej, Jag undrar lite över ökningstips 2, ökning i sidan mellan fram och bakstycke. Ska de 4 ökade maskorna hamna på framstycket, eller 2 på bakstycket? När jag läser tipset låter det nästan som att två ska hamna på vänster framstycke och två ska hamna på höger sida av bakstycket. Det kan väl ändå inte stämma eller? Men det blir ju så om jag ökar två maskor innan varje markör.
28.07.2020 - 09:49DROPS Design answered:
Hej Emilia, du øker 1 masker på hver side af masken med markør i begge sider (markøren er i midten af siden). God fornøjelse!
05.08.2020 - 15:31
![]() Wilmo wrote:
Wilmo wrote:
Bonjour, je voudrais faire une rehausse dos pour ce gilet. Si je fais des rangs raccourcis sur 15 mailles, est-ce que ça sera équilibré? j\'ai vu ces explications sur un autre modèle, le ROSENDAL 181-1 . merci de votre aide - je n'ai jamais tricoté de pull avec une rehausse!
25.06.2020 - 17:18DROPS Design answered:
Bonjour Mme Wilmo, il serait plus sage de prendre en base un modèle avec réhausse tricoté dans le même groupe de fils A/avec le même échantillon - le Modèle Rosendal est tricoté avec une laine du groupe B, le calcul sera différent. Bon tricot!
26.06.2020 - 07:51
|
|
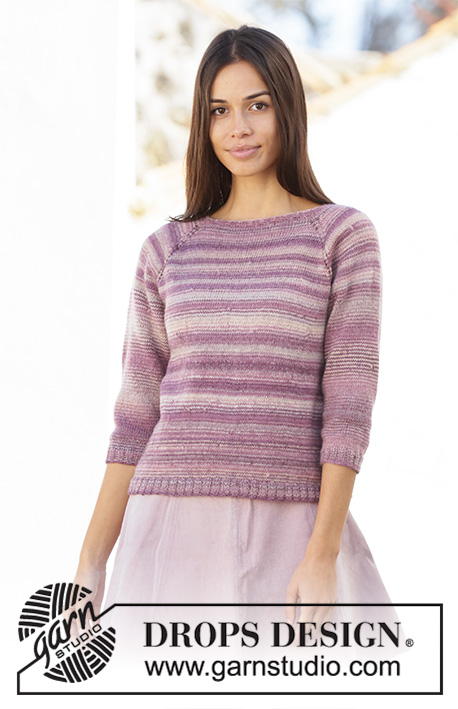
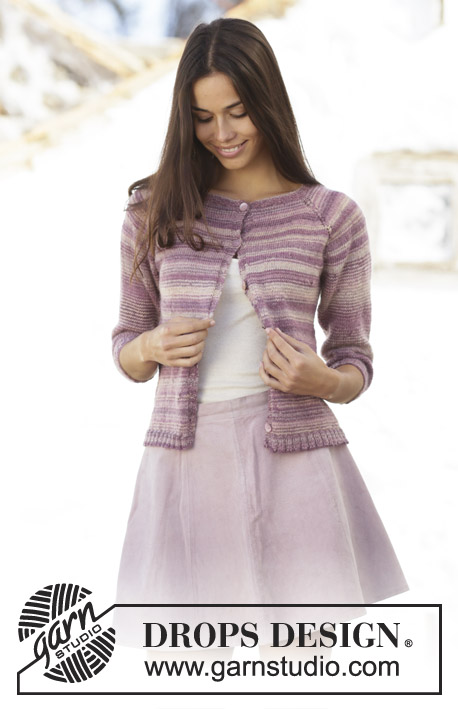
Summer Berries Jacket#summerberriesjacket |
|
 |
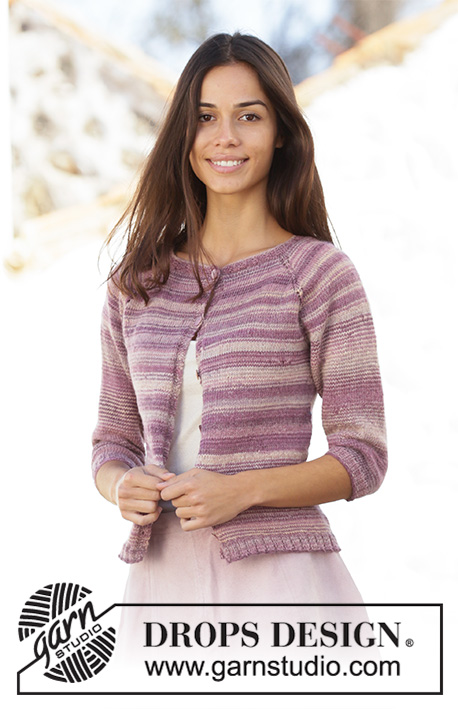 |
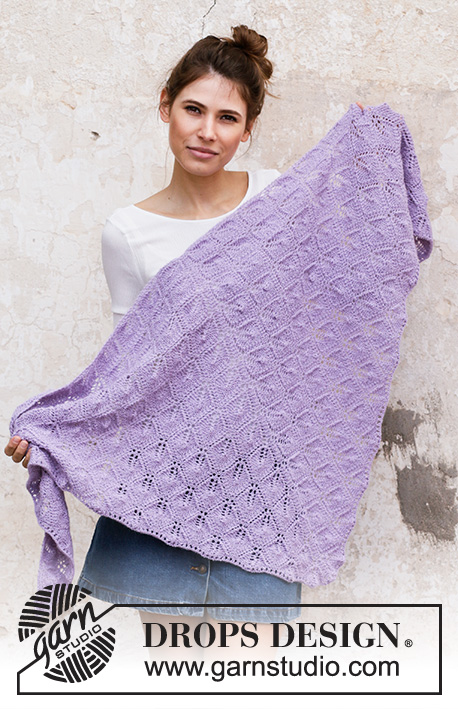
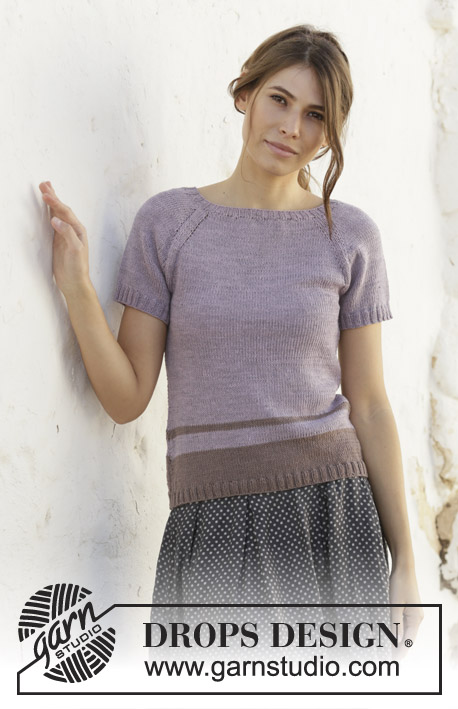
Knitted jacket in DROPS Delight. Piece is knitted top down with raglan, ¾ sleeves and A-shape. Size: S - XXXL
DROPS 201-14 |
|
|
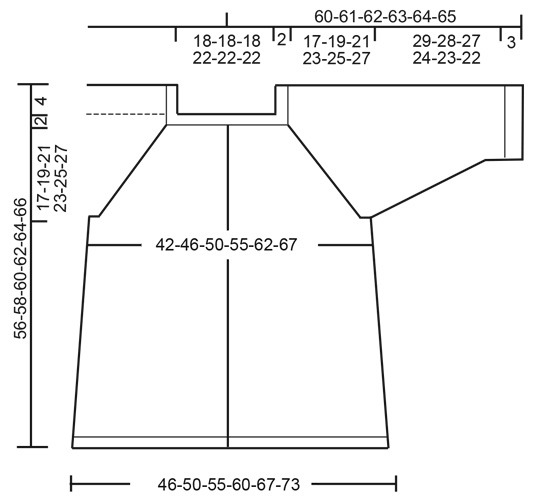
---------------------------------------------------------- EXPLANATION FOR THE PATTERN: ---------------------------------------------------------- MOSS STITCH (work back and forth on needle): ROW 1: * Knit 1, purl 1 *, repeat from *-*. ROW 2: Knit over purl and purl over knit. Repeat 2ND ROW upwards. STRIPES: To make more stripes on garment work alternately 1 strand from 2 different balls, adjust so that balls start with different colours. * Work 2 rows/rounds with the first ball, work 2 rows/rounds with the other ball (do not tighten yarn when pulling it upwards) *, work from *-l*. This way the colour are mixed more and will produce more narrow stripes. INCREASE TIP-1 (evenly spaced): To calculate how to increase evenly, use the total number of stitches on row (e.g. 116 stitches), minus bands (e.g. 10 stitches) and divide the remaining stitches by number of increases to be done (e.g. 20) = 5.3. In this example increase after approx. every 5th stitch. Do not increase over bands. Increase 1 stitch by making 1 yarn over, on next row work yarn over twisted to avoid holes. INCREASE TIP-2 (applies to sides of body): All increases are done from the right side. Begin 1 stitch before marker, make 1 yarn over, knit 1, 1 yarn over (= 2 stitches increased). Repeat at both markers. On next row purl yarn overs twisted to avoid holes. RAGLAN: Increase for raglan in every transition between sleeves and body. All increases are done from right side and work the increased stitches in stocking stitch. INCREASE AS FOLLOWS WHEN INCREASING 2 STITCHES ON EACH SIDE OF STITCH WITH MARKER THREAD: Begin before stitch with marker thread, pick up loop before stitch and knit loop twisted, make 1 yarn over, knit 1 (= stitch with marker thread), make 1 yarn over, pick up loop before next stitch and knit loop twisted (= 4 stitches increased). On next row purl yarn overs to make holes. INCREASE AS FOLLOWS WHEN INCREASING 1 STITCH ON EACH SIDE OF STITCH WITH MARKER THREAD: Begin before stitch with marker thread, make 1 yarn over, knit 1 (= stitch with marker thread), make 1 yarn over (= 2 stitches increased). On next row purl yarn overs to make holes. KNITTING TIP: When increasing for raglan on every 4th row, the holes in raglan line will be further apart than when increasing on every other row. To avoid this work holes on the rows from right side without increase as follows: Begin 2 stitches before stitch with marker thread, knit 2 together, make 1 yarn over, knit 1 (= stitch with marker thread), make 1 yarn over, slip 1 stitch knitwise, knit 1, pass slipped stitch over stitch worked. On next row purl yarn overs to make holes. DECREASE TIP (applies to mid under sleeves): Begin 2 stitches before stitch with marker, knit 2 twisted together, knit 1 (stitch with marker), knit 2 together (= 2 stitches decreased). BUTTONHOLES: Decrease for first buttonhole on first row from right side after ridge in neck, then decrease the next 5-5-5-6-6-6 approx. 8 cm apart. Decrease for buttonholes on right band as follows: Work until 3 stitches remain on needle (seen from right side), make 1 yarn over, knit 2 together and knit 1. On next row knit yarn over to make holes. ---------------------------------------------------------- START THE PIECE HERE: ---------------------------------------------------------- JACKET - SHORT OVERVIEW OF THE PIECE: Work back and forth on circular needle from mid front, work top down. Work sleeves in the round on double pointed needles. Work entire piece in STRIPES - see explanation above. YOKE: Cast on 116-116-116-136-136-136 stitches (including 5 band stitches in each side towards mid front) on circular needle size 2.5 mm with Delight. Work 5 band stitches in MOSS STITCH – read explanation above, rib with knit 2/purl 2 until 5 stitches remain and 5 band stitches in moss stitch. When piece measures 1.5 cm, work 1 row from right side to increase as follows: Work moss stitch over 5 band stitches, knit and increase 18 stitches evenly over the next 106-106-106-126-126-126 stitches - READ INCREASE TIP-1, and finish with 5 band stitches in moss stitch = 134-134-134-154-154-154 stitches. Purl 1 row from wrong side with 5 band stitches in each side in moss stitch. Switch to circular needle size 3 mm. REMEMBER BUTTONHOLES on right band - see explanation above. Insert 4 marker threads in piece (without working the stitches): Insert first marker thread in 26th-26th-26th-31st-31st-31st stitch on needle, second marker thread in 47th-47th-47th-52nd-52nd-52nd stitch on needle, insert third marker thread in 88th-88th-88th-103rd-103rd-103rd stitch on needle and insert fourth marker thread in 109th-109th-109th-124th-124th-124th stitch on needle. There are now 25-25-25-30-30-30 stitches between stitches with marker thread on each front piece, 40-40-40-50-50-50 stitches on back piece and 20 stitches in all sizes on each sleeve. REMEMBER THE KNITTING TENSION! Work next row as follows from right side: 5 band stitches in moss stitch, stocking stitch over the next 20-20-20-25-25-25 stitches, increase 2 stitches on each side of stitch with marker thread for RAGLAN – see explanation above, work stocking stitch over the 20 stitches on sleeve, increase 2 stitches on each side of stitch with marker thread, work stocking stitch over the 40-40-40-50-50-50 stitches on back piece, increase 2 stitches on each side of stitch with marker thread, work stocking stitch over the 20 stitches on sleeve, increase 2 stitches on each side of stitch with marker thread, work stocking stitch over the next 20-20-20-25-25-25 stitches on front piece and finish with 5 band stitches in moss stitch. Continue in stocking stitch with band stitches in moss stitch and increase for raglan in every transition between body and sleeves as follows: Increase 2 stitches on each side of stitches with marker thread on every other row (i.e. every row from right side) 6-6-6-8-8-10 times in total (first increase is already done), then increase 1 stitch on each side of stitches with marker threads every other row 8-8-8-9-9-10 times in total. When increase has been done 14-14-14-17-17-20 times in total, there are 294-294-294-354-354-394 stitches on row. Continue increase for raglan and increase 1 stitch on each side of stitches with marker threads every other row 0-7-12-4-13-12 times in total and then every 4th row (i.e. every other row from right side) 6-4-3-7-4-5 times in total – READ KNITTING TIP. After last increase for raglan there are 342-382-414-442-490-530 stitches on row and piece measures approx. 19-21-23-25-27-29 cm from cast-on edge (measured mid front). Work next row as follows from wrong side: Work the first 52-57-61-67-73-78 stitches as before (= right front piece), slip the next 72-82-90-92-104-114 stitches on 1 stitch holder for sleeve, cast on 7-7-9-9-13-15 new stitches on needle (= in the side under sleeve), work the next 94-104-112-124-136-146 stitches as before (= back piece), slip the next 72-82-90-92-104-114 stitches on 1 stitch holder for sleeve, cast on 7-7-9-9-13-15 new stitches on needle (= in the side under sleeve) and work the remaining 52-57-61-67-73-78 stitches as before. Finish body and sleeves separately. Remove the marker threads in piece. NOW MEASURE PIECE FROM HERE! BODY: = 212-232-252-276-308-332 stitches. Insert 1 marker thread in the middle of the 7-7-9-9-13-15 stitches cast on under each sleeve and move the marker threads upwards when working. Continue back and forth in stocking stitch with 5 band stitches in moss stitch in each side. When piece measures 3 cm, increase 2 stitches in each side - READ INCREASE TIP-2 (= 4 stitches increased). Increase like this every 6-6-6-5-5-4 cm 5-5-5-6-6-7 times in total = 232-252-272-300-332-360 stitches. When piece measures 30 cm, switch to circular needle size 2.5 mm. Work moss stitch over 5 band stitches with knit 2/purl 2 until 7 stitches remain, knit 2 and 5 band stitches in moss stitch. Work like this until rib measures 3 cm. Switch back to circular needle size 3 mm and cast off by knitting from right side. Jacket measures approx. 56-58-60-62-64-66 cm from shoulder and down. SLEEVE: Slip the 72-82-90-92-104-114 stitches from stitch holder in one side of piece on double pointed needles size 3 mm and pick in addition up 1 new stitch in each of the 7-7-9-9-13-15 stitches cast on under sleeve = 79-89-99-101-117-129 stitches on needle. Work in stocking stitch in the round. Insert a marker in the middle stitch under sleeve. When piece measures 3 cm in all sizes, decrease 1 stitch on each side of marker - read DECREASE TIP. Decrease 9-13-17-17-23-28 times in total in S: On every 10th round, in M: On every 6th round, in L and XL: On every 4th round, in XXL: On every round 4 times in total and then every 3rd round 19 times in total and in XXXL: On every round 8 times in total and then every other round 20 times in total = 61-63-65-67-71-73 stitches. Work until sleeve measures 29-28-27-24-23-22 cm from division. Knit 1 round while decreasing 5-3-1-3-3-1 stitch evenly = 56-60-64-64-68-72 stitches. Switch to double pointed needles size 2.5 mm and work rib with knit 2/purl 2 for 3 cm. Switch back to double pointed needles size 3 mm and cast off by knitting. Work the other sleeve the same way. ASSEMBLY: Sew the buttons on to the left band. |
|
 |
|
Have you finished this pattern?Tag your pictures with #dropspattern #summerberriesjacket or submit them to the #dropsfan gallery. Do you need help with this pattern?You'll find 30 tutorial videos, a Comments/Questions area and more by visiting the pattern on garnstudio.com. © 1982-2026 DROPS Design A/S. We reserve all rights. This document, including all its sub-sections, has copyrights. Read more about what you can do with our patterns at the bottom of each pattern on our site. |
|


With over 40 years in knitting and crochet design, DROPS Design offers one of the most extensive collections of free patterns on the internet - translated to 17 languages. As of today we count 324 catalogues and 12290 patterns translated into English (UK/cm). 12290
We work hard to bring you the best knitting and crochet have to offer, inspiration and advice as well as great quality yarns at incredible prices! Would you like to use our patterns for other than personal use? You can read what you are allowed to do in the Copyright text at the bottom of all our patterns. Happy crafting!
Post a comment to pattern DROPS 201-14
We would love to hear what you have to say about this pattern!
If you want to leave a question, please make sure you select the correct category in the form below, to speed up the answering process. Required fields are marked *.