Comments / Questions (27)
Daisie wrote:
This model is beautiful but please also include photos of regular sized models. It is very difficult to "imagine" what the garment would look like on an average/small body. Thank you kindly.
19.08.2018 - 14:53
![]() Eva Sjømoen wrote:
Eva Sjømoen wrote:
Jeg får bare opp to diagrammer på min oppskrift. Hvordan skal jeg få oppskrift med alle fem diagrammene. Har fått svar at alle fem skal være i oppskriften. Jeg får kun opp de to diagrammene med A1B i to varianter (til forskjellige størrelser).
17.05.2018 - 20:35DROPS Design answered:
Hei Eva. Vi har sjekket denne oppskriften igjen og kunne ikke se noen feil eller mangler med diagrammene. Men vi har nå lastet dem opp på nytt og håper dette løser problemet. God fornøyelse
22.05.2018 - 08:49
![]() Eva Sjømoen wrote:
Eva Sjømoen wrote:
Hvor er mønster A1a? Står øverst i oppskriften at det er to mønstre, A1 og A2, men i oppskriften er de referert til som a og b. Det er kun A1b som ligger ved i oppskriften. Det mangler også tre tegn i tegnforklaringen.
16.05.2018 - 10:52DROPS Design answered:
Hej Eva, Du finder alle 5 diagrammer nederst i opskriften (lige ovenfor måleskitsen) God fornøjelse!
17.05.2018 - 14:54
![]() Loly Aguilar wrote:
Loly Aguilar wrote:
Hola! La vuelta 35 como la tengo que empezar para que me quede bien ,pues no la entiendo del diagrama A.1a en la vuelta de antes al terminar hay que empezar la vuelta 35 o que pues no lo consigo entender poner vídeos de esto para que lo veamos y así entenderlo . Muchas gracias
29.04.2018 - 12:33DROPS Design answered:
Hola Loly. El diagrama se trabaja igual como antes.El hueco que hay en esta fila, al principio de la repetición del diagrama, se compensa con el último punto de la repetición del diagrama, el que sobresale hacia fuera por el otro lado. Por lo tanto, el número de puntos en la repetición no varía El dibujo se desplaza, pero hay que seguir trabajando según el diagrama.
30.04.2018 - 20:18Vicky wrote:
Sí, así lo hice. Muchísimas gracias! :D
14.04.2018 - 23:40
![]() Vicky wrote:
Vicky wrote:
Sí, eso lo tengo claro. Pero la duda es el primer punto de la primera repetición. Hago 3Dr para compensar dicho desplazamiento? No sé si me explico. Muchas gracias
08.04.2018 - 20:20DROPS Design answered:
Hola Vicky, no,si haces un punto de más, no vas a llegar al último punto. El dibujo se desplaza y, por tanto, tu también tienes que desplazarte y trabajar según el diagrama.
14.04.2018 - 12:40
![]() Vicky wrote:
Vicky wrote:
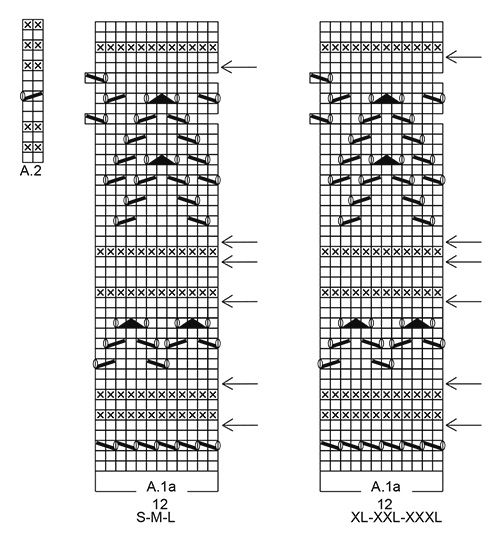
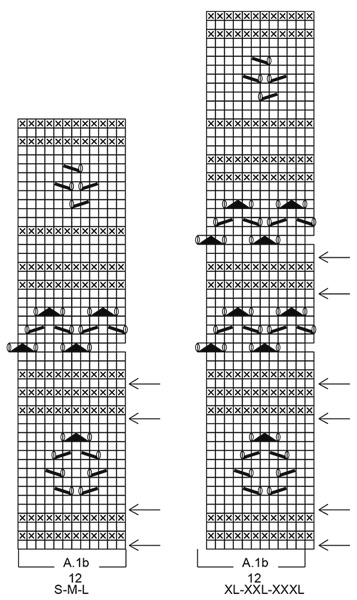
Duda sobre diagramas. En A-1.a vueltas 35 y 39. Y en A-1.b vuelta 23. Entiendo que el desplazamiento a la izq es para que cuadre el dibujo, y que el último punto (12) de cada repetición se teje con el primero (1) de la siguiente. Pero al empezar la vuelta, ¿qué hago con el primer punto? P.ej. en la v35 el diagrama se desplaza a la izquierda, dejando un Hueco en el 1º Punto y luego 2 dr, etc. ¿Qué tengo que hacer con ese 1º hueco del inicio? ¿Tejo 3 dr al inicio? Muchas gracias
06.04.2018 - 15:39DROPS Design answered:
Hola Vicky, no falta ningún punto. El hueco que hay al principio de la repetición del diagrama en esta fila se compensa con el último punto de la repetición del diagrama, que sobresale hacia fuera por el otro lado. El número de puntos en la repetición se mantiene constante.
08.04.2018 - 19:04
Taormina Top#taorminatop |
||||||||||||||||||||||
 |
 |
|||||||||||||||||||||
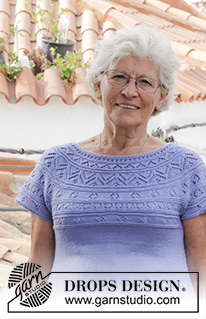
Knitted top with lace pattern, round yoke and short sleeves, worked top down. Sizes S - XXXL. The piece is worked in DROPS BabyMerino.
DROPS 186-37 |
||||||||||||||||||||||
|
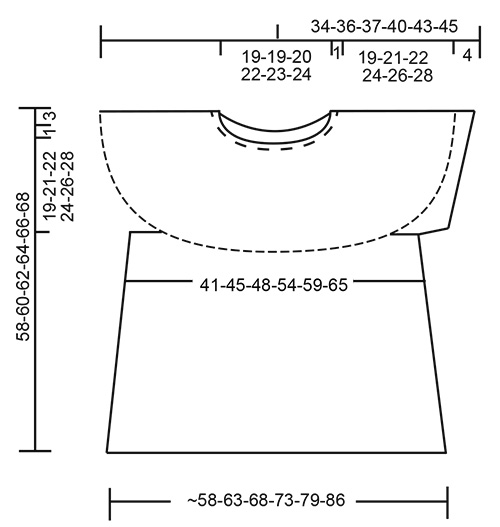
INFORMATION FOR THE PATTERN: RIDGE/GARTER STITCH (worked in the round): 1 ridge = 2 rounds. Knit 1 round and purl 1 round PATTERN: See diagrams A.1 and A.2. Choose diagram for your size (applies to A.1). INCREASE TIP-1 (for increases on yoke): To work out how to increase evenly, count the total number of stitches on the needle (e.g. 116 stitches) and divide by the number of increases to be made (e.g. 16) = 7.25. In this example, increase by making 1 yarn over after approx. every 7th stitch. On the next round, work the yarn overs twisted into the pattern to avoid holes. INCREASE TIP-2 (for increases on body): Work until there are 2 stitches left before the marker thread, 1 yarn over, knit 4 stitches (the marker thread sits in the middle of these 4 stitches), 1 yarn over (= 2 stitches increased), increase like this at both marker threads (= a total of 4 stitches increased). The yarn overs are not worked twisted on the next round, there will be holes. ---------------------------------------------------------- TOP: The yoke and body are worked in the round, top down. The short sleeves are worked in the round with double pointed needles. YOKE: Cast on 116-120-126-132-139-144 stitches with circular needle size 2.5 mm and BabyMerino. The round starts mid back. Work 2 RIDGES – see description above. Knit 1 round and increase 16-24-30-36-41-36 stitches evenly on round – read INCREASE TIP-1 = 132-144-156-168-180-180 stitches. Purl 1 round (the yarn overs are worked twisted to avoid holes). REMEMBER THE KNITTING TENSION! Change to circular needle size 3 mm. Work A.1a (= 12 stitches) in the round over all stitches (= 11-12-13-14-15-15 times in width) Continue the pattern like this AT THE SAME TIME as you increase evenly on the rounds marked with an arrow in diagram A.1 as follows: Each time you increase 12 stitches, work A.1 one more time in width. Each time you increase 24 stitches, work A.1 two more times in width. Each time you increase 36 stitches, work A.1 three more times in width. INCREASE 1: Increase 24-24-24-24-24-36 stitches = 156-168-180-192-204-216 stitches. INCREASE 2: Increase 24-24-24-24-24-36 stitches = 180-192-204-216-228-252 stitches. INCREASE 3: Increase 24 stitches = 204-216-228-240-252-276 stitches. INCREASE 4: Increase 24 stitches = 228-240-252-264-276-300 stitches. INCREASE 5: Increase 24 stitches = 252-264-276-288-300-324 stitches. INCREASE 6: Increase 24 stitches = 276-288-300-312-324-348 stitches. When A.1a has been worked 1 time in height, the piece measures approx. 14 cm from the neck edge. Now work A.1b over A.1a and the increases continue as follows: INCREASE 7: Increase 12-24-24-24-24-24 stitches = 288-312-324-336-348-372 stitches. INCREASE 8: Increase 12-12-24-24-24-24 stitches = 300-324-348-360-372-396 stitches. INCREASE 9: Increase 12-12-24-24-24-24 stitches = 312-336-372-384-396-420 stitches. INCREASE 10: Increase 12-12-12-12-24-24 stitches = 324-348-384-396-420-444 stitches. The increases are now finished in sizes S, M and L, but continue in sizes XL, XXL and XXXL as follows: INCREASE 11: Increase 12-24-24 stitches = 408-444-468 stitches. INCREASE 12: Increase 12-12-24 stitches = 420-456-492 stitches. ALL SIZES: = 324-348-384-420-456-492 stitches (A.1b is now repeated 27-29-32-35-38-41 times in width). Work pattern until the piece measures 20-22-23-25-27-29 cm from the cast-on edge. Now divide the piece for body and sleeves as follows: (The stitches which do not fit into the pattern are knitted when the stitches are knitted and purled when the stitches are purled). Work pattern as before over the first 44-49-53-60-66-73 stitches (= half back piece), place the next 74-76-86-90-96-100 stitches on a thread for sleeves, cast on 10 new stitches on the needle (= side under the sleeve), insert 1 marker thread in the middle of the new stitches, work pattern as before over the next 88-98-106-120-132-146 stitches (= front piece), place the next 74-76-86-90-96-100 stitches on a thread for sleeve, cast on 10 new stitches on the needle (= side under the sleeve), insert 1 marker thread in the middle of the new stitches, work pattern as before over the last 44-49-53-60-66-73 stitches (= half back piece). Body and sleeves are finished separately. THE PIECE IS NOW MEASURED FROM HERE! BODY: = 196-216-232-260-284-312 stitches. Continue to work pattern; the stitches which do not fit into the pattern under the sleeves are knitted when the stitches are knitted and purled when the stitches are purled. When A.1b has been worked 1 time in height, the piece measures approx. 27-27-27-30-30-30 cm. Continue working in stocking stitch. On the next round increase 1 stitch on each side of each marker thread – read INCREASE TIP-2! Increase like this every 4th round until the piece measures 32-32-33-33-33-33 cm from where the body and sleeves were divided = approx. 276-300-324-348-380-412 stitches. Change to circular needle size 2.5 mm. Work A.2 in the round over all stitches. When A.2 has been worked 1 time in height, the piece measures approx. 35-35-36-36-36-36 cm from where the body and sleeves were divided and approx. 55-57-59-61-63-65 cm from the neck edge. Cast off (make sure you cast off loosely; you can use a needle 1 size larger if necessary). SLEEVE EDGE: The piece is worked in the round with double pointed needles. Place the 74-76-86-90-96-100 stitches from the thread on the one side of the piece on double pointed needles size 3 mm and knit up 1 stitch in each of the 10 stitches cast on under the sleeve = 84-86-96-100-106-110 stitches. Continue with A.1b over the stitches which fit into the pattern; the stitches which do not fit into the pattern under the sleeve are purled when the stitches are purled and knitted when the stitches are knitted. When the sleeve measures 3 cm from where it was divided from the body (adjust so that you finish neatly in relation to the pattern) change to double pointed needles size 2.5 mm and work 2 ridges. Then cast off, make sure you cast off loosely; you can use a needle 1 size larger if necessary. Work the other sleeve edge in the same way. |
||||||||||||||||||||||
Diagram explanations |
||||||||||||||||||||||
|
||||||||||||||||||||||
 |
||||||||||||||||||||||
 |
||||||||||||||||||||||
 |
||||||||||||||||||||||
Have you finished this pattern?Tag your pictures with #dropspattern #taorminatop or submit them to the #dropsfan gallery. Do you need help with this pattern?You'll find 23 tutorial videos, a Comments/Questions area and more by visiting the pattern on garnstudio.com. © 1982-2026 DROPS Design A/S. We reserve all rights. This document, including all its sub-sections, has copyrights. Read more about what you can do with our patterns at the bottom of each pattern on our site. |
||||||||||||||||||||||


Post a comment to pattern DROPS 186-37
We would love to hear what you have to say about this pattern!
If you want to leave a question, please make sure you select the correct category in the form below, to speed up the answering process. Required fields are marked *.