
Popular categories
Looking for a yarn?


Comments / Questions (19)
Rikma wrote:
Thank you for your quick response. I will give it another try.
20.09.2018 - 21:05Rikma wrote:
Having trouble with instructions. I do well down to the yoke. First paragraph states knit 10 for 1/2 of back. looks like then knit 1 sleeve using the A.2 chart which is 16 stitches then knit 20 for front repeat sleeve for 16 then 10 more for the back total is 72 stitches but I have 106 stitches on my needle. could you explain that 1st paragraph please. find all the A.2, notations confusing. If I double the front and back stitches then I end up with 112stitches needed.
20.09.2018 - 13:25DROPS Design answered:
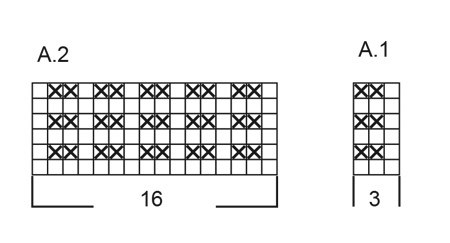
Dear Rikma, first round on yoke will be worked as follows (from mid back): Knit 10 (= half back piece), A.2 (= 16 sts), knit 1 (= sleeve), A.2, knit 20 (= front piece), A.2, knit 1 (= sleeve), A.2, knit 10 = 10 + 16+1+16+20+16+1+16+10= .106 sts. At the same time, increase for raglan with 1 YO on each side of each A.2 = 8 sts increased = 114 sts after first increase round. Happy knitting!
20.09.2018 - 13:31
![]() Celia wrote:
Celia wrote:
Me gustaria saber cuantas madejas necesito para la talla XL y sustituir la lana de este patrón por lana merino extra fino de drops
31.08.2018 - 12:51DROPS Design answered:
Hola Celia. Para la talla XL vas a necesitar aprox 13 ovillos de merino extra fino del grupo de lanas B.
31.08.2018 - 20:38
![]() Anki wrote:
Anki wrote:
Hej Hur mycket garn går det åt av Drops Air i storlek XL? Så jag får en aning om hur mycket jag behöver beställa... Ser fram emot detta ☺
18.08.2018 - 23:44DROPS Design answered:
Hej, Se här hur du gör: Räkna om garnmängden från en kvalitet till en annan Det vill säga: 8x167m = 1336m/150= 8,9 = 9 nystan DROPS Air.
22.08.2018 - 13:31
![]() Karin Kirsch wrote:
Karin Kirsch wrote:
Hallo, ich habe glaube ich ein Problem.... ich habe nach dem Kragen bei Größe XL 110 Maschen auf der Nadel. Der Raglan mit Muster A.2 in der ersten Reihe benötigt nur 76 Maschen? Was mache ich mit dem Rest? :( Wo ist da mein Denkfehler? Lieben Dank für eine schnelle Antwort
27.06.2018 - 09:54DROPS Design answered:
Liebe Frau Kirsch, diese 110 M stricken Sie so: 11 Maschen rechts (= halbes Rückenteil), A.2 (= 16 Maschen), 1 Masche rechts (= Ärmel), A.2 (= 16 M), 22 Maschen rechts (= Vorderteil), A.2 (= 16 M), 1 Masche rechts (= Ärmel), A.2, (= 16 M), 11 Maschen rechts. das sind: 11 + 16 + 1 + 16 + 22 + 16 + 1 + 16 + 11 = 110 M. Viel Spaß beim stricken!
27.06.2018 - 16:28
![]() Inger Christensen wrote:
Inger Christensen wrote:
Sidste punkt i ' forhøjning i nakken' skal vel være: strik ret til midt bagpå? Det giver for mig ikke mening at strikke vrang på retsiden der.
28.02.2018 - 12:54DROPS Design answered:
Hej Inger, du har helt ret og det er rettet. God fornøjelse!
06.03.2018 - 15:57
![]() Leclair wrote:
Leclair wrote:
Hallo,ik brei voor de eerste keer van boven naar beneden en alles met de rondbreinaald. Ik heb nu de kraag en het raglandeel. Het aantal steken en de hoeveelheid meerderen (25x )klopt allemaal. Enkel de hoogte klopt helemaal niet. Volgens proeflapje zijn 23 naalden 10 cm. Nu begreep ik 25 naalden te moeten breien maar moet dan 23 cm hebben. Ikkom maar op 13. 10cm verder breien zonder meerderen lijkt me geen goed idee. Wat doe ik verkeerd?
27.02.2018 - 09:04DROPS Design answered:
Hallo Leclair, Heb je van te voren ook een proeflapje gebreid? En komt deze overeen met de afmetingen van het proeflapje aangegeven in het patroon? Heb je de breedte van je werkstuk ook gecontroleerd? En komt deze overeen met de maten die aangegeven zijn op de tekening onderaan het patroon? Als het proeflapje in de breedte wel overeenkomt, maar niet in de hoogte, dan kun je af en toe in het raglandeel een aantal extra naalden breien, zonder te meerderen, maar deze moet je wel wat verdelen in het raglandeel anders raakt je trui uit vorm.
04.03.2018 - 19:42
![]() Maria wrote:
Maria wrote:
Posso lavorare con ferri diritti?
05.02.2018 - 13:31DROPS Design answered:
Buongiorno Maria. Il capo è lavorato in tondo dall'alto verso il basso, difficilmente adattabile ad una lavorazione con ferri dritti. Buon lavoro!
05.02.2018 - 14:27
![]() Bente Krogh wrote:
Bente Krogh wrote:
Tak for mange gode opskrifter, men her bliver jeg nødt til at spørge. Jeg er startet på "Woodland Walk" den lukkede model og jeg har vanskeligt ved at dele arbejdet i for-/bagstykke og ærmer. Der er en masse kommaer. Kunne I måske bruge +, hvis det hører sammen. Det korte af det lange er: hvor mange masker skal det være i de fire felter (str. m), men ønsker egentlig bare princippet. Venlig hilsen Bente
19.11.2017 - 09:56DROPS Design answered:
Hej Bente, når du starter med bærestykket har du 90 m på pinden. Du starter da midt bagpå med 6 + 16(A.2) + 1 + 16(A.2) + 12 + 16(A.2) + 1 + 16(A.2) + 6. De 16 m i A.2 er selve raglan-overgangen og udtagningerne sker på hver side af A.2 (ialt 8 gange pr udtagnings-pind). God fornøjelse!
05.12.2017 - 14:49
|
|||||||
Woodland Walk#woodlandwalksweater |
|||||||
 |
 |
||||||
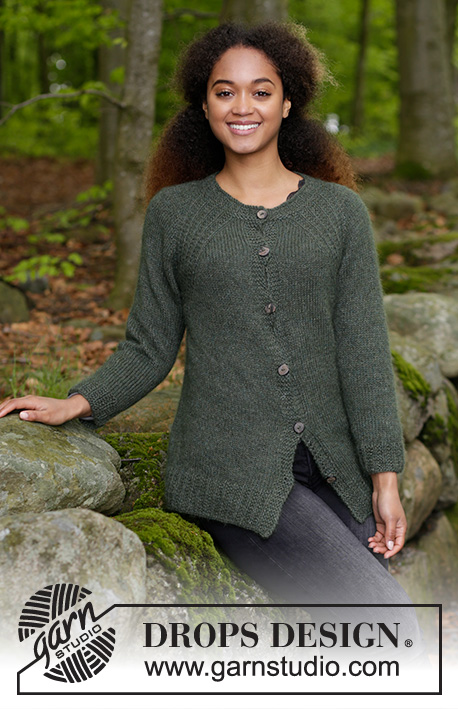
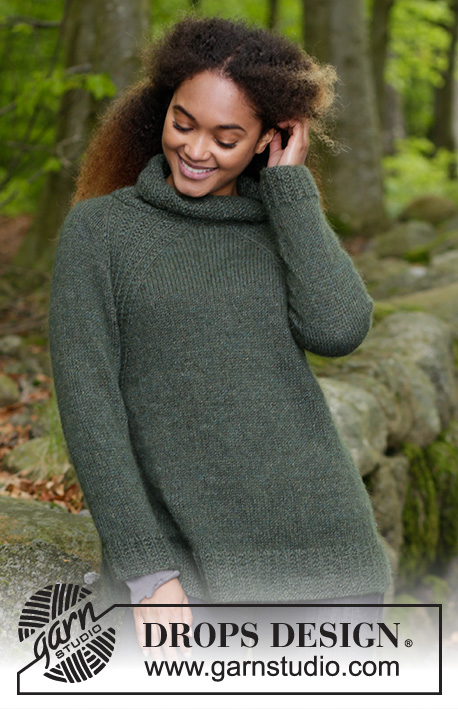
Knitted jumper with raglan, high collar and A-shape, knitted top down. Size: S - XXXL Piece is knitted in 1 strand DROPS Alpaca and 1 strand DROPS Kid-Silk.
DROPS 183-12 |
|||||||
|
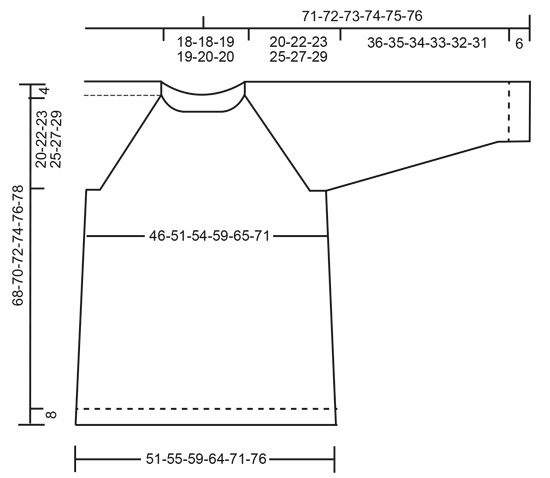
INFORMATION FOR PATTERN: DECREASE/INCREASE TIP (evenly): To calculate how to decrease/increase evenly, use the total number of stitches on row (e.g. 96 stitches) and divide stitches by number of decreased/increases to be done (e.g. 12) = 8. I.e. in this example knit approx. every 7th and 8th stitch together when decreasing. when increasing make 1 yarn over after approx. every 8th stitch, on next round knit yarn over twisted to avoid holes. PATTERN: See diagrams A.1 and A.2. Diagrams show all rows in pattern seen from the right side. RAGLAN: Increase for raglan on each side of A.2. Increase 1 stitch on each side of A.2 as follows (= 8 increased stitches per round with increase). Work until A.2, make 1 yarn over, work A.2, make 1 yarn over. On next round knit yarns over twisted to avoid holes. Then work the new stitches in stocking stitch. INCREASE TIP (applies to sides of body): Work until 2 stitches remain before marker thread, 1 yarn over, knit 4 (marker thread is in the middle of these stitches), 1 yarn over. On next round knit yarn overs twisted to avoid holes. DECREASE TIP: Decrease 1 stitch on each side of marker thread as follows: Work until 3 stitches remain before marker thread and knit 2 together, knit 2 (marker thread is between these stitches), slip 1 stitch knitwise, knit 1, pass slipped stitch over stitch worked. ---------------------------------------------------------- JUMPER: Worked in the round on circular needle, top down from mid back. An elevation in the back of neck can be worked to get a better fit so that yoke is somewhat higher in the neck. This elevation can be skipped, to make the neck the same at the front and back - see explanation on elevation in pattern. After yoke work body in the round on circular needle. Work sleeves in the round on double pointed needles, top down. NECK: Cast on 96-96-99-102-105-111 stitches on circular needle size 4.5 mm with 1 strand Alpaca and 1 strand Kid-Silk (= 2 strands). Knit 1 round. Work A.1 (= 3 stitches) in the round until piece measures 16 cm. Knit 1 round while decreasing 12-8-5-3-2-3 stitches evenly - read DECREASE/INCREASE TIP = 84-88-94-99-103-108 stitches. Purl 1 round. Knit 1 round while increasing 2-2-12-11-11-10 stitches evenly = 86-90-106-110-114-118 stitches. Purl 1 round. Now work elevation in the back of neck or start to work the yoke if you don’t want an elevation. ELEVATION IN BACK OF NECK: Skip this paragraph if you do not want an elevation. Insert 1 marker at beginning of round = mid back. Begin from right side and knit 11-11-12-13-13-14 past marker, turn, tighten yarn and purl 22-22-24-26-26-28. Turn, tighten yarn and knit 33-33-36-39-39-42, turn, tighten yarn and purl 44-44-48-52-52-56. Turn, tighten yarn and knit 55-55-60-65-65-70, turn, tighten yarn and purl 66-66-72-78-78-84, turn, tighten yarn and knit until mid back. YOKE: Insert a marker here. NOW MEASURE PIECE FROM HERE! Switch to circular needle size 5 mm and insert a marker thread at beginning of round (= mid back). Work pattern as follows: Knit 5-6-10-11-12-13 (= half back piece), A.2 (= 16 stitches), knit 1 (= sleeve), A.2, knit 10-12-20-22-24-26 (= front piece), A.2, knit 1 (= sleeve), A.2, knit 5-6-10-11-12-13. Continue pattern like this, AT THE SAME TIME increase for RAGLAN - see explanation above (= 8 stitches increased on round). Increase like this every other round 21-24-25-27-30-32 times = 254-282-306-326-354-374 stitches. After all increases for raglan continue size S with 2 rounds in stocking stitch and pattern without increase for raglan, then continue in all sizes as follows: Piece measures 20-22-23-25-27-29 cm from marker. If the piece is shorter than this, continue with pattern as before without increasing more stitches until piece have the correct measurements. Work next round as follows (continue pattern as before): Work 36-40-42-46-50-54 stitches (= half back piece), slip the next 55-61-69-71-77-79 stitches on a stitch holder (= sleeve), cast on 6-6-8-8-10-12 new stitches on needle (= under sleeve), work the next 72-80-84-92-100-108 stitches (= front piece), slip the next 55-61-69-71-77-79 stitches on a stitch holder (= sleeve), cast on 6-6-8-8-10-12 new stitches on needle (= under sleeve), work the remaining 36-40-42-46-50-54 stitches (= half back piece). BODY: = 156-172-184-200-220-240 stitches. NOW MEASURE THE PIECE FROM HERE! Insert a marker thread in each side (= the middle of the new stitches cast-on under each sleeve = 3-3-4-4-5-6 new stitches on each side of marker thread). Continue in the round with stocking stitch and continue A.2 over the 10-10-7-8-8-9 stitches in the remaining pattern on front/back piece but on every other row make 1 yarn over at the edge of every A.2 (= towards mid front and mid back) and knit 2 together inside every A.2 (towards the sides). Number of stitches will stay the same but stitches in A.2 will gradually disappear and there will be more stitches in stocking stitch. When all stitches in A.2 are gone, continue with stocking stitch over all stitches, AT THE SAME TIME on first round increase 1 stitch on each side of marker thread in each side – read INCREASE TIP. Increase like this every 14th-14th-14th-14th-12th-12th round 4-4-4-4-5-5 times = 172-188-200-216-240-260 stitches. When piece measures 36-36-37-37-37-37 cm, increase 14-10-13-15-12-16 stitches evenly = 186-198-213-231-252-276 stitches. Switch to circular needle size 4.5 mm. Work A.1 in the round for 8 cm. Cast off by knitting. Piece measures approx. 68-70-72-74-76-78 cm from shoulder and down. SLEEVE: Worked in the round on double pointed needles. Slip the 55-61-69-71-77-79 stitches from stitch holder in one side of piece on double pointed needles size 5 mm and cast in addition on 6-6-8-8-10-12 new stitch mid under sleeve = 61-67-77-79-87-91 stitches on needles. Insert a marker thread in the middle of the new stitches under sleeve – NOW MEASURE PIECE FROM HERE. Work in stocking stitch in the round at the same time decrease stitches in A.2 the same way as on body (number of stitches stays the same). When stitches in A.2 have been decreased, work stocking stitch over all stitches. When piece measures 6 cm in all sizes, decrease 2 stitches mid under sleeve - read DECREASE TIP. Decrease like this every 6th-5th-3rd-3rd-3rd-2nd round 12-13-18-18-20-22 times in total = 37-41-41-43-47-47 stitches. When piece measures 36-35-34-33-32-31 cm, increase 5-4-4-2-1-1 stitches evenly = 42-45-45-45-48-48 stitches. Switch to double pointed needles size 4.5 mm. Work A.1 over all stitches. When piece measures 42-41-40-39-38-37 cm, cast off all stitches by knitting. Work the other sleeve the same way. ASSEMBLY: Sew the openings under the sleeves. |
|||||||
Diagram explanations |
|||||||
|
|||||||
 |
|||||||
 |
|||||||
Have you finished this pattern?Tag your pictures with #dropspattern #woodlandwalksweater or submit them to the #dropsfan gallery. Do you need help with this pattern?You'll find 30 tutorial videos, a Comments/Questions area and more by visiting the pattern on garnstudio.com. © 1982-2026 DROPS Design A/S. We reserve all rights. This document, including all its sub-sections, has copyrights. Read more about what you can do with our patterns at the bottom of each pattern on our site. |
|||||||


With over 40 years in knitting and crochet design, DROPS Design offers one of the most extensive collections of free patterns on the internet - translated to 17 languages. As of today we count 324 catalogues and 12290 patterns translated into English (UK/cm). 12290
We work hard to bring you the best knitting and crochet have to offer, inspiration and advice as well as great quality yarns at incredible prices! Would you like to use our patterns for other than personal use? You can read what you are allowed to do in the Copyright text at the bottom of all our patterns. Happy crafting!
Post a comment to pattern DROPS 183-12
We would love to hear what you have to say about this pattern!
If you want to leave a question, please make sure you select the correct category in the form below, to speed up the answering process. Required fields are marked *.