
Popular categories
Looking for a yarn?


Comments / Questions (12)
![]() Diana wrote:
Diana wrote:
Hallo,das Bündchen schlägt am Ende um. Hab mich genau an die Anleitung gehalten, was kann ich dagegen machen?
04.04.2024 - 06:06DROPS Design answered:
Liebe Diana, Sie können den Pullover mit Stecknadeln auf einer geeigneten Unterlage spannen, anfeuchten (z.B. mit einer Sprühflasche für Blumen) und trocknen lassen, danach entfernen Sie die Stecknadeln, dann sollte sich der Rand nicht mehr rollen.
04.04.2024 - 08:39
![]() Mavi wrote:
Mavi wrote:
Buenos días, he iniciado el jersey con 98 puntos. Tras hacer los primeros aumentos del canesú (según mis cálculos 12 aumentos, ) el total de puntos que tengo es de 110 y no 118. ¿Es un error, estoy haciendo algo mal? Muchas gracia
01.11.2022 - 11:38DROPS Design answered:
Hola Mavi, para la talla L, tienes 110 puntos después de los aumentos (118 puntos es para la talla XL).
07.11.2022 - 00:51
![]() Maria Pia wrote:
Maria Pia wrote:
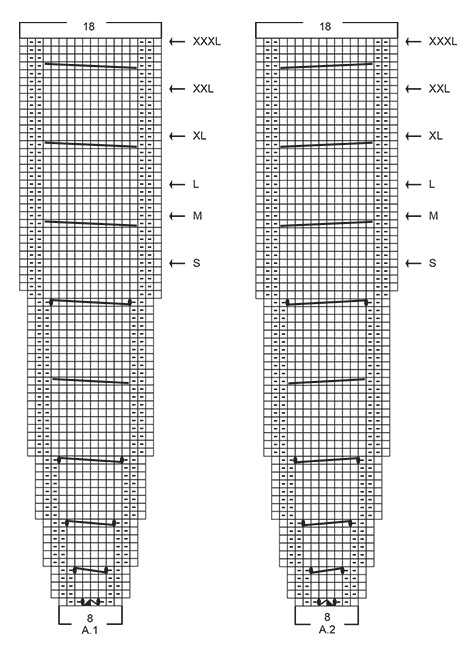
Salve, non capisco l inizio del raglan. Per la taglia xl ho sul ferro 118m. Il diagramma A1 e 2 è segnato come 8m, ma in realtà sono 6m più 2 gettati. Dunque il raglan è costruito su 6+9+6m. In totale 110m. Mi avanzano 8 m. Cosa ho sbagliato?
05.02.2021 - 23:11DROPS Design answered:
Buongiorno Maria Pia, il diagramma A.1 inizia su 8 maglie e poi aumenta già sul 1° giro. Deve lavorare in questo modo: 17 maglie diritto, 1 gettato, A.1 (= 8 maglie), 1 gettato, 9 maglie diritto, 1 gettato, A.2 (= 8 maglie), 1 gettato, 34 maglie diritto, 1 gettato, A.1, 1 gettato, 9 maglie diritto, 1 gettato, A.2, 1 gettato, 17-19-21 maglie diritto. Buon lavoro!
06.02.2021 - 13:48
![]() Maria Pia wrote:
Maria Pia wrote:
Salve, non capisco l inizio del raglan. Per la taglia xl ho sul ferro 118m. Il diagramma A1 e 2 è segnato come 8m, ma in realtà sono 6m più 2 gettati. Dunque il raglan è costruito su 6+9+6m. In totale 110m. Mi avanzano 8 m. Cosa ho sbagliato?
05.02.2021 - 23:10DROPS Design answered:
Buongiorno Maria Pia, il diagramma A.1 inizia su 8 maglie e poi aumenta già sul 1° giro. Deve lavorare in questo modo: 17 maglie diritto, 1 gettato, A.1 (= 8 maglie), 1 gettato, 9 maglie diritto, 1 gettato, A.2 (= 8 maglie), 1 gettato, 34 maglie diritto, 1 gettato, A.1, 1 gettato, 9 maglie diritto, 1 gettato, A.2, 1 gettato, 17-19-21 maglie diritto. Buon lavoro!
06.02.2021 - 13:48
![]() HELENE wrote:
HELENE wrote:
Bonjour, merci pour votre réponse. Je vais pouvoir continuer mon pull car il est beau comme tous vos modèles d'ailleurs et j'ai hâte de le finir et le porter car c'est pour printemps-été.
14.05.2018 - 13:19
![]() HELENE wrote:
HELENE wrote:
Bonjour, après avoir séparé les manches du dos et du devant dois-je continuer à tricoter les mailles de A1 et A2 comme elles se présentent ou dois-je tout tricoter en jersey ? Merci de me répondre car j'attends pour continuer mon pull. Bonne journée.
13.05.2018 - 12:50DROPS Design answered:
Bonjour Hélène, on tricote désormais toutes les mailles en jersey. Bon tricot!
14.05.2018 - 10:49
![]() Carla wrote:
Carla wrote:
Riscrivo la domanda precedente perché conteneva errori: nella spiegazione degli aumenti ai raglan,C’è scritto di fare un gettato ai lati delle otto maglie dello schema, ma guardando il diagramma i gettati sono ai lati delle due maglie della treccia che poi diventeranno quattro eccetera. Vorrei sapere se ho capito male grazie
17.01.2018 - 04:33DROPS Design answered:
Buongiorno Carla. Gli aumenti per il raglan non sono riportati nei diagrammi, ma vanno fatti prima / dopo le maglie dei diagrammi e verranno lavorati a diritto per formare un buco. Nel testo viene spiegato il primo aumento per il raglan. I gettati nei diagrammi vengono lavorati ritorti. Buon lavoro!
17.01.2018 - 06:52
![]() Carla wrote:
Carla wrote:
Nella spiegazione degli aumenti hai ragusane, c’è scritto di fare un aumento ai lati delle otto maglie del diagramma, ma guardandolo sembrerebbe che gli aumenti sono ai lati della treccia che inizia con due maglie che poi diventano quattro eccetera. Mi potreste spiegare se ho capito male grazie
17.01.2018 - 04:29
![]() Carla wrote:
Carla wrote:
Nella spiegazione degli aumenti ai raglan dite di fate un gettato ai lati delle 8 m del motivo, ma guardando il diagramma i gettati sono ai lati della treccia che inizia con due m, che poi diventano 4 ecc
17.01.2018 - 04:27
|
||||||||||||||||||||||||||||||||||||||||||||||
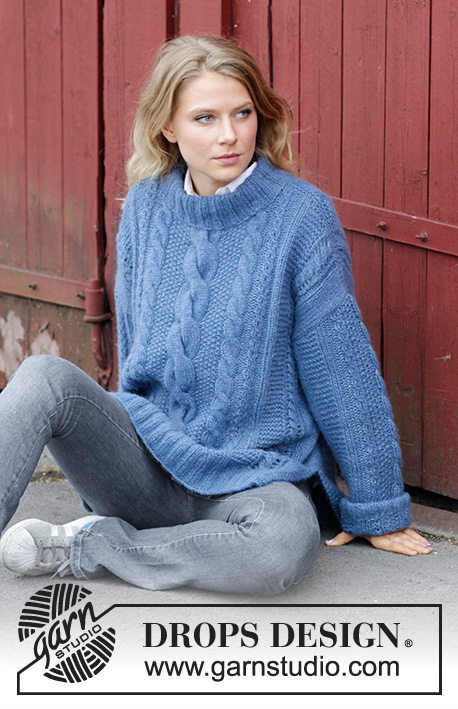
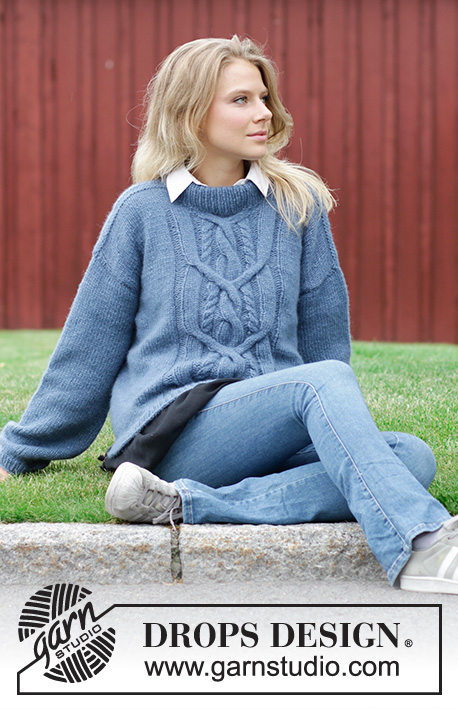
Moody Blues#moodybluessweater |
||||||||||||||||||||||||||||||||||||||||||||||
 |
 |
|||||||||||||||||||||||||||||||||||||||||||||
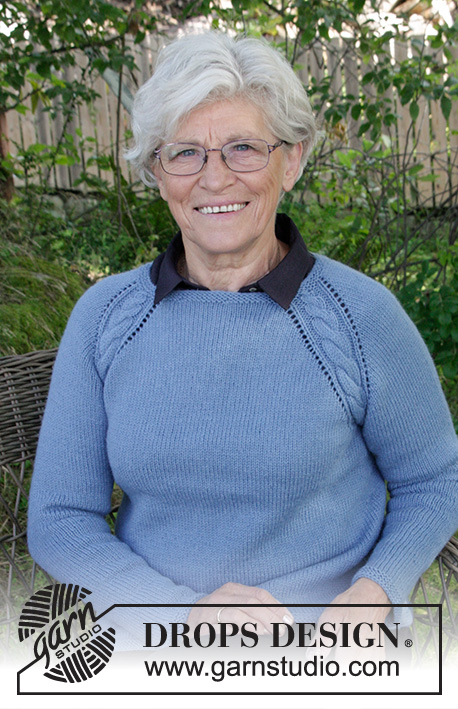
Knitted jumper with cables and raglan, worked top down. Sizes S - XXXL. The piece is worked in DROPS Lima.
DROPS 184-10 |
||||||||||||||||||||||||||||||||||||||||||||||
|
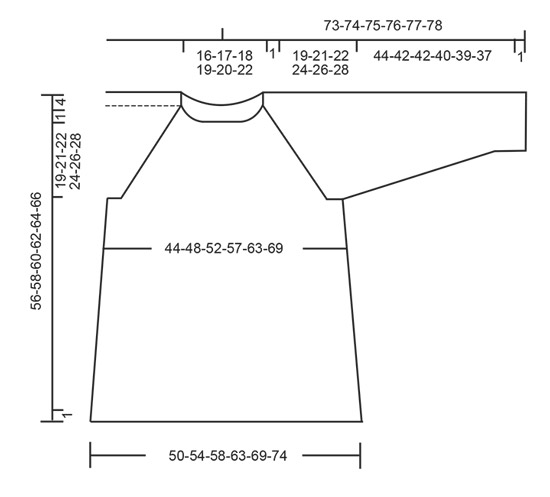
INFORMATION FOR THE PATTERN: RIDGE/GARTER STITCH (worked in the round): 1 ridge = 2 rounds. Knit 1 round and purl 1 round. PATTERN: See diagrams A.1 and A.2. The diagrams show all the rows in the pattern seen from the right side. DECREASE TIP-1 (evenly spaced): To work out how to decrease evenly, count the total number of stitches you are decreasing over (e.g. 12 stitches) and divide by the number of decreases to be made (e.g. 4) = 3. In this example knit every 2nd and 3rd stitch together. RAGLAN: Increase on each side of each repeat of A.1/A.2 (= 8 increases on the round). Increase 1 stitch by making 1 yarn over. On the next round knit the yarn overs, there will be holes. INCREASE TIP (for sides in body): Start 2 stitches before the marker thread, make 1 yarn over, knit 4 (marker thread sits in the middle of these 4 stitches), make 1 yarn over (= 2 stitches increased). On the next round knit the yarn overs twisted to prevent holes. DECREASE TIP-2 (for mid under sleeve): Start 3 stitches before the marker thread, knit 2 together, knit 2 (marker thread sits in the middle of these 2 stitches), slip 1 stitch as if to knit, knit 1, pass the slipped stitch over the knitted stitch (= 2 stitches decreased). ---------------------------------------------------------- JUMPER: The piece is worked in the round, top down with circular needle. The sleeves are worked in the round with double pointed needles. YOKE: Cast on 90-94-98-104-108-114 stitches with short circular needle size 3.5 mm and Lima. Work 3 RIDGES in the round – see description above. Change to short circular needle size 4 mm. Now work 1 round where you increase stitches as follows: Insert a marker thread at the beginning of the round (= mid back): knit 20-21-21-22-22-23 stitches, * knit 1, 1 yarn over *, work from *-* a total of 4-4-6-7-9-10 times, knit 41-43-43-45-45-47, * knit 1, 1 yarn over *, work from *-* a total of 4-4-6-7-9-10 times, knit 21-22-22-23-23-24 = 98-102-110-118-126-134 stitches. Knit 1 round (all the yarn overs are knitted twisted to prevent holes). REMEMBER THE KNITTING TENSION! On the next round work PATTERN as follows: Knit 12-13-15-17-19-21 stitches, 1 yarn over, A.1 (= 8 stitches), 1 yarn over, knit 9 stitches, 1 yarn over, A.2 (= 8 stitches), 1 yarn over, knit 24-26-30-34-38-42 stitches, 1 yarn over, A.1, 1 yarn over, knit 9 stitches, 1 yarn over, A.2, 1 yarn over, knit 12-13-15-17-19-21 stitches. The first increases to raglan are now finished (= 8 stitches increased on the round). Continue the pattern in this way and increase to RAGLAN – see description above, every 2nd round a total of 22-25-27-30-33-36 times (including the first increase and including the 10 stitches increased in every A.1/A.2) = 314-342-366-398-430-462 stitches. You have now worked as far as the arrow in the different sizes in diagrams A.1 and A.2. Continue in the round without increases and knit over knit and purl over purl across the stitches in A.1 and A.2, AT THE SAME TIME decrease 4 stitches evenly over the middle 12 stitches in each repeat of A.1/A.2 – read DECREASE TIP-1 (evenly spaced) (= 16 stitches decreased) = 298-326-350-382-414-446 stitches. Continue to work in the round until the piece measures 20-22-23-25-27-29 cm from the cast-on edge and down mid front. The next round is worked as follows: Work the first 41-45-49-54-59-64 stitches (= half back piece), place the next 67-73-77-83-89-95 stitches on a thread (= sleeve), cast on 10-10-12-12-14-16 new stitches under the sleeve, work the next 82-90-98-108-118-128 stitches (= front piece), place the next 67-73-77-83-89-95 stitches on a thread (= sleeve), cast on 10-10-12-12-14-16 new stitches under the sleeve, work the remaining 41-45-49-54-59-64 stitches (= half back piece). Body and sleeves are now continued separately. Insert a marker thread here. THE PIECE IS NOW MEASURED FROM HERE! BODY: = 184-200-220-240-264-288 stitches. Insert 1 marker thread in each side (i.e. in the middle of the 10-10-12-12-14-16 new stitches cast on under the sleeve in each side). Work stocking stitch in the round. When the piece measures 4 cm from the separation increase 2 stitches in each side – read INCREASE TIP (= 4 stitches increased). Increase in this way every 12th-12th-14th-14th-14th-14th round a total of 7-7-6-6-6-6 times = 212-228-244-264-288-312 stitches. Continue with stocking stitch until the piece measures 31-31-32-32-32-32 cm from the separation. Change to circular needle size 3.5 mm. Work 3 ridges. Cast off with knit. To avoid getting a tight cast-off edge you can cast off with a larger needle size. The jumper measures approx. 56-58-60-62-64-66 cm from the shoulder down. SLEEVE: Place the 67-73-77-83-89-95 stitches from the thread in one side of the piece on double pointed needles size 4 mm and, in addition, knit up 1 stitch in each of the 10-10-12-12-14-16 new stitches cast on under the sleeve = 77-83-89-95-103-111 stitches. Insert 1 marker thread in the middle of the 10-10-12-12-14-16 new stitches knitted up (= mid under the sleeve/side of jumper). Work stocking stitch in the round. When the piece measures 4 cm from the separation decrease 2 stitches mid under the sleeve – read DECREASE TIP-2. Decrease in this way every 6th-5th-4th-4th-3rd-2nd round a total of 15-18-20-22-26-29 times = 47-47-49-51-51-53 stitches. Continue working until the sleeve measures 44-42-42-40-39-37 cm from the separation. Change to double pointed needles size 3.5 mm. Work 3 ridges. Cast off with knit. To avoid getting a tight cast-off edge you can cast off with a larger needle size. Work another sleeve in the same way. |
||||||||||||||||||||||||||||||||||||||||||||||
Diagram explanations |
||||||||||||||||||||||||||||||||||||||||||||||
|
||||||||||||||||||||||||||||||||||||||||||||||
 |
||||||||||||||||||||||||||||||||||||||||||||||
 |
||||||||||||||||||||||||||||||||||||||||||||||
Have you finished this pattern?Tag your pictures with #dropspattern #moodybluessweater or submit them to the #dropsfan gallery. Do you need help with this pattern?You'll find 30 tutorial videos, a Comments/Questions area and more by visiting the pattern on garnstudio.com. © 1982-2026 DROPS Design A/S. We reserve all rights. This document, including all its sub-sections, has copyrights. Read more about what you can do with our patterns at the bottom of each pattern on our site. |
||||||||||||||||||||||||||||||||||||||||||||||


With over 40 years in knitting and crochet design, DROPS Design offers one of the most extensive collections of free patterns on the internet - translated to 17 languages. As of today we count 324 catalogues and 12290 patterns translated into English (UK/cm). 12290
We work hard to bring you the best knitting and crochet have to offer, inspiration and advice as well as great quality yarns at incredible prices! Would you like to use our patterns for other than personal use? You can read what you are allowed to do in the Copyright text at the bottom of all our patterns. Happy crafting!
Post a comment to pattern DROPS 184-10
We would love to hear what you have to say about this pattern!
If you want to leave a question, please make sure you select the correct category in the form below, to speed up the answering process. Required fields are marked *.