Clicking the ORDER button will redirect you to Saules siulas website
The yarn cost is calculated from the pattern’s smallest size and the yarn’s cheapest product type. Looking for an even better price? You might find it on the DROPS Deals!
-------------------------------------------------------
Alternative Yarn – See how to change yarns here
Yarn Groups A to F – Use the same pattern and change the yarn here
Yarn usage using an alternative yarn – Use our yarn converter here
-------------------------------------------------------
Clicking the ORDER button will redirect you to Saules siulas website
The yarn cost is calculated from the pattern’s smallest size and the yarn’s cheapest product type. Looking for an even better price? You might find it on the DROPS Deals!
This pattern has been corrected. Click here to see the correction/s.
= knit | |
= purl | |
= insert right needle through stitch from previous round, knit 1 and slip stitch off the needle |
Each of our patterns has specific tutorial videos to help you.
These step-by-step tutorials might also help you:
Why is the knitting/crochet tension so important?
Knitting tension is what determines the final measurements of your work, and is usually measured per 10 x 10 cm. It is provided like so: number of stitches in width x number of rows in height - eg: 19 stitches x 26 rows = 10 x 10 cm.
The knitting tension is very individual; some people knit/crochet loosely while others work tightly. You adjust the knitting tension with the needle size, which is why the suggested needle size is only meant as a guide! You need to adjust this (up or down) to ensure that YOUR knitting tension matches the knitting tension provided in the pattern. If you work with a different knitting tension than provided you will have a different yarn consumption, and your work will have different measurements than what the pattern suggests.
The knitting tension also determines which yarns can replace each other. As long as you achieve the same knitting tension you can replace one yarn with another.
See DROPS lesson: How to measure your tension/gauge
See DROPS video: How to make a gauge tension swatch
How do I know how many balls of yarn I need?
The required amount of yarn is provided in grams, eg: 450 g. To calculate how many balls you’ll need you first need to know how many grams are in 1 ball (25g, 50g or 100g). This information is available if you click on the individual yarn quality on our pages. Divide the amount required with the amount of each ball. For example, if each ball is 50g (the most common amount), the calculation will be as follows: 450 / 50 = 9 balls.
Can I use a different yarn than what the pattern suggests?
The important thing when changing from one yarn to another is that the knitting/crochet tension remains the same. This is so that the measurements of the finished piece will be the same as on the sketch provided. It is easier to achieve the same knitting tension using yarns from the same yarn group. It is also possible to work with multiple strands of a thinner yarn to achieve the knitting tension of a thicker one. Please try our yarn converter. We recommend you to always work a test swatch.
Please NOTE: when changing yarn the garment might have a different look and feel to the garment in the photo, due to individual properties and qualities of each yarn.
See DROPS lesson: Can I use a different yarn than the one mentioned in the pattern?
What are the yarn groups?
All our yarns are categorised into yarn groups (from A to F) according to thickness and knitting tension – group A contains the thinnest yarns and group F the thickest. This makes it easier for you to find alternative yarns to our patterns, should you wish to switch yarn. All yarns within the same group have a similar knitting tension and can easily replace each other. However, different yarn qualities have different structures and properties which will give the finished work a unique look and feel.
How do I use the yarn calculator?
At the top of all our patterns you’ll find a link to our yarn calculator, which is a helpful tool should you wish to use a different yarn than suggested. By filling in the yarn quality you wish to replace, the amount (in your size) and number of strands, the calculator will present good alternative yarns with the same knitting tension. Additionally it will tell you how much you’ll require in the new qualities and whether you’ll need to work with multiple strands. Most skeins are 50g (some are 25g or 100g).
If the pattern is worked with multiple colours, every colour will have to be calculated separately. Similarly, if the pattern is worked with several strands of different yarns (for example 1 strand Alpaca and 1 strand Kid-Silk) you will have to find alternatives for each, individually.
Why do you show discontinued yarns in the patterns?
Since different yarns have different qualities and textures we have chosen to keep the original yarn in our patterns. However, you can easily find options among our available qualities by using our yarn calculator, or simply pick a yarn from the same yarn group.
It is possible that some retailers still have discontinued yarns in stock, or that someone has a few skeins at home that they would like to find patterns for.
The yarn calculator will provide both alternative yarn as well as required amount in the new quality.
What size should I knit?
If you think it's hard to decide what size to make, it can be a good idea to measure a garment you own already and like the size of. Then you can pick the size by comparing those measures with the ones available in the pattern's size chart.
You'll find the size chart at the bottom of the pattern.
See DROPS lesson: How to read size chart
Why do I get the wrong knitting tension with the suggested needle size?
The needle size provided in the pattern serves only as a guide, the important thing is to follow the knitting tension. And since knitting tension is very individual, you will have to adjust the needle size to ensure that YOUR tension is the same as in the pattern – maybe you’ll have to adjust 1, or even 2 needle sizes, up or down to achieve the correct tension. For this, we recommend that you work test swatches.
Should you work with a different knitting tension than the one provided, the measurements of the finished garment might deviate from the measurement sketch.
See DROPS lesson: How to measure your tension/gauge
See DROPS video: How to make a tension/gauge swatch
Why is the pattern worked top-down?
Working a garment top-down provides more flexibility and room for personal adjustment. For example it is easier to try the garment on while working, as well as making adjustments to length of yoke and shoulder caps.
The instructions are carefully explaining every step, in the correct order. Diagrams are adjusted to the knitting direction and are worked as usual.
How do I work according to a knitting diagram?
The diagram depicts all rows/rounds, and every stitch seen from the right side. It is read from bottom to top, from right to left. 1 square = 1 stitch.
When working back and forth, every other row is worked from the right side and every other row is worked from the wrong side. When working from the wrong side, the diagram will have to be worked reversed: from left to right, knit stitches are purled, purl stitches are knit etc.
When working in the round every round is worked from the right side and the diagram are worked from right to left on all rounds.
See DROPS lesson: How to read knitting diagrams
How do I work according to a crochet diagram?
The diagram depicts all rows/rounds, and every stitch seen from the right side. It is worked from bottom to top, from right to left.
When working back and forth every other row is worked from the right side: from right to left and every other row is worked from the wrong side: from left to right.
When working in the round, every row in the diagram are worked from the right side, from right to left.
When working a circular diagram you start in the middle and work your way outwards, counter clockwise, row by row.
The rows usually start with a given number of chain stitches (equivalent to the height of the following stitch), this will either be depicted in the diagram or explained in the pattern.
See DROPS lesson: How to read crochet diagrams
How do I work several diagrams simultaneously on the same row/round?
Instructions for working several diagrams after each other on the same row/round, will often be written like so: “work A.1, A.2, A.3 a total of 0-0-2-3-4 times". This means you work A.1 once, then A.2 is worked once, and A.3 is repeated (in width) the number of times provided for your size – in this case like so: S = 0 times, M = 0 times, L=2 times, XL= 3 times and XXL = 4 times.
The diagrams are worked as usual: begin with the first row in A.1, then work the first row in A.2 etc.
See DROPS lesson: How to read knitting diagrams
See DROPS lesson: How to read crochet diagrams
Why are the sleeves shorter in larger sizes?
The total width of the garment (from wrist-to-wrist) will be larger in the larger sizes, despite the actual sleeves being shorter. The larger sizes have longer sleeve caps and wider shoulders, so there will be a good fit in all sizes.
Where on the garment is the length measured?
The measurement sketch/schematic drawing provides information regarding the full length of the garment. If it’s a jumper or a jacket the length is measured from the highest point on the shoulder closest to the neckline, and straight down to the bottom of the garment. It is NOT measured from the tip of shoulder. Similarly, the length of yoke is measured from the highest point on the shoulder and down to where yoke is split into body and sleeves.
On a jacket measures are never taken along bands, unless specifically stated. Always measure inside band stitches when measuring the length.
See DROPS lesson: How to read a schematic drawing
What is a repeat?
Diagrams are often repeated on the round or in height. 1 repeat is the diagram the way it appears in the pattern. If it says to work 5 repeats of A.1 in the round, then you work A.1 a total of 5 times after/next to each other in the round. If it says to work 2 repeats of A.1 vertically/in height you work the entire diagram once, then begin again at the start and work the entire diagram one more time.
Why does the piece start with more chain stitches than it’s worked with?
Chain stitches are slightly narrower than other stitches and to avoid working the cast-on edge too tight, we simply chain more stitches to begin with. The stitch count will be adjusted on the following row to fit the pattern and measurement sketch.
Why increase before the rib edge when the piece is worked top-down?
The rib edge is more elastic and will contract slightly compared to, for example, stocking stitch. By increasing before the rib edge, you avoid a visible difference in width between the rib edge and the rest of the body.
Why increase in the cast-off edge?
It’s very easy to cast off too tightly, and by making yarn overs while casting off (and simultaneously casting these off) you avoid a too tight cast off edge.
See DROPS video: How to bind off with yarn overs (yo)
How do I increase/decrease on every 3rd and 4th row/round alternately?
To achieve an even increase (or decrease) you can increase on, for example: every 3rd and 4th row alternately, like so: work 2 rows and increase on the 3rd row, work 3 rows and increase on the 4th. Repeat this until the increase is complete.
See DROPS lesson: Increase or decrease 1 st on every 3rd and 4th row alternately
How can I work a jacket in the round instead of back and forth?
Should you prefer to work in the round instead of back and forth, you may of course adjust the pattern. You’ll need to add steeks mid-front (usually 5 stitches), and follow the instructions. When you would normally turn and work from the wrong side, simply work across the steek and continue in the round. At the end you’ll cut the piece open, pick up stitches to work bands, and cover the cut edges.
See DROPS video: How to knit steeks and cut open
Can I work a jumper back and forth instead of in the round?
Should you prefer to work back and forth instead of in the round, you may of course adjust the pattern so you work the pieces separately and then assemble them at the end. Divide the stitches for the body in 2, add 1 edge stitch in each side (for sewing) and work the front and back pieces separately.
See DROPS lesson: Can I adapt a pattern for circular needles into straight needles?
Why is the pattern slightly different than what I see in the photo?
Pattern repeats can vary slightly in the different sizes, in order to get the correct proportions. If you’re not working the exact same size as the garment in the photo, yours might deviate slightly. This has been carefully developed and adjusted so that the complete impression of the garment is the same in all sizes.
Make sure to follow instructions and diagrams for your size!
How do I make a women’s size garment into a men’s size one?
If you have found a pattern you like which is available in women’s size it’s not very difficult to convert it to men’s size. The biggest difference will be the length of sleeves and body. Start working on the women size that you think would fit across the chest. The additional length will be worked right before you cast off for the armhole/sleeve cap. If the pattern is worked top-down you can add the length right after the armhole or before the first decrease on sleeve.
Regarding additional yarn amount, this will depend on how much length you add, but it is better with a skein too many than too few.
How do I prevent a hairy garment from shedding?
All yarns will have excess fibres (from production) that might come off as lint or shedding. Brushed yarns (ie hairier yarns) have more of these loose, excess fibres, causing more shedding.
Shedding also depends on what is worn under or over the garment, and whether this pulls at the yarn fibres. It’s therefore not possible to guarantee that there will be no shedding
Below are some tips on how to get the best result when working with hairier yarns:
1. When the garment is finished (before you wash it) shake it vigorously so the looser hairs come off. NOTE: do NOT use a lint roller, brush or any method that pulls at the yarn.
2. Place the garment in a plastic bag and put it in your freezer - the temperature will cause the fibres to become less attached to each other, and excess fibres will come off easier.
3. Leave in the freezer for a few hours before taking it out and shaking it again.
4. Wash the garment according to the instructions on the yarn label.
Why does my garment pill?
Pilling is a natural process that happens to even the most exclusive of fibers. It's a natural sign of wear and tear that is hard to avoid, and that is most visible in high friction areas of your garment like a sweater's arms and cuffs.
You can make your garment look as new by removing the pilling, using a fabric comb or a pill/lint remover.
Perkins |
||||||||||
|
|
|||||||||
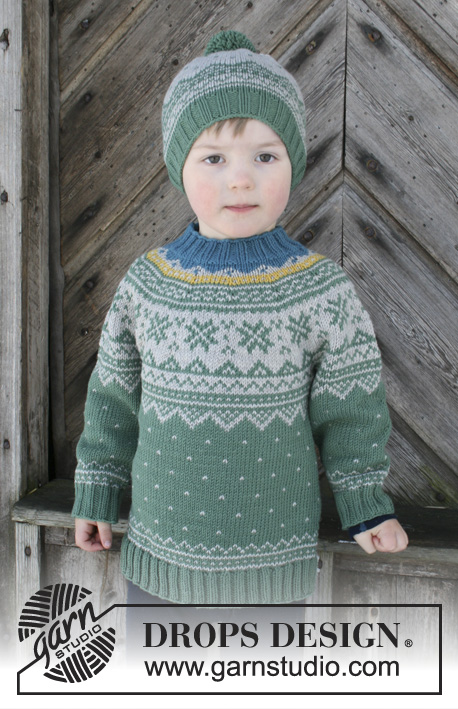
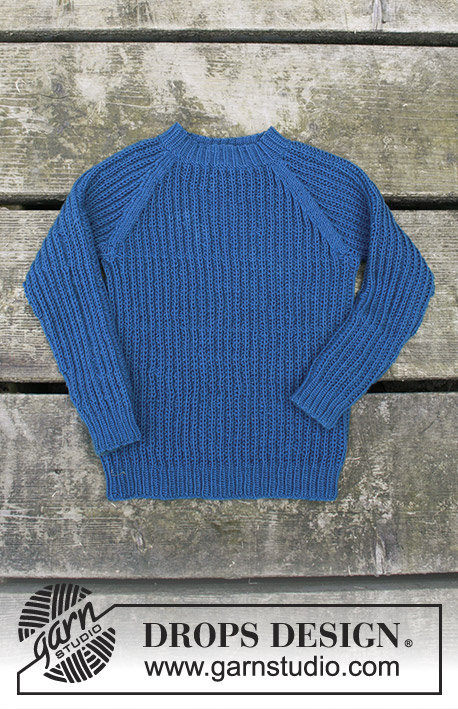
Knitted jumper with false Fisherman’s rib and raglan for kids in DROPS BabyMerino or DROPS Safran. Size 2 - 12 years.
DROPS Children 30-9 |
||||||||||
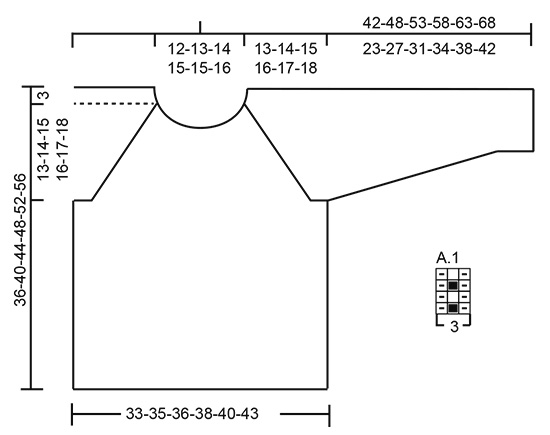
INFORMATION FOR PATTERN: GARTER STITCH (worked in the round): 1 ridge = 2 rounds. Knit 1 round and purl 1 round. PATTERN: See diagram A.1. INCREASE TIP: Work until 1 stitch remains before marker thread. Make 1 yarn over, purl 2 (marker is between these 2 stitches), make 1 yarn over (= 2 stitches increased). On next round work yarn overs twisted to avoid holes. Work the increased stitches in A.1 and purl the 2 stitches at the marker thread. RAGLAN: Decrease for raglan in every transition between sleeves and body. Begin 3 stitches before marker thread and knit 2 together, knit 2 (marker thread is between these 2 stitches), slip 1 stitch knitwise, knit 1, pass slipped stitch over stitch worked (= 2 stitches decreased). DECREASE TIP: To calculate how to decrease evenly, use the total number of stitches on round (e.g. 100 stitches) and divide stitches by number of decreases to be done (e.g. 19) = 5.3. In this example knit approx. every 4th and 5th stitch together. ---------------------------------------------------------- JUMPER: Worked in the round on circular needle. BODY: Cast on 156-168-174-186-192-204 stitches on circular needle size 2.5 mm with Baby Merino or Safran. Knit 1 round, then work rib as follows: purl 1, * knit 1, purl 2 *, repeat from *-* until 2 stitches remain on round, finish with knit 1 and purl 1. Continue rib like this for 4 cm. Switch to circular needle size 3 mm and work A.1 in the round over all stitches. REMEMBER THE KNITTING TENSION! When piece measures 20-23-26-29-32-35 cm, work next round as follows: Cast off 4 stitches for armhole, work 70-76-79-85-88-94 stitches (= front piece), cast off 8 stitches for armhole, work 70-76-79-85-88-94 stitches (= back piece) and cast off the last 4 stitches on needle for armhole. Put piece aside and work the sleeves. SLEEVE: Work in the round on double pointed needles/a short circular needle. Cast on 42-42-42-48-48-48 stitches on double pointed needles size 2.5 mm with Baby Merino or Safran. Knit 1 round, then work rib as follows: purl 1, * knit 1, purl 2 *, repeat from *-* until 2 stitches remain on round, finish with knit 1 and purl 1. Continue rib like this for 4 cm. Switch to double pointed needles size 3 mm and work A.1 in the round over all stitches. Insert 1 marker thread at beginning of round (= mid under sleeve). When piece measures 6 cm, increase 1 stitch on each side of marker thread - read INCREASE TIP! Repeat increase every 2½-2½-2½-3-3-2½ cm 7-9-10-9-11-13 times in total = 56-60-62-66-70-74 stitches. When piece measures approx. 23-28-31-35-39-42 cm (adjust to finish on same round in A.1 as on body), cast off 8 stitches mid under sleeve (cast off 4 stitches on each side of marker thread) = 48-52-54-58-62-66 stitches. Put piece aside and knit another sleeve. YOKE: Slip sleeves on to same circular needle as body where armholes were cast off (without working the stitches first) = 236-256-266-286-300-320 stitches on needle. Insert 1 marker thread in all transitions between sleeves and body piece (= 4 marker threads). RAGLAN: Continue pattern in the round as before. Work in the round over all stitches for 2 cm. On next round decrease for RAGLAN – see explanation above (= 8 stitches decreased). Continue decrease for raglan every other round until decrease has been done 17-19-20-22-24-26 times in total on each side of all marker threads. After all decreases for raglan there are 100-104-106-110-108-112 stitches on needle and piece measures approx. 36-40-44-48-52-56 cm up to shoulder. NECK EDGE: Switch to circular needle size 2.5 mm. Work 1 ridge in GARTER STITCH in the round over all stitches, AT THE SAME TIME on first round in ridge decrease 19-17-13-11-6-7 stitches evenly – read DECREASE TIP = 81-87-93-99-102-105 stitches. Work rib = knit 1/purl 2 for 3 cm, then cast off with knit over knit and purl over purl. ASSEMBLY: Sew the openings under the sleeves. |
||||||||||
Diagram explanations |
||||||||||
|
||||||||||
Have you made this or any other of our designs? Tag your pictures in social media with #dropsdesign so we can see them! Do you need help with this pattern?You'll find tutorial videos, a Comments/Questions area and more by visiting the pattern on garnstudio.com. © 1982-2024 DROPS Design A/S. We reserve all rights. This document, including all its sub-sections, has copyrights. Read more about what you can do with our patterns at the bottom of each pattern on our site. |
With over 40 years in knitting and crochet design, DROPS Design offers one of the most extensive collections of free patterns on the internet - translated to 17 languages. As of today we count 304 catalogues and 11428 patterns - 11428 of which are translated into English (UK/cm).
We work hard to bring you the best knitting and crochet have to offer, inspiration and advice as well as great quality yarns at incredible prices! Would you like to use our patterns for other than personal use? You can read what you are allowed to do in the Copyright text at the bottom of all our patterns. Happy crafting!
Comments / Questions (111)
Agáta Maňásková wrote:
Dobrý den, nezlobte se, ale i když jste opravili návod, je absolutně nesrozumitelný, vůbec nechápu jak to má vypadat, kdyby bylo alespon foto rukávu od prostředku, abych věděla jak to má vypadat.
16.11.2021 - 17:53Gabriela Preuschoff wrote:
Hallöchen Ich habe alle 3 Teile bis zum Arm Ausschnitt. Kann mir jetzt nicht vorstellen wie ich die Maschen von den Ärmeln in 8Maschen Lücke bekomme .Auch wenn ich es ganz eng zusammen schiebe ,es passt nicht rein. LG Gaby
09.11.2021 - 10:09DROPS Design answered:
Liebe Frau Preuschoff, dieses Video zeigt, wie man die Ärmel mit dem Rumpfteil auf eine Rundnadel strickt, bei den ersten Runden kann es etwas trickig sein, dann können Sie noch mit Nadelspiel oder einer anderen Rundnadel stricken, nach einigen Runden wird es einfacher. Viel Spaß beim stricken!
09.11.2021 - 13:14Agáta Maňásková wrote:
Dobrý den, prosím vás vůbec jsem nepochopila jakým způsobem se přidávají oka na rozšíření rukávu, zkoušela jsem dle návodu tip na přidávání, ale vůbec mně to nejde, není to hezké a nevím jak pak zapracovávat přidané oka, děkuji
04.11.2021 - 22:16DROPS Design answered:
Dobrý den, Agáto! Způsob přidávání jsme zrevidovali a poupravili, teď už by to tedy mělo vycházet lépe: TIP - PŘIDÁVÁNÍ: Pleteme po poslední 1 oko před značkou: 1x nahodíme, 2 oka upleteme obrace (značka leží mezi nimi), 1x nahodíme (= přidali jsme 2 oka). V následující kruhové řadě pleteme nahození za zadní nit, aby se v pletenině netvořily dírky. Přidaná oka zapracujeme do vzoru A.1 a 2 oka na každé straně značky pleteme v každé kruhové řadě obrace. Hodně zdaru! Hana
05.11.2021 - 16:36Jenny wrote:
Do you have further diagrams for increases in sleeve please
28.09.2021 - 06:14DROPS Design answered:
Dear Jenny, increase as explained under INCREASE TIP: work until 1 stitch remain before marker at the beg of the round (= purl stitch, last stitch of the round), make 1 yarn over, purl 2 (= the last stitch of the round + the first stitch of next round), make 1 yarn over. On next round, purl these yarn overs twisted , on next increase, knit the yarn overs twisted, on next 2 increases purl the yarn overs twisted, and so on, so that the yarn overs are worked into A.1. The pattern doesn't fit under the sleeve and you should always increase on each side of P2 mid under sleeve. Happy knitting!
28.09.2021 - 08:26Hildegard wrote:
Ich würde diesen Pullover gerne für einen erwachsenen Mann stricken, gibt es eine Umrechnungstabelle/Anpassung für Erwachsene (XXL)?
01.09.2021 - 11:48DROPS Design answered:
Liebe Hildegard, könnte Ihnen das Modell Lagoon gefallen? Die Dame-Version finden Sie auch hier. Viel Spaß beim stricken!
01.09.2021 - 13:02Jenny wrote:
My 30 year-old son would like a sweater just like this one. How can I adjust this pattern for a large male adult?
27.07.2021 - 22:24DROPS Design answered:
Dear Jenny, please understand that we cannot modifí our patterns for each induvidual request. We do have alarge number of patterns for adult males, for example THIS is kind of similar to the one you looked at. Happy Stitching!
28.07.2021 - 05:12Maru wrote:
Hola, tengo una duda. Soy novata y no entiendo bien si el diagrama A1 se repite sólo a lo ancho del tejido o también a lo largo, o sea, quiero saber si se repite también en todo el cuerpo de la prenda hasta llegar arriba, a la parte en que cerramos puntos para la sisa. Gracias.
07.07.2021 - 20:57Marion wrote:
Kann ich dieses Modell auch glatt rechts stricken? Oder verändert sich dadurch die Passform?
18.06.2021 - 15:00DROPS Design answered:
Liebe Marion, die Maschenprobe in der Höhe wurde unterschiedlich sein als mit Patentmuster, am besten suchen Sie ein anderes Modell wenn Sie glatt rechts stricken möchten. Viel Spaß beim stricken!
21.06.2021 - 07:21Elisa wrote:
Spørgsmål til ryg og forstykke: jeg har nu lavet ribben (1 ret 2 vrang), og vil høre, hvordan jeg får lagt alle retmaskerne fra diagrammet (1 ret 1 vrang) ovenpå alle retmaskerne fra ribben? Skal jeg lave indtagninger eller hur?
01.06.2021 - 08:33DROPS Design answered:
Hej Elisa, diagrammet går över 3 maskor (inte 2 som du skriver här) :)
02.06.2021 - 11:57Johanna wrote:
Auch das ist mir klar. Aber da gibt es einen Schritt vorher. Es sollen an den Ärmeln 4M und am Rumpfteil 2x8M für den Armausschnitt abgekettet werden. Ann sollen die Maschen der Ärmel auf die Rundnadel genommen werden und es soll noch ein Stück gerade weitergestrickt werden, ehe die Raglanabnahmen beginnen. Dafür wäre es erforderlich, dass das Muster an den Übergängen weiterläuft. \r\nIch glaube aber, dass das nicht so ist,
24.05.2021 - 22:24