DROPS Baby Merino
DROPS Baby Merino
100% Wool
from 3.50 £ /50g
Get the yarn to make this pattern from 17.50£.

The yarn cost is calculated from the pattern’s smallest size and the yarn’s cheapest product type. Looking for an even better price? You might find it on the DROPS Deals!

DROPS Super Sale

Perkins

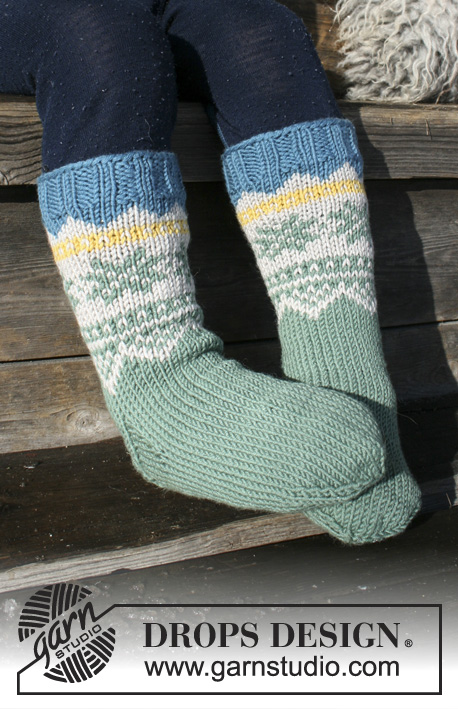
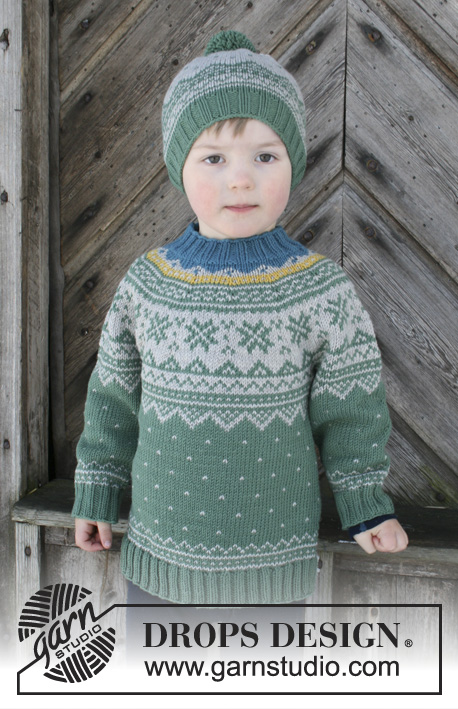
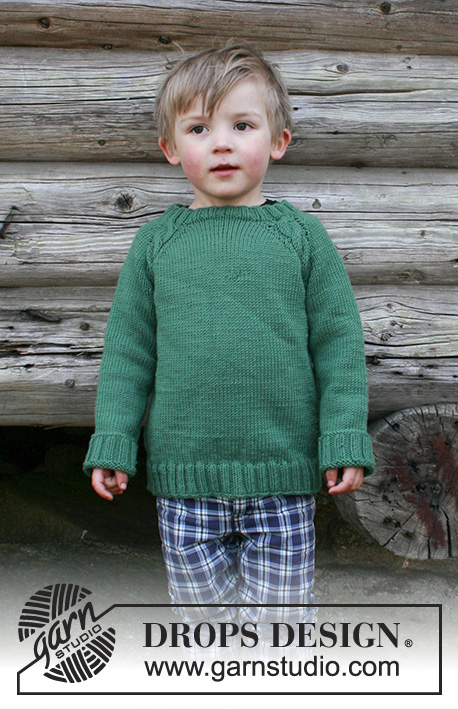
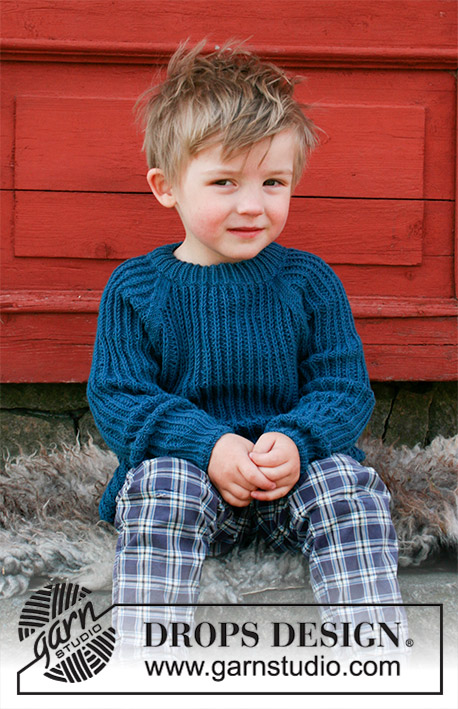
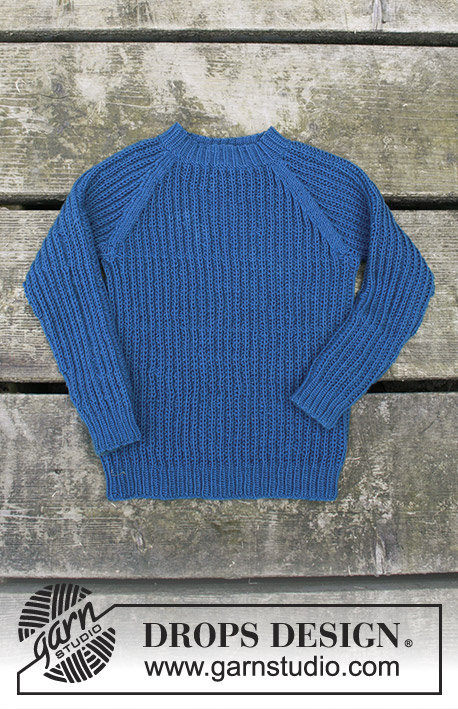
Knitted jumper with false Fisherman’s rib and raglan for kids in DROPS BabyMerino or DROPS Safran. Size 2 - 12 years.

DROPS Children 30-9
DROPS design: Pattern no bm-010-bn
Yarn group A
----------------------------------------------------------
Size: 2 - 3/4 - 5/6 - 7/8 - 9/10 - 11/12 years
Size in cm: 92 - 98/104 - 110/116 - 122/128 - 134/140 - 146/152
Materials:
DROPS BABY MERINO from Garnstudio (belongs to yarn group A)
250-250-300-300-350-350 g colour no 42, petrol

Or use:
DROPS Safran from Garnstudio (belongs to yarn group A)
300-300-350-350-400-400 g colour no 51, petrol

Piece can also be knitted with yarn from:
“Alternative yarn (yarn group A)” - see link below.

DROPS DOUBLE POINTED NEEDLES AND CIRCULAR NEEDLE (40 + 60 or 80 cm) SIZE 3 mm – or size needed to get 24 stitches and 32 rows in stocking stitch = width 10 cm and 10 cm vertically.

DROPS DOUBLE POINTED NEEDLES AND CIRCULAR NEEDLE (40 and 80 cm) SIZE 2.5 mm for rib – or size needed to get 26 stitches and 34 rows in stocking stitch = width 10 cm and 10 cm vertically.
----------------------------------------------------------

-------------------------------------------------------

Alternative Yarn – See how to change yarns here
Yarn Groups A to F – Use the same pattern and change the yarn here
Yarn usage using an alternative yarn – Use our yarn converter here

-------------------------------------------------------

DROPS Baby Merino
DROPS Baby Merino
100% Wool
from 3.50 £ /50g
Get the yarn to make this pattern from 17.50£.

The yarn cost is calculated from the pattern’s smallest size and the yarn’s cheapest product type. Looking for an even better price? You might find it on the DROPS Deals!

DROPS Super Sale

SAVE 30% on 6 cotton favourites!
Valid until 12.04.2024

Pattern instructions

NOTE: This pattern is written in British English. All measurements in charts are in cm. For conversion from cm to inches - click here. There are different terms for crocheting in British and American English. If this pattern includes crochet, click for "crochet terms" here. For this pattern in American English, please click here.
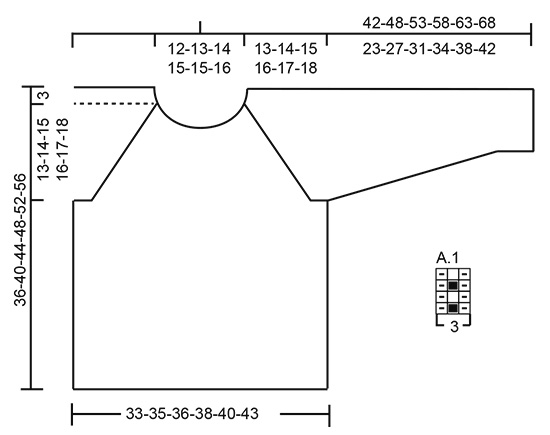
INFORMATION FOR PATTERN:

GARTER STITCH (worked in the round):
1 ridge = 2 rounds. Knit 1 round and purl 1 round. 

PATTERN:
See diagram A.1.

INCREASE TIP:
Work until 1 stitch remains before marker thread. Make 1 yarn over, purl 2 (marker is between these 2 stitches), make 1 yarn over (= 2 stitches increased). On next round work yarn overs twisted to avoid holes. Work the increased stitches in A.1 and purl the 2 stitches at the marker thread.

RAGLAN:
Decrease for raglan in every transition between sleeves and body. 
Begin 3 stitches before marker thread and knit 2 together, knit 2 (marker thread is between these 2 stitches), slip 1 stitch knitwise, knit 1, pass slipped stitch over stitch worked (= 2 stitches decreased).

DECREASE TIP:
To calculate how to decrease evenly, use the total number of stitches on round (e.g. 100 stitches) and divide stitches by number of decreases to be done (e.g. 19) = 5.3.
In this example knit approx. every 4th and 5th stitch together.
----------------------------------------------------------

JUMPER:
Worked in the round on circular needle.

BODY:
Cast on 156-168-174-186-192-204 stitches on circular needle size 2.5 mm with Baby Merino or Safran. Knit 1 round, then work rib as follows: purl 1, * knit 1, purl 2 *, repeat from *-* until 2 stitches remain on round, finish with knit 1 and purl 1. Continue rib like this for 4 cm. Switch to circular needle size 3 mm and work A.1 in the round over all stitches. REMEMBER THE KNITTING TENSION! When piece measures 20-23-26-29-32-35 cm, work next round as follows: Cast off 4 stitches for armhole, work 70-76-79-85-88-94 stitches (= front piece), cast off 8 stitches for armhole, work 70-76-79-85-88-94 stitches (= back piece) and cast off the last 4 stitches on needle for armhole. Put piece aside and work the sleeves.

SLEEVE:
Work in the round on double pointed needles/a short circular needle.
Cast on 42-42-42-48-48-48 stitches on double pointed needles size 2.5 mm with Baby Merino or Safran. Knit 1 round, then work rib as follows: purl 1, * knit 1, purl 2 *, repeat from *-* until 2 stitches remain on round, finish with knit 1 and purl 1. Continue rib like this for 4 cm. Switch to double pointed needles size 3 mm and work A.1 in the round over all stitches. Insert 1 marker thread at beginning of round (= mid under sleeve). When piece measures 6 cm, increase 1 stitch on each side of marker thread - read INCREASE TIP! Repeat increase every 2½-2½-2½-3-3-2½ cm 7-9-10-9-11-13 times in total = 56-60-62-66-70-74 stitches. When piece measures approx. 23-28-31-35-39-42 cm (adjust to finish on same round in A.1 as on body), cast off 8 stitches mid under sleeve (cast off 4 stitches on each side of marker thread) = 48-52-54-58-62-66 stitches. Put piece aside and knit another sleeve.

YOKE:
Slip sleeves on to same circular needle as body where armholes were cast off (without working the stitches first) = 236-256-266-286-300-320 stitches on needle. Insert 1 marker thread in all transitions between sleeves and body piece (= 4 marker threads). 

RAGLAN:
Continue pattern in the round as before. Work in the round over all stitches for 2 cm. On next round decrease for RAGLAN – see explanation above (= 8 stitches decreased). Continue decrease for raglan every other round until decrease has been done 17-19-20-22-24-26 times in total on each side of all marker threads.
After all decreases for raglan there are 100-104-106-110-108-112 stitches on needle and piece measures approx. 36-40-44-48-52-56 cm up to shoulder.

NECK EDGE:
Switch to circular needle size 2.5 mm. Work 1 ridge in GARTER STITCH in the round over all stitches, AT THE SAME TIME on first round in ridge decrease 19-17-13-11-6-7 stitches evenly – read DECREASE TIP = 81-87-93-99-102-105 stitches. Work rib = knit 1/purl 2 for 3 cm, then cast off with knit over knit and purl over purl.

ASSEMBLY:
Sew the openings under the sleeves.

This pattern has been corrected.

Updated online: 20.10.2020
Correction:
INCREASE TIP:
Work until 1 stitch remains before marker thread. Make 1 yarn over, purl 2 (marker is between these 2 stitches), make 1 yarn over (= 2 stitches increased). On next round work yarn overs twisted to avoid holes. Work the increased stitches in A.1 and purl the 2 stitches on each side of the marker thread on every round.

Diagram

symbols = knit
symbols = purl
symbols = insert right needle through stitch from previous round, knit 1 and slip stitch off the needle
diagram

Each of our patterns has specific tutorial videos to help you.

Do you have a question? See a list of frequently asked questions (FAQ)

Knitting tension is what determines the final measurements of your work, and is usually measured per 10 x 10 cm. It is provided like so: number of stitches in width x number of rows in height - eg: 19 stitches x 26 rows = 10 x 10 cm.

The knitting tension is very individual; some people knit/crochet loosely while others work tightly. You adjust the knitting tension with the needle size, which is why the suggested needle size is only meant as a guide! You need to adjust this (up or down) to ensure that YOUR knitting tension matches the knitting tension provided in the pattern. If you work with a different knitting tension than provided you will have a different yarn consumption, and your work will have different measurements than what the pattern suggests.

The knitting tension also determines which yarns can replace each other. As long as you achieve the same knitting tension you can replace one yarn with another.

See DROPS lesson: How to measure your tension/gauge

See DROPS video: How to make a gauge tension swatch

The required amount of yarn is provided in grams, eg: 450 g. To calculate how many balls you’ll need you first need to know how many grams are in 1 ball (25g, 50g or 100g). This information is available if you click on the individual yarn quality on our pages. Divide the amount required with the amount of each ball. For example, if each ball is 50g (the most common amount), the calculation will be as follows: 450 / 50 = 9 balls.

The important thing when changing from one yarn to another is that the knitting/crochet tension remains the same. This is so that the measurements of the finished piece will be the same as on the sketch provided. It is easier to achieve the same knitting tension using yarns from the same yarn group. It is also possible to work with multiple strands of a thinner yarn to achieve the knitting tension of a thicker one. Please try our yarn converter. We recommend you to always work a test swatch.

Please NOTE: when changing yarn the garment might have a different look and feel to the garment in the photo, due to individual properties and qualities of each yarn.

See DROPS lesson: Can I use a different yarn than the one mentioned in the pattern?

All our yarns are categorised into yarn groups (from A to F) according to thickness and knitting tension – group A contains the thinnest yarns and group F the thickest. This makes it easier for you to find alternative yarns to our patterns, should you wish to switch yarn. All yarns within the same group have a similar knitting tension and can easily replace each other. However, different yarn qualities have different structures and properties which will give the finished work a unique look and feel.

Click here for an overview of the yarns in each yarn group

At the top of all our patterns you’ll find a link to our yarn calculator, which is a helpful tool should you wish to use a different yarn than suggested. By filling in the yarn quality you wish to replace, the amount (in your size) and number of strands, the calculator will present good alternative yarns with the same knitting tension. Additionally it will tell you how much you’ll require in the new qualities and whether you’ll need to work with multiple strands. Most skeins are 50g (some are 25g or 100g).

If the pattern is worked with multiple colours, every colour will have to be calculated separately. Similarly, if the pattern is worked with several strands of different yarns (for example 1 strand Alpaca and 1 strand Kid-Silk) you will have to find alternatives for each, individually.

Click here to see our yarn calculator

Since different yarns have different qualities and textures we have chosen to keep the original yarn in our patterns. However, you can easily find options among our available qualities by using our yarn calculator, or simply pick a yarn from the same yarn group.

It is possible that some retailers still have discontinued yarns in stock, or that someone has a few skeins at home that they would like to find patterns for.

The yarn calculator will provide both alternative yarn as well as required amount in the new quality.

If you think it's hard to decide what size to make, it can be a good idea to measure a garment you own already and like the size of. Then you can pick the size by comparing those measures with the ones available in the pattern's size chart.

You'll find the size chart at the bottom of the pattern.

See DROPS lesson: How to read size chart

The needle size provided in the pattern serves only as a guide, the important thing is to follow the knitting tension. And since knitting tension is very individual, you will have to adjust the needle size to ensure that YOUR tension is the same as in the pattern – maybe you’ll have to adjust 1, or even 2 needle sizes, up or down to achieve the correct tension. For this, we recommend that you work test swatches.

Should you work with a different knitting tension than the one provided, the measurements of the finished garment might deviate from the measurement sketch.

See DROPS lesson: How to measure your tension/gauge

See DROPS video: How to make a tension/gauge swatch

Working a garment top-down provides more flexibility and room for personal adjustment. For example it is easier to try the garment on while working, as well as making adjustments to length of yoke and shoulder caps.

The instructions are carefully explaining every step, in the correct order. Diagrams are adjusted to the knitting direction and are worked as usual.

The diagram depicts all rows/rounds, and every stitch seen from the right side. It is read from bottom to top, from right to left. 1 square = 1 stitch.

When working back and forth, every other row is worked from the right side and every other row is worked from the wrong side. When working from the wrong side, the diagram will have to be worked reversed: from left to right, knit stitches are purled, purl stitches are knit etc.

When working in the round every round is worked from the right side and the diagram are worked from right to left on all rounds.

See DROPS lesson: How to read knitting diagrams

The diagram depicts all rows/rounds, and every stitch seen from the right side. It is worked from bottom to top, from right to left.

When working back and forth every other row is worked from the right side: from right to left and every other row is worked from the wrong side: from left to right.

When working in the round, every row in the diagram are worked from the right side, from right to left.

When working a circular diagram you start in the middle and work your way outwards, counter clockwise, row by row.

The rows usually start with a given number of chain stitches (equivalent to the height of the following stitch), this will either be depicted in the diagram or explained in the pattern.

See DROPS lesson: How to read crochet diagrams

Instructions for working several diagrams after each other on the same row/round, will often be written like so: “work A.1, A.2, A.3 a total of 0-0-2-3-4 times". This means you work A.1 once, then A.2 is worked once, and A.3 is repeated (in width) the number of times provided for your size – in this case like so: S = 0 times, M = 0 times, L=2 times, XL= 3 times and XXL = 4 times.

The diagrams are worked as usual: begin with the first row in A.1, then work the first row in A.2 etc.

See DROPS lesson: How to read knitting diagrams

See DROPS lesson: How to read crochet diagrams

The total width of the garment (from wrist-to-wrist) will be larger in the larger sizes, despite the actual sleeves being shorter. The larger sizes have longer sleeve caps and wider shoulders, so there will be a good fit in all sizes.

The measurement sketch/schematic drawing provides information regarding the full length of the garment. If it’s a jumper or a jacket the length is measured from the highest point on the shoulder closest to the neckline, and straight down to the bottom of the garment. It is NOT measured from the tip of shoulder. Similarly, the length of yoke is measured from the highest point on the shoulder and down to where yoke is split into body and sleeves.

On a jacket measures are never taken along bands, unless specifically stated. Always measure inside band stitches when measuring the length.

See DROPS lesson: How to read a schematic drawing

Diagrams are often repeated on the round or in height. 1 repeat is the diagram the way it appears in the pattern. If it says to work 5 repeats of A.1 in the round, then you work A.1 a total of 5 times after/next to each other in the round. If it says to work 2 repeats of A.1 vertically/in height you work the entire diagram once, then begin again at the start and work the entire diagram one more time.

Chain stitches are slightly narrower than other stitches and to avoid working the cast-on edge too tight, we simply chain more stitches to begin with. The stitch count will be adjusted on the following row to fit the pattern and measurement sketch.

The rib edge is more elastic and will contract slightly compared to, for example, stocking stitch. By increasing before the rib edge, you avoid a visible difference in width between the rib edge and the rest of the body.

It’s very easy to cast off too tightly, and by making yarn overs while casting off (and simultaneously casting these off) you avoid a too tight cast off edge.

See DROPS video: How to bind off with yarn overs (yo)

To achieve an even increase (or decrease) you can increase on, for example: every 3rd and 4th row alternately, like so: work 2 rows and increase on the 3rd row, work 3 rows and increase on the 4th. Repeat this until the increase is complete.

See DROPS lesson: Increase or decrease 1 st on every 3rd and 4th row alternately

Should you prefer to work in the round instead of back and forth, you may of course adjust the pattern. You’ll need to add steeks mid-front (usually 5 stitches), and follow the instructions. When you would normally turn and work from the wrong side, simply work across the steek and continue in the round. At the end you’ll cut the piece open, pick up stitches to work bands, and cover the cut edges.

See DROPS video: How to knit steeks and cut open

Should you prefer to work back and forth instead of in the round, you may of course adjust the pattern so you work the pieces separately and then assemble them at the end. Divide the stitches for the body in 2, add 1 edge stitch in each side (for sewing) and work the front and back pieces separately.

See DROPS lesson: Can I adapt a pattern for circular needles into straight needles?

Pattern repeats can vary slightly in the different sizes, in order to get the correct proportions. If you’re not working the exact same size as the garment in the photo, yours might deviate slightly. This has been carefully developed and adjusted so that the complete impression of the garment is the same in all sizes.

Make sure to follow instructions and diagrams for your size!

If you have found a pattern you like which is available in women’s size it’s not very difficult to convert it to men’s size. The biggest difference will be the length of sleeves and body. Start working on the women size that you think would fit across the chest. The additional length will be worked right before you cast off for the armhole/sleeve cap. If the pattern is worked top-down you can add the length right after the armhole or before the first decrease on sleeve.

Regarding additional yarn amount, this will depend on how much length you add, but it is better with a skein too many than too few.

All yarns will have excess fibres (from production) that might come off as lint or shedding. Brushed yarns (ie hairier yarns) have more of these loose, excess fibres, causing more shedding.

Shedding also depends on what is worn under or over the garment, and whether this pulls at the yarn fibres. It’s therefore not possible to guarantee that there will be no shedding

Below are some tips on how to get the best result when working with hairier yarns:

1. When the garment is finished (before you wash it) shake it vigorously so the looser hairs come off. NOTE: do NOT use a lint roller, brush or any method that pulls at the yarn.

2. Place the garment in a plastic bag and put it in your freezer - the temperature will cause the fibres to become less attached to each other, and excess fibres will come off easier.

3. Leave in the freezer for a few hours before taking it out and shaking it again.

4. Wash the garment according to the instructions on the yarn label.

Pilling is a natural process that happens to even the most exclusive of fibers. It's a natural sign of wear and tear that is hard to avoid, and that is most visible in high friction areas of your garment like a sweater's arms and cuffs.

You can make your garment look as new by removing the pilling, using a fabric comb or a pill/lint remover.

Still can't find the answer you need? Then scroll down and leave your question so one of our experts can try to help you. This will be done normally within 5 to 10 working days.
In the meantime, you can read the questions and answers that others have left to this pattern or join the DROPS Workshop on Facebook to get help from fellow knitters/crocheters!

You might also like...

s30-9 Perkins

Elly's Knitting Days, Bulgaria

Zoe's blue electric sweater

Esti Juango, Spain

Post a comment to pattern DROPS Children 30-9

We would love to hear what you have to say about this pattern!

If you want to leave a question, please make sure you select the correct category in the form below, to speed up the answering process. Required fields are marked *.

Comments / Questions (109)

country flag Janine wrote:

Hallo DropsDesign-Team, ich habe Schwierigkeiten bei den Ärmeln. "Die neuen Maschen fortlaufend in A.1 einarbeiten und die beiden Maschen neben dem Markierungsfaden in jeder Runde links stricken." Bedeutet das, dass man das Muster dann versetzt? Denn mit den 2 zugenommen Maschen kann man kein komplettes Muster Stricken. Oder wie ist das zu verstehen?

07.03.2024 - 22:42

DROPS Design answered:

Liebe Janine, die erste + die letzte Masche der Runde werden beide links bis zur Ende gestrickt, man wird für die Ärmel beidseitig von diesen 2 linken Maschen zunehmen. Am Anfang der Runde stricken Sie die neuen Masche wie ein neues Rapport, von links nach rechts gesehen, am Ende der Runde stricken Sie die.neuen Maschen wie ein neues Rapport von rechts nach links, so wird das Muster nicht verschoben. Viel Spaß beim stricken!

08.03.2024 - 08:34

country flag Karina wrote:

Efter endt udtagning på ærme, da ender jeg op med at skulle strikke 3 vrang, ser lidt fjollet ud? Eller skal sidste mask, inden mærke tråden ændres til 'ret' ?

09.02.2024 - 09:14

DROPS Design answered:

Hej Karina, forstår ikke helt hvad du mener... kan du ikke strikke den midterste af de 3, som den midterste i diagrammet?

22.02.2024 - 10:46

country flag Birgitta wrote:

Är Diagram 1 verkligen rätt? Här finns inget omslag. \r\nDet brukar ju vara 1 rät maska och 1 avig maska i patentstickning. Här är det 1 rät maska och 2 aviga maskor. Är det rätt?

30.10.2023 - 15:21

country flag Marita Schmidt wrote:

Guten Tag, Was bedeutet beim Diagramm die gestrichelte Linie ? Die obere Linie ist die Schulter. Was sind die 3 cm zwischen gestrichelter Linie und Schulter ? Das Bündchen kann es ja nicht sein, weil die Länge bis zur Schulter in der Anleitung genannt wird, bevor es mit den 3cm Bündchen weiter geht. (letzter Satz bei Raglanabnahmen). Liebe Grüße Marita Schmidt

08.10.2023 - 19:56

DROPS Design answered:

Liebe Frau Schmidt, die 3 cm entsprechen die Höhe von den Schultern, da der Pullover von oben nach unten gestrickt wird, gehören ein Teil von den angeschlagenen Maschen zum Schulter. Viel Spaß beim stricken!

09.10.2023 - 09:52

country flag Sara wrote:

Hei, neulomalla resori *1 o, 2n* kuten ohjeessa lukee ei tee kaunista siirtymää valepatenttineuleeseen kuten mallin kuvassa. Ymmärtääkseni kuvatussa neuleessa on käytetty ohjeesta poiketen resoriin *1o, 1n*.

29.04.2023 - 20:13

country flag Annika wrote:

Dom två nya maskorna stickas fortlöpande in i A1 och dom två nya maskorna stickas aviga? Motsägelsefullt, hur gör man bäst?

13.03.2023 - 08:10

DROPS Design answered:

Hei Annika. De 2 maskene ved merketråden strikkes vrang, men de nye maskene strikkes fortløpende inn i diagram A.1. Så noen ganger vil de nye maskene strikkes rett og noen ganger vrang. Strikkes de vrang kan det bli flere vrangmasker etter hverandre, side de 2 maskene ved merketråden alltid strikkes vrang. mvh DROPS Design

13.03.2023 - 14:03

country flag Danielle wrote:

Bonjour, Comment fait on pour rabattre 4 mailles à la fin d’un rang sans qu’il reste une maille à la fin? Est-ce qu’il faut les rabattre à la fin du rang précédent? Merci 🙏

13.12.2022 - 01:52

DROPS Design answered:

Bonjour Danielle, vous rabattez les 4 dernières mailles du rang et passez le fil dans la dernière des mailles. Tricotez le tour des emmanchures ainsi: rabattez les 4 premières m du tour, tricotez 70-76-79-85-88-94 m (la 1ère de ces mailles est déjà sur l'aiguille droite), rabattez les 8 m suivantes, tricotez 70-76-79-85-88-94 m (la 1ère de ces mailles est déjà sur l'aiguille droite), rabattez les 4 dernières mailles, coupez le fil et passez le dans la dernière maille. Bon tricot!

13.12.2022 - 08:18

country flag Danielle wrote:

Comment faire pour rabattre 4 mailles à la fin du rang (sur le corps du chandail ) pour l’emmanchure sans qu’il reste une maille à la fin? Doit-on rabattre ces 4 mailles à la fin de l’avant-dernier rang? Merci

08.12.2022 - 00:03

DROPS Design answered:

Bonjour Danielle, vous rabattez les 4 dernières mailles et passez le fil dans la dernière maille sur l'aiguille; vérifiez que vous avez bien le bon nombre de mailles pour le devant et le dos et bien 8 mailles rabattues pour chaque emmanchure. Lorsque vous tricoterez l'empiècement, vous joindrez le fil à nouveau. Bon tricot!

08.12.2022 - 09:57

country flag Tina wrote:

Hvor er Diagrammet A1?

15.06.2022 - 04:50

DROPS Design answered:

Hej Tina, det ligger lige til højre for måleskitsen, nederst i opskriften :)

15.06.2022 - 15:28

country flag Denise wrote:

This pattern is very confusing about how to continue the A1 pattern in the sleeve as you add stitches. I have read all the answers to this same question that are in English and it has left me more confused. It would be nice to have a video on how to do this or a better description.

03.06.2022 - 22:32

DROPS Design answered:

Dear Denise, in the middle underarm you purl 2 stitches, one on each side of the marker. You work the increase as follows: increase, purl 2, increase. So there will always be 2 purl stitches in the mid underarm and the increased stitches are worked in A.1. Happy knitting!

04.06.2022 - 18:49