
Popular categories
Looking for a yarn?


Comments / Questions (28)
![]() Anja wrote:
Anja wrote:
Ich habe nun in den glatt rechts gestrickten Reihe eine Höhe von 14cm. Bei der Blende habe ich laut Anleitung bis jetzt 3x verkürzte Reihen eingearbeitet, aber sie hat nur eine Höhe von 11,8cm. Soll ich mehr verkürzte Reihen stricken oder gibt sich das, wenn die Jacke fertig ist?
31.03.2017 - 13:17DROPS Design answered:
Liebe Anja, gerne können Sie die Höhe der verkürkzten Reihen anpassen, damit die Blende nicht zusammenzieht. Viel Spaß beim stricken!
31.03.2017 - 13:38
![]() Anja wrote:
Anja wrote:
Verbesserung: Ich meinte Reihe 11.
20.03.2017 - 15:48
![]() Anja wrote:
Anja wrote:
Frage zu A1 Reihe 10, dort heißt es: *... 1 Umschlag, die linke Nadel von links nach rechts durch die 7 abgehobenen Maschen auf der rechten Nadel stechen, die Maschen zurück auf die linke Nadel setzen, * Es wären ja jetzt wieder alle Maschen auf der linken Nadel und man könnte mit dem Muster nicht fortfahren. Müßte nicht der Umschlag mit der rechten Nadel durch alle 7 Maschen gezogen werden, so daß dann eine Masche auf der rechten Nadel übrig bleibt?
20.03.2017 - 15:38DROPS Design answered:
Liebe Anja, diese Maschen muß man von der linken Nadel gleiten lassen, die Anleitung wurde korrigiert. Viel Spaß beim stricken!
21.03.2017 - 08:40
![]() Julia Meinel wrote:
Julia Meinel wrote:
Ich hätte eine kurze Frage zur Sweet Ivy Leaves, in den Bildern sieht es aus, als wenn das Muster links wäre (also HinReihen links - laut Chart sind es aber rechte Maschen. Somit sieht mein Ergebnis auch aktuell ganz anders aus :-( Was ist korrekt? LG Julia Meinel
28.02.2017 - 13:53DROPS Design answered:
Liebe Frau Meinel, die mittleren Maschen sind Kraus re gestrickt, so lautet es im Diagram: rechts in Hin-Reihen und rechts in Rück-Reihen. Viel Spaß beim stricken!
28.02.2017 - 15:54
![]() Randi Strangstadstuen wrote:
Randi Strangstadstuen wrote:
Hvor er det blitt av mønster til A1 og A2??
26.01.2017 - 22:11DROPS Design answered:
Hej Randi, du finder diagrammerne til A1 og A2 nederst i opskriften. God fornøjelse!
30.01.2017 - 08:52
![]() Anne Marie wrote:
Anne Marie wrote:
Très joli gilet : il sera parfait pour le printemps prochain, en couleur pêche.
23.01.2017 - 16:22
![]() Judith wrote:
Judith wrote:
Eine Strickjacke als Accessoire, will ich mir machen
18.01.2017 - 06:46
![]() HELENE wrote:
HELENE wrote:
Parfait pour le printemps prochain. Reste à choisir la couleur ... J'aime !
17.01.2017 - 21:40
![]() Beate Eckardt wrote:
Beate Eckardt wrote:
Werde ich mir stricken, sobald das Muster da ist.
17.01.2017 - 15:03
![]() Beatriz Silva wrote:
Beatriz Silva wrote:
Gosto! (I love it)
17.01.2017 - 14:11
|
|||||||||||||||||||||||||
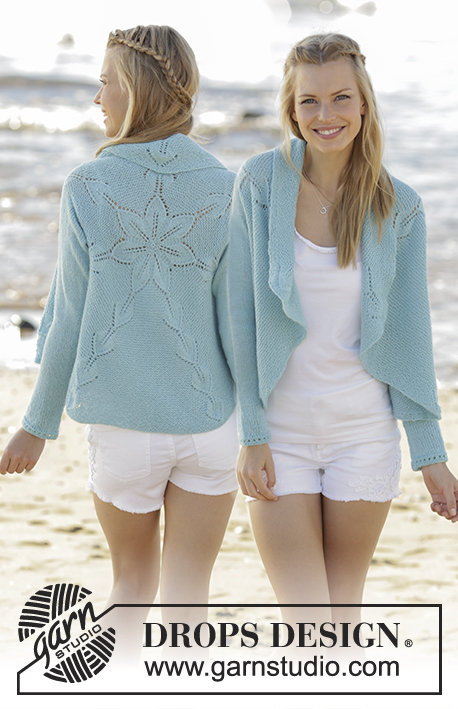
Sweet Ivy Leaves#sweetivyleavescardigan |
|||||||||||||||||||||||||
 |
 |
||||||||||||||||||||||||
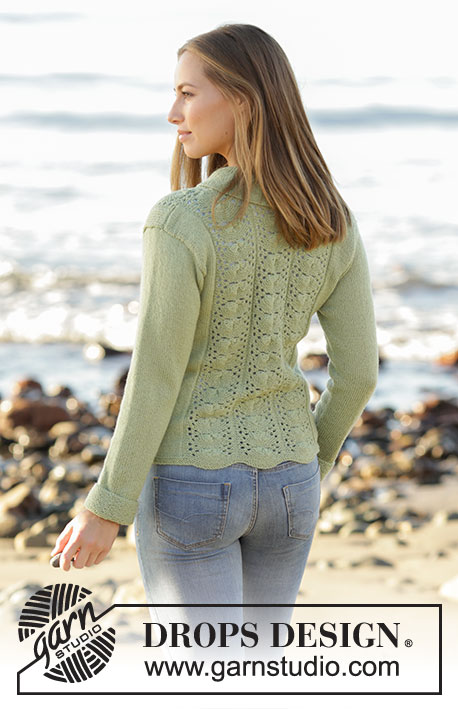
Knitted jacket with lace pattern and shawl collar in DROPS Flora. Size: S - XXXL
DROPS 175-25 |
|||||||||||||||||||||||||
|
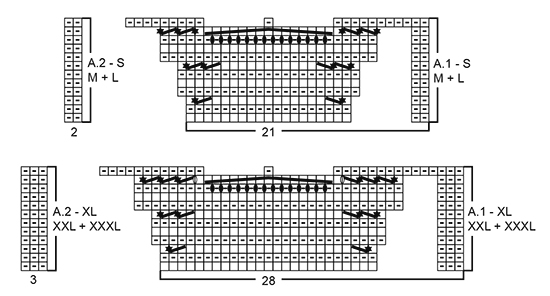
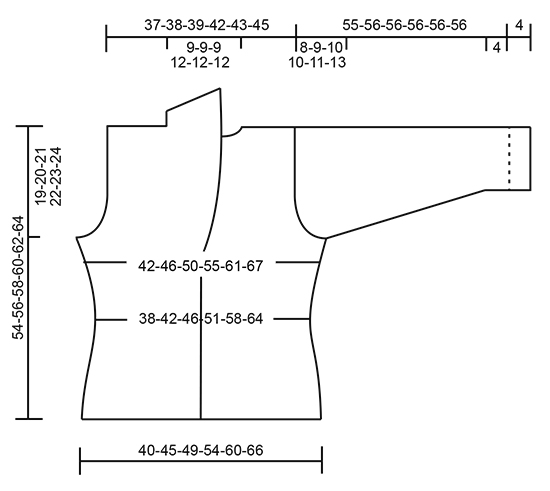
GARTER STITCH (worked back and forth): 1 ridge = knit 2 rows. GARTER STITCH (worked in the round): 1 ridge = 2 rounds. Knit 1 round and purl 1 round. PATTERN: See diagrams A.1 and A.2. Diagrams show all rows in pattern seen from the right side. Choose diagram for your size. KNITTING INFO: Because of the pattern in A.1 number of stitches on needle will vary. Where number of stitches is given in pattern the numbers are given without increases in pattern (i.e. with number of stitches A.1/A.2 have at the beginning of 1 repetition vertically). SHORT ROWS: To avoid the bands from contracting vertically work short rows over band in each side as follows: * Knit 2 rows back and forth only over the outermost 10-10-12-12-14-14 band stitches in one side of piece (or over as many stitches as there are in band after increase for shawl collar), work 1 row over all stitches on needle, turn piece and knit 2 row back and forth over the 10-10-12-12-14-14 band stitches in the other side of piece *, repeat from *-* every 4 cm until finished measurements. DECREASE TIP-1 (applies to sides of body): All decreases are done from the right side. Begin 4 stitches before marker and knit 2 together, knit 4 (marker is between the 4 stitches), slip 1 stitch knitwise, knit 1, pass slipped stitch over stitch worked (= 2 stitches decreased). DECREASE TIP-2 (applies to neck at the front): All decreases are done from the right side. RIGHT FRONT PIECE (= after A.2): Slip 1 stitch knitwise, knit 1, pass slipped stitch over stitch worked (= 1 stitch decreased). LEFT FRONT PIECE (= 2 stitches before A.1): Knit 2 together (= 1 stitch decreased). INCREASE TIP-1 (applies to sides on body and mid under sleeve): All increases are done from the right side. Work until 3 stitches remain before marker, make 1 yarn over, knit 6 (marker is in the middle of these 6 stitches), make 1 yarn over (= 2 stitches increased). On next row work yarn overs twisted to avoid holes. INCREASE TIP-2 (applies to shawl collar): Increase 1 stitch by making 1 yarn over needle inside the 2 outermost stitches in each side towards mid front. On next row knit yarn over twisted to avoid holes. BUTTONHOLES: Decrease for buttonhole at the edge on right band when piece measures 4, 10, 16 and 22 cm in all sizes. 1 buttonhole = begin from wrong side and work until 1 stitch remains on needle towards mid front, make 2 yarn overs and knit last stitch. Turn piece, knit first stitch together with the first yarn over, knit the second yarn over together with next stitch, then continue as before. -------------------------------------------------------- JACKET: Worked back and forth on circular needle from mid front. Work sleeves in the round on double pointed needles/a short circular needle. BODY: Cast on 215-235-255-279-311-339 stitches on circular needle size 2.5 mm with Flora. Work 3 ridges in GARTER STITCH - see explanation above. Switch to circular needle size 3 mm and work next row from right side as follows: 10-10-12-12-14-14 band stiches in garter stitch, A.1 (= 21-21-21-28-28-28 stitches), A.2 (= 2-2-2-3-3-3 stitches), 26-31-34-32-38-45 stitches in stocking stitch, insert 1 marker thread (= in the side), 16-21-26-21-29-36 stitches in stocking stitch, A.1 over the next 63-63-63-84-84-84 stitches (= 3 repetitions of 21-21-21-28-28-28 stitches), A.2 (= 2-2-2-3-3-3 stitches), 16-21-26-21-29-36 stitches in stocking stitch, insert 1 marker thread (= in the side), 26-31-34-32-38-45 stitches in stocking stitch, A.1 (= 21-21-21-28-28-28 stitches), A.2 (= 2-2-2-3-3-3 stitches) and finish with 10-10-12-12-14-14 band stitches in garter stitch. Continue pattern like this. REMEMBER THE KNITTING TENSION READ ALL OF THE FOLLOWING SECTION BEFORE CONTINUING! BAND: When piece measures 3-3-3-3-4-4 cm, work SHORT ROWS over band in each side - see explanation above. BUTTONHOLES: When piece measures 4 cm, work BUTTONHOLES on right band - see explanation above. DECREASE IN THE SIDES: When piece measures 5 cm in all sizes, decrease 1 stitch on each side of both markers - READ DECREASE TIP-1 (= 4 stitches decreased). Decrease like this every 5 cm 3 times in total in each side = 203-223-243-267-299-327 stitches. INCREASE IN THE SIDES: When piece measures 22 cm in all sizes, increase 1 stitch on each side of both markers - READ INCREASE TIP-1 (= 4 stitches increased). Increase like this every 2-2-3-3-4-4 cm 5-5-5-5-4-4 times in total in each side. NECK: When piece measures 23 cm in all sizes, decrease 1 stitch for V-neck inside A.1 and A.2 on each front piece – READ DECREASE TIP-2. Decrease like this every 8th-8th-10th-10th-10th-10th row 11-11-10-10-9-9 times in total in each side. SHAWL COLLAR: When piece measures 30 cm in all sizes, increase 1 stitch in each side - READ INCREASE TIP-2! Increase like this every 4th row (i.e. every other row from right side) 12-13-13-14-14-15 times in total and then every 6th row 2 times in total in all sizes. ARMHOLES: When piece measures 35-36-37-38-39-40 cm, cast off 6 stitches for armholes in each side (3 stitches on each side of both markers). Then finish front and back piece separately. BACK PIECE: = 95-105-115-127-141-155 stitches. Continue pattern as before and cast off for armholes at the beginning of every row in each side as follows: 3 stitches 0-0-1-1-2-3 times, 2 stitches 1-2-2-3-4-4 times and 1 stitch 1-3-4-4-5-6 times = 89-91-93-101-103-109 stitches – READ KNITTING INFO. When piece measures 52-54-56-58-60-62 cm, cast off the middle 17-17-17-25-25-25 stitches for neck and finish each shoulder separately. Continue with stocking stitch and pattern and cast off 2 stitches on next row from neck = 34-35-36-36-37-40 stitches remain on shoulder (22-22-22-29-29-29 stitches pattern and 12-13-14-7-8-11 stitches stocking stitch. Cast off when piece measures 54-56-58-60-62-64 cm. Work the other shoulder the same way. LEFT FRONT PIECE: Continue pattern as before with decrease for neck and increase for shawl collar as before. AT THE SAME TIME cast off for armhole in the side the same way as on back piece. After all increases and decreases, there are 58-60-62-67-69-73 stitches on needle. When piece measures 54-56-58-60-62-64 cm, cast off the outermost 34-35-36-36-37-40 stitches on shoulder = 24-25-27-28-30-31 stitches remain on needle for shawl collar. Work the rest of row. Then work short rows over shawl collar as follows (begin from wrong side): * 1 ridge back and forth over the outermost 14-15-15-16-16-17 stitches towards mid front, 1 ridge back and forth over all stitches *, repeat from *-* until piece measures approx. 6-6-6-8-8-8 cm on the shortest (measures from shoulder). Cast off. RIGHT FRONT PIECE: Continue the same way as on left front piece but with increases and decreases in the opposite side. SLEEVE: Cast on 48-50-52-56-58-60 stitches on double pointed needles size 2.5 mm with Flora. Work in GARTER STITCH - see explanation above. When piece measures 4 cm, insert 1 marker - NOW MEASURE PIECE FROM HERE! Continue in garter stitch for 4 cm (piece measures 8 cm in total). Switch to double pointed needles size 3 mm. Insert 1 marker thread at beginning of round (= mid under sleeve). Work in stocking stitch. When piece measures 8-5-6-5-7-5 cm, increase 2 stitches mid under sleeve - READ INCREASE TIP-1. Increase like this every 2½-2½-2-2-1½-1½ cm 15-17-19-21-24-25 times in total = 78-84-90-98-106-110 stitches. When piece measures 47-47-46-46-45-43 cm (shorter measurements in the larger sizes because of longer sleeve cap and wider shoulders), cast off 6 stitches mid under sleeve (3 stitches on each side of marker). Then work sleeve cap back and forth on circular needle until finished measurements. Work stocking stitch and cast off at beginning of row in each side as follows: 2 stitches 3-3-4-4-5-6 times and 1 stitch 5-6-6-6-7-8 times, then cast off 2 stitches in each side until piece measures 54-55-55-55-55-55 cm before casting off 3 stitches 1 time in each side. Cast off the remaining stitches. Sleeve measures approx. 55-56-56-56-56-56 cm from the top and down to marker (59-60-60-60-60-60 cm from top and down to cast-on edge). Knit another sleeve the same way. ASSEMBLY: Sew the shoulder seams. Sew in sleeves. Fold up half the edge in garter stitch at the bottom of sleeves and fasten with a couple of stitches mid under sleeve. Sew collar tog mid back (seam mid back should be inwards when collar is folded). Sew collar to neckline in the back of neck. Sew on buttons. |
|||||||||||||||||||||||||
Diagram explanations |
|||||||||||||||||||||||||
|
|||||||||||||||||||||||||
 |
|||||||||||||||||||||||||
 |
|||||||||||||||||||||||||
Have you finished this pattern?Tag your pictures with #dropspattern #sweetivyleavescardigan or submit them to the #dropsfan gallery. Do you need help with this pattern?You'll find 31 tutorial videos, a Comments/Questions area and more by visiting the pattern on garnstudio.com. © 1982-2026 DROPS Design A/S. We reserve all rights. This document, including all its sub-sections, has copyrights. Read more about what you can do with our patterns at the bottom of each pattern on our site. |
|||||||||||||||||||||||||


With over 40 years in knitting and crochet design, DROPS Design offers one of the most extensive collections of free patterns on the internet - translated to 17 languages. As of today we count 324 catalogues and 12290 patterns translated into English (UK/cm). 12290
We work hard to bring you the best knitting and crochet have to offer, inspiration and advice as well as great quality yarns at incredible prices! Would you like to use our patterns for other than personal use? You can read what you are allowed to do in the Copyright text at the bottom of all our patterns. Happy crafting!
Post a comment to pattern DROPS 175-25
We would love to hear what you have to say about this pattern!
If you want to leave a question, please make sure you select the correct category in the form below, to speed up the answering process. Required fields are marked *.