
Popular categories
Looking for a yarn?


Comments / Questions (52)
![]() Lena wrote:
Lena wrote:
När kommer rättelsen? Väntat i flera månader nu!
04.03.2017 - 19:50DROPS Design answered:
Hej Lena. Jeg kan desvaerre ikke hjaelpe dig her. Det er noget vi skal have fra Design
06.03.2017 - 13:42
![]() Mariana wrote:
Mariana wrote:
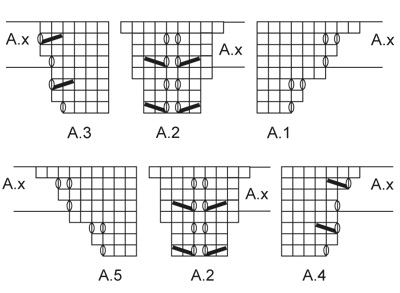
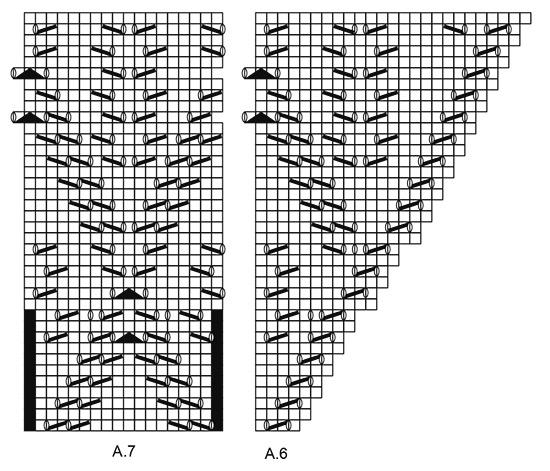
Non riesco a capire cosa devo fare alla fine dello schema A1-5. Devo ripetere Ax 24 volte? Grazie mille
03.01.2017 - 14:44DROPS Design answered:
Buongiorno Marianna. Esatto, dopo i diagrammi A.1 - A.5 ripete Ax per 24 volte. Buon lavoro!
03.01.2017 - 14:50
![]() Lena wrote:
Lena wrote:
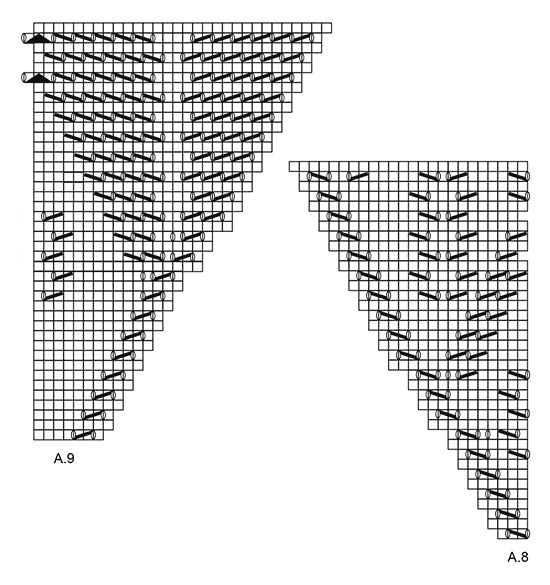
Hej! Har ni fixat övergången från A6 till A9?
21.12.2016 - 12:31DROPS Design answered:
Hej Lena. Nej, vi venter stadig paa en rettelse. Naar opskriften er rettet vil det staa under RETTELSER
21.12.2016 - 14:04
![]() Elisabeth Guggenmos wrote:
Elisabeth Guggenmos wrote:
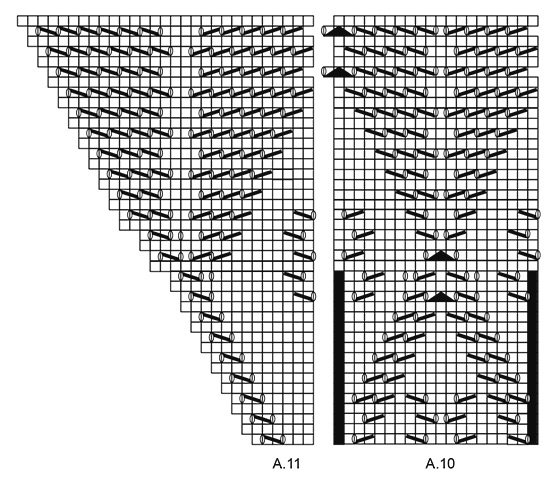
Hallo, meine Strickaktion geht dem Ende zu und mir ist aufgefallen, dass in dem Diagramm bei A11 (rechts unten) in Reihe 1, 3 und 5 die Zeichen für das mittlere Lochmuster (in der Raute) fehlen. Sehe ich das richtig oder habe ich da einen Denkfehler? LG
19.12.2016 - 23:13DROPS Design answered:
Liebe Frau Guggenmos, wahrscheinlich muss man auch das Lochmuster auch in A.11 stricken, Ihr Nachricht wurde unserem Designteam weitergeleitet, neue Diagramme sollten bald verfügbar sein. Vielen Dank!
20.12.2016 - 09:10
![]() Anita wrote:
Anita wrote:
Im Mustersatz A1-A5 gibt es in der 4. bzw 5. Reihe eine andere Anzahl von Maschen zw. A1 und A2 sowie zw. A2 und A3. Ebenso zw. A4 und A2 und A5. Jedenfalls hat es bei mir zw. A1 und A2 eine Masche mehr und bei A2 und A3 eine Masche weniger gegeben als im Muster angegeben. Danke für ihre Rückmeldung?
09.12.2016 - 10:40DROPS Design answered:
Liebe Anita, A.4 beginnt mit 4 M wie A.3 und A.5 beginnt mit 3 M. wie A.1, dh bei der 4. bzw 5. R haben Sie 7 M in A.4 und in A.3 und 6 M in A.5 und in A.1. Viel Spaß beim stricken!
09.12.2016 - 13:21Eleonora wrote:
From Sorry for the typo. Many thanks and Best regards, // Eleonora
01.12.2016 - 19:51Eleonora wrote:
The pattern frequency A.x.increases with 24 stitches fron A1 thru A5 (not as stated " increase i.e. 12 sts for every repetition vertically"). Hence the A.x pattern have to be repeated 12 times (not 24 times). When A1- A5 has been worked 1 time vertically there are 51 sts. on needle. Second repetition 75 sts, third repetition 99 sts and so on. After 12 times : 51 sts + 24sts. × 12 times =339 sts. Please check and confirm. // Eleonora
01.12.2016 - 19:27DROPS Design answered:
Dear Eleonora, you are working A.x a total of 2 times in width and inc 2 sts on row 1 x 2 times = 4 sts inc then inc 4 sts on row 3 x 2 times = 8 sts. When A.x has been worked 1 time in height and a total of 2 times in height you have inc 12 sts. Repeat A.x 24 times = 12 sts inc in A.x x 24 times = 288 + 51 sts = 339 sts. Happy knitting!
02.12.2016 - 08:32
![]() Tone K wrote:
Tone K wrote:
Hei igjen☺ Når jeg skal starte på A9 blir mønstret forskyvet og det passer ikke overens med A6. Jeg har rett maske antall, men virker som jeg mangler noen masker. Og jeg mente A9 og A11 skal se like ut.
28.11.2016 - 19:05DROPS Design answered:
Hej Tone. Med klippe/klistre kan jeg nu se hvad du mener. Jeg kan desvaerre ikke lige gennemskue hvordan dette skal blive korrekt og har sendt det til vores Designafdeling. Jeg afventer nu svar paa dette.
30.11.2016 - 12:02
![]() Tone K wrote:
Tone K wrote:
Er det feil I oppskriften? Jeg får ikke A9 til og stemme med resten av A6.
26.11.2016 - 12:45DROPS Design answered:
Hej Tone. Jeg har kigget her för og jeg kan ikke umiddelbart se det skulle vaere fejl. Men du maa gerne uddybe hvis det er hvorfor du mener det bliver fejl, saa kan jeg kigge igen.
28.11.2016 - 17:03
![]() Giuseppina wrote:
Giuseppina wrote:
Salve, sto lavorando questo stupendo scialle. Ho appena finito i diagrammi A6 A7 e A8, quindi devo cominciare i diagrammi A9 A10 e A1, ma ho riscontrato difficoltà a far coincidere il lavoro. Cioè il disegno non corrisponde viene sfalsato e inoltre nel diagramma A11 manca il disegno centrale oppure va lavorato senza? Potete per favore darmi delle spiegazioni? Perché se si confronta il diagramma A6 con il diagramma A9 coincide, però nella lavorazione è sfalsato e sembra brutto!
21.11.2016 - 08:36DROPS Design answered:
Buongiorno Giuseppina. Chiediamo una verifica al settore design. Eventuali modifiche ai diagrammi verranno apportate direttamente online. La ringraziamo per la segnalazione. Buon lavoro!
21.11.2016 - 13:56
|
|||||||||||||||||||
Angelique#angeliquescarf |
|||||||||||||||||||
 |
 |
||||||||||||||||||
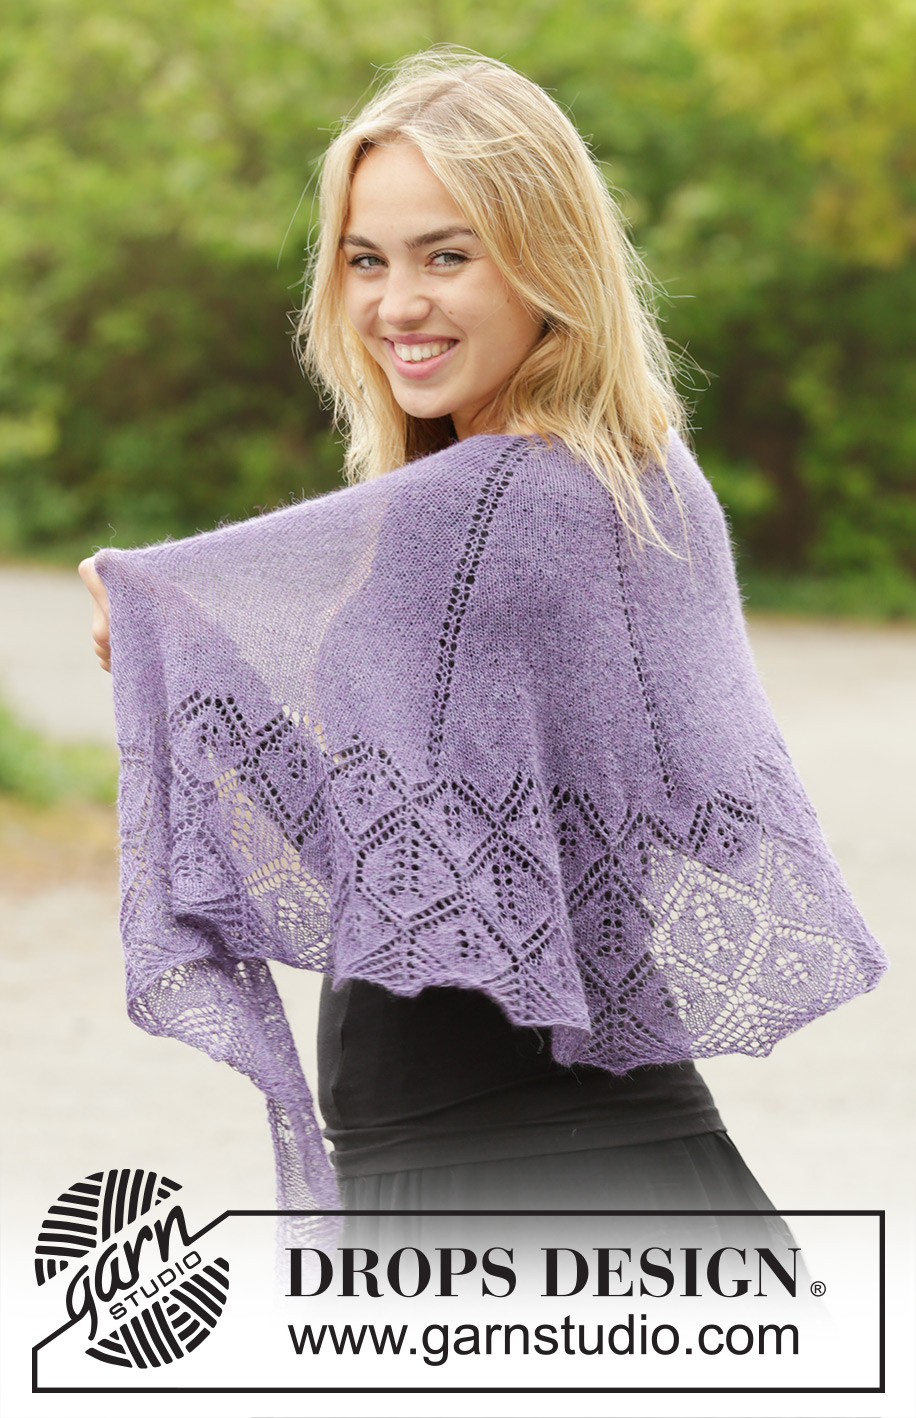
Knitted DROPS half-moon shaped shawl in stocking st with lace pattern in ”Lace”.
DROPS 171-47 |
|||||||||||||||||||
|
GARTER ST (back and forth): K all rows. 1 ridge = 2 rows K. PATTERN: See diagrams A.1 to A.11. The diagrams show all rows in pattern seen from RS. KNITTING TIP: The shawl can be knitted with other needle sizes than those given here. Use smaller needles for a smaller shawl and larger needles for a larger shawl. Stretch the shawl to shape at the end, possible uneven places should then even out. SHAPING: When using another yarn from yarn group A, there is no need to stretch the shawl to measurements, but place it gently out in shape. Leave to dry. Repeat the process when the shawl has been washed. ---------------------------------------------------------- SHAWL: Cast on 3 sts on circular needle size 3 mm with Lace - read KNITTING TIP above. Then work and inc as follows: ROW 1: 1 edge st in GARTER ST - see explanation above, 1 YO, 1 st in stocking st, 1 YO, 1 edge st in garter st. Insert a marker in the middle st = 5th st. ROW 2 and all rows from WS: Work 1 edge st in garter st in each side (K from WS) and P all sts and YOs. ROW 3: 1 edge st in garter st, K 1, 1 YO, K 1, 1 YO, K 1 and 1 edge st in garter st = 7 sts. ROW 5: 1 edge st in garter st, 1 YO, K 1, 1 YO, K 3, 1 YO, K 1, 1 YO and 1 edge st in garter st = 11 sts. ROW 7: 1 edge st in garter st, 1 YO, K 3, 1 YO, K 3, 1 YO, K 3, 1 YO and 1 edge st in garter st = 15 sts. ROW 9: 1 edge sts in garter st, 1 YO, K 1, 1 YO, K 3 and insert a marker in the middle of these st, 1 YO, K 1, 1 YO, K 3 (there is a marker in the sts in the middle of these sts = mid st), 1 YO, K 1, 1 YO, K 3 and insert a marker in the middle of these sts, 1 YO, K 1, 1 YO and 1 edge st in garter st = 23 sts. Row 11: 1 edge st in garter st, 1 YO, K until mid st, 1 YO, K1 (= mid st), 1 YO and K until 1 edge st remain, 1 YO and 1 edge st in garter st = 27 sts. Work according to diagram A.1 to A.5 as follows from RS: Work 1 edge st in garter st, A.1 over 3 sts, A.2 over 5 sts (first marker is in the middle of A.2), A.3 over 4 sts, 1 st in stocking st (second marker is in the middle of this st = mid st), A.4 over 4 sts, A.2 over 5 sts (third marker is in the middle of A.2), A.5 over 3 sts and 1 edge st in garter st = 31 sts. REMEMBER THE KNITTING TENSION. When A1-A.5 has been worked 1 time vertically, there are 51 sts on needle. Repeat inc as shown in A.x, inc alternately 4 and 8 sts on every row from RS (i.e. 12 sts for every repetition vertically), work the inc sts in stocking st on each side of every A.2. Move the markers upwards when working to mark mid st and middle of A.2. Repeat as shown in A.x 24 times in total vertically, there are 339 sts in total on needle (piece measures approx. 35 cm). On next row from RS work and inc 4 sts as shown on first row of A.x = 343 sts. P 1 row from WS (work edge sts in each side of piece in garter st until finished measurements). K 1 row from RS and inc 1 st inside 1 edge st in garter st in each side = 345 sts on needle and P 1 row from WS. Work according to diagram A.6 to A.8 as follows from RS: 1 edge st in garter st, A.6 over 4 sts, repeat A.7 21 times (4 sts remain on needle), A.8 over 3 sts and 1 edge st in garter st. NOTE: In diagram 2 sts are inc on the 11th row in every repetition of diagram A.7, A.6 and A.8. And 2 sts are inc on 17th row of A.6 and A.8. Work diagrams 1 time vertically = 429 sts. Work according to diagram A.9 to A.11 as follows from RS: 1 edge st in garter st, A.9 over 7 sts, repeat A.10 23 times (7 sts remain on needle), A.11 over 6 sts and 1 edge st in garter st. NOTE: In diagram 2 sts are inc on the 17th row in every repetition of diagram A.9, A.11 and A.10. And 2 sts are inc on 21st row in A.9 and A.11. Work diagrams 1 time vertically = 521 sts, but on last row from WS loosely cast off with P. BLOCKING: Place the shawl in lukewarm water until it is soaking wet. Carefully squeeze the water out of the shawl - do not twist the shawl - then roll the shawl in a towel and squeeze to remove more water - the shawl will now only be moist. If another yarn from yarn group A is used - read SHAPING above. Place the shawl on a carpet or mattress - carefully stretch it out to size and fasten it with pins. If desired shape the edge by stretching a little bit in the area between the leaves to form tips and fasten these tips with pins along the cast off edge. Leave shawl to dry. Repeat the process when the shawl has been washed. |
|||||||||||||||||||
Diagram explanations |
|||||||||||||||||||
|
|||||||||||||||||||
 |
|||||||||||||||||||
 |
|||||||||||||||||||
 |
|||||||||||||||||||
 |
|||||||||||||||||||
Have you finished this pattern?Tag your pictures with #dropspattern #angeliquescarf or submit them to the #dropsfan gallery. Do you need help with this pattern?You'll find 20 tutorial videos, a Comments/Questions area and more by visiting the pattern on garnstudio.com. © 1982-2026 DROPS Design A/S. We reserve all rights. This document, including all its sub-sections, has copyrights. Read more about what you can do with our patterns at the bottom of each pattern on our site. |
|||||||||||||||||||


With over 40 years in knitting and crochet design, DROPS Design offers one of the most extensive collections of free patterns on the internet - translated to 17 languages. As of today we count 324 catalogues and 12290 patterns translated into English (UK/cm). 12290
We work hard to bring you the best knitting and crochet have to offer, inspiration and advice as well as great quality yarns at incredible prices! Would you like to use our patterns for other than personal use? You can read what you are allowed to do in the Copyright text at the bottom of all our patterns. Happy crafting!
Post a comment to pattern DROPS 171-47
We would love to hear what you have to say about this pattern!
If you want to leave a question, please make sure you select the correct category in the form below, to speed up the answering process. Required fields are marked *.