
Popular categories
Looking for a yarn?


Comments / Questions (115)
![]() Lisa Robert wrote:
Lisa Robert wrote:
Bonjour, j'aimerai beaucoup essayer de tricoter ce modèle mais je ne vois pas le nombre de pelotes qu'il faut prendre pour une taille M. Merci de votre aide
26.09.2022 - 06:53DROPS Design answered:
Bonjour Mme Robert, vous trouverez la quantité nécessaire pour chaque taille dans l'en-tête, avec les tailles, les aiguilles et l'échantillon; autrement dit, en taille M, il vous faudra 1050 g DROPS Snow / 50 g la pelote = 21 pelotes. Bon tricot!
26.09.2022 - 11:31
![]() Sabrina Schmidt wrote:
Sabrina Schmidt wrote:
Hallo. Ich habe Probleme beim Annähen der Ärmel. Ich habe mehr Ärmelmaschen als Armausschnittsmaschen und somit passt es leider nicht. Bei der Anleitung der Ärmel steht am Ende: Die restlichen M abketten, die Arb hat eine Gesamtlänge von ca. 56-57-57-57-57-57 cm. Den 2. Ärmel ebenso str. Wie viel sind denn die restlichen Maschen? Bei mir sind es 10 Maschen. Ist das korrekt oder habe ich hier den Fehler, dass die Ärmel nicht passen? Vielen Dank
21.01.2022 - 14:55DROPS Design answered:
Liebe Frau Schmidt, die restlichen Maschenanzahl kann je nach Ihrer Maschenprobe in der Höhe unterschiedlich sein, wichtig ist hier die cm-Angaben, damit alle stimmen. Vesuchen Sie die Ärmel mit Stecknadel in das Armloch zu platzieren, es kann sicher helfen. Viel Spaß beim stricken!
21.01.2022 - 16:08
![]() Sabrina Schmidt wrote:
Sabrina Schmidt wrote:
Hallo. Ich habe heute eine Frage geschickt aber ich habe mein Problem gerade selbst klären können. Vielen Dank trotzdem.
18.01.2022 - 15:13
![]() Sabrina Schmidt wrote:
Sabrina Schmidt wrote:
Hallo. Ich bin bei den Ärmeln: Bei einer Gesamtlänge von 8-8-8-8-10-12 cm je 1 M beidseitig zunehmen . Bei Zunahmetipp steht: Es wird neben 1 kraus-re-Rand-M und 1 re-M zugenommen (d.h. neben 2 M), indem 1 Umschlag gearb wird. Wird denn hier nur am Anfang der Reihe zugenommen oder auch am Reihenende. Müsste ja so sein, da 2 Ma pro Reihe zugenommen werden, oder? Auf der Zeichnung der Ärmel sehe ich aber nur eine Zunahmeschräge an einer Seite. Vielen Dank vorab. Sabrina
18.01.2022 - 11:52DROPS Design answered:
Liebe Frau Schmidt, bei den Ärmel werden 2 Maschen (1 auf beide Seite = die erste nach der Randmaschen+ 1 Masche und die andere vor 1 Masche + der Randmaschen) zugenommen - bei der Skizze liegt die Ärmel flach = Die Schrägseite ist dann unten (mitte unter die Ärmel). Viel Spaß beim stricken!
18.01.2022 - 14:11
![]() Hanne Gawenda wrote:
Hanne Gawenda wrote:
Woher stammt die Wolle? Wird sie aus artgerechter Tierhaltung bzw tierfreundlich gewonnen?
20.08.2021 - 14:46
![]() Chantal wrote:
Chantal wrote:
Bonjour, J'aimerais tricoter ce modèle (INTO THE WOODS) en taille XS. Est-il possible d'avoir les explications. Merci :)
22.04.2021 - 21:59DROPS Design answered:
Bonjour Chantal, nous ne sommes malheureusement pas en mesure de pouvoir adapter chacun de nos modèles en fonction de chaque demande; vous pouvez vous inspirer d'un modèle analogue dans la taille souhaitée pour recalculer. Votre magasin saura vous aider, même par mail ou téléphone, ou bien vous pouvez vous adresser à un forum spécialiser si besoin. Merci pour votre compréhension. Bon tricot!
23.04.2021 - 08:04
![]() Sylvie wrote:
Sylvie wrote:
Bonjour, est-ce que je dois changer d'aiguille à chaque début de bordure et le point mouise (7) et changer à chaque rang pour les points de jersey et les motifs (8)? Merci
03.03.2021 - 18:39DROPS Design answered:
Bonjour Sylvie, seule la bordure du bas se tricote en 7, continuez ensuite avec les aiguilles 8 en jersey et point fantaisie, avec les mailles de la bordure devant au point mousse. Bon tricot!
04.03.2021 - 07:40
![]() Samantha Victor wrote:
Samantha Victor wrote:
I am unclear on how to work out what size to use. Is it possible to have a breakdown in UK sizes ie. small is for size6-8 etc.,?
23.11.2020 - 09:37DROPS Design answered:
Dear Mrs Victor, measure a similar garment you have and like the shape and compare these measurements to the ones in diagram - this is the best way to find the matching size. Read more here. Happy knitting!
23.11.2020 - 10:37
![]() Irma wrote:
Irma wrote:
Ik zou dit vest graag een stuk langer willen maken. Tot aan mijn enkels. Ik ben 173 cm. Hoe kan ik dit patroon dan t beste aanpassen?
15.11.2020 - 14:55DROPS Design answered:
Dag Irma,
Waarschijnlijk kun je de breedte aan de onderkant, zoals nu in de tekening staat aangegeven, aanhouden. Je maakt het onderste deel tot de buste langer en verdeelt de meerderingen over deze lenge.
18.11.2020 - 12:17
![]() Maya wrote:
Maya wrote:
Bonjour! J'aimerais savoir s'il faut continuer à tricoter la maille lisière au point mousse, sur le dos, après avoir rabattu les mailles pour les emmanchures? Merci beaucoup d'avance!
23.05.2020 - 15:57DROPS Design answered:
Bonjour Maya, vous pouvez tricoter les mailles lisières en jersey (cette vidéo vous montre comment assembler les manches ensuite). Bon tricot!
25.05.2020 - 08:41
|
|||||||||||||
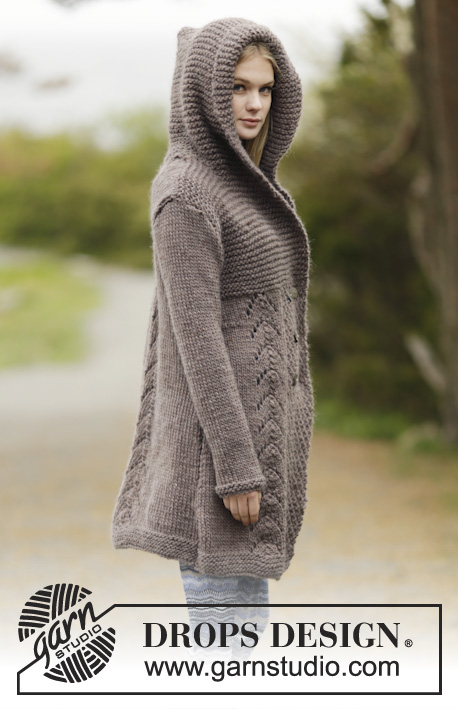
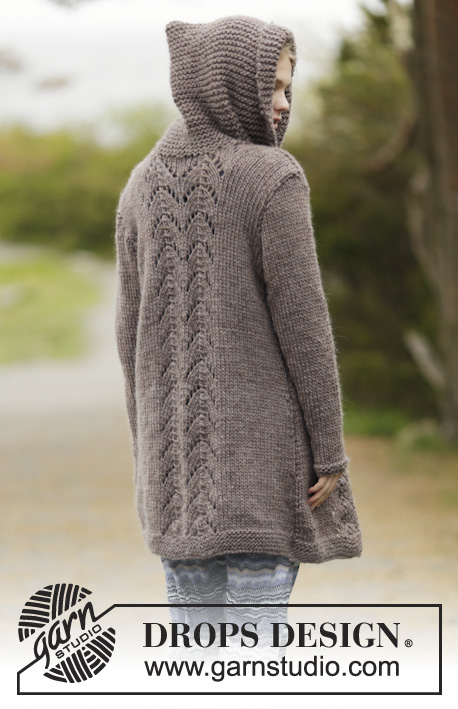
Into The Woods#intothewoodsjacket |
|||||||||||||
 |
 |
||||||||||||
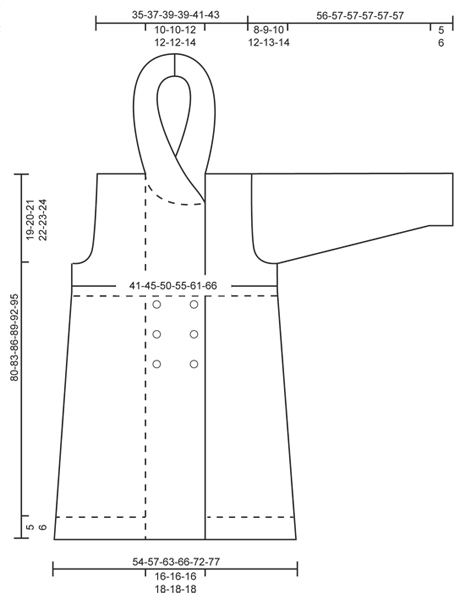
Knitted DROPS jacket in garter st, double moss st and lace pattern with hood in ”Snow”. Size: S - XXXL.
DROPS 164-1 |
|||||||||||||
|
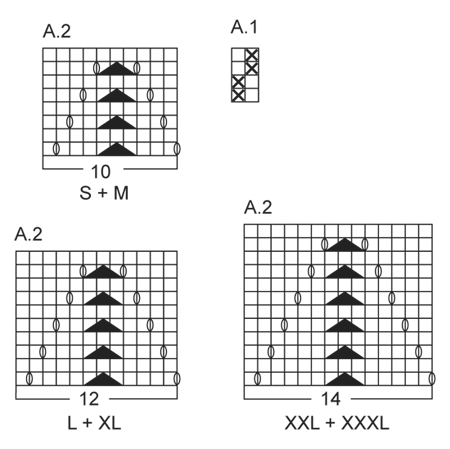
GARTER ST (back and forth): K all rows. 1 ridge = 2 rows K. PATTERN: See diagram A.1 and A.2 (choose diagram for correct size). The diagrams show all rows in pattern seen from RS. DECREASE TIP: All dec are done from RS! Dec inside 1 st K and 1 edge st in garter st. Dec as follows when 2 sts remain before 1 K st and 1 edge st in garter st: K 2 tog. Dec as follows after 1 sts in garter st and 1 sts: Slip 1 st as if to K, K 1, psso. INCREASE TIP: All inc are done from RS. Inc inside 1 edge st in garter st and 1 K by making 1 YO. On next row P YO twisted to avoid holes. MEASURING TIP 1 (applies for body and back piece): To get the correct proportions on the jacket make all length measurements when work lies flat. Because of the weight of the yarn and the garter sts on the yoke the work will stretch approx. 10 cm in total length to what is shown on the schematic drawing. MEASURING TIP 2 (applies for sleeves): Because of the weight of the yarn make all length measurements while holding the piece up. BUTTONHOLES: Dec for 6 buttonholes on right front piece (from RS): Work 4 sts, cast off 2 sts for button hole, work 6-6-6-8-8-8 sts, cast of the next 2 sts for buttonhole = 2 buttonholes on same row (4 sts remain on band). On next row cast on 2 new sts over the cast off sts. Dec for buttonholes when piece measures: SIZE S: 36, 45, 54 cm SIZE M: 38, 47, 56 cm SIZE L: 40, 49, 58 cm SIZE XL: 42, 51, 60 cm SIZE XXL: 44, 53, 62 cm SIZE XXXL: 46, 55, 64 cm NOTE: Approx. 1 cm remains after last buttonhole before working in garter st over all sts. (on band). ---------------------------------------------------------- BACK PIECE: The piece is worked back and forth on circular needle because of no of sts. Cast on 61-65-71-75-81-87 sts (incl 1 edge st in each side) on circular needle size 7 mm with Snow. Work in GARTER ST - see explanation above, for 5-5-5-6-6-6 cm (1st row = RS). Switch to circular needle size 8 mm and work next row from RS as follows: 1 edge st in garter st, 20-22-23-25-26-29 sts in stocking st, work pattern according to diagram A.2 2 times in total (choose diagram for correct size = 2 repetitions of 10-10-12-12-14-14 sts), work in stocking st until 1 st remains on row and finish with 1 edge st in garter st. Continue like this with stocking st, pattern and 1 edge st in garter st in each side. REMEMBER THE KNITTING TENSION When piece measures 8-8-8-10-10-10 cm, dec 1 st in each side - READ DECREASE TIP (= 2 sts dec) and MEASURING TIP 1. Repeat dec in each side every 7-7-8-10-10-10 cm a total of 7-7-7-6-6-6 times = 47-51-57-63-69-75 sts. Continue to work until piece measures 61-63-65-67-69-71 cm. Now cast off for armholes at beg of every row in each side as follows: Cast off 3 sts 1 time, 2 sts 0-0-1-2-3-4 times and 1 st 1-2-2-3-3-3 times = 39-41-43-43-45-47 sts. When piece measures 78-81-84-87-90-93 cm, cast off the middle 9-9-11-11-11-13 sts for neck and finish each shoulder separately. Continue to cast off 1 st on next row from neck = 14-15-15-15-16-16 sts remain on the shoulder. Loosely cast off all sts when piece measures 80-83-86-89-92-95 cm. Repeat on the other shoulder. RIGHT FRONT PIECE: Worked back and forth on circular needle. Cast on 40-42-44-48-52-54 sts (incl 1 edge st in the side and 18-18-18-20-20-20 band sts towards mid front) on circular needle size 7 mm with Snow. Work first row as follows from RS: Work A.1 over the first 18-18-18-20-20-20 sts (= band), then work in garter st over the remaining 22-24-26-28-32-34 sts. Continue with A.1 over band and garter st over the remaining sts for 5-5-5-6-6-6 cm. Switch to circular needle size 8 mm and work next row from RS as follows: A.1 over the first 18-18-18-20-20-20 sts as before, 2 sts in stocking st, work A.2 (choose diagram for correct size = 1 repetition of 10-10-12-12-14-14 sts), work in stocking st until 1 st remains on row and finish with 1 edge st in garter st. Continue like this with stocking st, pattern and 1 edge st in garter st towards the side. When piece measures 8-8-8-10-10-10 cm, dec in the side as on back piece. Repeat dec 7-7-7-6-6-6 times in total = 33-35-37-42-46-48 sts. AT THE SAME TIME when piece measures 36-38-40-42-44-46 cm, dec for BUTTONHOLES - see explanation above. When piece measures 55-57-59-61-63-65 cm - REMEMBER MEASURING TIP 1, work in garter st over all sts (also over the 18-18-18-20-20-20 band sts) until finished measurements. AT THE SAME TIME when piece measures 61-63-65-67-69-71 cm, cast off for armhole at beg of every row from the side as on back piece = 29-30-30-32-34-34 sts on needle. When piece measures 74-77-80-82-85-88 cm, slip the outermost 11-11-11-12-13-13 sts towards mid front on 1 stitch holder for neck (work them before slipping them on stitch holder to avoid cutting the yarn). Continue to cast off for neck at beg of every row from neck as follows: Cast off 2 sts 1 time and then 1 st 2-2-2-3-3-3 times in total = 14-15-15-15-16-16 sts remain on shoulder. Loosely cast off all sts when piece measures 80-83-86-89-92-95 cm. LEFT FRONT PIECE: Cast on and work as right front piece but reversed. NOTE: Beg A.2 as follows from RS: Work 1 edge st in garter st, work in stocking st until 29-29-31-33-35-35 sts remain on row, work pattern according to diagram A.2 (choose diagram for correct size = 1 repetition of 10-10-12-12-14-14 sts), work 1 st in stocking st and continue A.1 over the remaining 18-18-18-20-20-20 sts (= band). Do not dec for buttonholes on left front piece. ASSEMBLY: Sew the shoulder seams. HOOD: Pick up approx. 46 to 58 sts around the neck (incl sts on stitch holders at the front) on circular needle size 8 mm with Snow. K 1 row from WS while inc evenly to 66-68-70-72-74-76 sts - do not inc over bands. Then work in garter st back and forth over all sts until hood measures approx. 32-33-34-35-36-37 cm. Cast off. Fold the hood double and sew tog at the top with grafting/kitchener sts. SLEEVE: Worked back and forth on circular needle. Cast on 26-28-30-30-34-34 (incl 1 edge st in each side) on circular needle size 7 mm with Snow. Work 2 ridges. Switch to circular needle size 8 mm and work in stocking st with 1 edge st in garter st in each side. When piece measures 8-8-8-8-10-12 cm, inc 1 st in each side - READ INCREASE TIP (= 2 sts inc) and MEASURING TIP 2. Repeat inc every 7½-6-6-5-4½-3½ cm 6-7-7-8-8-9 times in total = 38-42-44-46-50-52 sts. When piece measures 48-48-47-45-44-43 cm (NOTE: Shorter measurements in the larger sizes because of longer sleeve cap and wider shoulders), cast off for sleeve cap at beg of every row in each side as follows: Cast off 3 sts 1 time, 2 sts 1-2-2-2-2-2 time and 1 st 2-2-3-3-3-3 times. Then cast off 2 sts at beg of every row in each side until piece measures approx. 55-56-56-56-56-56 cm, then cast off 3 sts 1 time in each side. Cast off the remaining sts, piece measures approx. 56-57-57-57-57-57 cm. Knit another sleeve. ASSEMBLY: Sew in the sleeves inside 1 edge st. Sew underarm and side seams in one inside 1 edge st. Sew the buttons on to left front piece. |
|||||||||||||
Diagram explanations |
|||||||||||||
|
|||||||||||||
 |
|||||||||||||
 |
|||||||||||||
Have you finished this pattern?Tag your pictures with #dropspattern #intothewoodsjacket or submit them to the #dropsfan gallery. Do you need help with this pattern?You'll find 28 tutorial videos, a Comments/Questions area and more by visiting the pattern on garnstudio.com. © 1982-2026 DROPS Design A/S. We reserve all rights. This document, including all its sub-sections, has copyrights. Read more about what you can do with our patterns at the bottom of each pattern on our site. |
|||||||||||||


With over 40 years in knitting and crochet design, DROPS Design offers one of the most extensive collections of free patterns on the internet - translated to 17 languages. As of today we count 325 catalogues and 12298 patterns translated into English (UK/cm). 12298
We work hard to bring you the best knitting and crochet have to offer, inspiration and advice as well as great quality yarns at incredible prices! Would you like to use our patterns for other than personal use? You can read what you are allowed to do in the Copyright text at the bottom of all our patterns. Happy crafting!
Post a comment to pattern DROPS 164-1
We would love to hear what you have to say about this pattern!
If you want to leave a question, please make sure you select the correct category in the form below, to speed up the answering process. Required fields are marked *.