
Popular categories
Looking for a yarn?


Comments / Questions (45)
![]() Ellen Pedersen wrote:
Ellen Pedersen wrote:
Kan opskrifter udskrives endnu ?
17.06.2024 - 00:18DROPS Design answered:
Hei Ellen. Klikk på "Skriv ut" ikonet og du får skrevet ut oppskriften. mvh DROPS Design
24.06.2024 - 13:31
![]() Ann Cathrin Mora wrote:
Ann Cathrin Mora wrote:
Fant svaret på mitt spørsmål selv. Den som leter, finner ;)
28.04.2024 - 12:09
![]() Ann Cathrin Mora wrote:
Ann Cathrin Mora wrote:
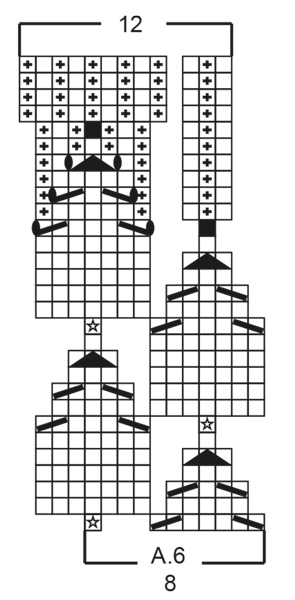
Kan ikke finne diagram A.6 - er diagram A.6 det samme som A.3+A.4+A.5? Strikker i str 2 år.
27.04.2024 - 16:13DROPS Design answered:
Hei Ann Cathrin, Diagram A.6 finner du ovenfor målskissen, på bunnen av oppskriften. God fornøyelse!
29.04.2024 - 06:51
![]() Schmitt wrote:
Schmitt wrote:
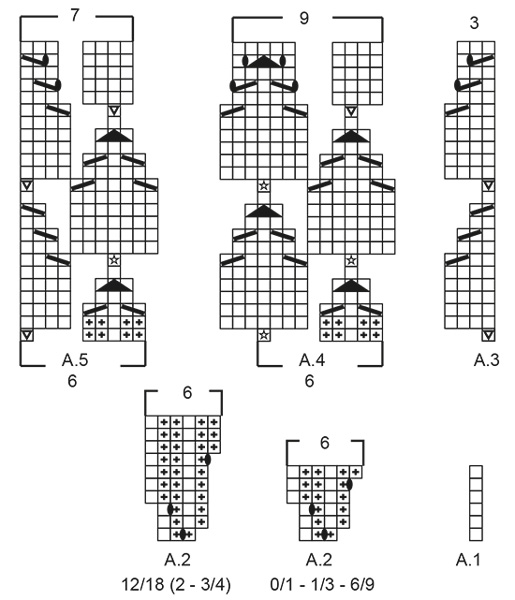
Bonjour Désolée mais ce n'est toujours pas clair : si je comprends bien une ligne correspond à un rang mais dans ce cas on répète le schéma dans ce rang combien de fois ? Ensuite je suppose puisque c'est en jersey qu'il faut faire un rang envers et ensuite le rang 3 et le rang 5 avec les augmentations ? Mais ça fait un jeté par rang ou plusieurs et si y en a qu'un combien de fois faut il répéter chaque rang ? Merci
23.04.2024 - 15:11DROPS Design answered:
Bonjour Mme Schmitt, vous devez répéter le diagramme tout le rang comme indiqué auparavant, autrement dit: vous tricotez 5 m point mousse, le diagramme A.1 (= 1 maille endroit), puis vous répétez le diagramme A.2 (cf diagramme et explications ci-dessous) jusqu'à ce qu'il reste 5 mailles et vous terminez par 5 mailles point mousse. Sur l'envers, tricotez 5 m point mousse, répétez A.2 (en lisant le diagramme de gauche à droite), terminez par A.1 (= 1 m envers) et 5 m point mousse. Vous allez augmenter 1 m aux rangs 1, 3 et 5 dans chacun des A.2, soit 24 motifs x 3 mailles = vous augmentez 72 mailles au total + 83 mailles = 155 mailles. Bon tricot!
23.04.2024 - 15:25
![]() Schmitt wrote:
Schmitt wrote:
Bonjour Merci pour votre réponse de ce matin mais ce n'est toujours pas clair : vous dites qu'il faut faire (tout ?) le diagramme de A2 et qu'on augmente de 3 mailles et après comment faut il continuer ? Je suis désolée : ma question vous paraît simple mais je ne vois vraiment pas comment avancer ....merci d'avance pour votre aide
23.04.2024 - 13:43DROPS Design answered:
Bonjour Mme Schmitt, si vous regardez bien le diagramme A.2, vous allez voir des petits ovales noirs, ils correspondent à 1 jeté à faire (entre les 2 premières mailles envers par ex au 1er rang de A.2), ce jeté se tricote ensuite torse à l'envers sur l'envers au rang suivant, et à l'endroit sur l'endroit. Vous avez ainsi augmenté 1 maille dans chaque A.2. Augmentez ensuite au 3ème rang ainsi: (1 m env, 1 m end, 1 m env, 1 jeté, 1 m end) dans chaque A.2 = vous avez maintenant 5 mailles et augmentez à l'avant-dernier rang de A.2 ainsi: (1 jeté, 1 m env, 1 m end, 2 m env, 1 m end) = on a 6 m dans chaque A.2. Est-ce plus clair ainsi?
23.04.2024 - 13:49
![]() Paula wrote:
Paula wrote:
As I read your diagram A1 and A2 and so on . Aim I to assume I work right to left and on the wrong side work left to right . Is there a picture example of what each step should look like so I can tell my pattern looks the same for guidance .
23.04.2024 - 03:30DROPS Design answered:
Hi Paula, Yes, the diagrams are worked bottom up, from right to left from the right side and left to right from the wrong side. We do not have a picture from the wrong side, but when you look at your work from the right side it will resemble the diagram. Happy crafting!
23.04.2024 - 06:33
![]() Schmitt wrote:
Schmitt wrote:
Bonjour, Je souhaite faire ce modèle mais je coince sur le diagramme A2 : il est dit qu\'il faut le faire 24 fois apparemment sur le même rang mais je ne vois pas comment on peut ensuite arriver à 155 mailles ? Ou faut il faire les différents rangs 24 fois (ça me paraît énorme) ? Pouvez vous m\'aider svp ? Merci d\'avance
22.04.2024 - 23:21DROPS Design answered:
Bonjour Mme Schmitt, vous allez répéter 24 fois le diagramme A.2 en largeur ainsi: 5 m point mousse, la maille de A.1, puis on répète les 3 mailles de A.2 (en augmentant en même temps 1 m au 1er rang), et on termine par 5 m point mousse. On va ainsi augmenter 3 mailles dans A.2, on a 6 mailles dans A.2 quand le diagramme est terminé, on va donc avoir ainsi: 5 m point mousse, 1 m de A.1, 24 x 6 m de A.2 et 5 m point mousse soit: 5+1+144+5=155 m. Bon tricot!
23.04.2024 - 08:11
![]() Lone Mathiesen wrote:
Lone Mathiesen wrote:
Hvordan strikker jeg A3, 4 og 5 på pinde frem og tilbage så det kommer til at se ud ligesom når A6 strikkes på rundpind.
12.04.2024 - 06:38DROPS Design answered:
Hei Lone. Følge tekstforklaringen til diagrammene, på hvordan de ulike ikonene skal strikkes fra retten og hvordan de skal strikkes fra vrangen. mvh DROPS Design
15.04.2024 - 13:05
![]() Katja wrote:
Katja wrote:
A.1 wird laut Anleitung 6 Reihen gestrickt. Wenn ich das Kleid für eine Zweijährige stricke, fällt A.1 in den letzten 4 Reihen weg und es verschiebt sich das A.2-Muster... ? Verstehe ich das richtig?
01.04.2024 - 11:58DROPS Design answered:
Liebe Katja, die erste Masche vor A.2 stricken Sie immer wie in A.1, dh immer 1 Masche glatt rechts nach der Blende und vor A.2 (von der Vorderseite gesehen), so ist das Muster symmetrisch. Viel Spaß beim stricken!
02.04.2024 - 15:10
![]() Anna M Høi Fodgaard wrote:
Anna M Høi Fodgaard wrote:
Altså skal de 7 masker strikkes der hvor man på sidste pind fra retsiden strikkede 2 sammen i Diagram A3 eller i masken før ?
27.02.2024 - 09:16DROPS Design answered:
Hei Anna. Usikker på hva du mener med de7 maskene. Det er 7 masker på siste pinne i A.5 og deretter strikkes de 5 kantmaskene i retstrikk. I A.3 er det 3 masker etter de 5 kantmaskene i retstrikk på siste pinne. mvh DROPS Design
04.03.2024 - 11:39
|
||||||||||||||||||||||||||||
Bellflower Dress#bellflowerdress |
||||||||||||||||||||||||||||
 |
 |
|||||||||||||||||||||||||||
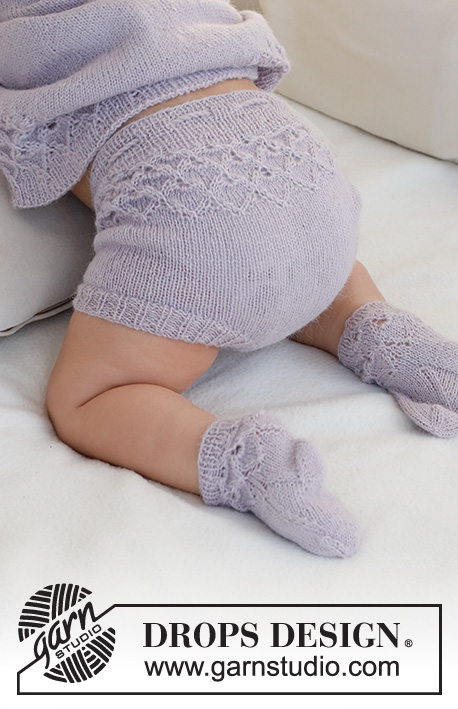
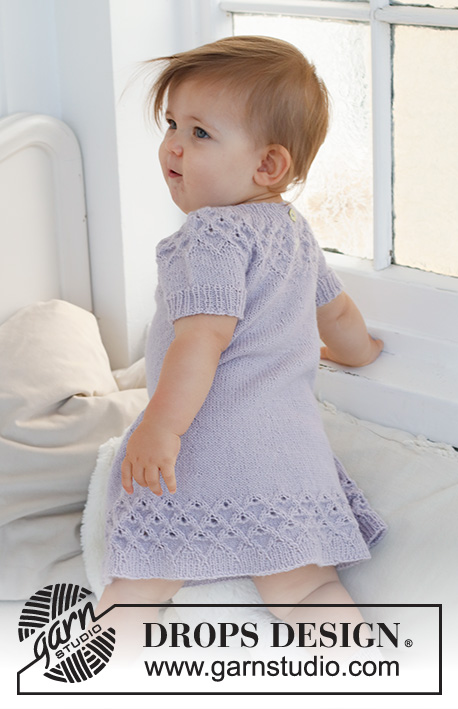
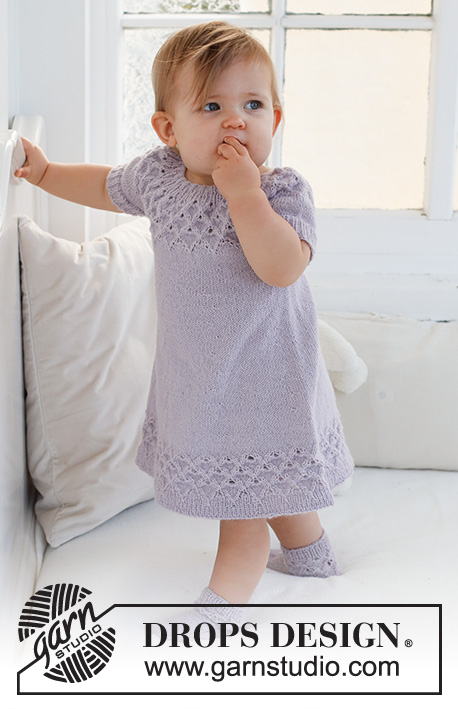
Knitted dress for babies and children in DROPS Alpaca. The piece is worked top down, with round yoke and lace pattern. Sizes 0 - 4 years.
DROPS Baby 43-11 |
||||||||||||||||||||||||||||
|
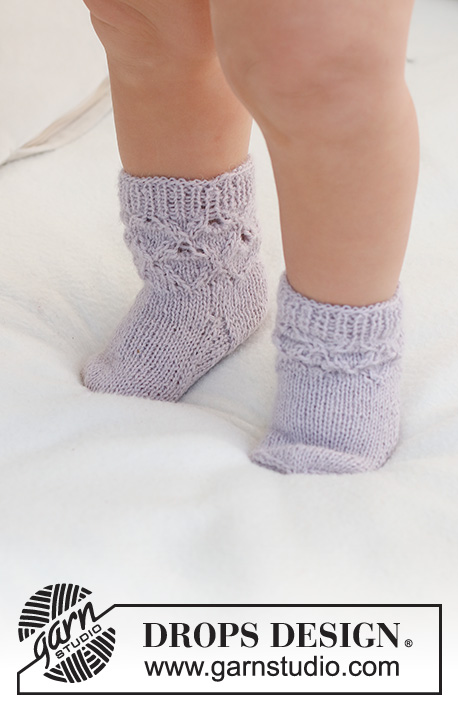
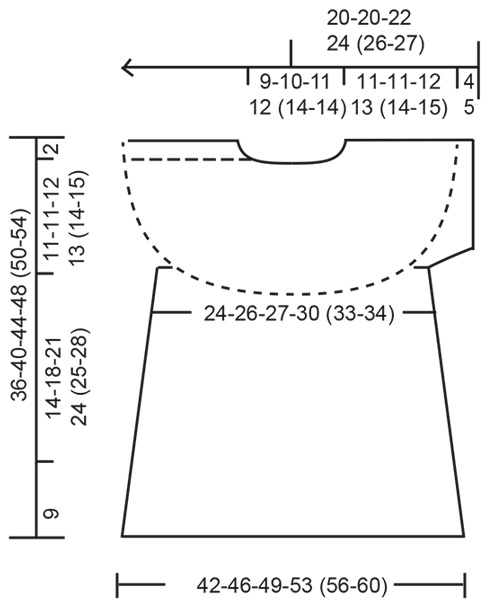
------------------------------------------------------- EXPLANATIONS FOR THE PATTERN: ------------------------------------------------------- RIDGE/GARTER STITCH (worked back and forth): Knit all rows. 1 ridge = knit 2 rows. PATTERN: See diagrams A.1 to A.6. Choose diagram for your size. The diagrams show all rows in the pattern from the right side. INCREASE TIP (for skirt): Increase alternately before and after each marker (i.e. the first increase is before each marker, the second after each marker, etc.). INCREASE 1 STITCH BEFORE EACH MARKER: Work until there is 1 stitch left before the marker, make 1 yarn over. INCREASE 1 STITCH AFTER EACH MARKER: Work to the marker, make 1 yarn over. On the next round knit the yarn overs twisted to avoid holes. Then work the new stitches in stocking stitch. BUTTONHOLES: Work the buttonholes on the left band (when the garment is worn). Work from the right side inside 1 stitch as follows: Knit 1, knit 2 together, make 1 yarn over. On the next row (wrong side), knit the yarn over to leave a hole. The first buttonhole is worked when the piece measures 1½-2 cm. The second buttonhole when the piece measures 5-6 cm. ------------------------------------------------------- START THE PIECE HERE: ------------------------------------------------------- DRESS – SHORT OVERVIEW OF THE PIECE: The piece is worked top down, back and forth until the split is finished mid-back. Then you continue in the round. The yoke is divided for the skirt and sleeve-edges and the skirt is continued in the round. The sleeve edges are worked in the round with double pointed needles. NECK: Cast on 71-77-83-89 (95-95) stitches with circular needle size 2.5 mm and DROPS Alpaca. Work 5 stitches in GARTER STITCH – read description above, * knit 1, purl 2 *, work from *-* until there are 6 stitches left, knit 1 and 5 stitches in garter stitch. Work this rib back and forth for 1 cm. Change to circular needle size 3 mm. YOKE: Work the next row from the right side as follows: 5 stitches in garter stitch, A.1, work A.2 20-22-24-26 (28-28) times and 5 stitches in garter stitch. Work the BUTTONHOLES – read description above. When A.1 and A.2 have been worked in height there are 131-143-155-167 (179-179) stitches. The piece measures approx. 3-3-3-4-4-4 cm. Continue with pattern as follows: 5 stitches in garter stitch, A.3, work A.4 19-21-23-25 (27-27) times, A.5 and 5 stitches in garter stitch. REMEMBER THE KNITTING TENSION! On the last row in A.3 to A.5 increase 0-0-0-0 (0-10) stitches evenly spaced. When A.3 to A.5 have been worked in height there are 191-209-227-245 (263-273) stitches. The piece measures approx. 10-10-10-12-12-12 cm. On the next row from the right side, cast off the first 5 stitches and knit to the end of the row = 186-204-222-240 (258-268) stitches. Continue with stocking stitch in the round. Move the start of the round 3 stitches so it is mid-back. When the piece measures 11-11-12-13 (14-15) cm, divide for the skirt and sleeves as follows: Knit 26-29-30-34 (37-39), place the next 40-44-50-52 (54-56) stitches on a thread for the sleeve, cast on 4 stitches under the sleeve, knit 53-58-61-68 (75-78), place the next 40-44-50-52 (54-56) stitches on a thread for the sleeve, cast on 4 stitches under the sleeve, knit the last 27-29-31-34 (38-39) stitches. SKIRT: = 114-124-130-144 (158-164) stitches. Continue with stocking stitch in the round for a further 3 cm. Insert 8 markers as follows: Knit 7-7-8-9 (10-10), insert 1 marker, * knit 14-15-16-18 (19-20), insert 1 marker, knit 14-16-16-18 (20-21), insert 1 marker *, work from *-* 2 more times, knit 15-16-17-18 (20-20), insert 1 marker and knit 8-8-9-9 (11-11). Allow the markers to follow your work onwards. On the next round increase 1 stitch before each marker – read INCREASE TIP! Increase like this every 4th-4th-5th-5th (6th-6th) round a total of 9-10-11-12 (12-13) times = 186-204-218-240 (254-268) stitches. When the skirt measures 14-18-21-24 (25-28) cm from the division, knit 1 round where you increase 6-4-6-0 (2-4) stitches evenly spaced = 192-208-224-240 (256-272) stitches. Then work A.6 on the round. When A.6 is finished there are 288-312-336-360 (384-408) stitches. Cast off with knit. The dress measures approx. 36-40-44-48 (50-54) cm from the shoulder down. SLEEVE-EDGES: Place the 40-44-50-52 (54-56) stitches from the thread on one side of the piece on double pointed needles size 3 mm and knit up 1 stitch in each of the 4 stitches cast on under the sleeve = 44-48-54-56 (58-60) stitches. Work stocking stitch in the round for 1-1-1-2-2-2 cm. Knit 1 round where you increase 4-3-3-4 (5-6) stitches evenly spaced = 48-51-57-60 (63-66) stitches. Change to double pointed needles size 2.5 mm. Work rib (knit 1, purl 2). Cast off with knit when the sleeve-edge measures 4-4-4-5-5-5 cm. Work the other sleeve-edge in the same way. ASSEMBLY: Lay the right band (the cast-off band) under the left band and sew down. Sew the buttons onto the right band. |
||||||||||||||||||||||||||||
Diagram explanations |
||||||||||||||||||||||||||||
|
||||||||||||||||||||||||||||
 |
||||||||||||||||||||||||||||
 |
||||||||||||||||||||||||||||
 |
||||||||||||||||||||||||||||
Have you finished this pattern?Tag your pictures with #dropspattern #bellflowerdress or submit them to the #dropsfan gallery. Do you need help with this pattern?You'll find 30 tutorial videos, a Comments/Questions area and more by visiting the pattern on garnstudio.com. © 1982-2026 DROPS Design A/S. We reserve all rights. This document, including all its sub-sections, has copyrights. Read more about what you can do with our patterns at the bottom of each pattern on our site. |
||||||||||||||||||||||||||||


With over 40 years in knitting and crochet design, DROPS Design offers one of the most extensive collections of free patterns on the internet - translated to 17 languages. As of today we count 324 catalogues and 12290 patterns translated into English (UK/cm). 12290
We work hard to bring you the best knitting and crochet have to offer, inspiration and advice as well as great quality yarns at incredible prices! Would you like to use our patterns for other than personal use? You can read what you are allowed to do in the Copyright text at the bottom of all our patterns. Happy crafting!
Post a comment to pattern DROPS Baby 43-11
We would love to hear what you have to say about this pattern!
If you want to leave a question, please make sure you select the correct category in the form below, to speed up the answering process. Required fields are marked *.