
Popular categories
Looking for a yarn?


Comments / Questions (15)
![]() Nancy Lapointe wrote:
Nancy Lapointe wrote:
Bonjour, pour « l’augmentation des manches »: il est indiqué tous les rangs. Est-ce que cela sugnifie :tous les rangs endroits? Il y a pas d’indications pour l’envers à cet endroit. J’ai fais les augmentations sur tous les rangs ( end. et env.) et je n’arrivais pas du tout à la longueur d’ouvrage indiqué. J’ai repris mon ouvrage. Pouvez-vous m’indiquer s’il s’agit seulement des rangs endroit? Merci beaucoup pour vos explications!
24.07.2024 - 16:55DROPS Design answered:
Nonjour Nancy, tous les rangs signifie sur l'endroit et sur l'envers. Comment le faire sur l'envers vous trouverez sous AUGMENTATIONS-3 (sur l'envers). Bon tricot!
26.07.2024 - 15:07
![]() Aurora López Lazaro wrote:
Aurora López Lazaro wrote:
Por favor me podrían poner entre cuantos puntos se colocan los marcadores para el canesú es que no me queda claro, es decir, x puntos 1°, x puntos 2°, x puntos 3°..... así hasta el 8°. Muchas gracias
27.02.2024 - 20:54DROPS Design answered:
Hola Aurora, el marcapuntos estará en un punto u otro dependiendo de la talla que estés trabajando. En los aumentos para el canesú tienes: marcapuntos 1, 13-13-13-14-14-14 puntos, 2º marcapuntos, 1 punto, 3º marcapuntos, 13-13-13-14-14-14 puntos, 4º marcapuntos, 5º marcapuntos (debería estar ya colocado de antes, cuando empezaste el canesú), 13-13-13-14-14-14 puntos, 6º marcapuntos, 1 punto, 7º marcapuntos 13-13-13-14-14-14 puntos, 8º marcapuntos.
29.02.2024 - 22:48
![]() Vladimíra Fidrmucová wrote:
Vladimíra Fidrmucová wrote:
Dobrý den, děkuji za vaše krásné stránky o pletení a háčkování. Některé modely ze starších katalogů nejsou přeloženy do českého jazyka . Mohla bych vás poprosit o přeložení tohoto svetru do českého návodu ? Děkuji Vlaďka
23.05.2023 - 15:39DROPS Design answered:
Dobrý den, Vlaďko, díky za zpráci a za tip - český návod přidáme během 1-2 dnů. Hezký den! Hana
23.05.2023 - 18:06
![]() Kim Clark wrote:
Kim Clark wrote:
I can see that the shoulder increases need to be every row to get a saddle shoulder but the first 4 sleeve increases are done every other row. It makes more sense to continue them that way in the first set of increases in the sleeve increase section.
27.06.2021 - 17:41DROPS Design answered:
Dear Kim, the increases are set at that place amd rythm, to get the shape of the cardigan, howevere, you are welcome to experiment with a different version. Happy Stitching!
28.06.2021 - 03:42
![]() Kim Clark wrote:
Kim Clark wrote:
In the sleeve increase section, should the 4 increases be done on every "other" row ie right side rows only? This seems to make sense based on the measurements after the increases and the next set of increases being every row starting on wrong side.
26.06.2021 - 02:23DROPS Design answered:
Dear Kim, increases are done on every ro in order to get the almost horizontal line of the saddle shoulder. If you do it on every other row, you get a regular raglan line, not the saddle shoulder. Happy Stitching!
26.06.2021 - 09:13
![]() Wiebke wrote:
Wiebke wrote:
Oh ist mir das unangenehm! Mir ist das gerade auch aufgefallen... Vielen Dank! Liebe Grüße von Wiebke
04.06.2021 - 19:38
![]() Wiebke wrote:
Wiebke wrote:
DROPS 221-35, Anleitung Seite 4, Passe Ich komme da nicht auf 90 Maschen, auch rechnerisch ergeben das bei mir 94 Maschen: Anschlag 88Maschen, 2x 5 Ma abketten = 78 Ma, 2x A1 = 10Ma Zunahme = 88 Ma, 6 Ma verteilt über den Rücken zunehmen= 94 Ma Was mache ich falsch? Liebe Grüße, Wiebke
03.06.2021 - 16:38DROPS Design answered:
Liebe Frau Wiebke, es sind nur 3 Maschen in jedem A.1 zugenommen: 88 M + 3 M x 2 (A.1) + 6 M (Rücken) - 10 M (Blende) = 90 Maschen. Viel Spaß beim stricken!
04.06.2021 - 06:58
![]() Sabine wrote:
Sabine wrote:
Hallo liebes DROPS-Team! Ich vermute in der deutschen Übersetzung einen kleinen Fehler. Hier heißt es für die erste Reihe nach dem Halsbündchen: "Die ersten 5 Maschen wie zuvor stricken" - im norwegischen Original sowie auch in der französischen und US-englischen Übersetzung werden die ersten 5 Maschen abgekettet. Liebe Grüße, Sabine
11.04.2021 - 14:13DROPS Design answered:
Liebe Sabine, ganz herzlichen Dank für den Hinweis, die Anleitung wird korrigiert. Viel Spaß beim stricken!
12.04.2021 - 09:56
![]() Anita wrote:
Anita wrote:
Helix
15.01.2021 - 05:13
![]() Eileen Di Cenzo wrote:
Eileen Di Cenzo wrote:
Pink Dream
13.01.2021 - 19:34
|
|||||||||||||||||||||||||||||||
Easy Twist Cardigan#easytwistcardigan |
|||||||||||||||||||||||||||||||
 |
 |
||||||||||||||||||||||||||||||
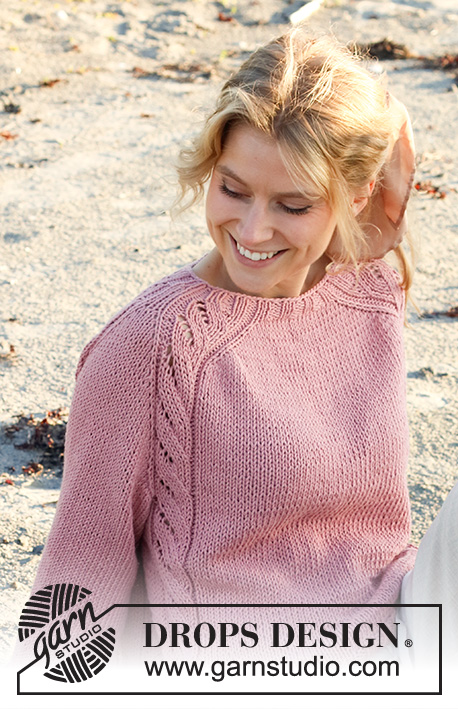
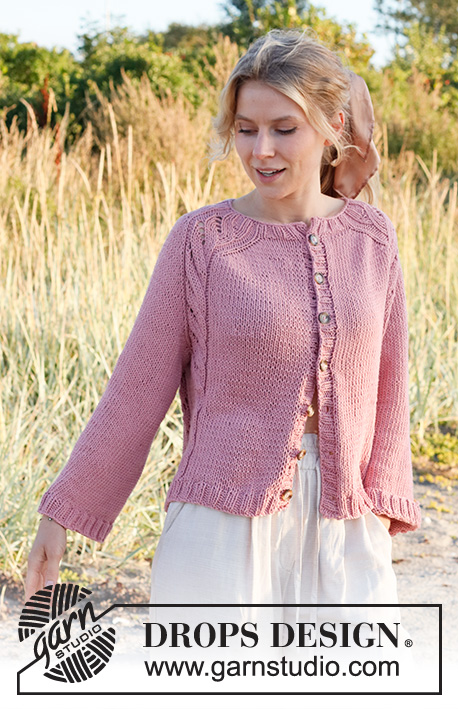
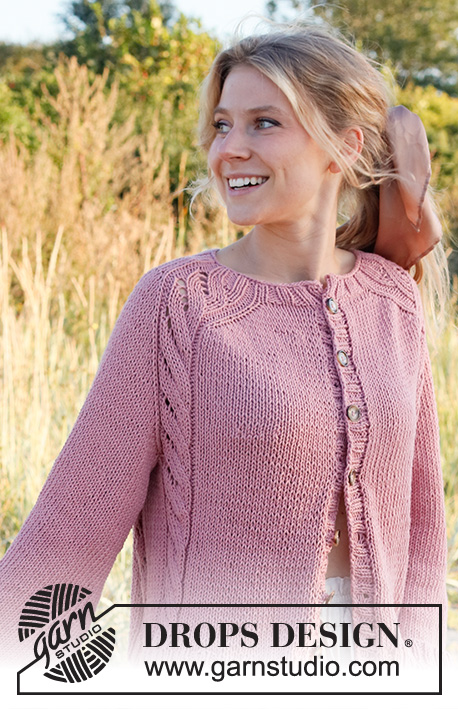
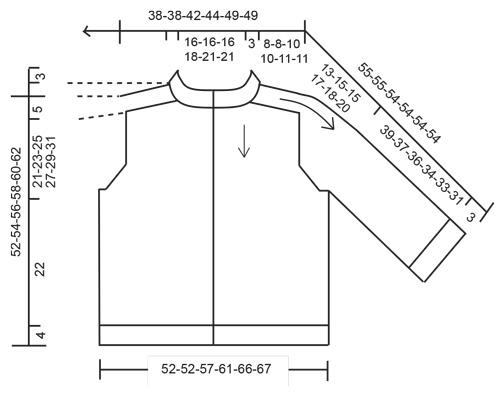
Knitted jacket in DROPS Paris. Piece is knitted top down with saddle shoulders and lace pattern. Size: S - XXXL
DROPS 221-35 |
|||||||||||||||||||||||||||||||
|
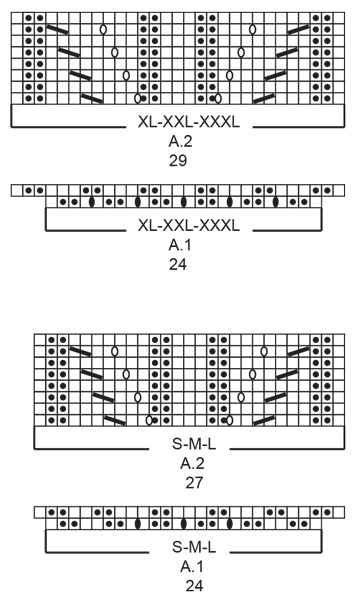
------------------------------------------------------- EXPLANATION FOR THE PATTERN: ------------------------------------------------------- GARTER STITCH (back and forth): Knit all rows. 1 ridge vertically = knit 2 rows. PATTERN: See diagrams A.1 and A.2. Choose diagram for your size. Diagrams show all rows in pattern seen from the right side. INCREASE TIP-1 (evenly): To calculate how to increase evenly, count the stitches to be increased (e.g. 9 stitches) and divide by stitches of increases to be done (e.g. 3) = 3. In this example increase by making 1 yarn over after every 3rd stitch. On next row work yarn overs twisted to avoid holes INCREASE TIP-2 (applies from right side): BEFORE MARKER: The stitch is twisted towards the right. Use left needle to pick up thread between 2 stitches from row below, pick up thread from behind and knit stitch in front loop. AFTER MARKER: The stitch is twisted towards the left. Use left needle to pick up thread between 2 stitches from row below, pick up thread from front and knit stitch in back loop. INCREASE TIP-3 (applies from wrong side): BEFORE MARKER: The stitch is twisted towards the right. Use left needle to pick up thread between 2 stitches from row below, pick up thread from front and purl stitch in back loop. AFTER MARKER: The stitch is twisted towards the left. Use left needle to pick up thread between 2 stitches from row below, pick up thread from behind and purl stitch in front loop. DECREASE TIP (applies to sleeves in size XL-XXL-XXXL): Decrease 1 stitch on each side of marker as follows: Work until 3 stitches remain before marker, knit 2 together, knit 2 stitches (marker is between these stitches), slip 1 stitch knitwise, stitches, knit 1, pass slipped stitch over stitch worked (= 2 stitches decreased). BUTTONHOLES: Decrease for 6-7-7-7-7-7 buttonholes on right band. 1 buttonhole = work 2 stitches together, make 1 yarn over - NOTE: It will look nicer if you decrease for buttonhole by purling 2 together in a section with 2 purl stitches (seen from right side). On next row knit yarn over to make holes. Bottom buttonhole should be approx. 4-6 cm from bottom edge, and top buttonhole approx. 1 cm from neck edge. Place the remaining 4-5-5-5-5-5 buttonholes evenly, approx. 8-7-7½-8-8-8½ cm between each buttonhole. CAST-OFF TIP: To avoid a tight cast-off edge you may use a larger needle size. If this also is too tight, work a 1 yarn over after approx. every 4th stitch while casting off (cast off yarn overs as regular stitches). ------------------------------------------------------- START THE PIECE HERE: ------------------------------------------------------- JACKET - SHORT OVERVIEW OF THE PIECE: Work neck edge and yoke back and forth on circular needle from mid front, top down. Increase stitches for saddle shoulder, then increase stitches for yoke, and finally increase stitches for sleeves. Now divide yoke for body and sleeves. Work body back and forth on circular needle from mid front, top down. Work sleeves in the round on double pointed needles/short circular needle, top down. NECK EDGE: Cast on 88-88-92-96-100-100 stitches (including 5 band stitches in each side towards mid front) on circular needle size 4.5 mm with Paris. Purl 1 row from wrong side. Then work rib from right side as follows: Work 1 stitch in GARTER STITCH - read explanation above, * knit 2, purl 2 *, repeat from *-* until 3 stitches remain, finish with knit 2 and 1 stitch in garter stitch. Continue rib like this for 3 cm. YOKE: On next row from right side increase increasing stitches evenly, insert 4 markers in piece. Use markers when increasing for saddle shoulder. Work as follows - from right side: Cast off the first 5 stitches, work 9 stitches in stocking stitch and increase 0-0-0-1-3-3 stitches evenly – read INCREASE TIP-1 (= left front piece), insert 1st marker, A.1 over the next 24 stitches (i.e. knit over knit and purl over purl and increase as shown in diagram = shoulder stitches), insert 2nd marker, 12-12-16-20-24-24 stitches in stocking stitch and increase 6-6-2-0-0-0 stitches evenly (= back piece), insert 3rd marker, A.1 over the next 24 stitches (i.e. knit over knit and purl over purl and increase as shown in diagram = shoulder stitches), insert 4th marker, 9 stitches in stocking stitch and increase 0-0-0-1-3-3 stitches evenly and work rib / garter stitch over the last 5 stitches as before (= right front piece). On next row from wrong side cast off the first 5 stitches and continue with A.1 and stocking stitch as before over the remaining stitches = 90-90-90-98-106-106 stitches. Move the markers upwards when working. Switch to circular needle size 5.5 mm. Insert 1 marker at the beginning of row mid front, measure yoke from this marker! SADDLE SHOULDER INCREASE: Read all of the following section before working! Continue piece with 1 edge stitch in each side towards mid front, A.2 over stitches in A.1 (27-27-27-29-29-29 stitches), and stocking stitch over stitches on front piece and back piece. AT THE SAME TIME on first row from right side increase 4 stitches for saddle shoulder as follows: Increase BEFORE 1st and 3rd marker and increase AFTER 2nd and 4th marker – read INCREASE TIP-2. Now increase only on front pieces and back piece, and number of shoulder stitches remains the same. On next row from wrong side increase 4 stitches for saddle shoulder as follows: Increase BEFORE 4th and 2nd marker and increase AFTER 3rd and 1st marker – read INCREASE TIP-3. I.e. increase on EVERY row, and increase differently from right and wrong side, so that stitches are placed nicely. REMEMBER THE KNITTING TENSION! Repeat A.2 vertically. Continue pattern like this, and increase on every row (i.e. both from right side and wrong side) 10-10-12-12-12-12 times in total (= 130-130-138-146-154-154 stitches). YOKE INCREASE: Now move 2 of the markers and insert 4 new markers without working the stitches as follows: Leave 1st marker, count 13-13-13-14-14-14 stitches of A.2, insert 2nd marker, count 1 stitches of A.2 (= mid on top of shoulder), insert 3rd marker, count 13-13-13-14-14-14 stitches of A.2, insert 4th marker, leave next marker (i.e. before next A.2 = 5th marker), count 13-13-13-14-14-14 stitches of A.2, insert 6th marker, count 1 stitch of A.2, insert 7th marker, count 13-13-13-14-14-14 stitches and insert 8th marker. On next row from right side continue with pattern as before, and increase as follows: Increase 1 stitch before 1st, 3th, 5th and 7th marker and 1 stitch after 2nd, 4th, 6th and 8th marker (= 8 stitches increased in total). On next row from wrong side increase before 8th and 4th marker and after 5th and 1st marker (= 4 stitches increased in total). I.e. increase is different from right and wrong side - remember INCREASE TIP-2 and 3. Work the increased stitches in stocking stitch, i.e. there are 2 stitches more between lace pattern in every A.2 for every increase from right side. From right side increase for both body and sleeve and from wrong side only for body. Increase for body 6-6-8-8-10-10 more times in total (i.e. increases have been done 16-16-20-20-22-22 times in total for body from neck edge) and 3-3-4-4-5-5 times in total for sleeve = 166-166-186-194-214-214 stitches. Piece now measures 8-8-10-10-11-11 cm from marker. SLEEVE INCREASE: Continue with stocking stitch, A.2 and 1 edge stitch in garter stitch in each side of piece. Continue to increase after 2nd and 6th marker and before 3rd and 7th marker (= 4 stitches increased in total). Increase like this on every row 10-12-13-14-14-16 times in total (i.e. 13-15-17-18-19-21 increases done in total on sleeve) = 206-214-238-250-270-278 stitches. Piece measures approx. 18-20-23-24-25-27 cm. Work until piece measures 18-20-23-24-25-27 cm (approx. 3-3-2-3-4-4 cm remain). Then increase on every row, i.e. increase as follows from wrong side: Increase 1 stitch after 7th and 3rd marker, and increase 1 stitch before 6th and 2nd marker (= 4 stitches increased in total). Continue increase both from right and wrong side 6-6-4-6-8-8 times in total (i.e. 3-3-2-3-4-4 times from right side and 3-3-2-3-4-4 times from wrong side) = 230-238-254-274-302-310 stitches. Piece measures approx. 21-23-25-27-29-31 cm from neck edge. On next row from right side divide piece for body and sleeves as follows: Work 1 edge stitch in garter stitch, 24-24-28-29-33-33 stitches in stocking stitch, pattern as before over the next 12-12-12-13-13-13 stitches (= front piece), slip the next 41-45-45-51-57-61 stitches on a stitch holder for sleeve and cast on 10-10-10-12-12-14 stitches under sleeve, pattern as before over the next 12-12-12-13-13-13 stitches, 50-50-58-60-68-68 stitches in stocking stitch, pattern as before over the next 12-12-12-13-13-13 stitches ( = back piece), slip the next 41-45-45-51-57-61 stitches on a stitch holder for sleeve and cast on 10-10-10-12-12-14 stitches under sleeve, pattern as before over the next 12-12-12-13-13-13 stitches, 24-24-28-29-33-33 stitches in stocking stitch and finish with 1 edge stitch in garter stitch (= front piece). BODY: = 168-168-184-196-212-216 stitches. Continue with stocking stitch, pattern as before and 1 edge stitch in garter stitch in each side of piece. Work stitches under sleeve in stocking stitch When piece measures 22 cm from division (or to desired length, approx. 4 cm remain), increase 8 stitches evenly on next row from wrong side = 176-176-192-204-220-224 stitches. Switch to circular needle size 4.5 mm and work rib as follows, begin from right side: Work 1 edge stitch in garter stitch, * knit 2, purl 2 *, repeat from *-* until 3 stitches remain, finish with knit 2 and 1 edge stitches in garter stitch. Continue like this until rib measures 4 cm. Cast off by knitting– read CAST-OFF TIP. Jacket measures approx. 52-54-56-58-60-62 cm from shoulder. SLEEVES: Slip the 41-45-45-51-57-61 stitches from stitch holder in one side of piece double pointed needles/a short circular needle size 5.5 mm and pick in addition up 1 stitch in each of the 10-10-10-12-12-14 new stitches cast on under sleeve = 51-55-55-63-69-75 stitches. Work in stocking stitch in the round. In size XL-XXL-XXXL decrease stitches as follows: SIZE XL-XXL-XXXL: Insert 1 marker in the middle of the 12-12-14 stitches cast on under sleeve. Decrease stitches on each side of this marker later. When sleeve measures 5 cm from division, decrease 1 stitch on each side of marker – read DECREASE TIP. Decrease like this every 12-10-5 cm 1-3-5 times in total = 61-63-65 stitches. ALL SIZES: = 51-55-55-61-63-65 stitches. Work in stocking stitch until piece measures 39-37-36-34-33-31 cm (or desired length, approx. 3 cm remain). On next round increase 13-13-13-11-13-11 stitches evenly = 64-68-68-72-76-76 stitches. Switch to double pointed needles/short circular needle size 4.5 mm. Work rib (= knit 2/purl 2) over all stitches. Cast off by knitting when rib measures 3 cm. Work the other sleeve the same way. LEFT BAND: Begin at the top of neck (i.e. from where stitches on neck edge were cast off) on left front piece, pick up stitches inside 1 edge stitch in garter stitch. Pick up approx. 79-99 stitches (adjust to that number of stitches is divisible by 4 + 3) from right side on circular needle 4.5 mm with Paris. Work rib, begin from wrong side as follows: 2 stitches in garter stitch, * purl 2, knit 2 *, repeat from *-* until 1 stitch remains, and finish with 1 stitch in garter stitch. Continue rib like this until band measures approx. 3 cm (adjust measurement with stitches cast off on neck edge). Cast off stitches with knit over knit and purl over purl. RIGHT BAND: Begin at the bottom of jacket on right front piece and pick up stitches inside 1 edge stitch in garter stitch. Pick up same number of stitches that were picked up on left band from right side on circular needle size 4.5 mm with Paris. Work rib, begin from wrong side as follows: Work 1 stitch in garter stitch, * knit 2, purl 2 *, work from *-* until 2 stitches remain, and work 2 stitches in garter stitch. When rib measures approx. 1½ cm, decrease for BUTTONHOLES - see explanation above. Continue rib until band measures 3 cm, adjust measurement with left band. Cast off stitches with knit over knit and purl over purl. ASSEMBLY: Sew band to neck edge where stitches were cast off. Sew the buttons on to the left band. |
|||||||||||||||||||||||||||||||
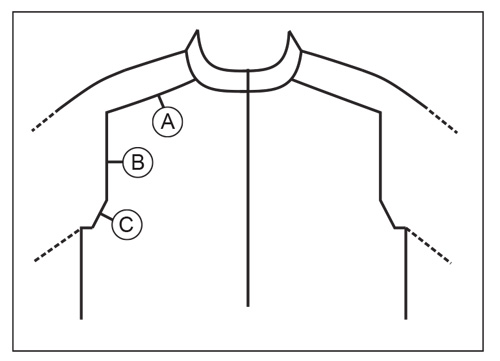
Diagram explanations |
|||||||||||||||||||||||||||||||
|
|||||||||||||||||||||||||||||||
 |
|||||||||||||||||||||||||||||||
 |
|||||||||||||||||||||||||||||||
 |
|||||||||||||||||||||||||||||||
Have you finished this pattern?Tag your pictures with #dropspattern #easytwistcardigan or submit them to the #dropsfan gallery. Do you need help with this pattern?You'll find 34 tutorial videos, a Comments/Questions area and more by visiting the pattern on garnstudio.com. © 1982-2026 DROPS Design A/S. We reserve all rights. This document, including all its sub-sections, has copyrights. Read more about what you can do with our patterns at the bottom of each pattern on our site. |
|||||||||||||||||||||||||||||||


With over 40 years in knitting and crochet design, DROPS Design offers one of the most extensive collections of free patterns on the internet - translated to 17 languages. As of today we count 325 catalogues and 12298 patterns translated into English (UK/cm). 12298
We work hard to bring you the best knitting and crochet have to offer, inspiration and advice as well as great quality yarns at incredible prices! Would you like to use our patterns for other than personal use? You can read what you are allowed to do in the Copyright text at the bottom of all our patterns. Happy crafting!
Post a comment to pattern DROPS 221-35
We would love to hear what you have to say about this pattern!
If you want to leave a question, please make sure you select the correct category in the form below, to speed up the answering process. Required fields are marked *.