
Popular categories
Looking for a yarn?


Comments / Questions (33)
![]() Rebekah wrote:
Rebekah wrote:
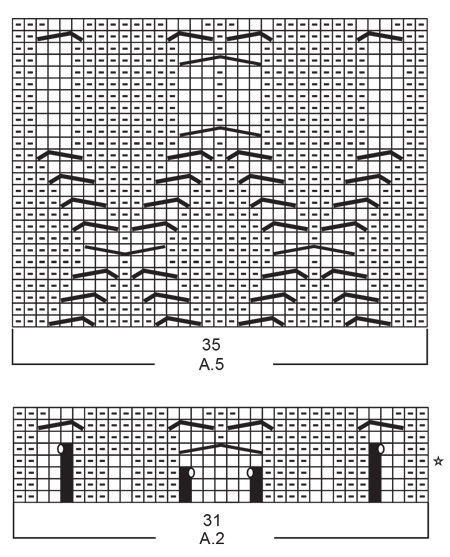
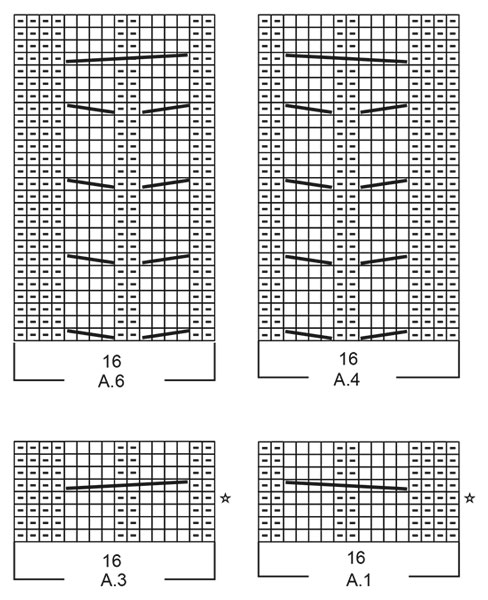
Hello. I've never done a cable stitch like the one that appears in A.1 and A.3 over 10 stitches (place 6 stitches on cable needle behind piece, knit 4, place outermost 2 stitches from cable needle back onto left needle, purl 2, knit 4 from cable needle). Can you explain which stitches are the "outermost 2 stitches"? Are they side by side--and if so, on which side of the needle? Thanks for your help.
09.03.2026 - 04:11DROPS Design answered:
Hi Rebekah, The 2 outermost stitches on the cable needle are the ones closest to the front end of the needle (the last stitches placed on the needle), and they are side by side. Regards, Drops Team.
09.03.2026 - 06:37
![]() Katie wrote:
Katie wrote:
I am knitting a medium, and cast on 107 stitches as the pattern indicates. If i follow the pattern I am supposed to decrease 5 stitches evenly on each end which leaves 97 stitches, but your pattern says 101 stitches — which is correct?
29.07.2025 - 15:41DROPS Design answered:
Hi Katie, In rows 3 and 5 of A.2 you have yarn overs which increase the stitch count (2 increases on row 3 and 2 increases on row 5). These 4 yarn overs bring your stitch count back up to 101 stitches. Regards, Drops team.
30.07.2025 - 06:29
![]() Engelien Vinken wrote:
Engelien Vinken wrote:
Ha ha ha in feite heb ik de trui bijna af. En hij is niet lelijk. Er stonden geen nummers bij, vandaar. Volgende keer beter. Groetjes
22.10.2024 - 13:44
![]() Engelien Vinken wrote:
Engelien Vinken wrote:
Ohoh, ik ben toch begonnen met de verkeerde kant van het werk te breien zoals ze zich voordoen. Maar dat is dan fout.
22.10.2024 - 13:38
![]() Engelien Vinken wrote:
Engelien Vinken wrote:
Wordt in het telpatroon alleen de rechter naalden weergegeven?
08.10.2024 - 23:01DROPS Design answered:
Dag Engelien,
Nee, in de telpatronen worden alle naalden weergegeven.
10.10.2024 - 18:45
![]() Renée Fijlstra wrote:
Renée Fijlstra wrote:
Beste meneer/mevrouw, In het patroon staat dat ik een aantal steken recht boven recht en averecht boven averecht moet breien. Wat wordt daarmee bedoeld? Is dat de ribbelsteek? Groetjes, Renée Fijlstra
13.03.2024 - 06:03DROPS Design answered:
Dag Renée,
Hiermee wordt bedoeld dat je rechte steken breit boven de steken die op de vorige naald ook recht waren gebreid en averecht over de steken die op de vorige naald ook averecht waren gebreid. (Dus je breit eigenlijk zoals de steken zich voordoen.)
14.03.2024 - 22:10
![]() Renée Fijlstra wrote:
Renée Fijlstra wrote:
Beste meneer/mevrouw, Ik heb een vraag over het patroon: DROPS Design: Patroon nr. ai-283, Seafarers heart. Het gaat om deze zin: Zet 99 steken op (inclusief 4 kantsteken aan elke kant) Wordt er bedoeld dat er 2 steken aan het begin van de naald afgehaald moeten worden en aan het einde van de naald 2 recht breien? Of moet ik een kantsteek extra maken en gelijk beginnen met het patroon? In mijn geval de boordsteek. Groetjes, Renée
28.02.2024 - 15:16DROPS Design answered:
Dag Renée,
Nee, je zet 99 steken op in totaal en daar zitten de kantststeken bij in. Je hoeft dus geen extra steken te maken of steken eraf te halen.
28.02.2024 - 20:18
![]() Margaretaqn wrote:
Margaretaqn wrote:
Novost
17.11.2023 - 09:40
![]() Evarda wrote:
Evarda wrote:
Med
15.11.2023 - 08:54
![]() Robebl wrote:
Robebl wrote:
Novost
14.11.2023 - 19:28
|
||||||||||||||||||||||||||||||||||||||||
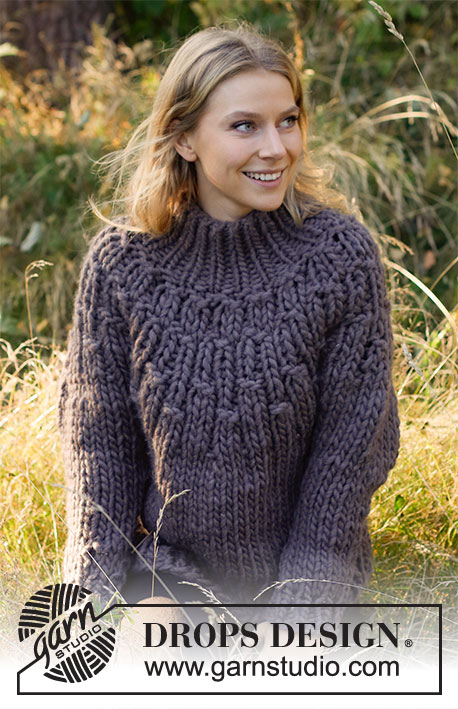
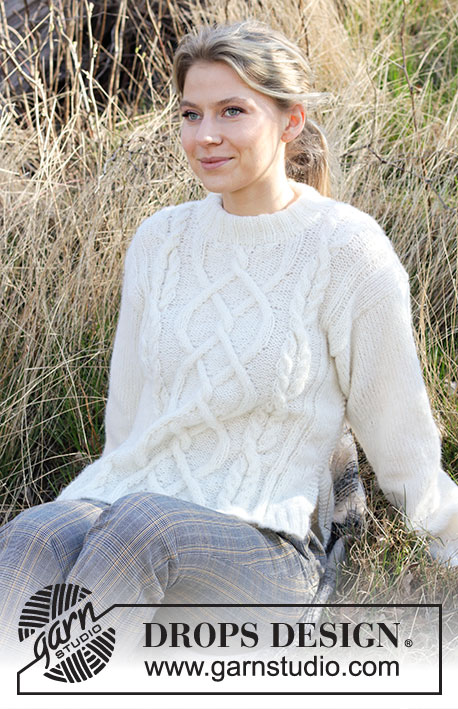
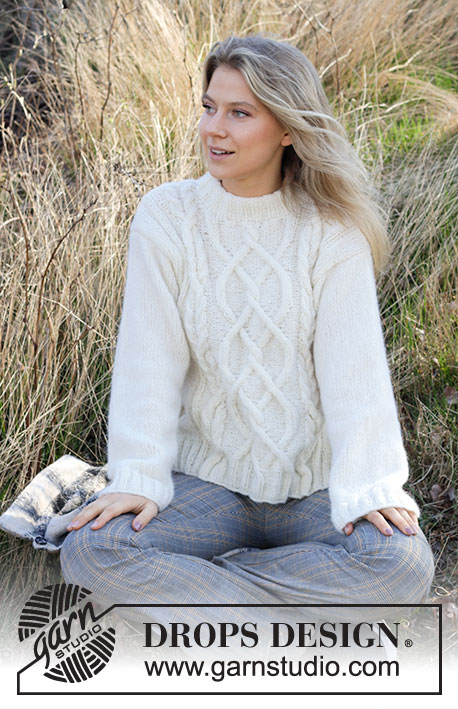
Seafarers Heart#seafarersheartsweater |
||||||||||||||||||||||||||||||||||||||||
 |
 |
|||||||||||||||||||||||||||||||||||||||
Knitted jumper in DROPS Air. The piece is worked with cables. Sizes S - XXXL.
DROPS 216-10 |
||||||||||||||||||||||||||||||||||||||||
|
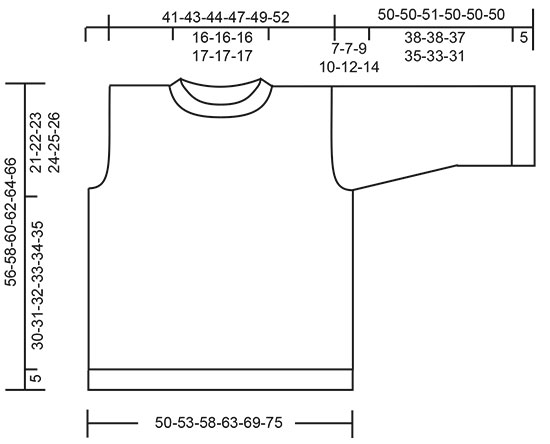
------------------------------------------------------- EXPLANATIONS FOR THE PATTERN: ------------------------------------------------------- RIDGE/GARTER STITCH (worked back and forth): Knit all rows. 1 ridge in height = Knit 2 rows. PATTERN: See diagrams A.1 to A.6. DECREASE TIP-1 (evenly spaced): To work out how to decrease evenly, count the total number of stitches on needle (e.g. 10 stitches) and divide by number of decreases to be made (e.g. 4) = 2.5. In this example decrease by alternately knitting together each 1st and 2nd stitch and each 2nd and 3rd stitch. DECREASE TIP-2: Decrease evenly – read DECREASE TIP-1 by purling 2 stitches together where you have purled or knitting 2 stitches together where you have knitted. INCREASE TIP: Work until there are 2 stitches left before the marker thread, 1 yarn over, knit 4 (marker thread sits between these 4 stitches), 1 yarn over. On the next round knit the yarn overs twisted to avoid holes. Then work the new stitches in stocking stitch. ------------------------------------------------------- START THE PIECE HERE: ------------------------------------------------------- JUMPER – SHORT OVERVIEW OF THE PIECE: The front and back pieces are worked separately, back and forth on the needle. The sleeves are worked with double pointed needles/short circular needle as far as the armholes. The sleeve cap is then finished back and forth. The neck is worked back and forth from top of shoulder. BACK PIECE: Cast on 99-107-115-123-139-147 stitches (including 4 edge stitches on each side) with circular needle size 4.5 mm and Air. Purl 1 row (= wrong side). Now work rib as follows: 4 stitches in GARTER STITCH – read description above, rib (= knit 2, purl 2) over the next 12-16-20-24-32-36 stitches, knit 2, work A.1 over the next 16 stitches, A.2 over the next 31 stitches, A.3 over the next 16 stitches, rib (= knit 2, purl 2) over the next 12-16-20-24-32-36 stitches, knit 2 and 4 stitches in garter stitch. Continue back and forth like this and repeat the first 2 rows in the diagrams until the rib measures 5 cm – adjust so the next row is from the right side. Now continue with the next 2 rows in A.1, A.2 and A.3, working as before over the other stitches. When you have finished the row with the star, change to circular needle size 5.5 mm and work pattern as follows from the right side: 4 stitches in garter stitch, stocking stitch over the next 10-14-18-18-26-30 stitches, decreasing at the same time 4-5-5-5-8-8 stitches evenly spaced – read DECREASE TIP-1 (= 6-9-13-13-18-22 stitches in stocking stitch), purl over purl and knit over knit over the next 4-4-4-8-8-8 stitches, continue with A.1, A.2 and A.3, knit over knit and purl over purl over the next 4-4-4-8-8-8 stitches, stocking stitch over the next 10-14-18-18-26-30 stitches, decreasing at the same time 4-5-5-5-8-8 stitches evenly spaced (= 6-9-13-13-18-22 stitches in stocking stitch) and 4 stitches in garter stitch. Continue this pattern. When the diagrams have been completed in height there are 95-101-109-117-127-135 stitches on the needle. Now work A.4 over A.1, A.5 over A.2 and A.6 over A.3. The other stitches are worked as before. REMEMBER THE KNITTING TENSION! When the diagrams have been completed, repeat the pattern in height. When the piece measures 35-36-37-38-39-40 cm, cast off stitches for the armholes on each side as follows: Cast off 3-4-5-6-6-7 stitches 1 time, 2 stitches 1-1-2-2-3-3 times and 1 stitch 1-1-1-2-3-4 times = 83-87-89-93-97-101 stitches. Continue the pattern with 1 edge stitch in garter stitch on each side. When the piece measures 52-54-56-58-60-62 cm, work the next row from the right side as follows: Work as before over the first 26-28-29-30-32-34 stitches, knit over knit and purl over purl over the next 31-31-31-33-33-33 stitches, AT THE SAME TIME as you decrease to 23-23-23-25-25-25 stitches – read DECREASE TIP-2 (= 8 stitches decreased), work as before over the next 26-28-29-30-32-34 stitches = 75-79-81-85-89-93 stitches. On the next row cast off the middle 23-23-23-25-25-25 stitches for the neck and each shoulder is finished separately. On the next row from the neck cast off 1 stitch for neck = 25-27-28-29-31-33 stitches. Continue working until the whole piece measures 56-58-60-62-64-66 cm (the armhole measures 21-22-23-24-25-26 cm). Knit 1 row from the right side where you decrease 4 stitches evenly spaced = 21-23-24-25-27-29 stitches. Cast off. Work the other shoulder in the same way. FRONT PIECE: Cast on and work in the same way as the back piece. When the piece measures 35-36-37-38-39-40 cm, cast off stitches for the armholes on each side in the same way as the back piece. Continue with pattern as before and 1 edge stitch in garter stitch on each side. When the piece measures 48-50-51-53-54-56 cm, work the next row from the right side as follows: Work the first 31-33-34-35-37-39 stitches as before, work the next 21-21-21-23-23-23 stitches as before AT THE SAME TIME as these stitches are decreased evenly to 13-13-13-15-15-15 stitches – remember DECREASE TIP-2 (= 8 stitches decreased), place these 13-13-13-15-15-15 stitches on a thread for the neck and work the last 31-33-34-35-37-39 stitches as before. Each shoulder is finished separately. Continue the pattern and cast off stitches as follows on each row from the neck: Cast off 2 stitches 2 times and 1 stitch 2 times = 25-27-28-29-31-33 stitches. Continue working until the whole piece measures 56-58-60-62-64-66 cm (the armhole measures approx. 21-22-23-24-25-26 cm). Knit 1 row from the right side where you decrease 4 stitches evenly spaced = 21-23-24-25-27-29 stitches. Cast off. Work the other shoulder in the same way. SLEEVE: Cast on 60-60-64-64-68-72 stitches with double pointed needles/short circular needle size 4.5 mm and Air. Knit 1 round, then work rib (= knit 2, purl 2) in the round for 5 cm. Knit 1 round where you decrease 10-9-11-10-12-14 stitches evenly spaced = 50-51-53-54-56-58 stitches. Change to double pointed needles/short circular needle size 5.5 mm. Insert 1 marker at the beginning of the round and work stocking stitch. When the piece measures 9-9-9-9-8-8 cm, increase 2 stitches under the sleeve – read INCREASE TIP. Increase like this every 5-4½-3½3-3-2½ cm a total of 7-8-9-10-10-11 times = 64-67-71-74-76-80 stitches. Continue working until the sleeve measures 43-43-42-40-38-36 cm. Now continue back and forth with stocking stitch and 1 edge stitch in garter stitch on each side, AT THE SAME TIME as you cast off stitches for the sleeve cap on each side as follows: Cast off 4-4-5-6-6-7 stitches 1 time, 2 stitches 2-2-2-2-1-1 times, 1 stitch 0-0-3-4-7-9 times, 2 stitches 3-3-2-2-2-2 times and 4-4-4-3-3-2 stitches 1 time = 28-31-31-32-32-32 stitches. Cast off the remaining stitches. The sleeve measures approx. 50-50-51-50-50-50 cm. Work the other sleeve in the same way. ASSEMBLY: Sew the shoulder seams inside the cast-off edge. Sew the sleeves to the body inside the 1 edge stitch on the body and the cast-off edge on the sleeves. Sew the side seams in the outermost loop of the outermost stitch so the seams are flat – start under the sleeve and work downwards until there is approx. 17 cm left (= split). NECK: Start mid-top of the shoulder with short circular needle size 4.5 mm and Air and knit up 72-80 stitches from the right side around the neck (the number of stitches must be divisible by 4). Work rib (= knit 2, purl 2) in the round for 11 cm. Cast off with knit over knit and purl over purl. Fold the rib at the top of the neck to the wrong side and sew down to give a folded edge. To avoid the neck-edge being tight and rolling down, the seam must be elastic. |
||||||||||||||||||||||||||||||||||||||||
Diagram explanations |
||||||||||||||||||||||||||||||||||||||||
|
||||||||||||||||||||||||||||||||||||||||
 |
||||||||||||||||||||||||||||||||||||||||
 |
||||||||||||||||||||||||||||||||||||||||
 |
||||||||||||||||||||||||||||||||||||||||
Have you finished this pattern?Tag your pictures with #dropspattern #seafarersheartsweater or submit them to the #dropsfan gallery. Do you need help with this pattern?You'll find 31 tutorial videos, a Comments/Questions area and more by visiting the pattern on garnstudio.com. © 1982-2026 DROPS Design A/S. We reserve all rights. This document, including all its sub-sections, has copyrights. Read more about what you can do with our patterns at the bottom of each pattern on our site. |
||||||||||||||||||||||||||||||||||||||||


With over 40 years in knitting and crochet design, DROPS Design offers one of the most extensive collections of free patterns on the internet - translated to 17 languages. As of today we count 324 catalogues and 12290 patterns translated into English (UK/cm).
We work hard to bring you the best knitting and crochet have to offer, inspiration and advice as well as great quality yarns at incredible prices! Would you like to use our patterns for other than personal use? You can read what you are allowed to do in the Copyright text at the bottom of all our patterns. Happy crafting!
Post a comment to pattern DROPS 216-10
We would love to hear what you have to say about this pattern!
If you want to leave a question, please make sure you select the correct category in the form below, to speed up the answering process. Required fields are marked *.