
Popular categories
Looking for a yarn?


Comments / Questions (208)
![]() Mette Grønborg wrote:
Mette Grønborg wrote:
Jeg skal i gang med raglan. De første 9 gange er det 2 ud på hver anden omgang. Men når man skal tage 2 ud før og efter mærketråd, giver det 16 og ikke 8 masker ud. Det forstår jeg ikke.
09.08.2024 - 22:02DROPS Design answered:
Hej Mette, du tager kun ud i hver side af forstykke og bagstykket (ikke på ærmerne) :)
15.08.2024 - 08:23
![]() Janine wrote:
Janine wrote:
Hallo, bei den Raglanzunahmen heißt es im letzten Teil "In der nächsten Runde die Umschläge rechts verschränkt stricken, um Löcher zu vermeiden. Dann die neuen Maschen glatt rechts stricken." Heißt das, das Rippmuster wird nicht entlang der Raglanlinien weiter gestrickt? Auf den Bildern sieht es für mich danach aus, als würden die Ärmel komplett aus Rippmuster bestehen.
07.08.2024 - 15:26DROPS Design answered:
Liebe Janine, man wird für die Ärmel nicht zunehmen, nur beim Vorder und Rückenteil, deshalb sind alle Raglanzunahmen rechts verschränkt gestrickt. Viel Spaß beim Stricken!
07.08.2024 - 16:35
![]() Silke wrote:
Silke wrote:
Ich bin mit dem Rumpfteil fast fertig und soll nun in der letzten Runde, bevor ich die Nadelstärke und zum Rippenbündchen wechsle, nochmal 34 Maschen zunehmen. Wofür ist diese hohe Zahl an Maschenzunahmen gut und wie soll ich das machen? Auch mit Umschlägen und dann im Rippenbündchen rechts oder links mitstricken? Über Hilfe wäre ich sehr dankbar.
24.07.2024 - 09:48DROPS Design answered:
Liebe Silke, die Zunahmen werden gemacht, damit das untere Bündchen in etwa die gleiche Breite wie das restliche Top hat, d.h. es soll das Top unten nicht zusammenziehen, sondern locker hängen. Die Zunahmen können Sie mit Umschlägen machen und diese dann beim Stricken des Rippenmusters rechts oder links verschränkt stricken. Viel Spaß beim Weiterstricken!
26.07.2024 - 12:26
![]() Linn wrote:
Linn wrote:
Hei jeg plages allerede med starten i oppskriften står det 1 rett 2 vrang ganger så så mange… men da blir d jo ikke en vrang bord med to rett to vrang? E dette en skrivefeil i oppskrifta. Skjønner ikke noe
09.07.2024 - 21:26DROPS Design answered:
Hei Linn. I denne oppskriften er det 2 ulike vrangborder i halskanten. 2 rett / 2 vrang over skuldrene og 1 vrang / 2 rett på for-og bakstykket. Om du følger forklaringen vil du få 2 rettmasker der de 4 raglanlinjene skal være. mvh DROPS Design
10.07.2024 - 12:52
![]() Kai wrote:
Kai wrote:
Hello. I was working on the yoke section and I couldn’t find any mention of when to start the stockinette stitch for the front and back parts. I looked at the picture and the whole yoke seems like it is in stockinette on front and back, but the pattern doesn’t mention this.
23.05.2024 - 15:21DROPS Design answered:
Dear Kai, you should start working stocking stitch on front and back piece before the end of NECK EDGE, ie when it says When rib is done, work next round as follows: you wil then knit until first marker thread (increasing at the same time) for back piece, work K over K and P over P over sleeves (increasing as explained), knit until next marker thread increasing at the same time for front piece, and K over K and P over P for the sleeve (increase as explained) and knit to the end of the round for 2nd part of back piece (increasing evenly), then work K over K and P over P, this means rib over sleeves and stocking stitch over front and back piece. Happy knitting!
23.05.2024 - 15:55
![]() Sammi wrote:
Sammi wrote:
Hello, can someone please help me understand this portion of the pattern; Insert 1 marker thread in the in each side, in middle of the new stitches cast-on under the sleeves (= 3-3-5-5-5-7 new stitches on each side of marker thread). Move the marker threads upwards when working; they should be used for increase later in the sides. I have already cast on the necessary 10 additional sts under each arm. I am currently at the marker for the center of the back and do not know where to go from here.
17.05.2024 - 04:19DROPS Design answered:
Dear Sammi, after you have worked the divided round, work the stitches from mid back (beg of round by yoke) to the new stitches cast on under sleeve, work the first 5 sts, insert a marker here, the rounds start here from now on. Happy knitting!
17.05.2024 - 09:42
![]() Elidia wrote:
Elidia wrote:
Ho finito il collo e devo cominciare gli aumenti per il raglan ma non capisco dove farli. Se aumento due maglie prima e due dopo il segno alla fine del giro ne andrò 16 in più e non 8 come indicate. Non capisco dove non devo farle.
13.05.2024 - 21:14DROPS Design answered:
Buonasera Elidia, in quel punto gli aumenti sono lavorati solo sul corpo, non sulle maniche. Buon lavoro!
16.06.2024 - 22:11
![]() Crys wrote:
Crys wrote:
Bonjour J'ai terminé les côtes du col et vient maintenant le moment de faire les augmentations. Les augmentations se font en faisant des jetés et au 2eme rang des mailles torses Est ce que les jetés peuvent être remplacés par des augmentations classiques pour éviter les mailles torses et les trous ? Merci
07.03.2024 - 08:49
![]() Crys wrote:
Crys wrote:
Bonjour J'ai terminé les côtes du col et vient maintenant le moment de faire les augmentations. Les augmentations se font en faisant des jetés et au 2eme rang des mailles torses Est ce que les jetés peuvent être remplacés par des augmentations classiques pour éviter les mailles torses et les trous ? Merci
07.03.2024 - 08:41DROPS Design answered:
Bonjour Crys, vous pouvez volontiers augmenter comme vous le souhaitez, les augmentations avec les jetés sont celles les plus utilisées dans nos modèles, mais vous pouvez naturellement augmenter différemment. Bon tricot!
07.03.2024 - 13:16
![]() Esther Heiliegers wrote:
Esther Heiliegers wrote:
Sorry, ik schreef eerder dat het om 4 steken gaat maandag is niet zo. Als ik alle steken optel, 30,50,62,50 en 32 steken, kom ik op aantal op de naald 224 steken ( maat s), die ik op de naald heb staan. Ik heb de term: brei dan in de buitenste steek aan elke kant van het voorpand en achterpand in op de mouwen ( geen idee wat daarmee bedoeld wordt!) maar gelaten voor wat het is!
30.01.2024 - 11:53DROPS Design answered:
Dag Esther,
Mooi dat je eruit gekomen bent en bedankt voor de terugkoppeling. Nu ik die zin lees wat je moet doen vlak nadat de pas klaar is, lijkt het me ook dat die daar tussenuit kan.
31.01.2024 - 20:01
|
|
Canyon Clay#canyonclaytop |
|
 |
 |
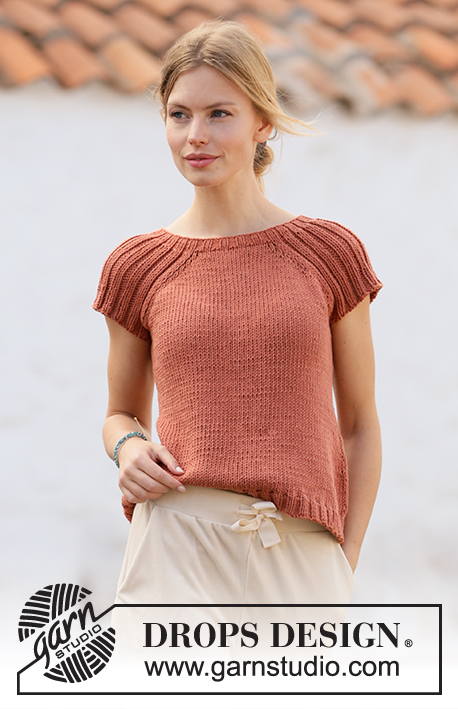
Knitted top with raglan in DROPS Paris. Piece is knitted top down with rib. Size: S - XXXL
DROPS 212-15 |
|
|
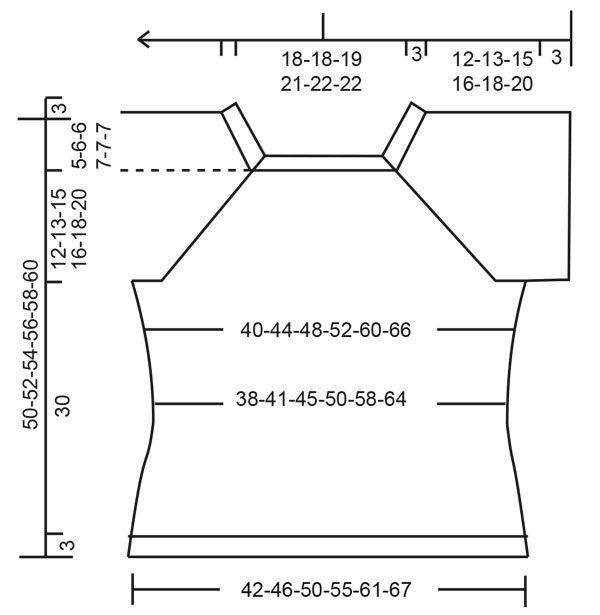
---------------------------------------------------------- EXPLANATION FOR THE PATTERN: ---------------------------------------------------------- INCREASE TIP-1 (evenly): To calculate how to increase evenly, count the stitches to be increased (e.g. 9 stitches) and divide by stitches of increases to be done (e.g. 2) = 4.5. In this example increase by making 1 yarn over after alternately every 4th and 5th stitch. On next row work yarn overs twisted to avoid holes. INCREASE TIP-2: Increase 1 stitch by making 1 yarn over. On next round purl yarn over twisted to avoid holes. Purl the new stitches. INCREASE TIP-3 (applies to sides of body): Work until 2 stitches remain before marker thread, 1 yarn over, knit 4 (marker thread is in the middle of these stitches), 1 yarn over. On next round knit yarn overs twisted to avoid holes. Then work the new stitches in stocking stitch. DECREASE TIP: Decrease 1 stitch on each side of marker thread as follows: Work until 3 stitches remain before marker thread and knit 2 together, knit 2 (marker thread is between these stitches), slip 1 stitch knitwise, knit 1, pass slipped stitch over stitch worked. RAGLAN: In the beginning increase 2 stitches towards each raglan on front and back piece (= 8 stitches increased on round), and thereafter increase 1 stitch towards each raglan on front and back piece (= 4 stitches increased on round). Increase 2 stitches before marker thread as follows: Work until 2 stitches remain before marker thread: 1 yarn over, knit 1, 1 yarn over, knit 1, marker thread is here. Increase 2 stitches after marker thread as follows: Knit 1, 1 yarn over, knit 1, 1 yarn over. Increase 1 stitch before marker thread as follows: Work until 1 stitch remains before marker thread: 1 yarn over, knit 1, marker thread is here. Increase 1 stitch after marker thread as follows: Knit 1, 1 yarn over. On next round knit yarn overs twisted to avoid holes. Then work the new stitches in stocking stitch. CAST-OFF TIP: To avoid a tight cast-off edge you may use a larger needle. If this also is too tight, make 1 yarn over after approx. every 4th stitch and cast off these as regular stitches. ---------------------------------------------------------- START THE PIECE HERE: ---------------------------------------------------------- TOP - SHORT OVERVIEW OF THE PIECE: Work neck edge and yoke in the round on circular needle from mid back, top down. Now divide yoke for body and sleeves. Work body in the round on circular needle. Work sleeves in the round on double pointed needles/short circular needle, top down. NECK EDGE: Cast on 112-118-126-138-144-144 stitches on circular needle size 3.5 mm with Paris. Knit 1 round. Work next round as follows: (Knit 2/purl 2) over the first 8-8-12-12-12-12 stitches, knit 1, insert a marker thread here (= in transition between back piece and right sleeve), knit 1, (purl 1/knit 2) over the next 33-36-36-42-45-45 stitches, purl 1, knit 1, insert a marker thread here (= in transition between right sleeve and front piece), knit 1, (purl 2/knit 2) over the next 16-16-20-20-20-20 stitches, purl 2, knit 1, insert a marker thread here (= in transition between front piece and left sleeve), knit 1, (purl 1/knit 2) over the next 33-36-36-42-45-45 stitches, purl 1, knit 1, insert a marker thread here (= in transition between left sleeve and back piece), knit 1, (purl 2/knit 2) over the next 8-8-8-8-8-8 stitches, purl 2. Continue in the round like this until rib measures 3 cm. When rib is done, work next round as follows: Knit until first marker thread and increase at the same time 2-3-3-3-3-4 stitches evenly – read INCREASE TIP-1, knit over knit and purl over purl until next marker thread and increase at the same time 1 stitch in every purl section – read INCREASE TIP-2, knit until next marker thread and increase at the same time 4-6-5-5-6-8 stitches evenly, knit over knit and purl over purl until next marker thread and increase at the same time 1 stitch in every purl section, knit the last 11-11-11-11-11-11 stitches and increase at the same time 2-3-2-2-3-4 stitches evenly = 144-156-162-178-188-192 stitches. Work 1 row with knit over knit and purl over purl (work the yarn overs twisted to avoid holes). Switch to circular needle size 5 mm. Insert 1 marker at the beginning of round (= approx. mid back), measure yoke from this marker! YOKE: Knit over knit and purl over purl. On first round start increase for RAGLAN – read explanation above. Only increase on front piece and back piece towards each raglan. Increase 2 stitches every other round 9-9-8-10-12-13 times in total, then increase 1 stitch every other round 2-4-6-6-8-8 times = 224-244-250-282-316-328 stitches. REMEMBER THE KNITTING TENSION! Continue with knit over knit and purl over purl until piece measures 12-13-15-16-18-20 cm from marker. The yoke is finished. Then work in the outermost stitch in each side of front piece and back piece in on sleeves. Work next round as follows: Work the first 30-33-37-41-47-50 stitches, slip the next 50-54-54-62-66-66 stitches on a stitch holder for sleeve and cast on 6-6-10-10-10-14 stitches on needle (= in the side under sleeve), work the next 62-68-71-79-92-98 stitches (= front piece), slip the next 50-54-54-62-66-66 stitches on a stitch holder for sleeve and cast on 6-6-10-10-10-14 stitches on needle (= in the side under sleeve), work the remaining 32-35-34-38-45-48 stitches on needle. Then finish body and sleeves separately. NOW MEASURE PIECE FROM HERE! BODY: = 136-148-162-178-204-224 stitches. Insert 1 marker thread in the in each side, in middle of the new stitches cast-on under the sleeves (= 3-3-5-5-5-7 new stitches on each side of marker thread). Move the marker threads upwards when working; they should be used for increase later in the sides. Work in stocking stitch in the round. When piece measures 4 cm from division, decrease 1 stitch on each side of marker threads - read DECREASE TIP. Decrease like this approx. every 8-7-6-5-4-3 cm 2 times in total = 128-140-154-170-196-216 stitches. When piece measures 20-18-16-14-12-10 cm from division, increase 1 stitch on each side of marker threads - read INCREASE TIP-3. Increase like this approx. every 3-4-4-5-6-6 cm 4-4-4-4-3-3 times in total = 144-156-170-186-208-228 stitches. When piece measures 30 cm from division (3 cm remain until finished measurements - work to desired length), knit 1 round while increasing 28-28-34-38-40-44 stitches = 172-184-204-224-248-272 stitches. Switch to circular needle size 3.5 mm. Work rib (knit 2/purl 2) in the round for 3 cm. Cast off with knit over knit and purl over purl - read CAST-OFF TIP. Top measures total 50-52-54-56-58-60 cm in total from shoulder and down. SLEEVE: Slip the 50-54-54-62-66-66 stitches from stitch holder in one side back on double pointed needles/circular needle size 5 mm, and pick up 1 stitch in each of the 6-6-10-10-10-14 stitches cast on under the sleeve = 56-60-64-72-76-80 stitches. Work rib (knit 2/purl 2) in the round. When sleeve measures 3 cm from division, cast off with knit over knit and purl over purl - remember CAST-OFF TIP. Work the other sleeve the same way. |
|
 |
|
Have you finished this pattern?Tag your pictures with #dropspattern #canyonclaytop or submit them to the #dropsfan gallery. Do you need help with this pattern?You'll find 24 tutorial videos, a Comments/Questions area and more by visiting the pattern on garnstudio.com. © 1982-2026 DROPS Design A/S. We reserve all rights. This document, including all its sub-sections, has copyrights. Read more about what you can do with our patterns at the bottom of each pattern on our site. |
|


With over 40 years in knitting and crochet design, DROPS Design offers one of the most extensive collections of free patterns on the internet - translated to 17 languages. As of today we count 324 catalogues and 12245 patterns translated into English (UK/cm).
We work hard to bring you the best knitting and crochet have to offer, inspiration and advice as well as great quality yarns at incredible prices! Would you like to use our patterns for other than personal use? You can read what you are allowed to do in the Copyright text at the bottom of all our patterns. Happy crafting!
Post a comment to pattern DROPS 212-15
We would love to hear what you have to say about this pattern!
If you want to leave a question, please make sure you select the correct category in the form below, to speed up the answering process. Required fields are marked *.