
Popular categories
Looking for a yarn?


Comments / Questions (216)
![]() Esther wrote:
Esther wrote:
Hallo, bin kurz davor, die Ärmelmaschen still zu legen. Da steht :jeweils die äußerste beidseitig von Vorder und Rücken Teil mit zu den Ärmeln nehmen. Welche? :vor der Raglanschräge, die letzte vor dem markierer oder ist die letzte,die, bevor das rippen Muster beginnt
29.04.2026 - 19:56DROPS Design answered:
Liebe Esther, die erste und die letzte Masche vom Vorder und Rückenteil gehören jetzt den Ärmeln, dh die letzte Masche vor dem Markierungsfaden vor Ärmel + die erste Masche nach dem Markierungsfaden nach Ärmel. Viel Spaß beim Stricken!
30.04.2026 - 09:00
![]() Pam wrote:
Pam wrote:
I am having a very hard time with the increase. Pattern says increase on back and front. How about the sleeves? I finally finished the yoke but was short 40 stitches. Help
16.04.2026 - 19:17DROPS Design answered:
Dear Pam, there are no increases for raglan on sleeves, you increase on sleeves on last row before yoke (when increasing 1 st in each P-section on each sleeve and inc evenly on front and back pieces); then for raglan you only increase for front and back piece first 2 sts at the beg + at the end of front/back pieces (= 8 sts inc / round) then only 1 st at the beg + at the end of front/back pieces (= 4 sts inc /round). See RAGLAN at the beg of pattern to know how to increase first 2 sts then 1 st. Happy knitting!
17.04.2026 - 08:27
![]() Leen wrote:
Leen wrote:
Hi, I have been reading the pattern over and over, but in your first comment you said: 'on sleeves you will increase P1, YO1, P1, but there are no 2 Pst in the sleeve section, only on the back and front. Unless the sleeve section is the one with the 33 st (cfr neck edge on pattern). which means the pattern is wrong. So the sleeve increase should be YO before the P stitch and not between 2 P stitches..... ?
31.03.2026 - 09:58DROPS Design answered:
Dear Leen, the rounds start on mid back with K2/P2 and the sleeves are worked between 1st end 2nd marker thread + between 3rd and 4th marker thread. So when increasing on sleeves you will increase 12 sts (1 st in each P-section as you work 11 times (P1, K2)+ P1) + 2 sts on first half mid back + 4 sts on front piece and 2 sts on 2nd half back piece = 112+2+12+4+12+2=144 sts (applies to first size). Hope it can help. Happy knitting!
07.04.2026 - 14:46
![]() Leen wrote:
Leen wrote:
Hi, thank you for the explanation, but I have 20 st for front and back. Also, are you telling me to only knit the front and back and not do the ribbing anymore ? thank you
30.03.2026 - 15:27DROPS Design answered:
Hi Leen, the rib is over sleeves, the front and back are now in stocking stitch. Please read the pattern carefully from 'When rib is done, work next round as follows: Knit until first marker thread....' Happy knitting!
30.03.2026 - 16:16
![]() Leen wrote:
Leen wrote:
Hi, I have a problem understanding the increases after the rib, in the neck edge section. Could this be explained more? Thank you so much!
29.03.2026 - 21:59DROPS Design answered:
Hi Leen, I take the smallest size. On the front and back you will increase 4 sts evenly over 16 sts: knit 2, 1 yarn over, knit 4, 1 yarn over, knit 4, 1 yarn over, knit 4, 1 yarn over, knit 2. How to increase evenly you will find HERE. On the sleeves you will increase 1 st in each purl section: purl 1, 1 yarn over, purl 1. Please also see INCREASE TIP-1 (evenly) and INCREASE TIP-2 in the pattern. Happy knitting!
30.03.2026 - 10:00
![]() Gudrun wrote:
Gudrun wrote:
Hallo, ich stricke den Pulli in XXXL. Würde aber gerne die Passe verlängern und noch ein paar Maschen zunehmen. Wie mache ich das? Liebe Grüße
29.03.2026 - 12:48DROPS Design answered:
Liebe Gudrun, je nach den gewünschten Maschenanzahl/Höhe (bzw Länge) können Sie wahrscheinlich mehr Mals 2 Maschen dann vielleicht auch mehr Mals 1 Masche zunehmen. Das sollen Sie je nach die gewünschten fertige Länge/Breite entscheiden. Viel Spaß beim Stricken!
07.04.2026 - 11:46
![]() Stéphanie wrote:
Stéphanie wrote:
Bonjour..une fois augmentations faites les cotes sont complètement destructurées et cela ne fait pas beau. J'abandonne c'est trop moche ! C'est dommage car le modèle est sympa
26.03.2026 - 20:26DROPS Design answered:
Bonjour Stéphanie, les mailles endroit des côtes continuent après le col, on va juste augmenter dans les mailles envers de ces côtes sur les manches, et on tricote le dos/le devant en jersey. Pensez à bien mettre des marqueurs pour bien vous repérer et savoir quelle partie vous tricotez, cela peut vous aider. Bon tricot!
27.03.2026 - 07:22
![]() Gudrun wrote:
Gudrun wrote:
Hallo, Leider verstehe ich das mit den Raglan Zunahmen nicht. Warum muss ich nach dem Maschen Markierer erst 2 Maschen stricken und dann die Umschläge arbeiten? LG
23.03.2026 - 10:45DROPS Design answered:
Liebe Gudrun, die Raglanzunahmen entstehen nur beim Vorder- und Rückenteil, so sollen Sie zuerst 2 Maschen am Anfang Vorder- + Rückenteil + am Ende Vorder + Rückenteil zunehmen (= 8 Maschen, 4 Maschen für Vorder- / Rückenteil) dann wird man nur 1 Masche vor/nach den Markierungen zunehmen = 4 Maschen /Zunahmen pro Zunahmerunde; so bekommt man die richtige Form. Viel Spaß beim Stricken!
23.03.2026 - 16:12
![]() Rosalia wrote:
Rosalia wrote:
Schlimm - bin nicht blutige Anfängerin und habe es aufgegeben. Die Verständlichkeit ist für mich absolut nicht gegeben. Bei den Antworten auf Fragen ( in deutsch) habe ich für mich festgestellt das ich auch die Antworten nicht verstehe - also wohl auch bei Nachfrage nicht weiterkomme...schade das Modell gefällt mir optisch gut
12.03.2026 - 13:18DROPS Design answered:
Liebe Rosalia, gerne können Sie Ihre Frage hier stellen, so daß wir mal versuchen können, Ihnen zu helfen. Gerne schreiben Sie auch mal die Größe und die Stelle, wo Sie Problemen haben. Danke im voraus für Ihr Verständnis.
12.03.2026 - 15:57
![]() Margaret wrote:
Margaret wrote:
No comments
08.03.2026 - 21:41
|
|
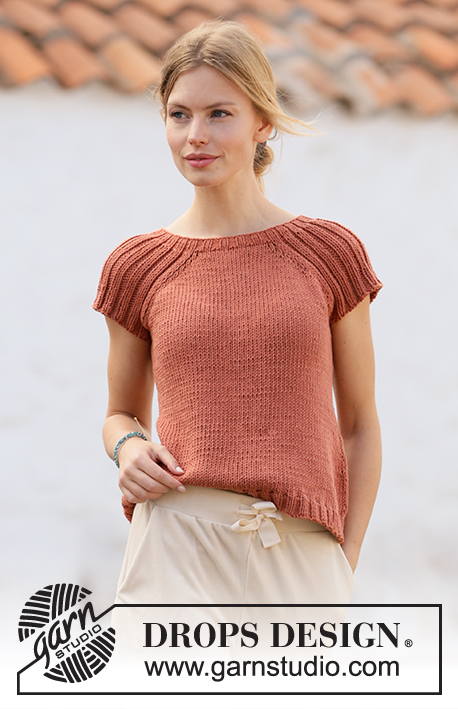
Canyon Clay#canyonclaytop |
|
 |
 |
Knitted top with raglan in DROPS Paris. Piece is knitted top down with rib. Size: S - XXXL
DROPS 212-15 |
|
|
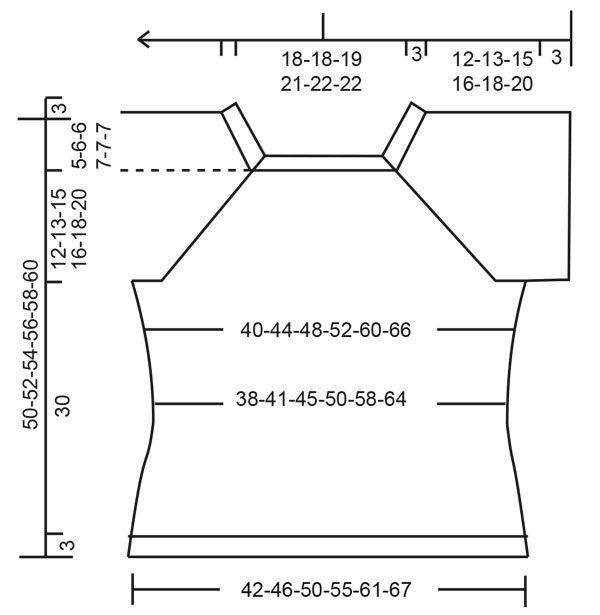
---------------------------------------------------------- EXPLANATION FOR THE PATTERN: ---------------------------------------------------------- INCREASE TIP-1 (evenly): To calculate how to increase evenly, count the stitches to be increased (e.g. 9 stitches) and divide by stitches of increases to be done (e.g. 2) = 4.5. In this example increase by making 1 yarn over after alternately every 4th and 5th stitch. On next row work yarn overs twisted to avoid holes. INCREASE TIP-2: Increase 1 stitch by making 1 yarn over. On next round purl yarn over twisted to avoid holes. Purl the new stitches. INCREASE TIP-3 (applies to sides of body): Work until 2 stitches remain before marker thread, 1 yarn over, knit 4 (marker thread is in the middle of these stitches), 1 yarn over. On next round knit yarn overs twisted to avoid holes. Then work the new stitches in stocking stitch. DECREASE TIP: Decrease 1 stitch on each side of marker thread as follows: Work until 3 stitches remain before marker thread and knit 2 together, knit 2 (marker thread is between these stitches), slip 1 stitch knitwise, knit 1, pass slipped stitch over stitch worked. RAGLAN: In the beginning increase 2 stitches towards each raglan on front and back piece (= 8 stitches increased on round), and thereafter increase 1 stitch towards each raglan on front and back piece (= 4 stitches increased on round). Increase 2 stitches before marker thread as follows: Work until 2 stitches remain before marker thread: 1 yarn over, knit 1, 1 yarn over, knit 1, marker thread is here. Increase 2 stitches after marker thread as follows: Knit 1, 1 yarn over, knit 1, 1 yarn over. Increase 1 stitch before marker thread as follows: Work until 1 stitch remains before marker thread: 1 yarn over, knit 1, marker thread is here. Increase 1 stitch after marker thread as follows: Knit 1, 1 yarn over. On next round knit yarn overs twisted to avoid holes. Then work the new stitches in stocking stitch. CAST-OFF TIP: To avoid a tight cast-off edge you may use a larger needle. If this also is too tight, make 1 yarn over after approx. every 4th stitch and cast off these as regular stitches. ---------------------------------------------------------- START THE PIECE HERE: ---------------------------------------------------------- TOP - SHORT OVERVIEW OF THE PIECE: Work neck edge and yoke in the round on circular needle from mid back, top down. Now divide yoke for body and sleeves. Work body in the round on circular needle. Work sleeves in the round on double pointed needles/short circular needle, top down. NECK EDGE: Cast on 112-118-126-138-144-144 stitches on circular needle size 3.5 mm with Paris. Knit 1 round. Work next round as follows: (Knit 2/purl 2) over the first 8-8-12-12-12-12 stitches, knit 1, insert a marker thread here (= in transition between back piece and right sleeve), knit 1, (purl 1/knit 2) over the next 33-36-36-42-45-45 stitches, purl 1, knit 1, insert a marker thread here (= in transition between right sleeve and front piece), knit 1, (purl 2/knit 2) over the next 16-16-20-20-20-20 stitches, purl 2, knit 1, insert a marker thread here (= in transition between front piece and left sleeve), knit 1, (purl 1/knit 2) over the next 33-36-36-42-45-45 stitches, purl 1, knit 1, insert a marker thread here (= in transition between left sleeve and back piece), knit 1, (purl 2/knit 2) over the next 8-8-8-8-8-8 stitches, purl 2. Continue in the round like this until rib measures 3 cm. When rib is done, work next round as follows: Knit until first marker thread and increase at the same time 2-3-3-3-3-4 stitches evenly – read INCREASE TIP-1, knit over knit and purl over purl until next marker thread and increase at the same time 1 stitch in every purl section – read INCREASE TIP-2, knit until next marker thread and increase at the same time 4-6-5-5-6-8 stitches evenly, knit over knit and purl over purl until next marker thread and increase at the same time 1 stitch in every purl section, knit the last 11-11-11-11-11-11 stitches and increase at the same time 2-3-2-2-3-4 stitches evenly = 144-156-162-178-188-192 stitches. Work 1 row with knit over knit and purl over purl (work the yarn overs twisted to avoid holes). Switch to circular needle size 5 mm. Insert 1 marker at the beginning of round (= approx. mid back), measure yoke from this marker! YOKE: Knit over knit and purl over purl. On first round start increase for RAGLAN – read explanation above. Only increase on front piece and back piece towards each raglan. Increase 2 stitches every other round 9-9-8-10-12-13 times in total, then increase 1 stitch every other round 2-4-6-6-8-8 times = 224-244-250-282-316-328 stitches. REMEMBER THE KNITTING TENSION! Continue with knit over knit and purl over purl until piece measures 12-13-15-16-18-20 cm from marker. The yoke is finished. Then work in the outermost stitch in each side of front piece and back piece in on sleeves. Work next round as follows: Work the first 30-33-37-41-47-50 stitches, slip the next 50-54-54-62-66-66 stitches on a stitch holder for sleeve and cast on 6-6-10-10-10-14 stitches on needle (= in the side under sleeve), work the next 62-68-71-79-92-98 stitches (= front piece), slip the next 50-54-54-62-66-66 stitches on a stitch holder for sleeve and cast on 6-6-10-10-10-14 stitches on needle (= in the side under sleeve), work the remaining 32-35-34-38-45-48 stitches on needle. Then finish body and sleeves separately. NOW MEASURE PIECE FROM HERE! BODY: = 136-148-162-178-204-224 stitches. Insert 1 marker thread in the in each side, in middle of the new stitches cast-on under the sleeves (= 3-3-5-5-5-7 new stitches on each side of marker thread). Move the marker threads upwards when working; they should be used for increase later in the sides. Work in stocking stitch in the round. When piece measures 4 cm from division, decrease 1 stitch on each side of marker threads - read DECREASE TIP. Decrease like this approx. every 8-7-6-5-4-3 cm 2 times in total = 128-140-154-170-196-216 stitches. When piece measures 20-18-16-14-12-10 cm from division, increase 1 stitch on each side of marker threads - read INCREASE TIP-3. Increase like this approx. every 3-4-4-5-6-6 cm 4-4-4-4-3-3 times in total = 144-156-170-186-208-228 stitches. When piece measures 30 cm from division (3 cm remain until finished measurements - work to desired length), knit 1 round while increasing 28-28-34-38-40-44 stitches = 172-184-204-224-248-272 stitches. Switch to circular needle size 3.5 mm. Work rib (knit 2/purl 2) in the round for 3 cm. Cast off with knit over knit and purl over purl - read CAST-OFF TIP. Top measures total 50-52-54-56-58-60 cm in total from shoulder and down. SLEEVE: Slip the 50-54-54-62-66-66 stitches from stitch holder in one side back on double pointed needles/circular needle size 5 mm, and pick up 1 stitch in each of the 6-6-10-10-10-14 stitches cast on under the sleeve = 56-60-64-72-76-80 stitches. Work rib (knit 2/purl 2) in the round. When sleeve measures 3 cm from division, cast off with knit over knit and purl over purl - remember CAST-OFF TIP. Work the other sleeve the same way. |
|
 |
|
Have you finished this pattern?Tag your pictures with #dropspattern #canyonclaytop or submit them to the #dropsfan gallery. Do you need help with this pattern?You'll find 25 tutorial videos, a Comments/Questions area and more by visiting the pattern on garnstudio.com. © 1982-2026 DROPS Design A/S. We reserve all rights. This document, including all its sub-sections, has copyrights. Read more about what you can do with our patterns at the bottom of each pattern on our site. |
|


With over 40 years in knitting and crochet design, DROPS Design offers one of the most extensive collections of free patterns on the internet - translated to 17 languages. As of today we count 324 catalogues and 12290 patterns translated into English (UK/cm).
We work hard to bring you the best knitting and crochet have to offer, inspiration and advice as well as great quality yarns at incredible prices! Would you like to use our patterns for other than personal use? You can read what you are allowed to do in the Copyright text at the bottom of all our patterns. Happy crafting!
Post a comment to pattern DROPS 212-15
We would love to hear what you have to say about this pattern!
If you want to leave a question, please make sure you select the correct category in the form below, to speed up the answering process. Required fields are marked *.