
Popular categories
Looking for a yarn?


Comments / Questions (260)
![]() Mona wrote:
Mona wrote:
Jeg er venstrehåndet. Når jeg kommer til sidste række i a1 er der 2 masker mere end i anden sidste række. Hvordan gør jeg det rigtig. Jeg ved ikke om jeg gør det rigtige men det passer med mønstret mvh mona
01.07.2025 - 13:01DROPS Design answered:
Hej Mona, jo du har 2 ekstra omslag på næstsidste pind, det er de 2 masker du har mere på sidste pind :)
02.07.2025 - 12:00
![]() Deborah Re wrote:
Deborah Re wrote:
Bonsoir, Je suis arrivée à la fin du 24ème rang de A1, A2 et A3. Le schéma est fini et je ne comprends pas comment je dois continuer. Dois-je dessiner tous les schémas à partir du rang 25? Si je reprends à partir du rang 13 je ne sais pas comment faire la deuxième partie du rang 13 qui sera sûrement spéculaire et encore moins pour le schéma A3. Merci d’avance pour votre aide
30.06.2025 - 22:51DROPS Design answered:
Bonjour Mme Re, lorsque vous avez terminé A.1, A.2 et A.3 en hauteur, reprenez les diagrammes au 1er rang: tricotez A.1 (sur les 2 premières mailles du A.1 précédent), répétez A.2 (le 1er A.2 se tricote sur les 14 dernières mailles du A.1 précédent et le dernier A.2 se tricote sur les 14 premières mailles du A.3 précédent) et terminez par A.3 sur les 3 dernière m du A.3 précédent = vous avez 2 motifs de A.2 en plus en largeur entre A.1 et A.3. Bon tricot!
01.07.2025 - 08:44
![]() Lefevre Yves wrote:
Lefevre Yves wrote:
Bonjour , je fais la plus grande taille de ce pull , sur le tuto je monte 132 mailles , je mets les marqueurs comme dit sur les explications , 45 ms et 19 ms et 45 ms et 19 ms a la fin Il reste 4 mailles ? mon calcul 47 ms 19 ms et 47 mas et 19 ms . je voudrai savoir si les augmentations du dessin dentelles font partie des augmentations de raglan ? ou pas merci
30.06.2025 - 11:51DROPS Design answered:
Bonjour Mr Lefevre, notez que dans ce modèle, les marqueurs se mettent dans une maille et pas entre les mailles, ainsi vous aurez: 22+1+19+1+45+1+19+1+23=132 mailles. Les augmentations raglan des manches figurent dans les diagrammes A.1 et A.3 Bon tricot!
30.06.2025 - 15:14
![]() DONATELLA wrote:
DONATELLA wrote:
Buongiorno,come viene lavorato a4 c'è scritto che ci sono state delle correzioni nel f.9 e f.13 ma da immagine non mi sembrano fatte correzioni sia nel grafico che in foto, come va fatto?
22.06.2025 - 21:43DROPS Design answered:
Buonasera Donatella, i grafici e il modello online sono già aggiornati. Buon lavoro!
23.06.2025 - 22:39
![]() Mandy wrote:
Mandy wrote:
Bonjour, il y a-t-il la possibilité de trouver le motif expliquer autrement? Je ne comprend absolument pas le diagramme avec les jetés noté à cheval sur deux mailles, le rang suivant je me retrouve avec trop de maille par rapport au dit diagramme?
22.06.2025 - 02:02DROPS Design answered:
Bonjour Mandy, le jeté doit être fait entre les 2 mailles indiqué dans le diagramme, autrement dit, tricotez le 1er rang de A.1 ainsi: (1 m end, 1 m env, 1 jeté); le 1er rang de A.2 ainsi: (1 m end; 1 jeté, 1 m env, 1 dim, 7 m end, 1 dim, 1 m env, 1 jeté), le 1er rang de A.3 ainsi: (1 m end, 1 jeté, 1 m env, 1 jeté) et le 1er rang de A.4 ainsi (3 m end, 1 dim, 1 m env, 1 jeté, 1 m end, 1 jeté, 1 m env, 1 dim, 3 m end). En espérant réussir à vous débloquer ainsi. Bon tricot!
26.06.2025 - 16:25
![]() Biene wrote:
Biene wrote:
Es werden ja 2 Ärmel gestrickt :). Dadurch kommen nochmal 28 + 22 Maschen dazu. Das ergibt dann, wie in der Anleitung geschrieben, 294 Maschen.
17.06.2025 - 12:00
![]() Biene wrote:
Biene wrote:
Wenn ich XS stricke, habe ich zu Beginn der Passe 106 Maschen. Nach 44 Reihen ergibt sich eine Raglanzunahme von 22x4=88 Maschen. Dazu kommen für die A-Muster einmal 28 Maschen (entspricht 24 Reihen) + 22 Maschen (für 20 Reihen). Das ergibt 106 +88 +28 + 22 = 244 Maschen. Laut Anleitung müssten es aber 294 Maschen sein. Was stimmt da nicht?
15.06.2025 - 15:45DROPS Design answered:
Liebe Biene, beachten Sie, daß in den Diagrammen manchmal auch 2 Maschen und nicht nur 1 Masche zugenommen wird, so wird sich die Maschenanzahl nicht immer bei 8 zunehmen. Aber nach der letzten Zunahmenrunde sollen Sie dann die 294 Maschen bekommen. Viel Spaß beim Stricken!
16.06.2025 - 08:33
![]() Marja wrote:
Marja wrote:
Goedenavond, in A4, de negende rij krijg ik het telpatroon niet goed gebreid. Volgens het telpatroon moeten er tussen de twee averechtse steken 11 steken recht zitten in regel 10. Bij mij blijven het er 9. Wat ik ook doe. Bovendien trekt de aan de rechterkant van regel negen de meest limkse rechte steek scheeftrekkend naar het midden. Wat doe ik niet goed? Mvg, Marja
09.06.2025 - 20:36DROPS Design answered:
Dag Marja,
Het klopt ook dat er 9 steken recht zitten tussen de 2 steken averecht en niet 11 steken.
11.06.2025 - 20:37
![]() LUCYNA wrote:
LUCYNA wrote:
Witam, mam mały problem. Oddzieliłam rękawy i chcę kontynuować body ale nie rozumiem kwestii " Zacząć okrążenie 6 oczek przed 1 z oczek z nitką z markerem". Mam nabrane dodatkowe 15 oczek wg rozpiski i nie mam pojęcia kiedy zacząć przerabiać schemat A4. Dziękuję za odpowiedź.
09.06.2025 - 09:39DROPS Design answered:
Witaj Lucyno, jak nabierzesz oczka pod rękawami i dojdziesz do połowy tyłu to odcinasz nitkę. W robótce masz 2 markery, każdy jest włożony w oczko środkowe pod rękawem. Teraz odliczasz 6 oczek w prawo od oczka z markerem (obojętnie którym), bierzesz nową nitkę i od tego miejsca zaczynasz kolejne okrążenie - od teraz to będzie początek okrążenia. Pozdrawiamy!
09.06.2025 - 10:38
![]() Biene wrote:
Biene wrote:
Sind die Korrekturen in der Druckversion bereits berücksichtigt? Wenn nein, habe ich nicht verstanden an welcher Stelle folgende Korrektur steht "PASSE: ... die markierte Masche glatt rechts stricken, 1 Umschlag, die restlichen Maschen glatt rechts stricken (= halbes Rückenteil). " Die wievielte Zeile ist das imAbsatz Passe?
09.06.2025 - 09:08DROPS Design answered:
Liebe Biene, ja, die Korrektur gelten nur, wenn Sie die Anleitung davor gedruckt haben. Viel Spaß beim Stricken!
09.06.2025 - 10:23
|
|||||||||||||||||||
Catch the Wind#catchthewindtop |
|||||||||||||||||||
 |
 |
||||||||||||||||||
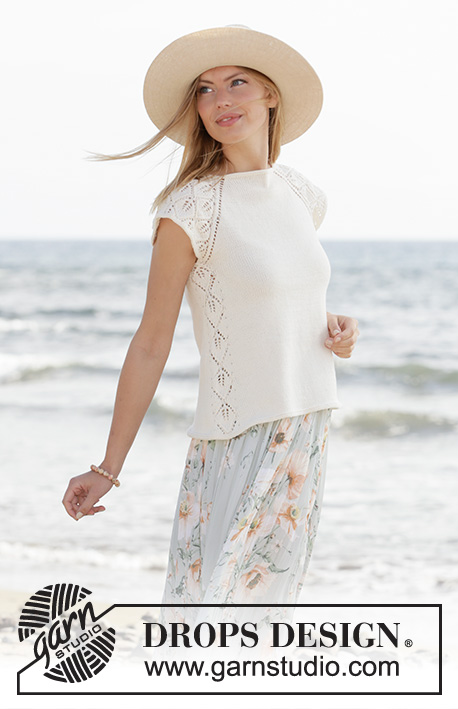
Knitted top with raglan and short sleeves in DROPS Safran. The piece is worked top down with lace pattern. Sizes XS - XXL.
DROPS 211-5 |
|||||||||||||||||||
|
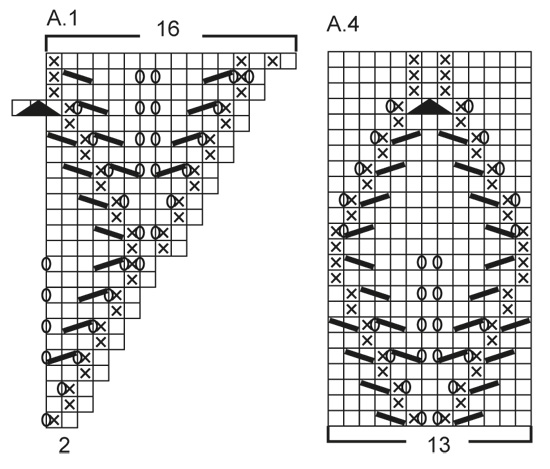
------------------------------------------------------- EXPLANATIONS FOR THE PATTERN: ------------------------------------------------------- RIDGE/GARTER STITCH (worked in the round): 1 ridge in height = 2 rounds; Knit 1 round and purl 1 round. PATTERN: See diagrams A.1 to A.4. RAGLAN: Increase to raglan on each side of the back piece and each side of the front piece (towards the sleeves). Increase by making 1 yarn over before/after the stitch with the marker thread; on the next round knit the yarn overs to leave holes. The increases on the sleeves are drawn into patterns A.1 and A.3. ------------------------------------------------------- START THE PIECE HERE: ------------------------------------------------------- TOP – SHORT OVERVIEW OF THE PIECE: The neck and yoke are worked in the round with circular needle, top down. The yoke is divided for body and sleeves and the body continued in the round. A small edge is worked around the armholes. NECK: Cast on 106-110-116-120-124-132 stitches with circular needle size 3 mm and Safran. Work 2 RIDGES – read description above. Then work the yoke as described below. YOKE: Insert 4 marker threads in the piece as described below (without working the stitches). The threads will be used when increasing to raglan. Count 16-17-18-19-20-22 stitches (= half back piece), insert 1 marker thread in the next stitch, count 19 stitches (= sleeve), insert 1 marker thread in the next stitch, count 32-34-37-39-41-45 stitches (= front piece), insert 1 marker thread in the next stitch, count 19 stitches (= sleeve), insert 1 marker thread in the next stitch. There are 16-17-19-20-21-23 stitches after the last marker thread (half back piece). The first round is worked as follows: Work stocking stitch as far as the first marker-stitch, make 1 yarn over (first increase to RAGLAN – see description above), work the marker-stitch in stocking stitch, A.1 (= 2 stitches), A.2 (= 14 stitches) and A.3 ( = 3 stitches) (= 19 stitches on the sleeve), work the marker-stitch in stocking stitch, 1 yarn over, work stocking stitch as far as the next marker-stitch (= front piece), 1 yarn over, work the marker-stitch in stocking stitch, A.1 (= 2 stitches), A.2 (= 14 stitches) and A.3 (= 3 stitches) (= 19 stitches on the sleeve), work the marker-stitch in stocking stitch, 1 yarn over, work stocking stitch over the remaining stitches (= half back piece). Continue this pattern with stocking stitch on the front and back pieces and A.1, A.2 and A.3 on the sleeves. Each time A.1, A.2 and A.3 are worked 1 time in height, you work 2 more repeats of A.2 between A.1 and A.3. REMEMBER THE KNITTING TENSION! AT THE SAME TIME continue to increase to raglan every 2nd round a total of 22-26-28-31-35-39 times at each marker thread (including the first increase described above). The new stitches are worked in stocking stitch on the front and back pieces and in lace pattern as shown in the diagrams on the sleeves. When the increases to raglan are finished there are 294-334-356-388-424-468 stitches on the needle. The next round is worked as follows: Work 39-44-47-51-56-62 stitches (= half the back piece), place the next 69-79-83-91-99-109 stitches on 1 thread for the sleeve, cast on 9-9-9-11-13-15 new stitches on the needle (= in side under sleeve), work 78-88-95-103-113-125 stitches (= front piece), place the next 69-79-83-91-99-109 stitches on 1 thread for the sleeve, cast on 9-9-9-11-13-15 new stitches on the needle (= in side under sleeve), work the last 39-44-48-52-57-63 stitches (= half back piece). Body and sleeves are finished separately. THE PIECE IS NOW MEASURED FROM HERE! BODY: = 174-194-208-228-252-280 stitches. Insert 1 marker thread in the middle of the 9-9-9-11-13-15 stitches cast on under each sleeve. Cut the strand and begin the round 6 stitches before 1 of the stitches with marker thread. Work A.4 (= 13 stitches), work 74-84-91-101-113-127 stitches in stocking stitch, work A.4 and then stocking stitch over the last 74-84-91-101-113-127 stitches. Continue this pattern, AT THE SAME TIME, when the piece measures 2 cm, increase by making 1 yarn over on each side of A.4, on the next round knit the yarn overs twisted to avoid holes (= 4 increased stitches). Repeat the increase every 1 ½ cm a total of 18 times; the increased stitches are worked in stocking stitch = 246-266-280-300-324-352 stitches. When the piece measures 28-29-29-30-29-29 cm from the division work 2 ridges over all stitches, then cast off. SLEEVE-EDGE: Place the 69-79-83-91-99-109 stitches on one of the threads on short circular needle size 3 mm and knit up 1 stitch in each of the 9-9-9-11-13-15 new stitches under the sleeve = 78-88-92-102-112-124 stitches. Work 2 ridges over all stitches, then cast off. Work the other sleeve-edge in the same way. |
|||||||||||||||||||
Diagram explanations |
|||||||||||||||||||
|
|||||||||||||||||||
 |
|||||||||||||||||||
 |
|||||||||||||||||||
 |
|||||||||||||||||||
Have you finished this pattern?Tag your pictures with #dropspattern #catchthewindtop or submit them to the #dropsfan gallery. Do you need help with this pattern?You'll find 20 tutorial videos, a Comments/Questions area and more by visiting the pattern on garnstudio.com. © 1982-2026 DROPS Design A/S. We reserve all rights. This document, including all its sub-sections, has copyrights. Read more about what you can do with our patterns at the bottom of each pattern on our site. |
|||||||||||||||||||


With over 40 years in knitting and crochet design, DROPS Design offers one of the most extensive collections of free patterns on the internet - translated to 17 languages. As of today we count 324 catalogues and 12291 patterns translated into English (UK/cm).
We work hard to bring you the best knitting and crochet have to offer, inspiration and advice as well as great quality yarns at incredible prices! Would you like to use our patterns for other than personal use? You can read what you are allowed to do in the Copyright text at the bottom of all our patterns. Happy crafting!
Post a comment to pattern DROPS 211-5
We would love to hear what you have to say about this pattern!
If you want to leave a question, please make sure you select the correct category in the form below, to speed up the answering process. Required fields are marked *.