
Popular categories
Looking for a yarn?


Comments / Questions (197)
![]() Kerstin Strömwall wrote:
Kerstin Strömwall wrote:
Ex. En rapport: 1avig, 3 räta, 1 avig. Blir 2 rapporter då : 1 avig, 3 räta, 1 avig, 1 avig, 3 räta 1 avig? Osv
13.09.2022 - 17:31DROPS Design answered:
Hej Kerstin, ja det stämmer :)
15.09.2022 - 15:43
![]() Kascha wrote:
Kascha wrote:
Jeg ved ikke hvad det er jeg gøre forkert, har prøvet 2 gang nu at strikke A1 og A2 og jeg når til at skulle måle diameteren (jeg strækker efter mønster for L/XL) jeg mangler 7 cm så i stedet for 41cm har jeg igen 34 og jeg holder strikkefastheden så jeg ved virkelig ikke hvad der sker. er det noget i kan hjælpe mig med ?
09.08.2022 - 22:31DROPS Design answered:
Hej Kascha, du skal have 15 pinde på 10 cm. A.1 og A.2 går over 31 pinde = 20 cm x 2 for at få diameter = 40 cm Prøv med ½ nummer tykkere pinde :)
10.08.2022 - 07:23
![]() Jacqueline wrote:
Jacqueline wrote:
Ich habe ein Problem am Anfang. Nach dem Anschlagen von 8 Maschen soll ich Chart A.1 arbeiten. Das zeigt in der ersten Runde aber nur eine Masche, welche verdoppelt wird. Was mache ich mir den restlichen 7 Maschen? In der zweiten Runde habe ich entsprechend 9 Maschen aber nur 2 + einen neuen Umschlag im Chart angegeben. Was passiert mit den restlichen Maschen?
21.06.2022 - 16:45DROPS Design answered:
Liebe Jacqueline, Sie wiederholen A.1 die ganze Runde, dh Sie striken A.1 8 Mal in der Runde, so haben Sie nach der 1. Runde 16 Maschen auf der Nadel (S, M, XXL, XXXL) = 8 Rapporter A.1 mit je 2 Maschen. Viel Spaß beim stricken!
22.06.2022 - 08:04
![]() Heike wrote:
Heike wrote:
Hallo, tut mir leid, dass mit dem Wenden in der hinteren Rückenmitte (weiter nach den 42 Reihen 7 Rapporte A.4) verstehe ich auch nicht. Dann wird doch der hintere Rücken geteilt (wenn Maschen stillgelegt werden), auf den Fotos sehe ich aber keine Teilung im Rücken. Gibt es zu diesem Schritt vielleicht ein weiteres Foto, wie die Arbeit hier aussehen soll? Das wäre wirklich hilfreich. Vielen Dank.
02.05.2022 - 20:20DROPS Design answered:
Liebe Heike, es sind auch keine Teilung, Sie sind ja richtig, Sie stricken jetzt beide Vorderteile und das untere Mitte, mit verkürzten Reihen damit immer weniger Maschen gestrickt werden (um das untere Oval Form zu haben). Nach diesen 42 Reihen stricken Sie verkürzten Reihen aber jetzt um das eine Vorderteil zu stricken dann stricken Sie das 2. Vorderteil. Am Ende stricken Sie dann ein Rand über alle Maschen des Kreises. Viel Spaß beim stricken!
03.05.2022 - 09:11
![]() Heike wrote:
Heike wrote:
Hallo, ich habe eine Frage zu Vorderteile und unterer Rücken. Muster A4 hat 6 Reihen, Reihen 1+2 sind je um 3 Maschen verkürzte Reihen, Reihen 3+4 je um 6 Maschen verkürzte Reihen. Sind Reihen 5+6 auch verkürzte Reihen (und wenn ja, um wie viele Maschen?) oder werden diese beiden Reihen unverkürzt gestrickt? Danke für die Hilfe.
02.05.2022 - 20:09DROPS Design answered:
Liebe Heike, Sie stricken immer 3 Maschen weniger am Ende jeder Reihe bis Sie A.4 insgesamt 7 Mal in der Höhe gestrickt haben. dh bei Reihen 5+6 sind es 9 M übrig, bei Reihen 7+8 sind es 12 M übrig usw. Viel Spaß beim stricken!
03.05.2022 - 09:06
![]() Heike wrote:
Heike wrote:
Hallo, noch eine Frage zu Vorderteile und hinterer Rücken: verstehe ich das richtig, dass die Maschen, die in den verkürzten Reihen nicht gestrickt werden, auch stillzulegen sind, und erst beim Rand stricken wieder mit zu intergrieren (zu stricken) sind? Vielen Dank.
24.04.2022 - 15:29DROPS Design answered:
Liebe Heike, ja ganz genau. Viel Spaß beim stricken!
25.04.2022 - 07:53
![]() Heike wrote:
Heike wrote:
Hallo, was bedeutet nach A3 " Die ersten 94-94-110-110-124-124 Maschen der Runde (= Maschen zwischen den 2 Markierungsfäden) stilllegen. " ? Abketten? Und welche Stelle des Strickmantels ist das genau? Vielen Dank für die Hilfe. Heike
16.04.2022 - 22:22
![]() Amanda L wrote:
Amanda L wrote:
Could you help me? I was wondering if there is a way to make this shorter? I am only 5 feet tall but love this and really want to make it. Any help appreciated!
06.03.2022 - 07:31DROPS Design answered:
Dear Amanda, yes, you could make it shorter. We don't make personalized patterns, but you may make the adjustments yourself. For example, you can reduce the length of the front piece and down the body. Happy knitting!
06.03.2022 - 13:44
![]() Anke wrote:
Anke wrote:
Hallo, kann mir jemand bei der Anleitung der Ärmel helfen? Da steht Gleichzeitig neue Maschen am Ende jeder Reih, d.h. Beidseitig wie folgt anschlagen….Soll ich nun am Anfang und am Ende zunehmen? Wenn ich das nicht mache, sondern nur am Ende zunehme, komme ich bei der angegebenen Zunahmezahl nicht auf die weiter unten angegebenen 37-39-42…Maschen. Versteht mich jemand? Tausend Dank für eine Antwort
09.02.2022 - 11:09DROPS Design answered:
Liebe Anke, Sie sollen jetzt neuen Maschen am Ende jeder Reihe anschlagen, dh am Ende jeder Hin- sowie jeder Rückreihe = beidseitig, damit genauso viele Maschen beidsitig angeschlagen werden. Dieses Video zeigt, wie man am Ende einer Rückreihe neuen Maschen anschlägt, am Ende einer Hinreihe stricken Sie genau so. Viel Spaß beim stricken!
09.02.2022 - 13:44
![]() Susie Hartland wrote:
Susie Hartland wrote:
I can’t use double ended needles, would it be possible to knit this entirely with circular needles? Many thanks.
21.11.2021 - 13:39DROPS Design answered:
Dear Susie, yes, you can. You might want to try the magic loop method for the sleeves. Happy Stitching!
21.11.2021 - 14:49
|
|||||||||||||||||||||||||||||||
Empress#empressjacket |
|||||||||||||||||||||||||||||||
 |
 |
||||||||||||||||||||||||||||||
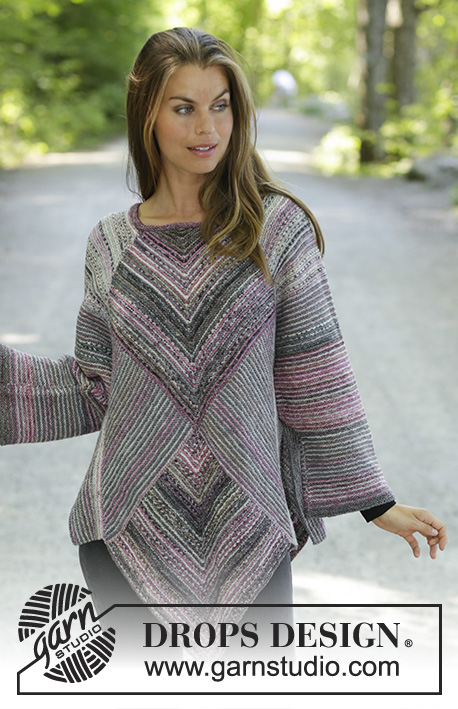
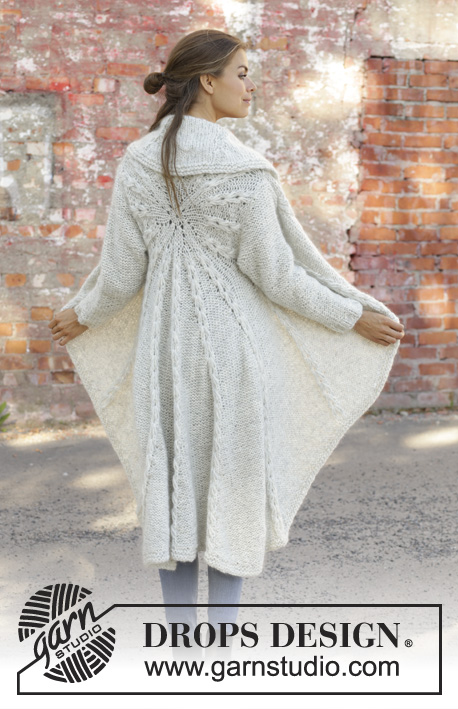
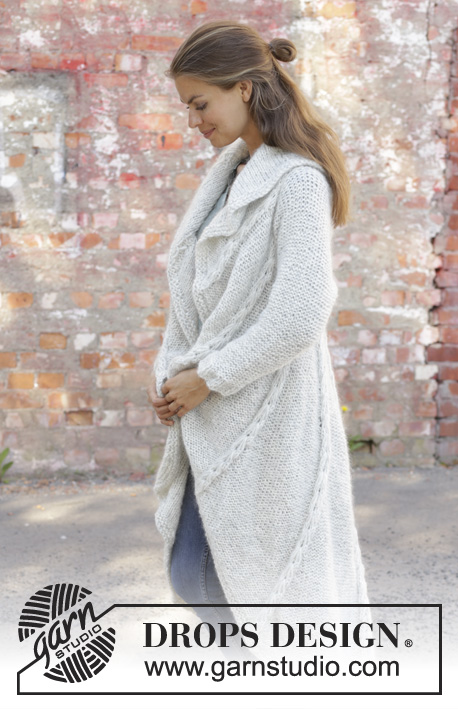
Knitted long circle jacket in 1 strand DROPS Air and 1 strand DROPS Brushed Alpaca Silk. The piece is worked in the round in a circle with texture. Sizes S - XXXL.
DROPS 194-17 |
|||||||||||||||||||||||||||||||
|
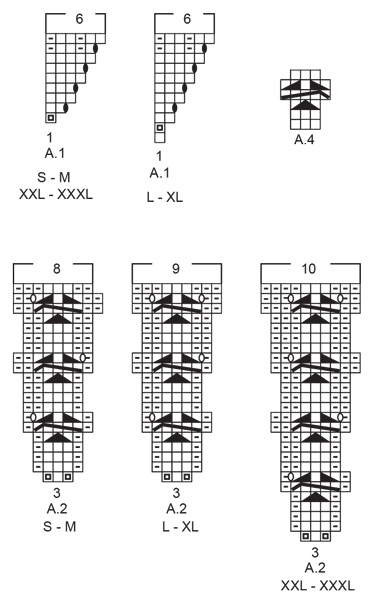
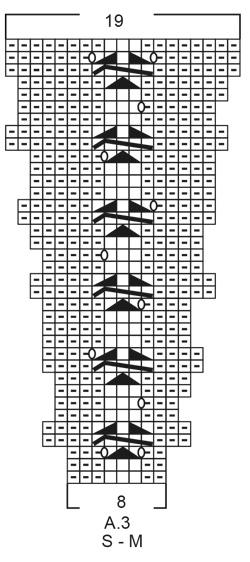
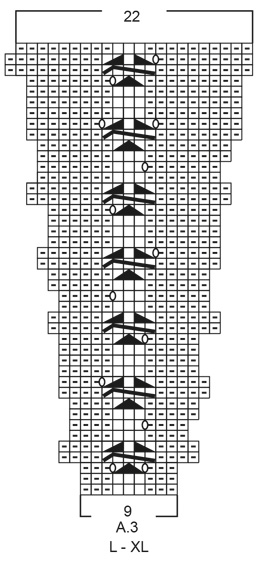
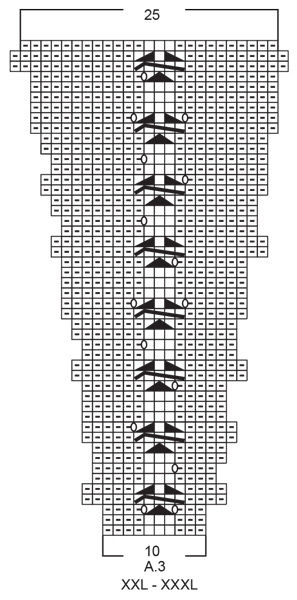
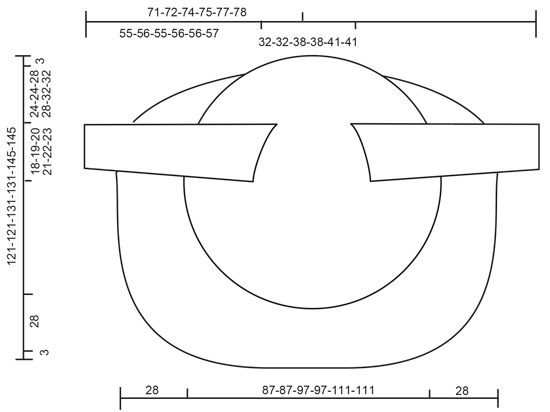
------------------------------------------------------- EXPLANATIONS FOR THE PATTERN: ------------------------------------------------------- RIDGE/GARTER STITCH (worked in the round): 1 ridge = 2 rounds. Knit 1 round and purl 1 round. RIDGE/GARTER STITCH (worked back and forth): 1 ridge = knit 2 rows. PATTERN: See diagrams A.1 to A.4. Choose diagram for your size. The diagrams show all the rows in the pattern seen from the right side! DECREASE TIP (for sleeves): All decreases are made from the side in purl! Decrease 1 stitch by purling 2 stitches together ------------------------------------------------------- START THE PIECE HERE: ------------------------------------------------------- CIRCLE JACKET - SHORT OVERVIEW OF THE PIECE: The piece is worked in the round in a circle from the middle of the back outwards. Change to circular needle(s) when necessary. Then work back and forth with short rows for the front pieces and down the back. The sleeves are worked top down in stocking stitch with the wrong side out. Because of the weight of the yarn, the garment will stretch somewhat after use. CIRCLE JACKET: CIRCLE: Cast on 8 stitches with double pointed needles size 8 mm and 1 strand Air and 1 strand Brushed Alpaca Silk (= 2 strands). Divide the stitches between 4 needles so that there are 2 stitches on each. Insert a marker thread at the beginning of the round. Allow the marker thread to follow your work onwards. Work pattern in the round according to A.1 – choose diagram for your size, a total of 8 times on the round. REMEMBER THE KNITTING TENSION! When A.1 is finished, there are 48 stitches on the round. Now work pattern as follows: Work A.2 – choose diagram for your size, a total of 16 times on the round. After the next-to-last round in A.2 there are 128-128-144-144-160-160 stitches on the round. The last round in A.2 is worked as follows: Work the first 39-39-45-45-49-49 stitches (there is now 1-1-0-0-1-1 stitch left in the last repeat of A.2 worked), insert a new marker thread here (follows your work onwards and is later used when you work short rows from the front pieces and down the body on the back piece), cast off the next 20-21-22-23-24-25 stitches (= armhole), work the next 49-47-55-53-63-61 stitches, cast off the last 20-21-22-23-24-25 stitches (= armhole). The piece measures approx. 39-39-41-41-47-47 cm in diameter. The next round is worked as follows: Work A.3 – choose diagram for your size (= 8-8-9-9-10-10 stitches on the first round in the diagram) a total of 16 times on the round and at the same time cast on 20-21-22-23-24-25 new stitches on the needle where the stitches were cast off for the armholes = 128-128-144-144-160-160 stitches. Continue in the round with A.3 until the whole diagram has been completed in height. There are now 304-304-352-352-400-400 stitches on the round. The piece measures approx. 87-87-97-97-111-111 cm in diameter. Cut the strand. Place the first 94-94-110-110-124-124 stitches on the round (= stitches between the 2 marker threads) on a thread. FRONT PIECES AND DOWN THE BODY: There are now 210-210-242-242-276-276 stitches for the front pieces and down the body on the back piece. Start from the right side after the second marker thread and work short rows back and forth for the front pieces and down the body on the back piece as follows: ROW 1 (right side): Purl over purl and work A.4 (= 3 stitches) over each cable until there are 3 stitches left before the next marker thread (i.e. start of round), turn. ROW 2 (wrong side): Work back until there are 3 stitches left before the marker thread, turn. ROW 3: Purl over purl and work A.4 over each of the cables until there are 6 stitches left before the marker thread, AT THE SAME TIME increase 1 purled stitch after each cable/A.4, turn. ROW 4: Work back until there are 6 stitches left before the marker thread, turn. Continue back and forth like this by working 3 fewer stitches than the previous row and increase 1 stitch after each cable/A.4 every 4th row until you have worked 7 repeats of A.4 in height (= 42 rows). The piece measures approx. 72-72-77-77-84-84 cm from the middle of the circle and down mid back. The last row is worked from the wrong side. Do not cut the strand. Insert a marker thread in the middle cable/A.4 mid back of jacket. Continue back and forth with pattern as before over the bottom of the left front piece as follows: ROW 1 (right side): Work until there are 4 stitches left before the cable/A.4 with the marker thread mid back, turn. ROW 2 (wrong side): Work until there are 3 more stitches left before the marker thread than the previous row (start of round), AT THE SAME TIME increase 1 purled stitch after each cable/A.4, turn. ROW 3 (right side): Work until there are 4 more stitches than last time left before the cable/A.4 with the marker thread mid back, turn. ROW 4 (wrong side): Work until there are 3 more stitches before the marker thread than the previous row, turn. Continue back and forth with pattern and increase after each cable/A.4 every 4th row until you have worked 3 repeats of A.4 in height (= 18 rows). Cut the strand. Start from the right side and after A.4/mid back and work short rows back and forth over the bottom of the right front piece in the same way, but reversed, i.e. each row from the wrong side is turned when there are 4 more stitches before the cable/A.4 with the marker thread mid back than the previous time and on each row from the right side is turned when there are 3 more stitches left than the previous time. EDGE: Place all stitches on the circle back on circular needle and work 2 RIDGES – read description above, around the whole circle. Cast off, but to avoid the cast-off edge being tight you can make 1 yarn over after approx. each 5th stitch - the yarn overs are cast off as normal stitches. SLEEVE: The sleeve is worked in stocking stitch with the wrong side out (reversed stocking stitch). Cast on 11-11-12-12-14-14 stitches with circular needle size 8 mm and 1 strand Air and 1 strand Brushed Alpaca Silk (= 2 strands). Work stocking stitch back and forth, AT THE SAME TIME cast on new stitches at the end of each row in each side as follows: Cast on 2 stitches 2 times, 1 stitch 3-4-5-6-6-7 times, 2 stitches 1 time and 4 stitches 1 time = 37-39-42-44-46-48 stitches. THE PIECE IS NOW MEASURED FROM HERE. Continue back and forth with stocking stitch and 1 edge stitch in GARTER STITCH – read description above, in each side. When the piece measures 4 cm decrease 1 stitch inside the 1 edge stitch in garter stitch in each side – read DECREASE TIP. Decrease like this every 7-6-6-5-5-4 cm a total of 6-7-7-8-8-9 times = 25-25-28-28-30-30 stitches. When the piece measures 42-42-40-40-39-39 cm increase 7-7-4-9-7-7 stitches evenly on row = 32-32-32-37-37-37 stitches. Change to circular needle size 7 mm. Work rib, starting from the side with purl (reversed stocking stitch/the wrong side out) as follows: 1 edge stitch in garter stitch (knit 2, purl 3) until there is 1 stitch left, 1 edge stitch in garter stitch. When the rib measures 5 cm cast off with knit over knit and purl over purl. The sleeve measures approx. 55-56-55-56-56-57 cm from the sleeve cap down. Work the other sleeve in the same way. ASSEMBLY: Sew sleeves to body inside the cast-off/cast-on edge. Sew sleeve seams. Make sure that the seam is not tight. |
|||||||||||||||||||||||||||||||
Diagram explanations |
|||||||||||||||||||||||||||||||
|
|||||||||||||||||||||||||||||||
 |
|||||||||||||||||||||||||||||||
 |
|||||||||||||||||||||||||||||||
 |
|||||||||||||||||||||||||||||||
 |
|||||||||||||||||||||||||||||||
 |
|||||||||||||||||||||||||||||||
Have you finished this pattern?Tag your pictures with #dropspattern #empressjacket or submit them to the #dropsfan gallery. Do you need help with this pattern?You'll find 31 tutorial videos, a Comments/Questions area and more by visiting the pattern on garnstudio.com. © 1982-2026 DROPS Design A/S. We reserve all rights. This document, including all its sub-sections, has copyrights. Read more about what you can do with our patterns at the bottom of each pattern on our site. |
|||||||||||||||||||||||||||||||


With over 40 years in knitting and crochet design, DROPS Design offers one of the most extensive collections of free patterns on the internet - translated to 17 languages. As of today we count 324 catalogues and 12290 patterns translated into English (UK/cm).
We work hard to bring you the best knitting and crochet have to offer, inspiration and advice as well as great quality yarns at incredible prices! Would you like to use our patterns for other than personal use? You can read what you are allowed to do in the Copyright text at the bottom of all our patterns. Happy crafting!
Post a comment to pattern DROPS 194-17
We would love to hear what you have to say about this pattern!
If you want to leave a question, please make sure you select the correct category in the form below, to speed up the answering process. Required fields are marked *.