
Popular categories
Looking for a yarn?


Comments / Questions (27)
![]() Nolinia wrote:
Nolinia wrote:
Est ce que pour le snood on est obligé de tricoter avec des aiguilles circulaires ? J'utilise de la laine mohair et pour cette laine j'ai besoin d'utiliser des aiguilles droites.
30.07.2023 - 16:32DROPS Design answered:
Bonjour Nolinia, vous pouvez probablement tricoter en allers et retours, pensez juste à bien monter 2 mailles en plus pour les coutures. Bon tricot!
31.07.2023 - 11:28
![]() Celine wrote:
Celine wrote:
Re-bonjour, je viens de comprendre que sur le rang suivant, pour chaque double-jeté, l'un des deux jetés devait être lâché et que c'est pour ça qu'on retournait à 14 mailles! Merci pour votre aide!
13.01.2022 - 18:08
![]() Celine wrote:
Celine wrote:
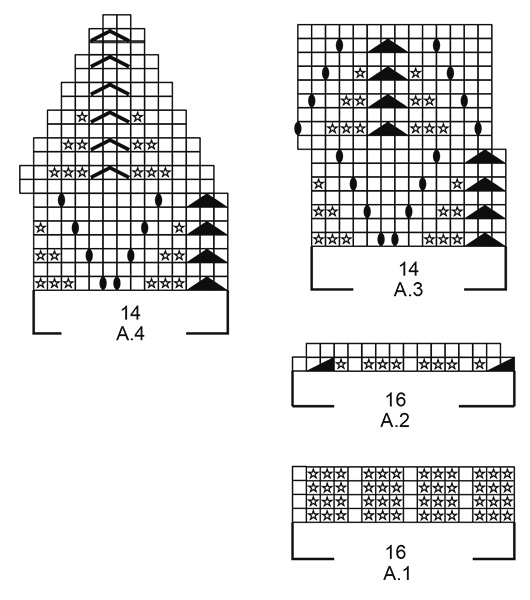
Bonjour, Je suis en train de faire le bonnet et je ne comprends pas comment A3 peut rester à 14 mailles: dans chaque motif aux rangs impairs, il y a 3 mailles env ens, ce qui revient à faire -2 mailles, puis deux fois une double-jeté, ce qui revient à faire 2* +2 mailles. Du coup, à chacun de ces rangs impairs on ajoute 2 mailles au total, non? Merci d'avance! PS: j'ai bien compris qu'il fallait faire les 3 mailles ens (rg impair) avec une maille du rang précédent (rg pair).
12.01.2022 - 22:52DROPS Design answered:
Bonjour Céline, à chaque rang impair, vous diminuez 2 mailles et faites 2 jetés = le nombre de mailles reste le même, soit 14 mailles. Au 3ème et 5ème rang de A.3, tricotez la dernière maille du 2ème/4ème tour avec les 2 premières mailles du premier A.3 du tour et tricotez la dernière maille de chaque A.3 avec les 2 premières mailles du A.3 suivant. Bon tricot!
13.01.2022 - 09:10
![]() Vernier wrote:
Vernier wrote:
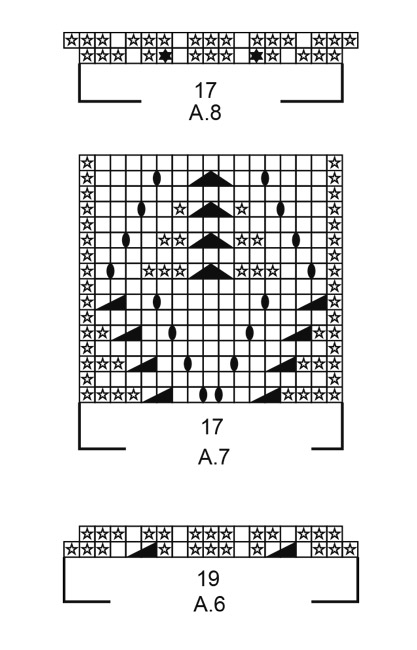
Concernant les mitaines, une petite correction : quant au premier rang de A8, après le diagrame, c’est 28 mailles que l’on tricote à l’endroit et non 26. Merci pour vos beaux modèles et vos explications au top. cordialement, Myriam Vernier
25.03.2020 - 14:37
![]() Julie Masse wrote:
Julie Masse wrote:
Bonjour. Qu'est-ce que cela signifie quand les rangs, comme dans A3 au huitième rang, ne s'aligne pas? Dois-je débuter une maille plus loin?
07.01.2020 - 16:54DROPS Design answered:
Bonjour Mme Masse, les 7 premiers tours de A.3 se tricotaient en commençant par la dernière maille du tour (pour que les 4 diminutions soient alignées les unes au-dessus des autres). À partir du 8ème tour, la 1ère m de A.3 est la 1ère m de chaque motif (et du tour au début), autrement dit la diminution faites aux 4 tours précédents. Bon tricot!
08.01.2020 - 08:12
![]() Danielle wrote:
Danielle wrote:
Bonjour. Je ne comprends pas les explications pour les côtes de la mitaine gauche : (=1maille envers 3/1 maille endroit). Quelqu'un peut-il m'aider ?
07.12.2019 - 18:40DROPS Design answered:
Bonjour Danielle, oups faute de frappe corrigée, on tricote en côtes 3 mailles envers/1 maille endroit, merci pour votre retour. Bon tricot!
09.12.2019 - 08:48
![]() Ros-Marie wrote:
Ros-Marie wrote:
Ska börja med A4 i mössan, ska jag sticka likadant med första 3 maskorna, som i A3?
05.11.2019 - 19:31DROPS Design answered:
Hei Ros-Marie. Ja, det skal strikkes på sammen måte (När A.3 har stickats 2 ggr på höjden stickas A.4 runt på samma sätt). God Fornøyelse!
11.11.2019 - 09:51
![]() CHRISTINE wrote:
CHRISTINE wrote:
Merci pour votre réponse ce qui me gène ce sont les 3 m ensembles au début des rangs. Ça ne tombe toujours pas juste pour moi. J'ai vraiment beaucoup de mal à comprendre vos explications. Bonne journée
02.10.2019 - 11:57DROPS Design answered:
Bonjour Christine, dès le 1er tour en fait (échantillon à l'appui), vous gardez la dernière maille du tour sur l'aiguille gauche (la dernière m de A.2), puis tricotez le 1er A.3 ainsi: tricotez la dernière m de A.2 et les 2 mailles suivantes ensemble à l'envers (= 3 m ens à l'env), continuez A.3 = vous avez tricoté 14 m, répétez A.3 tout le tour. À la fin du 2ème tour, gardez la dernière maille sur l'aiguille gauche et tricotez la ensemble à l'envers avec les 2 premières m de A.3, terminez A.3 = 14 m, tricotez la dernière m du 1er A.3 avec les 2 premières m du A.3 suivant et ainsi de suite pour ces tours 1, 3, 5 et 7. Bon tricot!
02.10.2019 - 13:48
![]() CHRISTINE wrote:
CHRISTINE wrote:
Vous donnez cette explication mais je je comprends pas le nombre de maille n'est pas bon je n'ai plus 98 mailles ci-dessous l'explication que vous donnez merci DROPS Design 15.11.2018 kl. 14:40: Bonjour Mary, pour tricoter les 3 m ens à l'env au début du tour, vous allez tricoter la dernière m du tour + les 2 premières m du tour suivant pour que ces diminutions soient alignées les unes au-dessus des autres. Bon tricot!
01.10.2019 - 21:47DROPS Design answered:
Bonjour Christine, quand vous tricotez A.3, le nombre de mailles doit rester le même pendant les 2 motifs en hauteur jusqu'au début de A.4 (les diminutions se font dans A.4 uniquement). Vous devez donc toujours avoir 14 mailles dans chaque A.3 et ce tout le tour pendant les 2 motifs en hauteur. Tous les 2 rangs, on diminue 2 m par motif et on fait 2 double-jetés (= 1 jeté) = le nombre de mailles doit rester le même. Aux tours 3, 5 et 7, tricotez comme dans la réponse indiquée pour que les A.3 s'alignent. Bon tricot!
02.10.2019 - 08:22
![]() Christine wrote:
Christine wrote:
Les côtes du bonnet 1/1 ou 2/2 et 5 cm je crois merci cdlt
20.09.2019 - 23:41DROPS Design answered:
Bonjour Christine, les côtes du bonnet se tricotent en suivant le diagramme A.1 = on va ainsi tricoter en côtes 3 m envers, 1 m endroit pendant 5 cm. Bon tricot!
23.09.2019 - 08:12
|
||||||||||||||||||||||
Stay Warm#staywarmset |
||||||||||||||||||||||
 |
 |
|||||||||||||||||||||
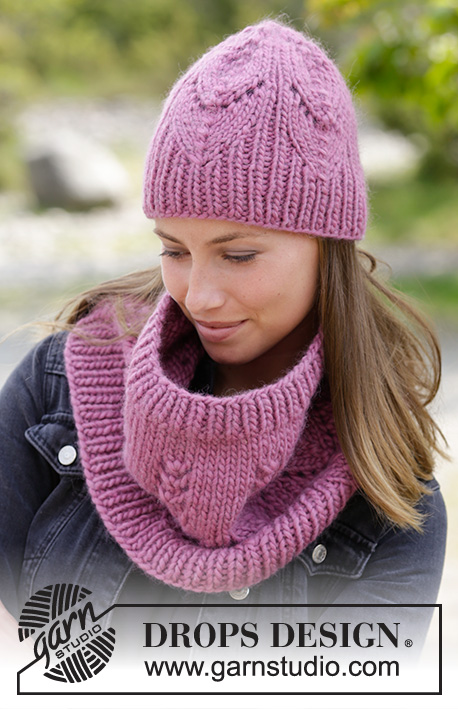
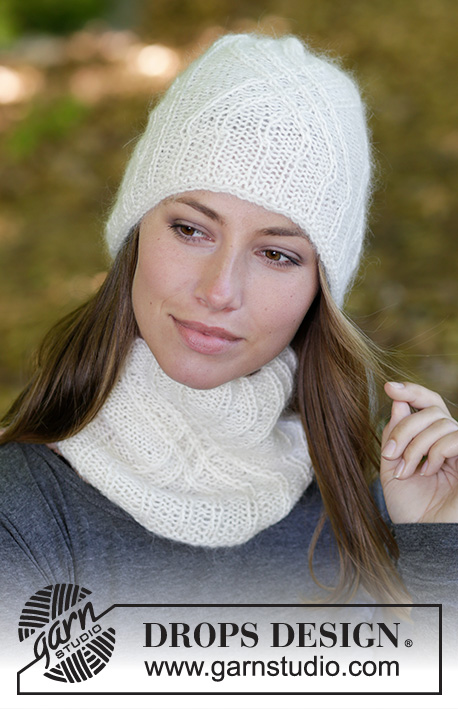
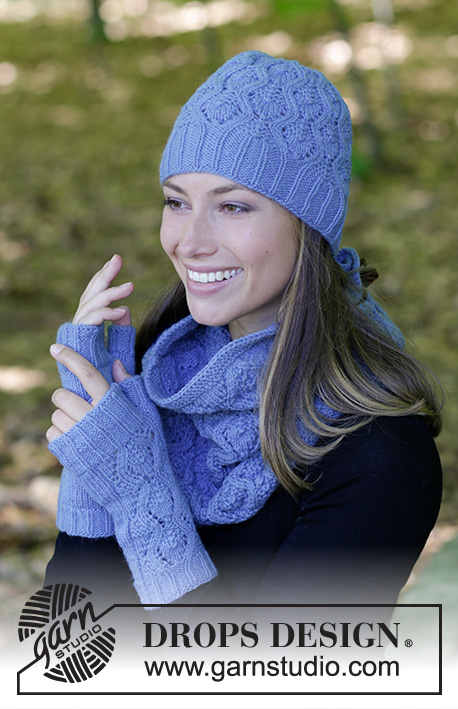
The set consists of: Knitted hat, neck warmer and wrist warmers with lace pattern. Sizes S/M – M/L. The piece is worked in DROPS Lima.
DROPS 182-20 |
||||||||||||||||||||||
|
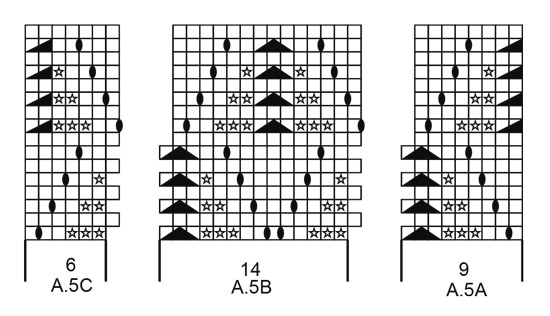
INFORMATION FOR THE PATTERN: PATTERN: Hat: See diagrams A.1 to A.4. Neck warmer: See diagram A.5. Wrist warmers: See diagrams A.6 to A.8. RIDGE/GARTER STITCH (worked in the round): 1 ridge = 2 rounds. Knit 1 round and purl 1 round. DECREASE TIP (evenly spaced - for neck and wrist warmers): To work out how to decrease evenly, count the total number of stitches on needle (= (e.g.) 165 stitches) and divide by the number of decreases to be made (e.g. 10) = 16.5. In this example, knit together alternately every 15th and 16th stitch and 16th and 17th stitch. INCREASE TIP (for wrist warmers - thumb gusset): Work to the stitch with marker thread, make 1 yarn over, knit 1, make 1 yarn over (= 2 stitches increased). On the next round knit the yarn overs twisted to avoid holes. The next time you increase work as follows: Knit until there is 1 stitch left before stitch with marker thread, make 1 yarn over, knit 3, make 1 yarn over (= 2 stitches increased). NOTE: You are always increasing on the outside of the increased stitches. ---------------------------------------------------------- HAT: The piece is worked in the round with circular needle, change to double pointed needles when necessary. Cast on 112 stitches with circular needle size 3.5 mm and Lima. Knit 1 round. Then work A.1 in the round (= 7 repeats of 16 stitches). When the rib measures 5 cm work A.2 (= 7 repeats of 16 stitches which are reduced to 14 masker) = 98 stitches. After A.2 change to circular needle size 4 mm. Work A.3 in the round (= 7 repeats of 14 stitches). REMEMBER THE KNITTING TENSION! NOTE: at the beginning of round 3, 5 and 7 purl together the last stitch of the previous round with the first 2 stitches on this round (= first symbol of A.3). Continue the round according to diagram. When A.3 has been worked 2 times in height, work A.4 in the round in the same way. When A.4 has been completed there are 14 stitches left. Cut the strand, pull it through the remaining stitches, tighten and fasten well. The hat measures approx. 24 cm from the top down. ---------------------------------------------------------- NECK WARMER: The piece is worked in the round with circular needle. Cast on 151-165 stitches with circular needle size 3.5 mm and Lima. Work 3 RIDGES – see description above. Knit 1 round where you decrease 10-10 stitches evenly on round – read DECREASE TIP = 141-155 stitches. Change to circular needle size 4mm and work the next round as follows: Work A.5A (= 9 stitches), work A.5B until there are 6 stitches left on the round (= 9-10 repeats of 14 stitches), work A.5C (= 6 stitches). REMEMBER THE KNITTING TENSION! Continue the pattern in this way until the piece measures approx. 32 cm – finish after a complete repeat in height. Change to circular needle size 3.5 mm. Knit 1 round where you increase 10-10 stitches evenly on round = 151-165 stitches. Work 3 ridges and cast off with knit. To avoid a tight casting-off edge you can cast off with a larger needle size. The neck warmer measures approx. 34 cm from the top down. ---------------------------------------------------------- LEFT WRIST WARMER: The piece is worked in the round with double pointed needles. Cast on 52-56 stitches with double pointed needles size 2.5 mm and Lima. Knit 1 round. Then work rib in the round (= purl 3 / knit 1). When the rib measures 3-4 cm work the next round as follows: Knit the first 4 stitches and decrease at the same time 2-1 stitches evenly over these 4 stitches, work first round in A.6 (= 19 stitches which are decreased to 17 stitches), knit the remaining 29-33 stitches and decrease at the same time 6-7 stitches evenly over these stitches – read DECREASE TIP = 42-46 stitches. Change to double pointed needles size 3 mm. Work the next round as follows: 2-3 stitches stocking stitch, work the last round of A.6 over the next 17 stitches and work 23-26 stitches stocking stitch. Then work as follows: 2-3 stitches stocking stitch, A.7 (= 17 stitches), 23-26 stitches stocking stitch. Continue the pattern in this way. REMEMBER THE KNITTING TENSION! AT THE SAME TIME When the piece measures 10-11 cm insert 1 marker thread in the first stitch on the round. On the next round increase 1 stitch on each side of this first stitch – read INCREASE TIP (= 2 stitches increased). Increase in this way every 6th round a total of 4 times (remember you are always increasing on the outside of the increased stitches to make a thumb gusset) = 50-54 stitches on needle. Continue the pattern and AT THE SAME TIME place the 9 thumb gusset stitches on a thread. In addition, cast on 3 new stitches on the needle at the back of the thumb = 44-48 stitches on the needle. Continue A.7 in the round until the piece measures approx. 19-21 cm – finish after a whole repeat in height (there are now 5 cm left to finished length – you can try the wrist warmer on and work to desired length). Change to double pointed needles size 2.5 mm and work the next round as follows: knit the first 2-3 stitches and increase at the same time 2-1 stitches evenly over these stitches, work A.8 (= 17 stitches which are increased to 19 stitches) and knit the next 23-26 stitches and increase at the same time 6-7 stitches evenly over these stitches = 52-56 stitches on needle. Now work rib in the round (= purl 3 / knit 1) for 5 cm. Cast off with knit over knit and purl over purl. To avoid the cast-off edge being tight you can cast off with a needle size larger. The whole wrist warmer measures approx. 24-26 cm. THUMB: Place the 9 stitches from the thread back on double pointed needles size 3 mm and knit up 7 new stitches at the back of the thumb = 16 stitches. Work 3 rounds stocking stitch (make sure the thumb is not worked too tightly). Then work rib in the round (= purl 3 /knit 1) for 3-3½ cm (or to desired length). Cast off with knit over knit and purl over purl. RIGHT WRIST WARMER: Cast on 52-56 stitches with double pointed needles size 2.5 mm and Lima. Knit 1 round. Then work rib in the round (start the rib with knit 1/ purl 3). When the rib measures 3-4 cm work the next round as follows: Knit the first 29-33 stitches and decrease at the same time 6-7 stitches evenly over these stitches, work A.6 (= 19 stitches which are decreased to 17 stitches), knit the last 4 stitches and decrease at the same time 2-1 stitches evenly over these 4 stitches = 42-46 stitches. Change to double pointed needles size 3 mm. Work the next round as follows: 23-26 stitches stocking stitch, work the last row of A.6 over the next 17 stitches and work 2-3 stitches stocking stitch. Then work as follows: 23-26 stitches stocking stitch, A.7 (= 17 stitches), 2-3 stitches stocking stitch. Continue the pattern in this way. AT THE SAME TIME when the piece measures 10-11 cm insert 1 marker thread in the last stitch on the round. On the next round increase 1 stitch on each side of this last stitch – remember INCREASE TIP (= 2 stitches increased). Increase in this way every 6th round a total of 4 times (remember, you are always increasing on the outside of the increased stitches to make a thumb gusset) = 50-54 stitches on needle. Continue the pattern and AT THE SAME TIME place the 9 thumb gusset stitches on a thread, in addition cast on 3 new stitches on the needle behind the thumb = 44-48 stitches on the round. Continue A.7 in the round until the piece measures approx. 19-21 cm – adjust to the left wrist warmer. Change to double pointed needles size 2.5 mm and work the next round as follows: Knit the first 23-26 stitches and increase at the same time 6-7 stitches evenly over these stitches, work A.8 (= 17 stitches which increase to 19 stitches), knit the last 2-3 stitches and increase at the same time 2-1 stitches evenly over these stitches = 52-56 stitches on needle. Now work rib in the round (= knit 1 / purl 3) for 5 cm. Cast off with knit over knit and purl over purl. To avoid the casting off edge being tight you can cast off with a larger needle size. The whole wrist warmer measures approx. 24-26 cm. THUMB: Work the thumb in the same way as for the left thumb. |
||||||||||||||||||||||
Diagram explanations |
||||||||||||||||||||||
|
||||||||||||||||||||||
 |
||||||||||||||||||||||
 |
||||||||||||||||||||||
 |
||||||||||||||||||||||
Have you finished this pattern?Tag your pictures with #dropspattern #staywarmset or submit them to the #dropsfan gallery. Do you need help with this pattern?You'll find 33 tutorial videos, a Comments/Questions area and more by visiting the pattern on garnstudio.com. © 1982-2026 DROPS Design A/S. We reserve all rights. This document, including all its sub-sections, has copyrights. Read more about what you can do with our patterns at the bottom of each pattern on our site. |
||||||||||||||||||||||


With over 40 years in knitting and crochet design, DROPS Design offers one of the most extensive collections of free patterns on the internet - translated to 17 languages. As of today we count 325 catalogues and 12298 patterns translated into English (UK/cm).
We work hard to bring you the best knitting and crochet have to offer, inspiration and advice as well as great quality yarns at incredible prices! Would you like to use our patterns for other than personal use? You can read what you are allowed to do in the Copyright text at the bottom of all our patterns. Happy crafting!
Post a comment to pattern DROPS 182-20
We would love to hear what you have to say about this pattern!
If you want to leave a question, please make sure you select the correct category in the form below, to speed up the answering process. Required fields are marked *.