


Komentáře / Otázky (27)
![]() Nolinia napsala:
Nolinia napsala:
Est ce que pour le snood on est obligé de tricoter avec des aiguilles circulaires ? J'utilise de la laine mohair et pour cette laine j'ai besoin d'utiliser des aiguilles droites.
30.07.2023 - 16:32Odpověď DROPS Design :
Bonjour Nolinia, vous pouvez probablement tricoter en allers et retours, pensez juste à bien monter 2 mailles en plus pour les coutures. Bon tricot!
31.07.2023 - 11:28
![]() Celine napsala:
Celine napsala:
Re-bonjour, je viens de comprendre que sur le rang suivant, pour chaque double-jeté, l'un des deux jetés devait être lâché et que c'est pour ça qu'on retournait à 14 mailles! Merci pour votre aide!
13.01.2022 - 18:08
![]() Celine napsala:
Celine napsala:
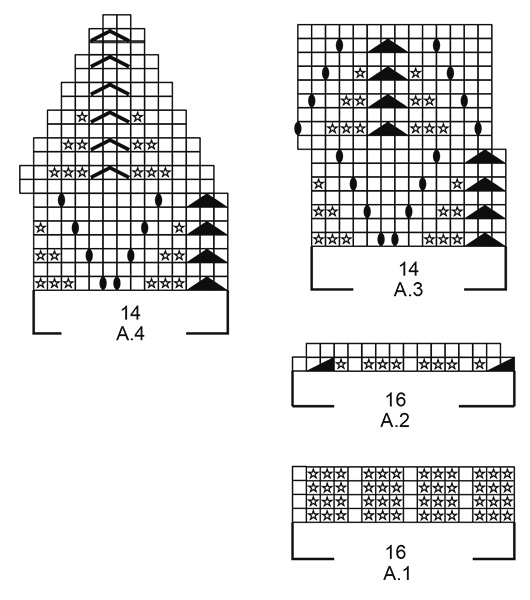
Bonjour, Je suis en train de faire le bonnet et je ne comprends pas comment A3 peut rester à 14 mailles: dans chaque motif aux rangs impairs, il y a 3 mailles env ens, ce qui revient à faire -2 mailles, puis deux fois une double-jeté, ce qui revient à faire 2* +2 mailles. Du coup, à chacun de ces rangs impairs on ajoute 2 mailles au total, non? Merci d'avance! PS: j'ai bien compris qu'il fallait faire les 3 mailles ens (rg impair) avec une maille du rang précédent (rg pair).
12.01.2022 - 22:52Odpověď DROPS Design :
Bonjour Céline, à chaque rang impair, vous diminuez 2 mailles et faites 2 jetés = le nombre de mailles reste le même, soit 14 mailles. Au 3ème et 5ème rang de A.3, tricotez la dernière maille du 2ème/4ème tour avec les 2 premières mailles du premier A.3 du tour et tricotez la dernière maille de chaque A.3 avec les 2 premières mailles du A.3 suivant. Bon tricot!
13.01.2022 - 09:10
![]() Vernier napsala:
Vernier napsala:
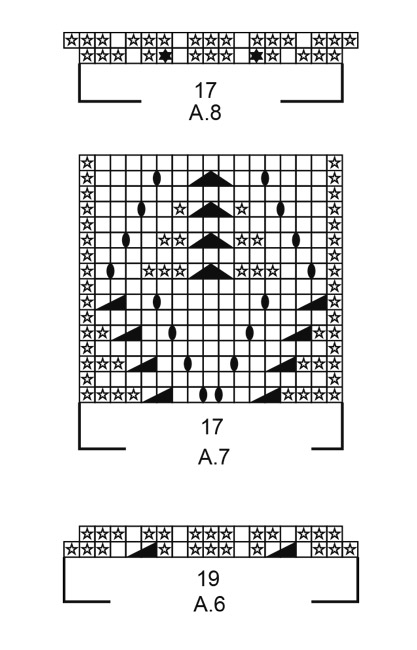
Concernant les mitaines, une petite correction : quant au premier rang de A8, après le diagrame, c’est 28 mailles que l’on tricote à l’endroit et non 26. Merci pour vos beaux modèles et vos explications au top. cordialement, Myriam Vernier
25.03.2020 - 14:37
![]() Julie Masse napsala:
Julie Masse napsala:
Bonjour. Qu'est-ce que cela signifie quand les rangs, comme dans A3 au huitième rang, ne s'aligne pas? Dois-je débuter une maille plus loin?
07.01.2020 - 16:54Odpověď DROPS Design :
Bonjour Mme Masse, les 7 premiers tours de A.3 se tricotaient en commençant par la dernière maille du tour (pour que les 4 diminutions soient alignées les unes au-dessus des autres). À partir du 8ème tour, la 1ère m de A.3 est la 1ère m de chaque motif (et du tour au début), autrement dit la diminution faites aux 4 tours précédents. Bon tricot!
08.01.2020 - 08:12
![]() Danielle napsala:
Danielle napsala:
Bonjour. Je ne comprends pas les explications pour les côtes de la mitaine gauche : (=1maille envers 3/1 maille endroit). Quelqu'un peut-il m'aider ?
07.12.2019 - 18:40Odpověď DROPS Design :
Bonjour Danielle, oups faute de frappe corrigée, on tricote en côtes 3 mailles envers/1 maille endroit, merci pour votre retour. Bon tricot!
09.12.2019 - 08:48
![]() Ros-Marie napsala:
Ros-Marie napsala:
Ska börja med A4 i mössan, ska jag sticka likadant med första 3 maskorna, som i A3?
05.11.2019 - 19:31Odpověď DROPS Design :
Hei Ros-Marie. Ja, det skal strikkes på sammen måte (När A.3 har stickats 2 ggr på höjden stickas A.4 runt på samma sätt). God Fornøyelse!
11.11.2019 - 09:51
![]() CHRISTINE napsala:
CHRISTINE napsala:
Merci pour votre réponse ce qui me gène ce sont les 3 m ensembles au début des rangs. Ça ne tombe toujours pas juste pour moi. J'ai vraiment beaucoup de mal à comprendre vos explications. Bonne journée
02.10.2019 - 11:57Odpověď DROPS Design :
Bonjour Christine, dès le 1er tour en fait (échantillon à l'appui), vous gardez la dernière maille du tour sur l'aiguille gauche (la dernière m de A.2), puis tricotez le 1er A.3 ainsi: tricotez la dernière m de A.2 et les 2 mailles suivantes ensemble à l'envers (= 3 m ens à l'env), continuez A.3 = vous avez tricoté 14 m, répétez A.3 tout le tour. À la fin du 2ème tour, gardez la dernière maille sur l'aiguille gauche et tricotez la ensemble à l'envers avec les 2 premières m de A.3, terminez A.3 = 14 m, tricotez la dernière m du 1er A.3 avec les 2 premières m du A.3 suivant et ainsi de suite pour ces tours 1, 3, 5 et 7. Bon tricot!
02.10.2019 - 13:48
![]() CHRISTINE napsala:
CHRISTINE napsala:
Vous donnez cette explication mais je je comprends pas le nombre de maille n'est pas bon je n'ai plus 98 mailles ci-dessous l'explication que vous donnez merci DROPS Design 15.11.2018 kl. 14:40: Bonjour Mary, pour tricoter les 3 m ens à l'env au début du tour, vous allez tricoter la dernière m du tour + les 2 premières m du tour suivant pour que ces diminutions soient alignées les unes au-dessus des autres. Bon tricot!
01.10.2019 - 21:47Odpověď DROPS Design :
Bonjour Christine, quand vous tricotez A.3, le nombre de mailles doit rester le même pendant les 2 motifs en hauteur jusqu'au début de A.4 (les diminutions se font dans A.4 uniquement). Vous devez donc toujours avoir 14 mailles dans chaque A.3 et ce tout le tour pendant les 2 motifs en hauteur. Tous les 2 rangs, on diminue 2 m par motif et on fait 2 double-jetés (= 1 jeté) = le nombre de mailles doit rester le même. Aux tours 3, 5 et 7, tricotez comme dans la réponse indiquée pour que les A.3 s'alignent. Bon tricot!
02.10.2019 - 08:22
![]() Christine napsala:
Christine napsala:
Les côtes du bonnet 1/1 ou 2/2 et 5 cm je crois merci cdlt
20.09.2019 - 23:41Odpověď DROPS Design :
Bonjour Christine, les côtes du bonnet se tricotent en suivant le diagramme A.1 = on va ainsi tricoter en côtes 3 m envers, 1 m endroit pendant 5 cm. Bon tricot!
23.09.2019 - 08:12
|
||||||||||||||||||||||
Stay Warm#staywarmset |
||||||||||||||||||||||
 |
 |
|||||||||||||||||||||
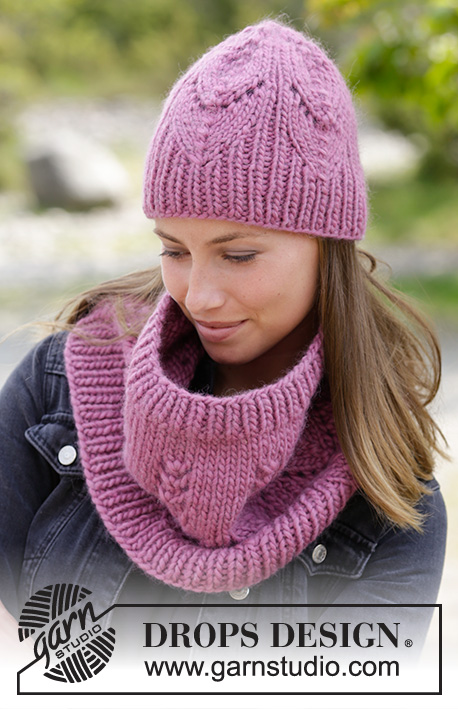
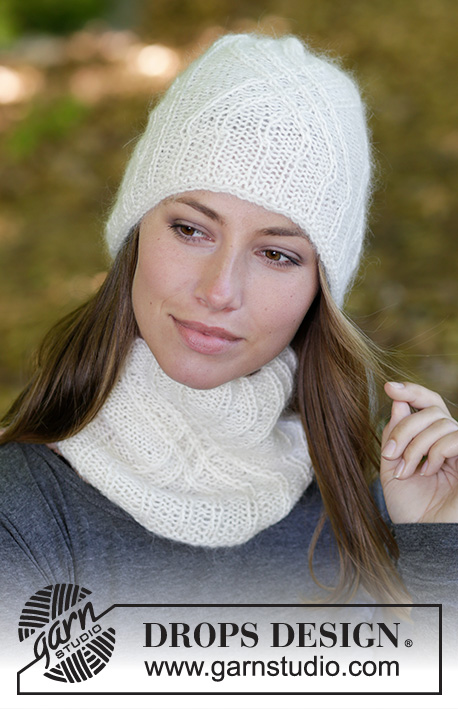
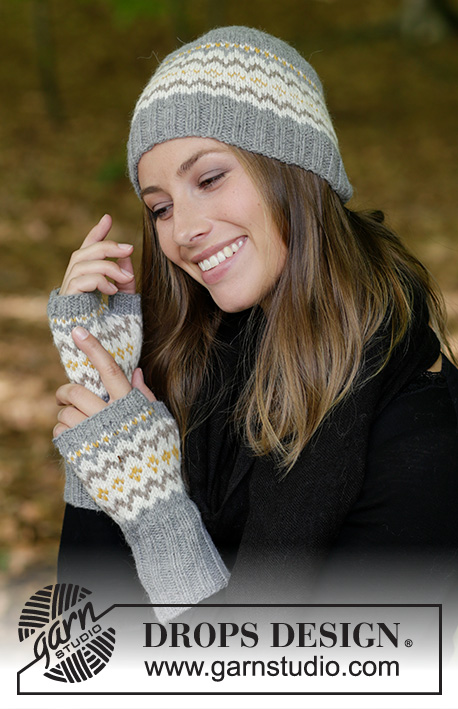
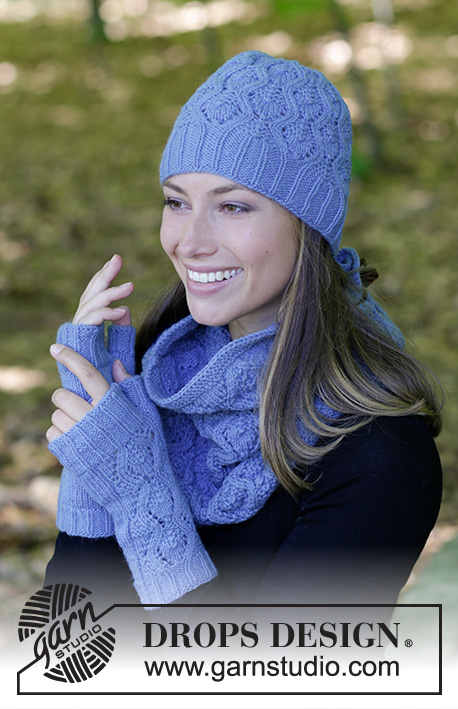
Souprava: čepice, nákrčník a bezprsté rukavice pletené ažurovým vzorem z příze DROPS Lima. Velikost S/M – M/L.
DROPS 182-20 |
||||||||||||||||||||||
|
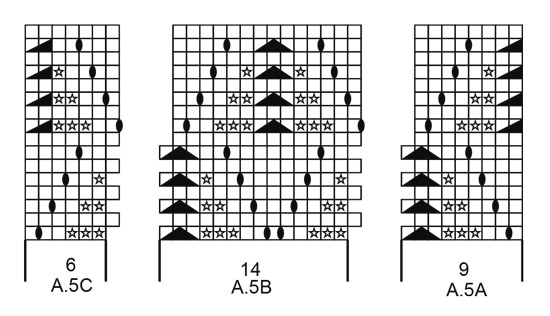
VZOR: Čepice: Viz schémata A.1 až A.4. Nákrčník: Viz schéma A.5. Bezprsté rukavice: Viz schémata A.6 až A.8. VROUBKOVÝ VZOR: 1 vroubek = 2 kruhové řady. Pleteme střídavě 1 kruhovou řadu hladce, 1 obrace. TIP – UJÍMÁNÍ (nákrčník a rukavice): Abychom vypočítali, jak často musíme ujímat, vydělíme celkový počet ok na jehlici (např.165 ok) počtem ok, která potřebujeme ujmout (např. 10), takže 165 : 10 = 16,5. V tomto případě tedy splétáme dohromady střídavě každé 15. a 16. oko a každé 16. a 17. oko. TIP – PŘIDÁVÁNÍ (rukavice - klínek pro palec): Pleteme až po označené oko, 1x nahodíme, 1 oko upleteme hladce (= označené oko), 1x nahodíme (= přidali jsme 2 oka). V následující kruhové řadě pleteme nahození za zadní nit, aby se v pletenině netvořily dírky. Při dalším přidávání postupujeme takto: pleteme až po 1 oko před označeným okem, 1x nahodíme, 3 oka upleteme hladce, 1x nahodíme (= přidali jsme 2 oka). POZN.: vždy přidáme na vnějších okrajích vznikajícího klínu. ---------------------------------------------------------- ČEPICE: Pleteme v kruhových řadách na kruhové jehlici, podle potřeby převedeme pleteninu s ubývajícím počtem ok na ponožkové jehlice. Na krátkou kruhovou jehlici č.3,5 nahodíme přízí Lima 112 ok a upleteme 1 kruhovou řadu hladce. Pak pleteme vzor A.1 (= 7 sekvencí vzoru po 16 okách). Když je pružný lem vysoký 5 cm, pleteme vzor A.2 (= 7 sekvencí vzoru po 16 okách, která zredukujeme na 14 ok) = 98 ok. Po dokončení celé sekvence vzoru A.2 (na výšku) převedeme pleteninu na kruhovou jehlici č.4. Pleteme vzor A.3 (= 7 sekvencí vzoru po 14 okách). Po dokončení 2 celých sekvencí vzoru A.3 (na výšku) pleteme v kruhových řadách stejným způsobem vzor A.4. Po dokončení celé sekvence vzoru A.4 (na výšku) nám zbývá 14 ok. Přízi odstřihneme, protáhneme zbylými oky, stáhneme a zapošijeme. Čepice je vysoká asi 24 cm. ---------------------------------------------------------- NÁKRČNÍK: Pleteme v kruhových řadách na kruhové jehlici. Na kruhovou jehlici č.3,5 nahodíme přízí Lima 151-165 ok a upleteme 3 VROUBKY – viz výše. Pak pleteme 1 kruhovou řadu hladce a SOUČASNĚ ujmeme rovnoměrně 10-10 ok – viz TIP - UJÍMÁNÍ = 141-155 ok. Pleteninu převedeme na kruhovou jehlici č.4 a následující kruhovou řadu pleteme takto: vzor A.5A (= 9 ok), vzor A.5B – opakujeme až po posledních 6 ok (= 9-10 sekvencí vzoru po 14 okách), vzor A.5C (= 6 ok). V tomto rozvržení vzoru pokračujeme až do výše asi 32 cm – končíme dopletením celé sekvence vzoru (na výšku). Pleteninu převedeme na kruhovou jehlici č.3,5. Pleteme 1 kruhovou řadu hladce a SOUČASNĚ přidáme rovnoměrně 10-10 ok = 151-165 ok. Upleteme 3 vroubky a poté všechna oka hladce uzavřeme. Abychom neměli uzavřený okraj příliš stažený, použijeme na uzavření silnější jehlice. Nákrčník je vysoký asi 34 cm. ---------------------------------------------------------- BEZPRSTÉ RUKAVICE PRAVÁ RUKAVICE: Pleteme v kruhových řadách na ponožkových jehlicích. Na ponožkové jehlice č.2,5 nahodíme přízí Lima 52-56 ok a upleteme 1 kruhovou řadu hladce. Pak pleteme lem pružným vzorem 1/3, tj. střídáme 1 oko hladce, 3 obrace – začínáme 3 oky obrace! Když je lem vysoký 3-4 cm, pleteme další kruhovou řadu takto: první 4 oka upleteme hladce a SOUČASNĚ nad těmito 4 oky ujmeme rovnoměrně 2-1 oka, pak pleteme 1. řadu vzoru A.6 (= 19 ok, která zredukujeme na 17 ok), zbylých 29-33 ok upleteme hladce a SOUČASNĚ nad nimi ujmeme rovnoměrně 6-7 ok – viz TIP – UJÍMÁNÍ = 42-46 ok. Pleteninu převedeme na ponožkové jehlice č.3 a následující kruhovou řadu pleteme takto: 2-3 oka lícovým žerzejem, nad následujícími 17 oky pleteme poslední řadu vzoru A.6, zbylých 23-26 ok upleteme lícovým žerzejem. Dál pleteme následovně: 2-3 oka lícovým žerzejem, vzor A.7 (= 17 ok), 23-26 ok lícovým žerzejem. V tomto rozvržení vzorů pokračujeme. SOUČASNĚ si ve výši 10-11 cm označíme 1. oko v kruhové řadě. V následující kruhové řadě přidáme na obou stranách tohoto označeného oka 1 oko – viz TIP - PŘIDÁVÁNÍ (= přidali jsme 2 oka). Takto přidáme v každé 6. kruhové řadě, celkem 4x (dbáme na to, abychom přidávali vždy na vnější straně vznikajícího klínu – přidaná oka z předchozích řad začnou tvořit trojúhelník) = na jehlicích máme 50-54 ok. Pokračujeme v pletení vzoru a SOUČASNĚ odložíme všech 9 ok palce na pomocnou jehlici. Za odloženými oky pak nahodíme 3 oka nová = na jehlicích máme 44-48 ok. Pleteme v kruhových řadách vzorem A.7. Ve výši asi 19-21 cm – končíme dopletením celé sekvence vzoru (na výšku, do ukončení práce nám zbývá doplést asi 5 cm výšky – rukavici si můžete vyzkoušet a upravit délku dle potřeby) – převedeme pleteninu na ponožkové jehlice č.2,5 a následující kruhovou řadu pleteme takto: první 2-3 oka upleteme hladce a SOUČASNĚ nad těmito oky přidáme rovnoměrně 2-1 oka, pak pleteme vzor A.8 (= 17 ok, která rozšíříme na 19 ok) a dalších 23-26 ok upleteme hladce – SOUČASNĚ nad těmito oky přidáme rovnoměrně 6-7 ok = na jehlicích máme 52-56 ok. Pak pleteme v kruhových řadách pružným vzorem 1/3, začínáme 3 oky obrace. Když je pružný lem vysoký 5 cm, všechna oka dle vzoru uzavřeme. Abychom neměli uzavřený okraj moc stažený, použijeme k uzavírání o číslo silnější jehlice. Rukavice měří asi 24-26 cm. PALEC: Odložených 9 ok palce vrátíme z pomocné jehlice zpět na ponožkové jehlice č.3 a navíc k nim nabereme z okraje za nimi 7 ok nových = 16 ok. Upleteme 3 kruhové řady lícovým žerzejem (dbáme na to, abychom příliš neutahovali a neměli pak palec moc stažený). Pokračujeme pružným vzorem 1/3, začínáme 3 oky obrace. Když je palec vysoký 3-3,5 cm (ppř. v jiné libvolné výšce), všechna oka dle vzoru uzavřeme. LEVÁ RUKAVICE: Na ponožkové jehlice č.2,5 nahodíme přízí Lima 52-56 ok a upleteme 1 kruhovou řadu hladce. Pak pleteme lem pružným vzorem 1/3, tj. střídáme 1 oko hladce, 3 obrace – začínáme 1 okem hladce! Když je lem vysoký 3-4 cm, pleteme další kruhovou řadu takto: prvních 29-33 ok upleteme hladce a SOUČASNĚ nad těmito oky ujmeme rovnoměrně 6-7 ok, pak pleteme vzor A.6 (= 19 ok, která zredukujeme na 17 ok), zbylá 4 oka upleteme hladce a SOUČASNĚ nad nimi ujmeme rovnoměrně 2-1 oka = 42-46 ok. Pleteninu převedeme na ponožkové jehlice č.3 a následující kruhovou řadu pleteme takto: 23-26 ok lícovým žerzejem, nad následujícími 17 oky pleteme poslední řadu vzoru A.6, zbylá 2-3 oka upleteme lícovým žerzejem. Dál pleteme následovně: 23-26 ok lícovým žerzejem, vzor A.7 (= 17 ok), 2-3 oka lícovým žerzejem. V tomto rozvržení vzorů pokračujeme. SOUČASNĚ si ve výši 10-11 cm označíme poslední oko v kruhové řadě. V následující kruhové řadě přidáme na obou stranách tohoto označeného oka 1 oko – viz TIP - PŘIDÁVÁNÍ (= přidali jsme 2 oka). Takto přidáme v každé 6. kruhové řadě, celkem 4x (dbáme na to, abychom přidávali vždy na vnější straně vznikajícího klínu – přidaná oka z předchozích řad začnou tvořit trojúhelník) = na jehlicích máme 50-54 ok. Pokračujeme v pletení vzoru a SOUČASNĚ odložíme všech 9 ok palce na pomocnou jehlici. Za odloženými oky pak nahodíme 3 oka nová = na jehlicích máme 44-48 ok. Pleteme v kruhových řadách vzorem A.7. Ve výši asi 19-21 cm – končíme dopletením celé sekvence vzoru, ve stejné výšce, jako u pravé rukavice – převedeme pleteninu na ponožkové jehlice č.2,5 a následující kruhovou řadu pleteme takto: prvních 23-26 ok upleteme hladce a SOUČASNĚ nad těmito oky přidáme rovnoměrně 6-7 ok, pak pleteme vzor A.8 (= 17 ok, která rozšíříme na 19 ok) a poslední 2-3 oka upleteme hladce – SOUČASNĚ nad těmito oky přidáme rovnoměrně 2-1 oka = na jehlicích máme 52-56 ok. Pak pleteme v kruhových řadách pružným vzorem 1/3, začínáme 1 okem hladce. Když je pružný lem vysoký 5 cm, všechna oka dle vzoru uzavřeme. Abychom neměli uzavřený okraj moc stažený, použijeme k uzavírání o číslo silnější jehlice. Rukavice měří asi 24-26 cm. PALEC: Levý palec upleteme stejným způsobem jako pravý palec. |
||||||||||||||||||||||
Vysvětlivky ke schématu |
||||||||||||||||||||||
|
||||||||||||||||||||||
|
||||||||||||||||||||||
|
||||||||||||||||||||||
|
||||||||||||||||||||||
Dokončili jste tento model?Pak označte své fotky tagem #dropspattern #staywarmset nebo je pošlete do galerie #dropsfan. Potřebujete s tímto návodem poradit?Otevřete-li si návod na stránce garnstudio.com, najdete tam 32 výukových video-ukázek, Komentáře/Dotazy a další užitečné informace. © 1982-2025 DROPS Design A/S. Vyhrazujeme si veškerá práva. Tento dokument, včetně všech jeho dílčích částí, podléhá autorským právům. Podrobnější komentář k možnostem užití našich návodů najdete dole pod každým návodem na našich stránkách. |
||||||||||||||||||||||


V oblasti pletené a háčkované módy působí DROPS Design více než 40 let. Díky tomu vám můžeme nabídnout jednu z nejrozsáhlejších kolekcí modelů s bezplatnými návody dostupnými na internetu - navíc v 17 jazycích. K dnešnímu dni máme na 314 katalogů a 11821 návodů celkem - z nich je už 7047 dostupných v [češtině].
Přidejte komentář k návodu DROPS 182-20
Rádi bychom věděli, co si o tomto modelu myslíte!
Pokud se chcete na něco zeptat, dbejte prosím na to, abyste ve formuláři níže vybrali správnou kategorii - díky tomu se dříve dozvíte, co potřebujete vědět. Povinná pole jsou označena *.