
Popular categories
Looking for a yarn?


Comments / Questions (199)
![]() Anne Zethelius wrote:
Anne Zethelius wrote:
Avfelling bakstykke, skal rettmaskene felles, og maskene med mønster kun reduseres?
12.06.2023 - 13:56DROPS Design answered:
Hei Anne, Alle masker skal felles av, men du bruker avfellingstips over maskene i diagrammene. God fornøyelse!
13.06.2023 - 06:49
![]() Birkdal Koba Elisabeth wrote:
Birkdal Koba Elisabeth wrote:
Förstår inte hur jag ska sy ihop ärmarna. Det står sy tillsammans ärmarna mitt bak? Ska ärmarna sitta ihop bakom nacken ?
03.05.2023 - 06:16DROPS Design answered:
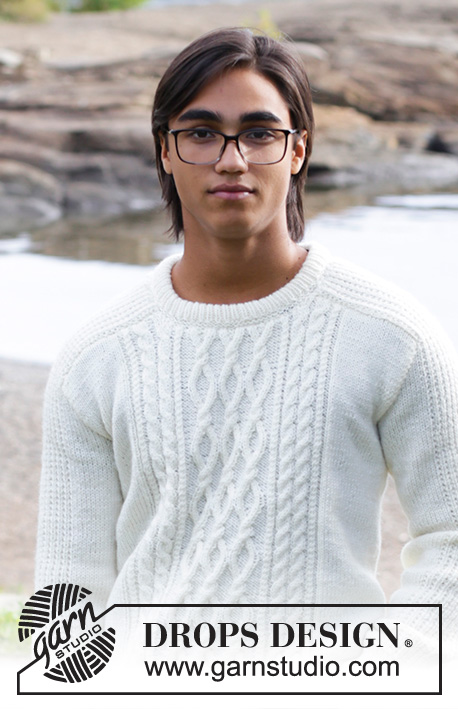
Hej :) Ja det stemmer, se Fig.1 ved siden af måleskitsen nederst i opskriften :)
04.05.2023 - 12:06
![]() Solange wrote:
Solange wrote:
Bonsoir pouvez-vous me dire quelle est la largeur du poignet des manches en cm au niveau des côtes pour ajuster mon nombre de mailles Merci
29.04.2023 - 21:57DROPS Design answered:
Bonjour Solange, nous n'avons pas cette mesure, mais si votre échantillon est juste, vous devriez obtenir le même effet que sur la photo. Bon tricot!
02.05.2023 - 08:45
![]() Conny wrote:
Conny wrote:
Hallo aus Deutschland :) Wenn in der Anleitung steht: ab 9 cm die ersten Zunahmen stricken, misst man dann ab dem Anfang des Musters oder ab der 1. Runde (also von ganz unten)? Herzlichen Gruss von Conny
21.04.2023 - 18:47DROPS Design answered:
Liebe Conny, diese 9 cm messen Sie ab der Anschlagskante (gesamte Höhe der Arbeit). Viel Spaß beim stricken!
24.04.2023 - 09:26
![]() Judith Foster wrote:
Judith Foster wrote:
I am unsure what you mean in pattern for back piece . When pieces measures 61cm bind off , at the same time as you decrease 20 st evenly over the stitches in diagram ?
12.03.2023 - 07:23DROPS Design answered:
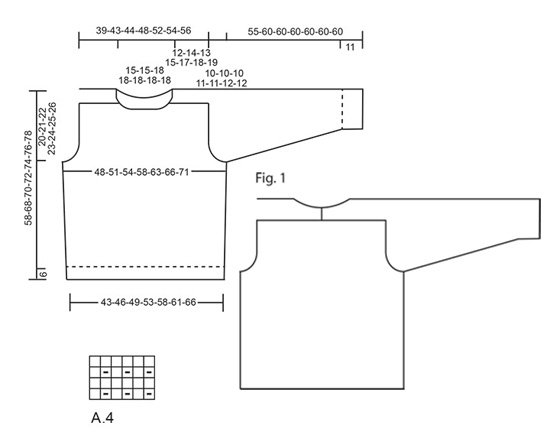
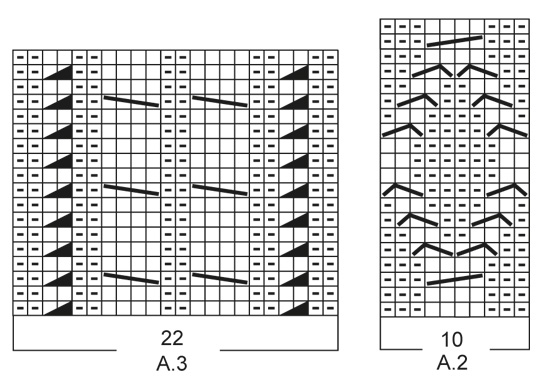
Dear Judith, you need to continue working the pattern, that is, the sequence of the charts as established in the body: "Work 27 stitches stocking stitch, A.1 (= 22 stitches), A.2 (= 10 stitches) over the next 30 stitches (= 3 repeats in width), A.3 (= 22 stitches), 27 stitches stocking stitch"plus the edge stitch in garter stitch on each side . When casting off the back piece, decrease 20 over the stitches worked according to the charts, that is, the stitches stitches in A.1, A.2, A.3 and not those worked in stocking stitch or the edge stitches. Happy knitting!
12.03.2023 - 18:11
![]() Kenneth Carlsson wrote:
Kenneth Carlsson wrote:
Jag ser att det är fler som frågat om just det här, men jag är trögtänkt och google översätt ger inte riktigt rätt ordbetydelse! Diagrammen A1, A2, A3 har olika många rader, hur hanterar jag det? Tacksam för ett enkelt svar. Med vänlig hälsning,Kenneth Carlsson
08.03.2023 - 00:00DROPS Design answered:
Hej Kenneth, du følger diagrammerne uafhængig af hinanden i højden. Det vil sige i A.1 og A.3 har du 5 varv mellan varje fläta hela tröjan upp. Och A.2 børjar du om enligt diagrammet för varje gång du har stickat 20 varv. Lycka till :)
08.03.2023 - 09:50
![]() Josie wrote:
Josie wrote:
Merci beaucoup d'avoir répondu aussi vite, j'aimerais finir le pull de mon mari pour le printemps. Je le réalisé en soft tweed bleu jeans, il va être trop CHOUPI.
28.02.2023 - 11:21
![]() Josie wrote:
Josie wrote:
Bonjour, je n'aime pas les aiguilles double pointes ni le magic loop, est-ce que je peux faire mes manches en aller et retour ? Merci et belle journée à vous.
28.02.2023 - 10:58DROPS Design answered:
Bonjour Josie, tout à fait, retrouvez ici comment vous pouvez procéder. Bon tricot!
28.02.2023 - 11:15
![]() Myriam Marty wrote:
Myriam Marty wrote:
Bonjour Comment tricoter sur l'envers les mailles que l'on place sur les aiguilles auxiliaires devant ou derrière l'ouvrage Merci à vous
12.02.2023 - 16:44DROPS Design answered:
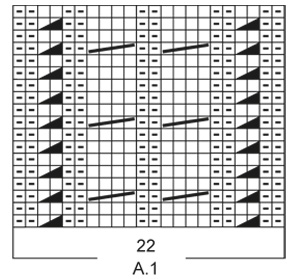
Bonjour Mme Marty, en fonction de la torsade il faudra tricoter ces mailles soit à l'endroit, soit à l'envers, c'est indiqué dans la légende sous "reprendre la maille/les 2 mailles en attente et les tricoter: à l'endroit ou à l'envers" en fonction de la torsade. Bon tricot!
13.02.2023 - 10:12
![]() Mylène wrote:
Mylène wrote:
Bonjour, Pour la taille M, arrivé à 61 cm de hauteur, je dois rabattre les mailles en diminuant 20 mailles au-dessus des diagrammes A1-A2-A3. Si j'ai bien compris, les diminutions se font dans les torsades. Hors si je diminue dans les torsades, je n'ai que 18 diminutions. Je ne sais pas où diminuer les 2 mailles qu'il me reste. Pouvez-vous m'éclairer Svp ? J'espère avoir été clair. Merci beaucoup.
24.01.2023 - 15:10DROPS Design answered:
Bonjour Mylène, tricotez les mailles des diagrammes ensemble 2 par 2 à l'endroit ou 2 par 2 à l'envers pour un total de 20 diminutions, c'est important pour que vous conserviez bien la bonne largeur. Bon tricot!
24.01.2023 - 16:46
|
||||||||||||||||||||||
Siberia#siberiasweater |
||||||||||||||||||||||
 |
 |
|||||||||||||||||||||
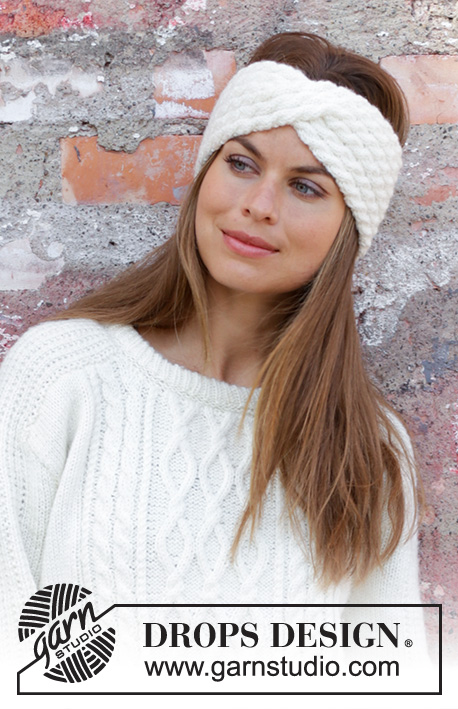
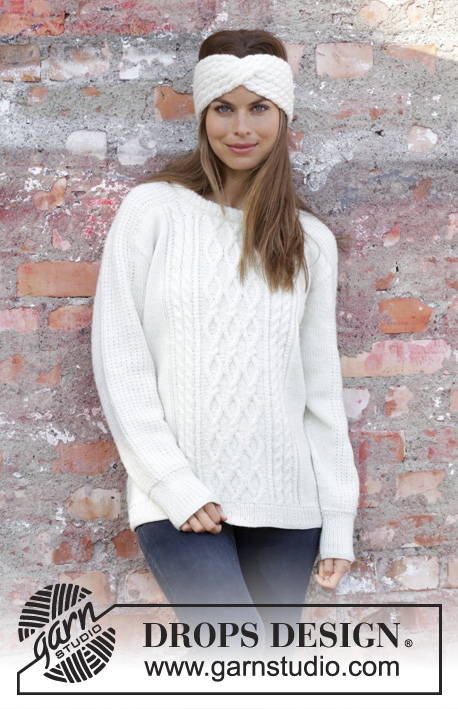
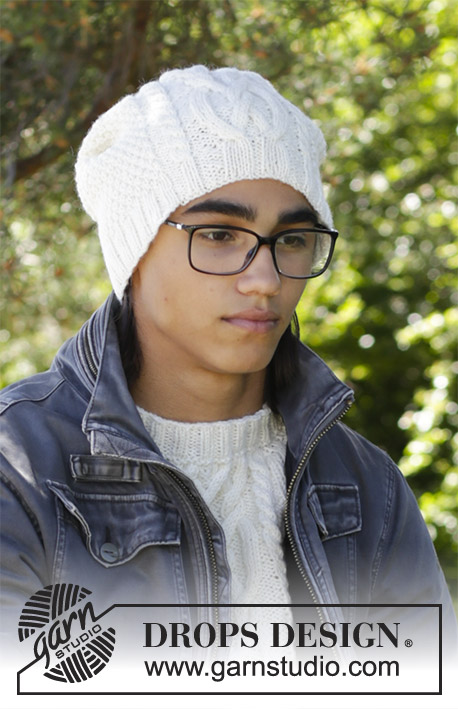
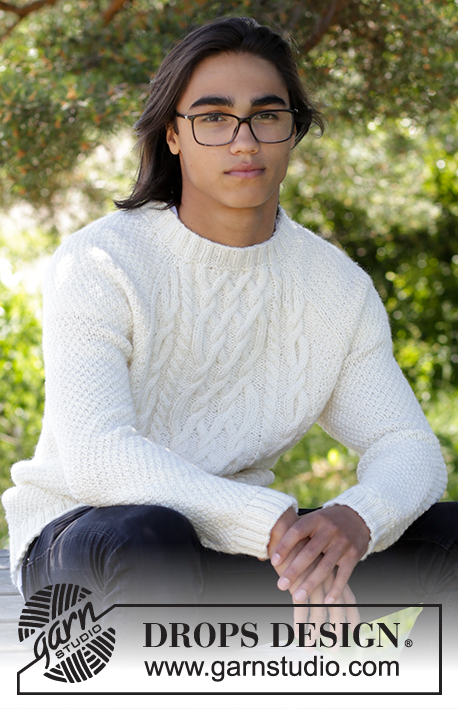
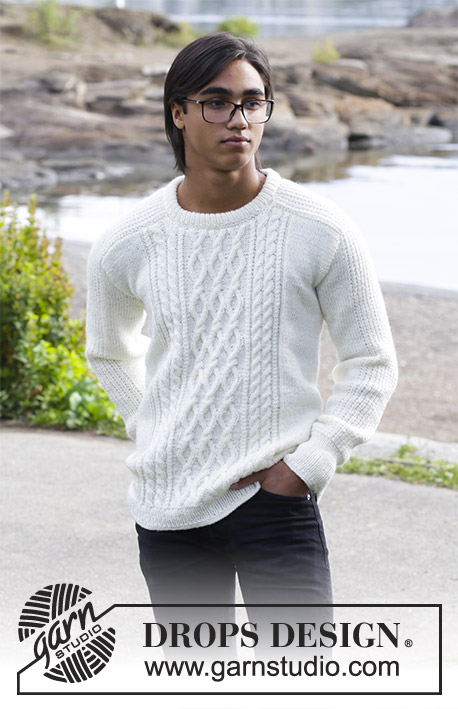
Men’s knitted jumper with cables. Sizes 13/14 years – XXXL. The piece is worked in DROPS Merino Extra Fine.
DROPS 185-2 |
||||||||||||||||||||||
|
INFORMATION FOR THE PATTERN: RIDGE/GARTER STITCH (worked in the round): 1 ridge = 2 rounds. Knit 1 round and purl 1 round. PATTERN: See diagrams A.1 to A.4. The diagrams show all the rows in the pattern seen from the right side. INCREASE/DECREASE TIP (evenly spaced): To work out how to increase/decrease evenly, count the total number of stitches on the needle (e.g. 218 stitches) and divide by the number of increases/decreases to be made (e.g. 10) = 21.8. In this example, increase alternately after approx. every 21st and 22nd stitch by making 1 yarn over. On the next round, work the yarn overs twisted to avoid holes. If you are decreasing (in this example) knit together alternately approx. every 20th and 21st stitch and every 21st and 22nd stitch. INCREASE TIP (for sides in body and sleeves): Start 1 stitch before the marker, make 1 yarn over, knit 2 (the marker sits in the middle of these two stitches), make 1 yarn over. On the next round knit the yarn overs twisted to avoid holes. The new stitches are subsequently worked in stocking stitch. CASTING OFF TIP: Decrease 1 stitch at the same time as casting off as follows: Knit 2 stitches together, knit 1 stitch, pass over (cast off) (= 1 extra stitch decreased). ---------------------------------------------------------- JUMPER – SHORT OVERVIEW OF THE PIECE: The sleeve is worked upwards, continued onto the shoulder and along the neck, top back. The neck-stitches at the top of the sleeve are decreased towards the front piece and a small section of the sleeve is continued along the top of the back piece and later sewn together mid-back, so the neck is higher at the back than at the front – see Fig.1. ---------------------------------------------------------- JUMPER: The piece is worked in the round with circular needle as far as the armholes, then the front and back pieces are worked back and forth separately. The sleeves are worked in the round with double pointed needles as far as the armholes, then the sleeves are worked back and forth. To finish, the sleeves are sewn into the armhole and shoulders on front and back pieces. BODY: Cast on 218-230-246-264-280-298-314 stitches with circular needle size 3.5 mm and Merino Extra Fine. Work 2 RIDGES – see description above! Then work rib (knit 1 /purl 1). When the piece measures 5 cm work 1 ridge, AT THE SAME TIME as you increase 10-10-10-12-12-14-14 stitches evenly on the first round – read INCREASE/DECREASE TIP= 228-240-256-276-292-312-328 stitches. Insert 2 markers in the piece, one at the beginning of the round and one after 114-120-128-138-146-156-164 stitches (= in each side). Change to circular needle size 4 mm and work PATTERN as follows – see description above: * Work 20-23-27-27-31-31-35 stitches stocking stitch, A.1 (= 22 stitches), A.2 (= 10 stitches) over the next 30-30-30-40-40-50-50 stitches (= 3-3-3-4-4-5-5 repeats in width), A.3 (= 22 stitches), 20-23-27-27-31-31-35 stitches stocking stitch, the marker sits here *, work from *-* 1 more time. REMEMBER THE KNITTING TENSION! Continue the pattern and repeat the charts in height. When the piece measures 9 cm increase 1 stitch on both sides of the markers in each side – read INCREASE TIP (= 4 stitches increased). Increase in this way every 6-8-8-9-9-9-10 cm a total of 5 times = 248-260-276-296-312-332-348 stitches. When the piece measures 38-47-48-49-50-51-52 cm cast off 6 stitches for the armhole in each side (cast off 3 stitches on both side of the markers in each side) and continue each piece separately. BACK PIECE: = 118-124-132-142-150-160-168 stitches. The piece is worked back and forth with circular needle. Continue with pattern, stocking stitch and 1 edge stitch in garter stitch in each side, AT THE SAME TIME continue to cast off for armhole at the beginning of each row in each side as follows: 2 stitches 3-3-4-4-4-4-5 times and 1 stitch 1-0-1-1-2-2-2 times = 104-112-114-124-130-140-144 stitches. When the piece measures 49-59-61-63-65-67-69 cm cast off, AT THE SAME TIME as you decrease 20-20-20-22-18-24-24 stitches evenly over the stitches in diagrams A.1, A.2 and A.3 – read CASTING OFF TIP. FRONT PIECE: = 118-124-132-142-150-160-168 stitches. Continue with pattern, stocking stitch and 1 edge stitch in garter stitch, AT THE SAME TIME as cast off for armhole as for back piece = 104-112-114-124-130-140-144 stitches. When the piece measures 46-56-58-60-62-64-66 cm decrease 10-10-10-12-12-12-12 stitches evenly over the middle 40-40-40-48-48-48-48 stitches before these stitches are placed on a thread for the neck (= 30-30-30-36-36-36-36 stitches on thread). The shoulders are now finished separately. On the next row from the neck cast off 2 stitches = 30-34-35-36-39-44-46 stitches. When the piece measures 49-59-61-63-65-67-69 cm (adjust to match the back piece) cast off, AT THE SAME TIME as you decrease 5-5-4-5-3-6-6 stitches evenly over the 15-15-15-16-16-21-21 stitches towards the neck – remember CASTING OFF TIP. Work the other shoulder in the same way. RIGHT SLEEVE: The piece is worked in the round with double pointed needles. Cast on 56-58-60-62-64-66-68 stitches with double pointed needles size 3.5 mm and Merino Extra Fine. Work 2 ridges. Then work rib (= knit 1 /purl 1) until the piece measures 10 cm. Work 1 ridge, AT THE SAME TIME as you decrease 5 stitches evenly on row = 51-53-55-57-59-61-63 stitches. Insert 1 marker at the beginning of the round. Change to double pointed needles size 4 mm and work pattern on the next round as follows: Stocking stitch over the first 4-5-6-7-8-9-10 stitches, work A.4 over the next 42 stitches, work the first stitch in A.4, 4-5-6-7-8-9-10 stitches stocking stitch. Continue this pattern upwards. AT THE SAME TIME when the piece measures 13-12-13-12-12-14-13 cm increase 1 stitch on each side of the marker – remember INCREASE TIP! Increase in this way every 2-2½-2-2-2-1½-1½ cm a total of 14-15-16-17-18-19-20 times = 79-83-87-91-95-99-103 stitches. When the piece measures 45-50-50-49-49-48-48 cm cast off 6 stitches mid under the sleeve (cast off 3 stitches on each side of the marker). Then work back and forth on the needle AT THE SAME TIME as you cast off for sleeve cap at the beginning of each row in each side as follows: 2 stitches 2-4-6-7-9-10-12 times and 1 stitch 12-10-8-8-6-6-4 times = 41 stitches left in all sizes. The piece measures 55-60-60-60-60-60-60 cm. NOW YOU MEASURE THE PIECE FROM HERE! Continue with pattern over the remaining stitches until the piece measures 12-14-13-15-17-18-19 cm. Then you cast off at the beginning of each row from the right side as follows: 19 stitches 1 time AT THE SAME TIME as 8 of these 19 stitches are knitted together 2 and 2 before they are cast off, 3 stitches 1 time, 2 stitches 1 time. Work 3 rows without decreases. Cast off 1 stitch on the next row = 16 stitches left in all sizes. Continue working until the piece measures 19-21-22-24-26-27-28 cm. The whole sleeve measures approx. 74-81-82-84-86-87-88 cm. LEFT SLEEVE: Worked as for right sleeve, but decreases at top are worked in opposite side, i.e. at the beginning of every row from the wrong side. ASSEMBLY: Sew the sleeves together mid back inside the cast off edge of each sleeve. Sew the sleeves to front and back piece on body in the outermost stitch as follows: Sew from the armhole and up along shoulder on back piece to mid back. Repeat on the other side. Sew in that same way from armhole and up along shoulder to the neck on the front piece. Repeat on the other side. NECKLINE: Knit up 94-94-108-108-108-108-108 stitches around the neck (including the stitches from the thread) with short circular needle size 3.5 mm and Merino Extra Fine. Work 2 ridges, AT THE SAME TIME as you increase on the last round 22-22-26-26-26-26-26 stitches evenly = 116-116-134-134-134-134-134 stitches. Then work rib (= knit 1 /purl 1). When the rib measures 8 cm work 1 ridge. Cast off. Fold the neck double and fasten on the inside, ridge to ridge. |
||||||||||||||||||||||
Diagram explanations |
||||||||||||||||||||||
|
||||||||||||||||||||||
 |
||||||||||||||||||||||
 |
||||||||||||||||||||||
 |
||||||||||||||||||||||
Have you finished this pattern?Tag your pictures with #dropspattern #siberiasweater or submit them to the #dropsfan gallery. Do you need help with this pattern?You'll find 30 tutorial videos, a Comments/Questions area and more by visiting the pattern on garnstudio.com. © 1982-2026 DROPS Design A/S. We reserve all rights. This document, including all its sub-sections, has copyrights. Read more about what you can do with our patterns at the bottom of each pattern on our site. |
||||||||||||||||||||||


With over 40 years in knitting and crochet design, DROPS Design offers one of the most extensive collections of free patterns on the internet - translated to 17 languages. As of today we count 324 catalogues and 12290 patterns translated into English (UK/cm).
We work hard to bring you the best knitting and crochet have to offer, inspiration and advice as well as great quality yarns at incredible prices! Would you like to use our patterns for other than personal use? You can read what you are allowed to do in the Copyright text at the bottom of all our patterns. Happy crafting!
Post a comment to pattern DROPS 185-2
We would love to hear what you have to say about this pattern!
If you want to leave a question, please make sure you select the correct category in the form below, to speed up the answering process. Required fields are marked *.