DROPS Merino Extra Fine
100% Wool
from 3.50 £ /50g
Get the yarn to make this pattern from 49.00£.

The yarn cost is calculated from the pattern’s smallest size and the yarn’s cheapest product type. Looking for an even better price? You might find it on the DROPS Deals!

DROPS SS24

Siberia

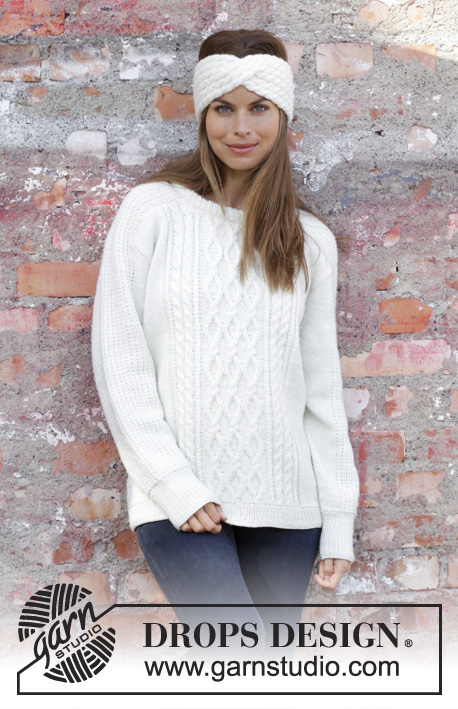
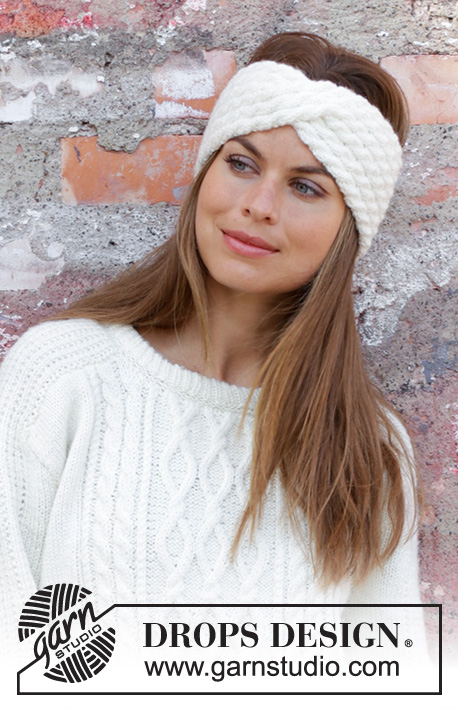
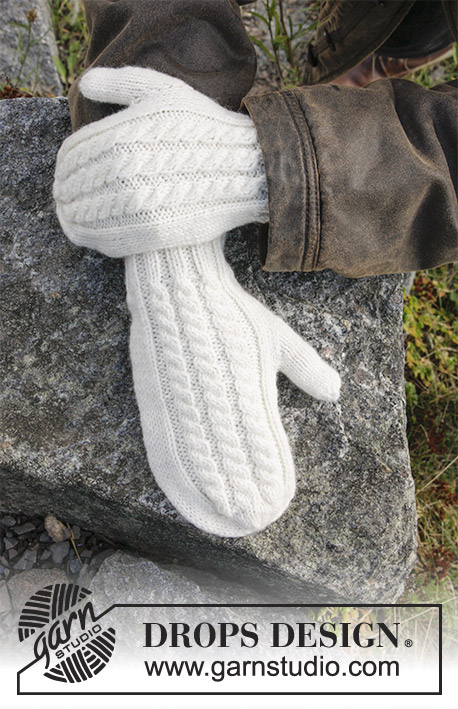
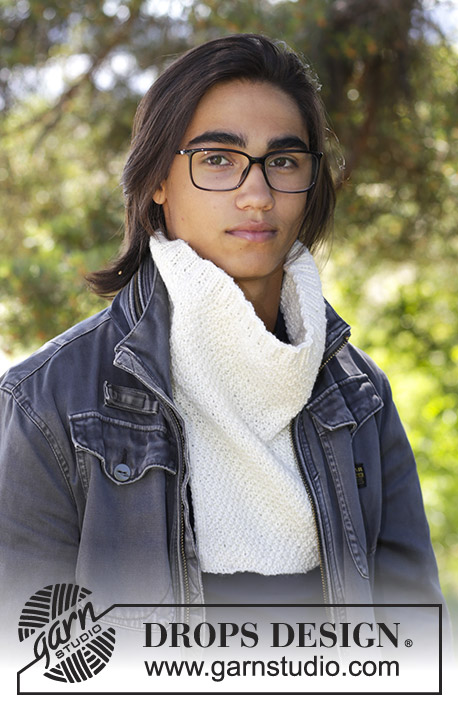
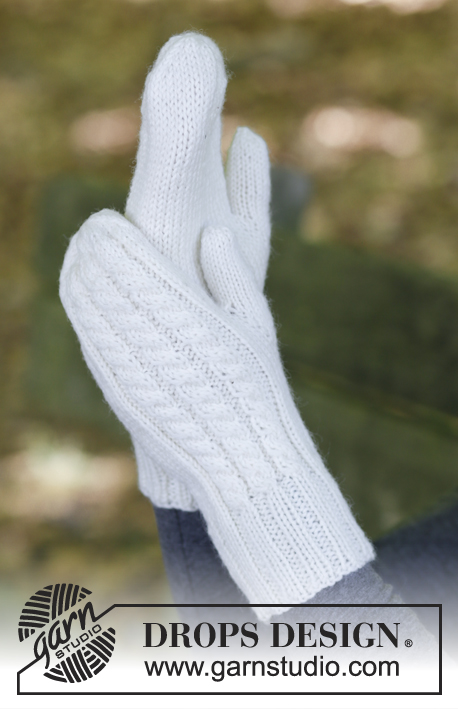
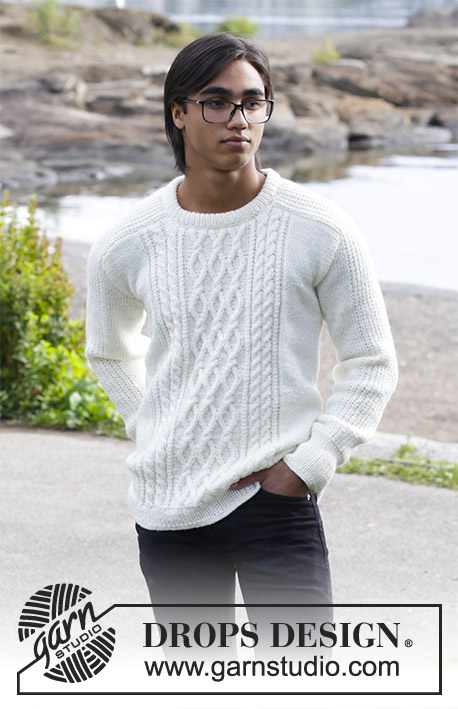
Men’s knitted jumper with cables. Sizes 13/14 years – XXXL. The piece is worked in DROPS Merino Extra Fine.

DROPS 185-2
DROPS Design: Pattern no me-124
Yarn group B
-----------------------------------------------------------
Sizes:
13/14 years - S - M - L - XL - XXL - XXXL
Materials:
DROPS MERINO EXTRA FINE from Garnstudio (belongs to yarn group B)
700-750-850-950-1000-1100-1200 g colour 01, off white

The piece can also be knitted with yarn from:
"Alternative yarn (Yarn Group B)" – see link below.

DROPS DOUBLE POINTED NEEDLES AND CIRCULAR NEEDLE (80 cm) SIZE 4 MM - or the size needed to get 21 stitches and 28 rows stocking stitch on 10 cm in width and 10 cm in height.
 
DROPS DOUBLE POINTED NEEDLES AND CIRCULAR NEEDLE (40 and 80 cm) SIZE 3.5 MM for rib – or the size needed to get 22 stitches and 30 rows stocking stitch on 10 cm in width and 10 cm in height.

DROPS CABLE NEEDLE – for cables.
----------------------------------------------------------

-------------------------------------------------------

Alternative Yarn – See how to change yarns here
Yarn Groups A to F – Use the same pattern and change the yarn here
Yarn usage using an alternative yarn – Use our yarn converter here

-------------------------------------------------------

DROPS Merino Extra Fine
100% Wool
from 3.50 £ /50g
Get the yarn to make this pattern from 49.00£.

The yarn cost is calculated from the pattern’s smallest size and the yarn’s cheapest product type. Looking for an even better price? You might find it on the DROPS Deals!

Pattern instructions

NOTE: This pattern is written in British English. All measurements in charts are in cm. For conversion from cm to inches - click here. There are different terms for crocheting in British and American English. If this pattern includes crochet, click for "crochet terms" here. For this pattern in American English, please click here.
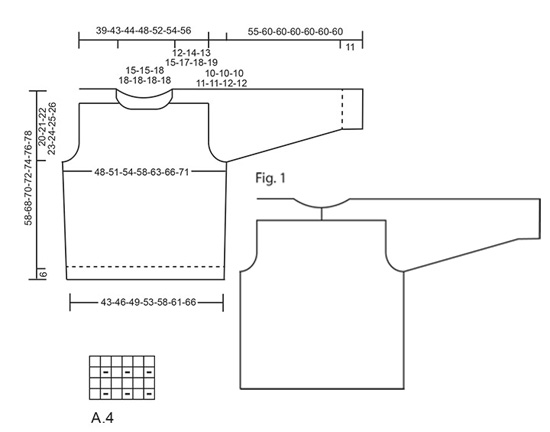
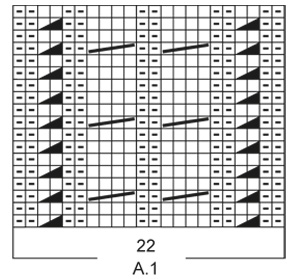
INFORMATION FOR THE PATTERN:

RIDGE/GARTER STITCH (worked in the round):
1 ridge = 2 rounds. Knit 1 round and purl 1 round.

PATTERN:
See diagrams A.1 to A.4.
The diagrams show all the rows in the pattern seen from the right side.

INCREASE/DECREASE TIP (evenly spaced):
To work out how to increase/decrease evenly, count the total number of stitches on the needle (e.g. 218 stitches) and divide by the number of increases/decreases to be made (e.g. 10) = 21.8. In this example, increase alternately after approx. every 21st and 22nd stitch by making 1 yarn over. On the next round, work the yarn overs twisted to avoid holes.
If you are decreasing (in this example) knit together alternately approx. every 20th and 21st stitch and every 21st and 22nd stitch.

INCREASE TIP (for sides in body and sleeves):
Start 1 stitch before the marker, make 1 yarn over, knit 2 (the marker sits in the middle of these two stitches), make 1 yarn over. On the next round knit the yarn overs twisted to avoid holes. The new stitches are subsequently worked in stocking stitch.

CASTING OFF TIP:
Decrease 1 stitch at the same time as casting off as follows: Knit 2 stitches together, knit 1 stitch, pass over (cast off)
(= 1 extra stitch decreased).
----------------------------------------------------------

JUMPER – SHORT OVERVIEW OF THE PIECE:
The sleeve is worked upwards, continued onto the shoulder and along the neck, top back. The neck-stitches at the top of the sleeve are decreased towards the front piece and a small section of the sleeve is continued along the top of the back piece and later sewn together mid-back, so the neck is higher at the back than at the front – see Fig.1.
----------------------------------------------------------

JUMPER:
The piece is worked in the round with circular needle as far as the armholes, then the front and back pieces are worked back and forth separately. The sleeves are worked in the round with double pointed needles as far as the armholes, then the sleeves are worked back and forth. To finish, the sleeves are sewn into the armhole and shoulders on front and back pieces.

BODY:
Cast on 218-230-246-264-280-298-314 stitches with circular needle size 3.5 mm and Merino Extra Fine. Work 2 RIDGES – see description above! Then work rib (knit 1 /purl 1). When the piece measures 5 cm work 1 ridge, AT THE SAME TIME as you increase 10-10-10-12-12-14-14 stitches evenly on the first round – read INCREASE/DECREASE TIP= 228-240-256-276-292-312-328 stitches. Insert 2 markers in the piece, one at the beginning of the round and one after 114-120-128-138-146-156-164 stitches (= in each side). Change to circular needle size 4 mm and work PATTERN as follows – see description above: * Work 20-23-27-27-31-31-35 stitches stocking stitch, A.1 (= 22 stitches), A.2 (= 10 stitches) over the next 30-30-30-40-40-50-50 stitches (= 3-3-3-4-4-5-5 repeats in width), A.3 (= 22 stitches), 20-23-27-27-31-31-35 stitches stocking stitch, the marker sits here *, work from *-* 1 more time. REMEMBER THE KNITTING TENSION! Continue the pattern and repeat the charts in height. When the piece measures 9 cm increase 1 stitch on both sides of the markers in each side – read INCREASE TIP (= 4 stitches increased). Increase in this way every 6-8-8-9-9-9-10 cm a total of 5 times = 248-260-276-296-312-332-348 stitches. When the piece measures 38-47-48-49-50-51-52 cm cast off 6 stitches for the armhole in each side (cast off 3 stitches on both side of the markers in each side) and continue each piece separately.

BACK PIECE: 
= 118-124-132-142-150-160-168 stitches. The piece is worked back and forth with circular needle. Continue with pattern, stocking stitch and 1 edge stitch in garter stitch in each side, AT THE SAME TIME continue to cast off for armhole at the beginning of each row in each side as follows: 2 stitches 3-3-4-4-4-4-5 times and 1 stitch 1-0-1-1-2-2-2 times = 104-112-114-124-130-140-144 stitches. When the piece measures 49-59-61-63-65-67-69 cm cast off, AT THE SAME TIME as you decrease 20-20-20-22-18-24-24 stitches evenly over the stitches in diagrams A.1, A.2 and A.3 – read CASTING OFF TIP.

FRONT PIECE:
= 118-124-132-142-150-160-168 stitches. Continue with pattern, stocking stitch and 1 edge stitch in garter stitch, AT THE SAME TIME as cast off for armhole as for back piece = 104-112-114-124-130-140-144 stitches. When the piece measures 46-56-58-60-62-64-66 cm decrease 10-10-10-12-12-12-12 stitches evenly over the middle 40-40-40-48-48-48-48 stitches before these stitches are placed on a thread for the neck (= 30-30-30-36-36-36-36 stitches on thread). The shoulders are now finished separately. On the next row from the neck cast off 2 stitches = 30-34-35-36-39-44-46 stitches.
When the piece measures 49-59-61-63-65-67-69 cm (adjust to match the back piece) cast off, AT THE SAME TIME as you decrease 5-5-4-5-3-6-6 stitches evenly over the 15-15-15-16-16-21-21 stitches towards the neck – remember CASTING OFF TIP.
Work the other shoulder in the same way.

RIGHT SLEEVE: 
The piece is worked in the round with double pointed needles. Cast on 56-58-60-62-64-66-68 stitches with double pointed needles size 3.5 mm and Merino Extra Fine. Work 2 ridges. Then work rib (= knit 1 /purl 1) until the piece measures 10 cm. Work 1 ridge, AT THE SAME TIME as you decrease 5 stitches evenly on row = 51-53-55-57-59-61-63 stitches. Insert 1 marker at the beginning of the round. Change to double pointed needles size 4 mm and work pattern on the next round as follows: Stocking stitch over the first 4-5-6-7-8-9-10 stitches, work A.4 over the next 42 stitches, work the first stitch in A.4, 4-5-6-7-8-9-10 stitches stocking stitch. Continue this pattern upwards. AT THE SAME TIME when the piece measures 13-12-13-12-12-14-13 cm increase 1 stitch on each side of the marker – remember INCREASE TIP! Increase in this way every 2-2½-2-2-2-1½-1½ cm a total of 14-15-16-17-18-19-20 times = 79-83-87-91-95-99-103 stitches. When the piece measures 45-50-50-49-49-48-48 cm cast off 6 stitches mid under the sleeve (cast off 3 stitches on each side of the marker). Then work back and forth on the needle AT THE SAME TIME as you cast off for sleeve cap at the beginning of each row in each side as follows: 2 stitches 2-4-6-7-9-10-12 times and 1 stitch 12-10-8-8-6-6-4 times = 41 stitches left in all sizes. The piece measures 55-60-60-60-60-60-60 cm. NOW YOU MEASURE THE PIECE FROM HERE! Continue with pattern over the remaining stitches until the piece measures 12-14-13-15-17-18-19 cm. Then you cast off at the beginning of each row from the right side as follows: 19 stitches 1 time AT THE SAME TIME as 8 of these 19 stitches are knitted together 2 and 2 before they are cast off, 3 stitches 1 time, 2 stitches 1 time. Work 3 rows without decreases. Cast off 1 stitch on the next row = 16 stitches left in all sizes. Continue working until the piece measures 19-21-22-24-26-27-28 cm. The whole sleeve measures approx. 74-81-82-84-86-87-88 cm. 

LEFT SLEEVE:
Worked as for right sleeve, but decreases at top are worked in opposite side, i.e. at the beginning of every row from the wrong side.

ASSEMBLY:
Sew the sleeves together mid back inside the cast off edge of each sleeve. Sew the sleeves to front and back piece on body in the outermost stitch as follows: Sew from the armhole and up along shoulder on back piece to mid back. Repeat on the other side. Sew in that same way from armhole and up along shoulder to the neck on the front piece. Repeat on the other side.

NECKLINE:
Knit up 94-94-108-108-108-108-108 stitches around the neck (including the stitches from the thread) with short circular needle size 3.5 mm and Merino Extra Fine. Work 2 ridges, AT THE SAME TIME as you increase on the last round 22-22-26-26-26-26-26 stitches evenly = 116-116-134-134-134-134-134 stitches. Then work rib (= knit 1 /purl 1). When the rib measures 8 cm work 1 ridge. Cast off. Fold the neck double and fasten on the inside, ridge to ridge.

This pattern has been corrected.

Updated online: 25.10.2017
No correction, but chart A.1 and A.3 are simplified + there is added an additional line under the BODY:(= ... REMEMBER THE KNITTING TENSION! Continue the pattern and repeat the charts in height. When the piece measures 9 cm...).

Diagram

symbols = knit from right side, purl from wrong side
symbols = purl from right side, knit from wrong side
symbols = place 1 stitch on cable needle behind piece, knit 1, knit stitch from cable needle
symbols = place 1 stitch on cable needle behind piece, knit 2, purl stitch from cable needle
symbols = place 2 stitches on cable needle in front of piece, purl 1, knit 2 from cable needle
symbols = place 2 stitches on cable needle behind piece, knit 2, knit 2 from cable needle
symbols = place 2 stitches on cable needle in front of piece, knit 2, knit 2 from cable needle
diagram
diagram
diagram

Each of our patterns has specific tutorial videos to help you.

Do you have a question? See a list of frequently asked questions (FAQ)

Knitting tension is what determines the final measurements of your work, and is usually measured per 10 x 10 cm. It is provided like so: number of stitches in width x number of rows in height - eg: 19 stitches x 26 rows = 10 x 10 cm.

The knitting tension is very individual; some people knit/crochet loosely while others work tightly. You adjust the knitting tension with the needle size, which is why the suggested needle size is only meant as a guide! You need to adjust this (up or down) to ensure that YOUR knitting tension matches the knitting tension provided in the pattern. If you work with a different knitting tension than provided you will have a different yarn consumption, and your work will have different measurements than what the pattern suggests.

The knitting tension also determines which yarns can replace each other. As long as you achieve the same knitting tension you can replace one yarn with another.

See DROPS lesson: How to measure your tension/gauge

See DROPS video: How to make a gauge tension swatch

The required amount of yarn is provided in grams, eg: 450 g. To calculate how many balls you’ll need you first need to know how many grams are in 1 ball (25g, 50g or 100g). This information is available if you click on the individual yarn quality on our pages. Divide the amount required with the amount of each ball. For example, if each ball is 50g (the most common amount), the calculation will be as follows: 450 / 50 = 9 balls.

The important thing when changing from one yarn to another is that the knitting/crochet tension remains the same. This is so that the measurements of the finished piece will be the same as on the sketch provided. It is easier to achieve the same knitting tension using yarns from the same yarn group. It is also possible to work with multiple strands of a thinner yarn to achieve the knitting tension of a thicker one. Please try our yarn converter. We recommend you to always work a test swatch.

Please NOTE: when changing yarn the garment might have a different look and feel to the garment in the photo, due to individual properties and qualities of each yarn.

See DROPS lesson: Can I use a different yarn than the one mentioned in the pattern?

All our yarns are categorised into yarn groups (from A to F) according to thickness and knitting tension – group A contains the thinnest yarns and group F the thickest. This makes it easier for you to find alternative yarns to our patterns, should you wish to switch yarn. All yarns within the same group have a similar knitting tension and can easily replace each other. However, different yarn qualities have different structures and properties which will give the finished work a unique look and feel.

Click here for an overview of the yarns in each yarn group

At the top of all our patterns you’ll find a link to our yarn calculator, which is a helpful tool should you wish to use a different yarn than suggested. By filling in the yarn quality you wish to replace, the amount (in your size) and number of strands, the calculator will present good alternative yarns with the same knitting tension. Additionally it will tell you how much you’ll require in the new qualities and whether you’ll need to work with multiple strands. Most skeins are 50g (some are 25g or 100g).

If the pattern is worked with multiple colours, every colour will have to be calculated separately. Similarly, if the pattern is worked with several strands of different yarns (for example 1 strand Alpaca and 1 strand Kid-Silk) you will have to find alternatives for each, individually.

Click here to see our yarn calculator

Since different yarns have different qualities and textures we have chosen to keep the original yarn in our patterns. However, you can easily find options among our available qualities by using our yarn calculator, or simply pick a yarn from the same yarn group.

It is possible that some retailers still have discontinued yarns in stock, or that someone has a few skeins at home that they would like to find patterns for.

The yarn calculator will provide both alternative yarn as well as required amount in the new quality.

If you think it's hard to decide what size to make, it can be a good idea to measure a garment you own already and like the size of. Then you can pick the size by comparing those measures with the ones available in the pattern's size chart.

You'll find the size chart at the bottom of the pattern.

See DROPS lesson: How to read size chart

The needle size provided in the pattern serves only as a guide, the important thing is to follow the knitting tension. And since knitting tension is very individual, you will have to adjust the needle size to ensure that YOUR tension is the same as in the pattern – maybe you’ll have to adjust 1, or even 2 needle sizes, up or down to achieve the correct tension. For this, we recommend that you work test swatches.

Should you work with a different knitting tension than the one provided, the measurements of the finished garment might deviate from the measurement sketch.

See DROPS lesson: How to measure your tension/gauge

See DROPS video: How to make a tension/gauge swatch

Working a garment top-down provides more flexibility and room for personal adjustment. For example it is easier to try the garment on while working, as well as making adjustments to length of yoke and shoulder caps.

The instructions are carefully explaining every step, in the correct order. Diagrams are adjusted to the knitting direction and are worked as usual.

The diagram depicts all rows/rounds, and every stitch seen from the right side. It is read from bottom to top, from right to left. 1 square = 1 stitch.

When working back and forth, every other row is worked from the right side and every other row is worked from the wrong side. When working from the wrong side, the diagram will have to be worked reversed: from left to right, knit stitches are purled, purl stitches are knit etc.

When working in the round every round is worked from the right side and the diagram are worked from right to left on all rounds.

See DROPS lesson: How to read knitting diagrams

The diagram depicts all rows/rounds, and every stitch seen from the right side. It is worked from bottom to top, from right to left.

When working back and forth every other row is worked from the right side: from right to left and every other row is worked from the wrong side: from left to right.

When working in the round, every row in the diagram are worked from the right side, from right to left.

When working a circular diagram you start in the middle and work your way outwards, counter clockwise, row by row.

The rows usually start with a given number of chain stitches (equivalent to the height of the following stitch), this will either be depicted in the diagram or explained in the pattern.

See DROPS lesson: How to read crochet diagrams

Instructions for working several diagrams after each other on the same row/round, will often be written like so: “work A.1, A.2, A.3 a total of 0-0-2-3-4 times". This means you work A.1 once, then A.2 is worked once, and A.3 is repeated (in width) the number of times provided for your size – in this case like so: S = 0 times, M = 0 times, L=2 times, XL= 3 times and XXL = 4 times.

The diagrams are worked as usual: begin with the first row in A.1, then work the first row in A.2 etc.

See DROPS lesson: How to read knitting diagrams

See DROPS lesson: How to read crochet diagrams

The total width of the garment (from wrist-to-wrist) will be larger in the larger sizes, despite the actual sleeves being shorter. The larger sizes have longer sleeve caps and wider shoulders, so there will be a good fit in all sizes.

The measurement sketch/schematic drawing provides information regarding the full length of the garment. If it’s a jumper or a jacket the length is measured from the highest point on the shoulder closest to the neckline, and straight down to the bottom of the garment. It is NOT measured from the tip of shoulder. Similarly, the length of yoke is measured from the highest point on the shoulder and down to where yoke is split into body and sleeves.

On a jacket measures are never taken along bands, unless specifically stated. Always measure inside band stitches when measuring the length.

See DROPS lesson: How to read a schematic drawing

Diagrams are often repeated on the round or in height. 1 repeat is the diagram the way it appears in the pattern. If it says to work 5 repeats of A.1 in the round, then you work A.1 a total of 5 times after/next to each other in the round. If it says to work 2 repeats of A.1 vertically/in height you work the entire diagram once, then begin again at the start and work the entire diagram one more time.

Chain stitches are slightly narrower than other stitches and to avoid working the cast-on edge too tight, we simply chain more stitches to begin with. The stitch count will be adjusted on the following row to fit the pattern and measurement sketch.

The rib edge is more elastic and will contract slightly compared to, for example, stocking stitch. By increasing before the rib edge, you avoid a visible difference in width between the rib edge and the rest of the body.

It’s very easy to cast off too tightly, and by making yarn overs while casting off (and simultaneously casting these off) you avoid a too tight cast off edge.

See DROPS video: How to bind off with yarn overs (yo)

To achieve an even increase (or decrease) you can increase on, for example: every 3rd and 4th row alternately, like so: work 2 rows and increase on the 3rd row, work 3 rows and increase on the 4th. Repeat this until the increase is complete.

See DROPS lesson: Increase or decrease 1 st on every 3rd and 4th row alternately

Should you prefer to work in the round instead of back and forth, you may of course adjust the pattern. You’ll need to add steeks mid-front (usually 5 stitches), and follow the instructions. When you would normally turn and work from the wrong side, simply work across the steek and continue in the round. At the end you’ll cut the piece open, pick up stitches to work bands, and cover the cut edges.

See DROPS video: How to knit steeks and cut open

Should you prefer to work back and forth instead of in the round, you may of course adjust the pattern so you work the pieces separately and then assemble them at the end. Divide the stitches for the body in 2, add 1 edge stitch in each side (for sewing) and work the front and back pieces separately.

See DROPS lesson: Can I adapt a pattern for circular needles into straight needles?

Pattern repeats can vary slightly in the different sizes, in order to get the correct proportions. If you’re not working the exact same size as the garment in the photo, yours might deviate slightly. This has been carefully developed and adjusted so that the complete impression of the garment is the same in all sizes.

Make sure to follow instructions and diagrams for your size!

If you have found a pattern you like which is available in women’s size it’s not very difficult to convert it to men’s size. The biggest difference will be the length of sleeves and body. Start working on the women size that you think would fit across the chest. The additional length will be worked right before you cast off for the armhole/sleeve cap. If the pattern is worked top-down you can add the length right after the armhole or before the first decrease on sleeve.

Regarding additional yarn amount, this will depend on how much length you add, but it is better with a skein too many than too few.

All yarns will have excess fibres (from production) that might come off as lint or shedding. Brushed yarns (ie hairier yarns) have more of these loose, excess fibres, causing more shedding.

Shedding also depends on what is worn under or over the garment, and whether this pulls at the yarn fibres. It’s therefore not possible to guarantee that there will be no shedding

Below are some tips on how to get the best result when working with hairier yarns:

1. When the garment is finished (before you wash it) shake it vigorously so the looser hairs come off. NOTE: do NOT use a lint roller, brush or any method that pulls at the yarn.

2. Place the garment in a plastic bag and put it in your freezer - the temperature will cause the fibres to become less attached to each other, and excess fibres will come off easier.

3. Leave in the freezer for a few hours before taking it out and shaking it again.

4. Wash the garment according to the instructions on the yarn label.

Pilling is a natural process that happens to even the most exclusive of fibers. It's a natural sign of wear and tear that is hard to avoid, and that is most visible in high friction areas of your garment like a sweater's arms and cuffs.

You can make your garment look as new by removing the pilling, using a fabric comb or a pill/lint remover.

Still can't find the answer you need? Then scroll down and leave your question so one of our experts can try to help you. This will be done normally within 5 to 10 working days.
In the meantime, you can read the questions and answers that others have left to this pattern or join the DROPS Workshop on Facebook to get help from fellow knitters/crocheters!

You might also like...

Siberia

Sari Järvenpää, Finland

Siberia

Woll-Elli, Germany

Siberia

svtcox, United States

Siberia

Tanis, Canada

Siberia

Franjaplus, United Kingdom

Siberia & Ivalo

Joanna, Poland

Siberia

Antonella, Italy

Post a comment to pattern DROPS 185-2

We would love to hear what you have to say about this pattern!

If you want to leave a question, please make sure you select the correct category in the form below, to speed up the answering process. Required fields are marked *.

Comments / Questions (144)

country flag Sheeba wrote:

Merci pour votre réponse. j'ai le problème avec les 10 x 1 maille. ceci me donne donc 20 rangs ?

15.11.2021 - 09:31

DROPS Design answered:

Bonjour Sheeba, à quel niveau en êtes-vous? je ne trouve pas de 10 x 1 maille à diminuer en taille S, pouvez-vous m'aider?

15.11.2021 - 12:53

country flag Sheeba wrote:

Bonjour. je tricote la 2ème taille = small. je voudrais savoir si pour les diminutions de l'emmanchure 4 x 2 mailles =8 rangs et puis 10 x 1 maille = 20 rangs. je devrais donc avoir tout juste 60 cm de hauteur après avoir terminé mes diminutions. merci

14.11.2021 - 19:56

DROPS Design answered:

Bonjour Sheeba, en taille S = 2ème taille, vous rabattez pour les emmanchures 3 fois 2 mailles (= 6 mailles sont rabattues de chaque côté au total) = il vous reste: 124 - 12 m = il vous reste 112 mailles (et vous avez tricoté 6 rangs: 3 rangs sur l'endroit en rabattant 2 mailles au début de chacun de ces 3 rangs et 3 rangs sur l'envers en rabattant 2 mailles au début de chacun de ces 3 rangs). Bon tricot!

15.11.2021 - 08:34

country flag Marie Kates wrote:

Thank you so much for quick reply and, yes, problem solved.

23.08.2021 - 09:36

country flag Marie Kates wrote:

Size XL and working the front - I have reached 62 cm and have 130 stitches. If I decrease 12 stitches over middle 48 (leaving 36 stitches on a thread), I am left with 41 stitches on each side - ( 130 minus 12 = 118 minus 36 (on a thread) leaves me with 41 stitches at either side of threaded stitches. Please can you explain the maths as I don’t have the stated 46 each side before casting off 2 at neck edge. Many thanks for your help.

22.08.2021 - 23:56

DROPS Design answered:

Dear Mrs Kates, you work the middle 48 sts decreasing 12 sts evenly ,; ie you will have 41 sts left on the needle for each shoulder; cast off for neck 2 sts at the beg of next row from neck = 39 sts remain for each shoulder in XL (and 44 sts in XXL and 46 sts remain in size XXXL). Can this help?

23.08.2021 - 08:00

country flag Jackie Dempsey wrote:

I have just read the comments from Anne Whelan, so have realised that the increases for the sleeve cap are made 14 times, i.e. 2 sts on both wrong and right side 7 times. I feel that the pattern instructions need clarification, as I do not appear to be the only person who is confused. I just hope I have got it right now and the sleeve cap will fit properly when I come to assemble the sweater.

07.06.2021 - 11:37

country flag Birgit Thomsen wrote:

Strikker Siberia og har spørgsmål til de 3 diagrammer, A1og A3 er over 18 pinde, men A2 er over 20 pinde, hvordan går det op

06.06.2021 - 18:59

DROPS Design answered:

Hei Birgit. Når du har strikket A.1 og A.3 1 gang i høyden, gjentar du diagrammene i høyden, så når du da strikker 1. og 2. omgang for 2. gang av A.1 og A.3 strikker du 19. og 20. omgang av diagram A.2. Så når du strikker 3. omgang av A.1 og A.3 for 2. gang strikker du 1 omgang av A.2 for 2. gang. Altså, du strikker A.1 og A.3 flere ganger i høyden enn A.2. mvh DROPS design

07.06.2021 - 11:19

country flag Jackie Dempsey wrote:

When decreasing for the sleeve armhole the pattern says to decrease 2 stitches at the beginning of each row, then 1 st, but this does not result in the correct no of sts. Is it at each end, so 4 sts decreased on each row, 2 at each end, then 2sts, 1 at each end? Even then the numbers do not work out. There is no instruction to cast off the final 16 sts. 1900 g of wool for the large size would make 2 sweaters!

04.06.2021 - 20:39

DROPS Design answered:

Dear Jackie, the decareases for each side, each armhole. Also, accrding to the pattern, the largest size needs 1200 grams of yarn. Happy Knitting!

07.06.2021 - 03:34

country flag Kim Hutchinson wrote:

I am really disappointed with this pattern. I started knitting the hem and the garter stitch then rib then garter stitch just looks horrible and wavy. I can imagine it would be fine if stretched but i don't expect it to be stretched on my son-in-law!!! I either adapt and complete with just a basic rib or find a new pattern. Has anyone completed this successfully?

05.05.2021 - 13:41

DROPS Design answered:

Dear Kim, the piece should be fine if you block it after finishing (to do so soak, press the water out as much as you can, shape it on a flat surface, pin it to size if necessary and let dry. Blocking evens out the knitting of different textures. Also, according to Ravelry, a number of people succesfully knitted the piece. Happy Knitting!

05.05.2021 - 21:26

country flag Tarja Furuholm wrote:

Help! About a mont ago I started to knit the model Siberia DROPS 185-2. Now part of the instructions are missing. Pattern knits no A1, A2 and A3 have disappeared from the site. Can you please return them. Thank you!

13.03.2021 - 19:06

DROPS Design answered:

Dear Tarja, I checked for a few languages, including the English, and American versions, and the diagrams are there . Can ypi try t o reload the pages and see if they are still missing? Happy Knitting!

13.03.2021 - 19:43

country flag Marie Kates wrote:

I’ve just started this pattern and understand the cables are on the back and front. I would like to make the back of the sweater plain so that the cables are only on the front. Is there any reason why I shouldn’t do this please?

01.03.2021 - 14:42

DROPS Design answered:

Dear Marie Kates, the number of stitches in the pattern is matching with cables on both front and back piece, if you like to get only plain stocking stitch on back piece, you should then adjust the number of stitches (remember you need less stitches when working stocking stitch than cables since cable tighten pieces together in width). Happy knitting!

01.03.2021 - 14:50