
Popular categories
Looking for a yarn?


Comments / Questions (10)
![]() Mireille wrote:
Mireille wrote:
Bonjour J’aimerai faire le châle mais je ne comprends la partie 5, et aussi comment peut-on n’avoir que 2 trous au centre si on fait 4 jetés sans les tricoter torse au retour ?
23.08.2023 - 08:06DROPS Design answered:
Bonjour Mireille, entendez-vous "rang" 5 pour "partie" 5? Si tel est le cas, au rang 5, vous allez augmenter 4 mailles en faisant 1 jeté à 1 maille des bords de chaque côté (après la 1ère maille et avant la dernière maille du rang) + 1 maile de chaque côté de la maille centrale. Les seuls jours visibles sur la photo sont ces derniers, ceux de chaque côté ne seront pas vraiment visibles car ils se trouveront en haut du châle sur l'envergure. Bon tricot!
23.08.2023 - 09:57
![]() Hannelore Müller wrote:
Hannelore Müller wrote:
Meine Freundin wünscht sich von mir ein Tuch gestrickt aus dickerer Wolle. Wenn ich dieses Tuch aus Modell 179-22 als Muster nehme, welche Wolle würden Sie mir vorschlagen und wieviel benötige ich dafür?
07.12.2022 - 00:50DROPS Design answered:
Liebe Frau Müller, je nach Maschenprobe und Wolle wird es unterschiedlich sein, hier finden Sie alle unsere Tücher, kraus rechts gestrickt - gerne können Sie extra filtern (kraus rechts weglassen, neue Filtern wählen, Garngruppe wählen usw). Viel Spaß beim stricken!
07.12.2022 - 08:16
![]() Kristina Boberger wrote:
Kristina Boberger wrote:
Hej. Beställde två stick-sett, med garn o mönster från er, via nätet,av Garnius. Men när dom kom var hela beskrivningen på norska! Hopplöst för mig att använda! Trots att jag betalat 40 kr st ,för textat på svenska. Företaget hänvisar till er o tycker att jag annars kan hitta en svensk text på nätet. Men där jag bor saknas ofta täckning o jag föredrar faktiskt på papper! Kan ni hjälpa mig? Gäller mönster DROPS 195-5 och DROPS 196-10
02.07.2021 - 13:36DROPS Design answered:
Hei Kristina. Alle våre oppskrifter finner du GRATIS på nett, på mange språk. Om du ønsker 195-5 og 196-10 på svensk er det bare å velge svensk som språk på vår hjemmeside og deretter skrive ut sidene. Bare husk å klikk på SKRIV UT ikonet. mvh DROPS design
05.07.2021 - 14:08
![]() France wrote:
France wrote:
Peut on avoir le patron en français il est très joli merci le chale
02.06.2019 - 16:47DROPS Design answered:
Bonjour France, tous nos modèles sont disponibles en français, cliquez sur la flèche du menu déroulant sous la photo pour sélectionner "français". Bon tricot!
03.06.2019 - 10:53
![]() G. Rischar wrote:
G. Rischar wrote:
Ich habe nun den ganzen Abend an der Beschreibung rumgerätselt und komme nicht dahinter, wie zum Schluss der graue Rand entsteht. Und muss ich die Umschläge verschränkt abstricken? Vielen Dank für ihre Antwort! Vielen Grüße, G.R.
19.10.2018 - 02:33DROPS Design answered:
Liebe Frau Rischar, die grauen Streifen entsehen durch die Streifen mit Farbe 602, Silver Fox - siehe STREIFEN-1 (gilt für das Tuch) - Die Umschläge bei dem Tuch werden nicht verschränkt gestrickt, damit Löcher enstehen. Viel Spaß beim stricken!
19.10.2018 - 08:45
![]() Markéta wrote:
Markéta wrote:
Dobrý den, prosím vás, jak se u vzoru šátku pletou krajová oka? Vzorek šátku začíná na tři oka...je to včetně krajových ok ? děkuji za odpověď Markéta
29.08.2018 - 14:55DROPS Design answered:
Dobrý den, Markéto, ano, oka jsou uváděna všechna, která vidíte na jehlici, tj. včetně krajových. Krajová oka pleteme v lícových i rubových řadách hladce. Hodně pohody při pletení! Hana
31.08.2018 - 07:49
![]() Angela wrote:
Angela wrote:
Ho iniziato a fare questo scialle, ma mi sembra che il lavoro non venga "piano" sembra quasi un cappello; un'amica mi ha detto di aumentare i m per parte anche nei ferri pari; quindi la sequenza delle maglie diventerebbe F1=5maglie, F2=7 maglie, F3=11m, F4 13 m eccetera. Dove sbaglio ? grazie
29.03.2018 - 18:37DROPS Design answered:
Buongiorno Angela, non ci sono errori nelle spiegazioni del modello e si aumenta solo sul diritto del lavoro. Tenga presente che la lavorazione dello scialle parte dal bordo superiore e non dalla punta. Se preferisce può mandare una mail a italian@garnstudio.com con la foto del suo lavoro. Buon lavoro
30.03.2018 - 14:04
![]() Pia Anderberg wrote:
Pia Anderberg wrote:
Hej! I mönstret till sjalen Autumn Joy står det att det är färgerna "picknick" och "candy" (+ silver fox). Kan det vara riktigt? Det finns ju gult i Candy och jag ser inte alls något gult på bilden. Jag frågar för jag tycker färgerna på bilden är så vackra. Skulle gärna vilja sticka i just den kombinationen. Tack. Vänligen Pia
27.03.2018 - 15:01DROPS Design answered:
Hej, färgerna på bilden stämmer med dem som anges i mönstret. Ibland kan färgerna avvika från det riktiga beroende på skärm och skärminställningar.
18.04.2018 - 17:38
![]() Katarina wrote:
Katarina wrote:
Hej! I svar till Camilla står det: du startar nederst på sjalen, men i beskrivningen startar man uppifrån (vilket är rätt)
24.01.2018 - 19:04
![]() Camilla wrote:
Camilla wrote:
Hej Det står inget om hur många maskor man ska lägga upp inte heller när man ska avmaska eller öka!! Hur gör jag??? Med vänlig hälsning, Camilla
26.09.2017 - 15:06DROPS Design answered:
Hei Camilla. Når det gjelder sjalet står det slik i oppskriften: SJAL: .... Lägg upp 3 maskor på rundsticka 4,5 med silver fox. VARV 1 (= rätsidan): Sticka 1 rätmaska, 1 omslag, 1 rätmaska, 1 omslag och 1 rätmaska = 5 maskor. VARV 2 (= avigsidan): Stickas rätt....osv Du starter nederst på sjalet og strikker som en slags trekant. Du legger opp 3 masker og øker allerede med 2 masker på 1. rad, så øker du på annenhver rad (se oppskriften for nærmere forklaring). Når arbeidet måler ca 78 ( målt langs midtmasken) feller du løst av. God Fornøyelse!
27.09.2017 - 09:01
|
|
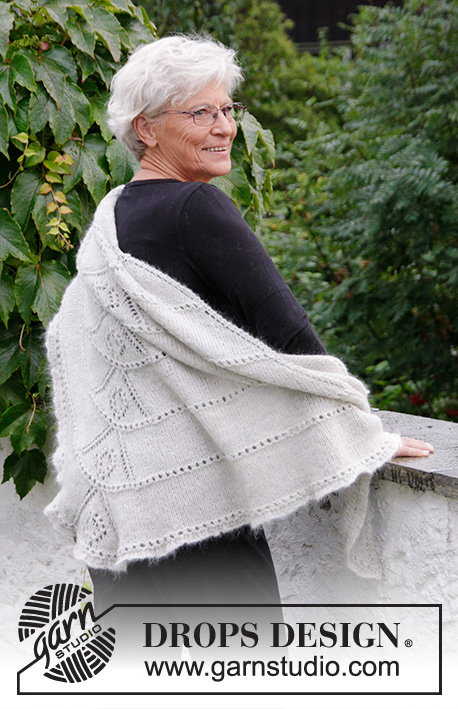
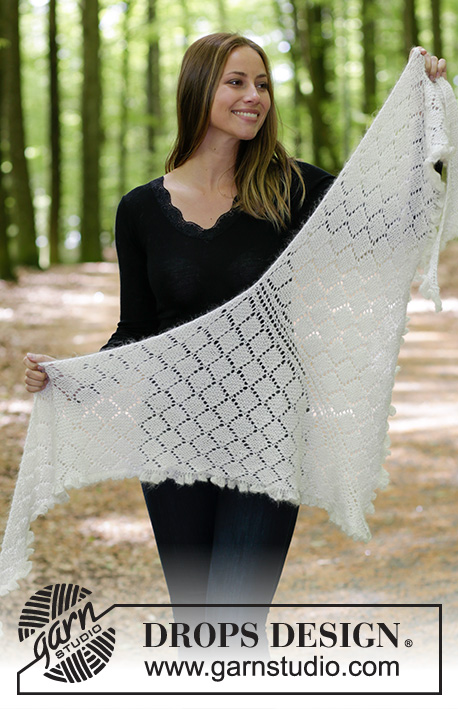
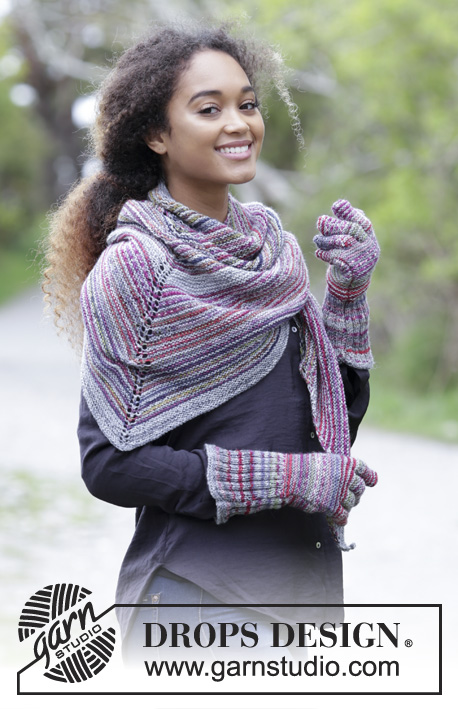
Autumn Joy#autumnjoyshawl |
|
 |
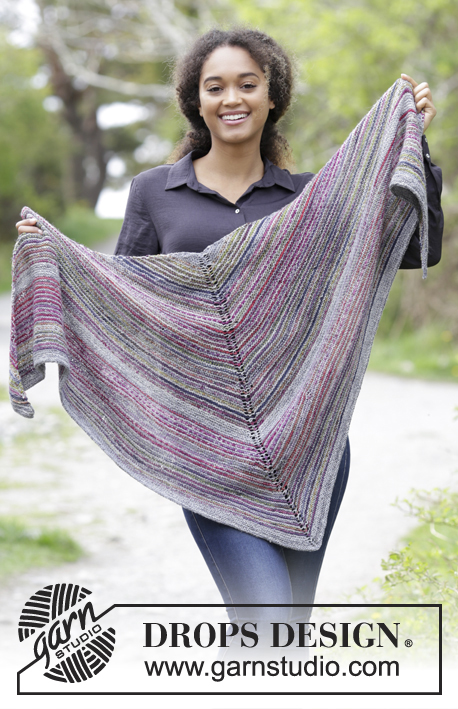 |
The set consists of: Knitted shawl and gloves with garter stitch and stripes. The set is worked in DROPS Fabel.
DROPS 179-22 |
|
|
INFORMATION FOR THE PATTERN: RIDGE/GARTER STITCH (worked back and forth): 1 ridge = Knit 2 rows. STRIPES-1 (for shawl): The first row in each stripe is from the right side. STRIPE 1: Work 6 ridges with silver fox. STRIPE 2: Work * 1 ridge with silver fox, 1 ridge with candy *, work from *-* for 10 cm, measured along the mid-stitch, adjust so that you finish with 1 ridge with candy. STRIPE 3: Work * 1 ridge with silver fox, 1 ridge with picnic *, work from *-* for 10 cm, measured along the mid-stitch, adjust so that you finish with 1 ridge with picnic. Repeat stripes 2 and 3 until the piece measures 40 cm, measured along the mid-stitch. Work stripe 1 one more time. Repeat stripes 2 and 3 until the piece measures 67 cm, measured along the mid-stitch. Work stripe 1 one more time. STRIPES-2 (for gloves): The first row in each stripe is from the right side. STRIPE 1: Work * 2 rows picnic, 4 rows silver fox *, work from *-* for 8 cm, adjust so that the last stripe is with picnic. STRIPE 2: Work * 2 rows silver fox, 2 rows picnic *, work from *-* to finished length. INCREASE TIP (for gloves): Increase 1 stitch by making 1 yarn over, on the next row knit the yarn over twisted to prevent a hole. ---------------------------------------------------------- SHAWL: The piece is worked back and forth with circular needle so that there is room for all the stitches. It is worked top down in GARTER STITCH and STRIPES-1 – see description above. Cast on 3 stitches with circular needle size 4.5 mm and silver fox. ROW 1 (= right side): Knit 1 stitch, 1 yarn over, knit 1 stitch, 1 yarn over and knit 1 stitch = 5 stitches. ROW 2 (= wrong side): Knit. ROW 3: Knit 1 stitch, 1 yarn over, knit 1 stitch, 1 yarn over, knit 1 stitch (insert a marker in this stitch = mid-stitch), 1 yarn over, knit 1 stitch, 1 yarn over and knit 1 stitch = 9 stitches. ROW 4: Knit. ROW 5: Knit 1 stitch, 1 yarn over, knit to mid-stitch, 1 yarn over, knit 1 stitch (= mid-stitch), 1 yarn over and knit until there is 1 stitch left on the needle, 1 yarn over and knit 1 stitch = 13 stitches. Repeat rows 4 and 5. REMEMBER THE KNITTING TENSION! When the stripes have been completed in height, the piece measures approx. 78 cm, measured along the mid-stitch. Loosely cast off. Cut and fasten the strands. ---------------------------------------------------------- GLOVES: The piece is worked back and forth and sewn together in the outer edge to finish. RIGHT GLOVE: Cast on 64-72 stitches over 2 needles size 2.5 mm with silver fox (this is done so that the cast-on edge is elastic). Pull one of the needles out and work 3 RIDGES – see description above, with silver fox. Then work the piece in STRIPES-2 – see description above. Then work rib on the next row from the right side as follows: Work 1 stitch garter stitch, * knit 2, purl 2 *, work from *-* and finish with knit 2 and 1 stitch garter stitch. Continue the rib until the piece measures approx. 11-12 cm – adjust so that the next row is worked from the right side. Now purl all 2-purl together to 1-purl = 49-55 stitches left on the needle. Knit 1 row from the wrong side. Continue with garter stitch to finished length. AT THE SAME TIME on the first row, decrease 7-5 stitches evenly on row = 42-50 stitches. REMEMBER THE KNITTING TENSION! Insert 1 marker thread in the 20th-24th stitch on the needle (seen from the right side). THUMB: When the piece measures 13-14 cm increase 1 stitch for thumb on each side of the stitch with marker thread (= 2 stitches increased) – read INCREASE TIP. Increase in this way every 4th row 2-3 more times = 7-9 thumb stitches. When the piece measures 18-20 cm place the 7-9 thumb stitches on 1 thread. Then cast on 1 new stitch behind the thumb stitches = 42-50 stitches, continue with garter stitch as before. When the piece measures 22-24 cm place the middle 34-40 stitches on 1 thread and work the pinkie over the 8-10 stitches left on the needle (place the stitches together so that the seam will be outermost in the side of the hand (not in the side towards the thumb)). Each finger is now worked separately in garter stitch, back and forth on the needle. PINKIE: Increase 3 stitches evenly on the first row = 11-13 stitches. When the finger measures approx. 5-7 cm work the stitches together 2 and 2, cut the strand and pull it through the remaining stitches. Place the 34-40 stitches from the thread back on the needle. Work 2 ridges over all stitches and place the middle 23-27 stitches back on the thread. RING FINGER: Place the 11-13 stitches nearest on each side of the pinkie back on the needle and increase 3 stitches evenly on the first row = 14-16 stitches. When the finger measures approx. 7.5-9 cm work the stitches together 2 and 2, cut the strand and pull it through the remaining stitches. MIDDLE FINGER: Place the outermost 6-7 stitches in each side on the thread back on the needle and increase 3 stitches evenly on the first row = 15-17 stitches. When the finger measures approx. 7.5-9 cm work the stitches together 2 and 2, cut the strand and pull it through the remaining stitches. INDEX FINGER: Place the last 11-13 stitches on the needle and increase 4 stitches evenly on the first row = 15-17 stitches. When the finger measures approx. 6-7.5 cm work the stitches together 2 and 2. Cut the strand and pull it through the remaining stitches. THUMB: Place the 7-9 stitches from the thread back on the needle and knit up 7-9 stitches behind these stitches = 14-18 stitches. Work garter stitch for approx. 5.5-6 cm, then work the stitches together 2 and 2, cut the strand and pull it through the remaining stitches. ASSEMBLY: Sew the fingers, edge to edge in the outermost loop of the outermost stitch. Sew the glove together in the side, inside the 1 stitch in garter stitch. LEFT GLOVE: Worked as for the right but reversed, i.e. insert 1 marker thread in the 18th-22nd stitch on the needle and increase for thumb on either side of this. |
|
Have you finished this pattern?Tag your pictures with #dropspattern #autumnjoyshawl or submit them to the #dropsfan gallery. Do you need help with this pattern?You'll find 20 tutorial videos, a Comments/Questions area and more by visiting the pattern on garnstudio.com. © 1982-2026 DROPS Design A/S. We reserve all rights. This document, including all its sub-sections, has copyrights. Read more about what you can do with our patterns at the bottom of each pattern on our site. |
|


With over 40 years in knitting and crochet design, DROPS Design offers one of the most extensive collections of free patterns on the internet - translated to 17 languages. As of today we count 324 catalogues and 12290 patterns translated into English (UK/cm).
We work hard to bring you the best knitting and crochet have to offer, inspiration and advice as well as great quality yarns at incredible prices! Would you like to use our patterns for other than personal use? You can read what you are allowed to do in the Copyright text at the bottom of all our patterns. Happy crafting!
Post a comment to pattern DROPS 179-22
We would love to hear what you have to say about this pattern!
If you want to leave a question, please make sure you select the correct category in the form below, to speed up the answering process. Required fields are marked *.